Why does he glue fillets directly onto beautiful wallpaper?
What to glue first: ceiling plinth or wallpaper? This question is asked both by a novice specialist and by the owner of a living space. Decorative finishing in a room adds comfort to the interior and creates a certain style, and the right molding for the ceiling can both narrow and expand the room, making it distinctly official or homely. The article will tell you how to glue ceiling plinth to wallpaper and to the wall.
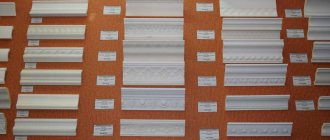
Types of skirting boards and their costs
- polyurethane 300-500 rubles per piece
- plastic from 40 rubles per piece
- expanded polystyrene from 20 rubles per piece
When purchasing planks you need to pay attention to:
- So that the skirting boards are the same color from the same batch
- Without defects
- No curvature
Step-by-step instruction
We will need:
- fillet
- roulette
- Can you use a laser builder?
- miter box and hacksaw for metal (or miter saw, or sharp knife, or grinder)
The blanks are cut using a miter box and a hacksaw according to the markings.
If you haven't hung wallpaper yet
- PVA glue
- container for stirring the mixture
- putty knife
- putty (read about putty on drywall and ceilings)
- water-based paint and brush
- sandpaper
If wallpaper is glued or there is a baseboard in the bathroom between the tiles and the ceiling
- white acrylic sealant
- mounting adhesive Moment Montazh Express decor white
- mounting gun
- rags
Features of choosing glue
Before making moldings on the wall with your own hands, choose glue. This is a very important point; the quality of the work depends on it. When choosing a mixture, they are guided by the weight of the element and the type of material from which it is made.
- For light plastic, PVA or any glue for heavy wallpaper is suitable. But it is best to choose special mounting compounds for decoration.
- The adhesive for polystyrene baguettes should not contain acetone or other solvents. Otherwise, the foam will deform or dissolve.
- Plaster baguettes are quite heavy. Mounting compounds are not suitable for them. They are attached to durable polyurethane glue or gypsum mortar.
- The tree is massive. Even particularly strong adhesives do not always withstand it; it is secured with self-tapping screws. Dents from the caps are repaired with putty.
How to cut a corner and make a blank?
First you need to understand which corners are in the room and mark out your blanks for each type (they are different!).
- External corner - in this case, the length of the base of the workpiece will be equal to the length of the span, and the cutting angle will be obtuse (that is, the top edge of the workpiece will be longer than the length of the bottom edge, 135 degrees).
- Internal corner - in this case, the length of the base of the workpiece will be equal to the length of the span, and the cutting angle will be acute (the upper edge of the workpiece is shorter than the lower edge, 45 degrees).
The saw must be used carefully and accurately to prevent chipping.
The blanks are cut using a miter box and a hacksaw according to the markings. To check the correctness of the cut blanks, you can dock “your creation” on the floor. If all the corners meet correctly, then you can start gluing and join them in place.
To check the correctness of the cut blanks, model “your creation” on the floor. If all the corners meet correctly, then you can start gluing.
If the corners do not meet, we make a new blank - this is why we bought fillets with a reserve.
Often the angles between the walls in rooms are not equal to 90 degrees. In such cases, you need to mark the workpieces “in place” and cut the corner without using a miter box. To do this, templates are made from paper and cardboard, and then a fillet is cut out using a sharp stationery or shoe knife.
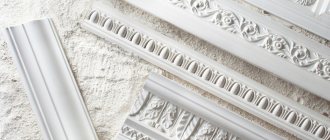
Types of baguettes
| Types of skirting boards for ceilings | What is it attached to? | Is it possible to paint | Mechanical stability | Moisture resistance |
| Foam | Glue, PVA, putty | Yes | No | Yes |
| Wooden | Glue, self-tapping screws, screws | Yes | Yes | No |
| Plaster | Glue, self-tapping screws, screws | Yes | No | No |
| Plastic | Glue, screws | No | No | Yes |
Baguettes can be made from different materials. All of them are presented below:
- The most affordable and lightweight to carry. A beginner will not have any inconvenience in how to glue a baguette from this material. However, this material also has some inconveniences, which are that it cannot be used in the bathroom or kitchen due to intolerance to moisture. But at the same time, for installation, for example, in the living room, there are no disadvantages.
- The best option to choose if you have a large budget is polyurethane baguettes. In addition to high reliability, they are suitable for use in places with large accumulations of moisture. But you have to pay a high price for quality and convenience.
- If you want to give the most beautiful and expensive look to a room, such as in a cafe or hall, then you can take a closer look at the plaster option. Like the first option, there is no reason, and there is no point in using it in the bathroom or kitchen. At the same time, baguettes made from this material will look beautiful only on high ceilings, so there is no point in installing them in an apartment.
- Baguettes made of wood are no less beautiful than those made of plaster, but it is advisable to use them in an apartment, but not in rooms with accumulation of moisture. Cracks do not form very often. Regular glue may not cope with fastening, in which case it is worth resorting to joining with nails.
- A good option is plastic baguettes. They are inexpensive and can be used in rooms with high moisture content.
Preparation of putty mixture
We prepare a mixture of putty and PVA glue for gluing the ceiling plinth to the wall and ceiling, as well as for sealing cracks and corner joints. Mix 4 parts of plaster and 1 part of PVA glue with water until it becomes sour cream, let it sit for 5 minutes and mix again. After this, you can use the mixture for 1.5 hours.
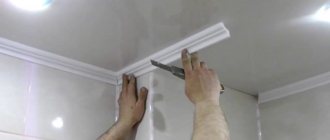
Apply putty in the center of the fillet along the entire length, press for 10 seconds, release, remove excess mixture.
- Dust the workpiece and the wall/ceiling area before applying the glue.
- Apply putty in the center of the fillet along the entire length, press for 10 seconds, release, remove excess mixture.
- We start gluing from the corner and from the wall that is opposite the door.
- You can draw a line around the perimeter using a laser builder and glue the fillet along it.
- We join pre-made blanks in the corners. If the spans are more than 2 meters, we make a direct joint of the fillets.
- Seal the cracks with the prepared mixture along the gluing process.
- The next day, after the putty has dried, we sand down the uneven areas and cover the baseboard with water-based paint.
You need to press the ceiling fillet gently and smoothly so as not to leave fingerprints or breaks on it.
Pasting process
Let's take a closer look at how to glue wallpaper to the ceiling quickly and efficiently with your own hands.
The gluing process includes several basic techniques:
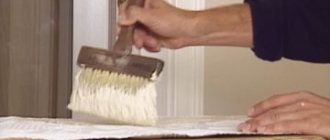
- for gluing paper and vinyl, glue is applied to both surfaces (both wallpaper and ceiling). The adhesive solution is distributed evenly with a brush or roller, in the direction from the central part to the edges. The glue should be absorbed for some time; for convenience, the vinyl wallpaper is folded in half inward. Meanwhile, spread the glue over the working surface of the ceiling. After 7-10 minutes, start gluing it;
- For non-woven materials, there is no need to apply glue to the canvas, only to the ceiling part. But keep in mind that the adhesive mass for non-woven wallpaper is thick. It must be applied in an even, dense layer;
- Attach the first strip according to the markings. Its edge should coincide with the drawn line;
- To ensure tight adhesion to the ceiling area, remove excess glue and prevent swelling of the canvas, smooth it out. Movements should be directed from the center to the side. To do this, use a rubber roller or wallpaper spatula;
- Apply subsequent strips butt to the previous ones;
- folds are not allowed. If they do not smooth out, then carefully separate part of the canvas and re-coat it. After that, try gluing the wallpaper again. Push excess glue to the edges of the canvas and remove with a clean cloth;
- Make sure that the edges of the canvases fit tightly and correctly to the surface of the ceiling. Go over the joints several times with a spatula. This will prevent them from peeling off in the future;
- the canvases should be 1-2 cm on the side wall. After drying, excess paper will be removed using a sharp knife;
- this way, you should get a smooth surface without blisters or noticeable wrinkles. There is no need to worry about small folds.
They will smooth out on their own as they dry.
Additional subtleties of wallpapering the ceiling are shown in the video
How to attach a ceiling plinth if wallpaper is glued
Advantages
- Can be done at any time and even with existing repairs
- No need to get dirty and dilute the mixture
- You can change the baseboard at any time if you get tired of it
- Dust the workpiece and the wall/ceiling area before applying the glue.
- We start gluing from the corner and from the wall that is opposite the door.
- Apply glue in the center of the fillet along the entire length, press for 1 minute, remove excess glue.
- Presses well in corners and joints.
- We coat the cracks with acrylic sealant, and remove the excess with your finger.
- The main goal is to create the most even seam possible. If you can’t see an even seam by eye, you need to glue masking tape and create a seam along it.
The main goal is to create the most even seam possible. If you can’t see an even seam by eye, you need to glue masking tape and create a seam along it.
Ceiling
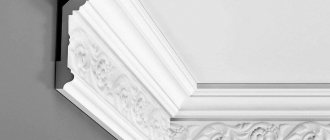
Many people perfectly imagine decorative stucco molding in the halls of castles and royal residences in the Baroque style, but have a weak or distorted idea of the use of molding in modern interiors.
Molding is a fairly broad term that means any applied part, often for decorative purposes. The most common and frequently used type of molding is the ceiling plinth, which is also poetically called fillet, baguette or frieze.
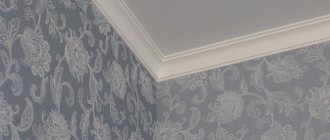
Ceiling plinth is designed to visually smooth the transition between the surface of the walls and ceiling, hide the joint of wallpaper and correct crooked corners and beams.
Most often, ceiling plinths are made from artificial synthetic materials - polystyrene foam and polyurethane.
Preparatory stage
Before purchasing a ceiling plinth, calculate the required number of strips.
Complex calculations are not required; you just need to know the perimeter of the room. Depending on the length of the skirting boards, you can easily determine the number of slats. We recommend buying one or two spare slats in case one of them gets damaged during operation.
- It is very important to correctly and accurately cut the baseboard slats for the corners of the room. To keep the gaps to a minimum, the contact angle of the slats should be 45°. Use a sharp mounting knife for cutting.
- Choose which side you will glue the baguette to the wall. It is better to use the wide side of the profile to cover the areas with the greatest flaws in the wallpaper.
How to glue foam ceiling plinth to wallpaper
Method 1. Fastening the ceiling plinth before wallpapering the walls.
This method is often used by professional craftsmen and is considered the most correct. Marks when attaching the baguette can be immediately removed without the threat of damage to the wallpaper; in addition, the frieze is easy to paint.
The plinth is glued to the prepared walls and ceiling.
How and what to glue? It is better to use special glue suitable for gluing different materials, as well as putty left after leveling the surface of the walls. It can also be used to carefully cover the space between the molding and the ceiling (wall).
You can start gluing wallpaper only after the putty has dried. The wallpaper is glued so that there is a slight overlap on the baseboard. Then it is advisable to trim off the excess using a spatula or a mounting knife.
Method 2. Installing the baseboard directly on the wallpaper.
What glue should you use if you decide to attach the ceiling plinth to wallpaper that has already been glued? Polymer-based glue, for example, “Dragon”, “Moment”, or assembly adhesive - liquid nails - is suitable. This method will require maximum concentration, attention and accuracy from you so as not to spoil the wallpaper.
A small amount of glue is applied to the foam molding and the wall (ceiling).
Usually you need to let the glue sit for 5-10 minutes or as long as indicated in the instructions, and then firmly press the baseboard to the surface. If excess appears, you need to immediately wipe it off with a rag. Seams and gaps can be hidden using white sealant.
If you want to change the color of the baguette, then before gluing it, it’s a good idea to paint the slats in any color. After installation, it will be possible to touch up the joints with a brush.
A few simple tips:
- Before cutting and gluing the plinth, it is very advisable to wash your hands thoroughly, since the delicate light surface quickly gets dirty.
- Remember that when gluing, you do not need to press the baguette very hard, otherwise fingerprints or even indentations will remain.
- When fitting the last plinth, you first need to adjust the angle, and then measure and cut the strip to length.
- For beginners, we recommend gluing the ceiling plinth onto already pasted wallpaper.
How to make molding with your own hands: instructions
Wall molding is often done independently, without the help of highly qualified craftsmen. There is nothing complicated about this: all that is required is a few tools and knowledge of a clear work algorithm.
Prepare the necessary equipment in advance so that it is at hand. Also mark the wall surface to prevent incorrect gluing: it will not be possible to remove the molding from the lined surface without leaving a trace. Therefore, make sure that everything is smooth and neat.
Preparing tools
It is simply impossible to make decorative wall molding without specially selected tools. Therefore, we will need to stock up on appropriate equipment.
So, we need:
- file for cutting baguettes;
- a miter box that will help cut the molding at the desired angle;
- construction glue gun;
- spatulas;
- sandpaper for rubbing away excess particles of the product.
Step-by-step work
First of all, you will need to measure the required length of the moldings and cut them according to the specified parameters. Using a miter box, cut the corners.
After this, we glue the corner parts in the corners and then install the even ones: follow the notes you made in advance.
If even after all the parts are glued, there are gaps, we recommend lubricating them with the same adhesive composition. It should take at least 24 hours for it to completely harden.
Installation of ceiling plinth
How to properly organize decorative finishing using ceiling skirting boards?
Before you begin to carry out your planned work, you need to buy a high-quality ceiling plinth on the basis that one standard strip is two meters long.
Also, when choosing the correct fillet width, you must take into account the height of the ceilings in the house. If you have high ceilings in your home, wide baseboards work well. If the height of your ceiling is standard, for example, 2.80 meters, then a fillet 5 cm wide would be an excellent option.
The ceiling plinth can be glued in two ways: using putty and using acrylic sealant.
Many professional builders come to the conclusion that when performing repair work, the first option is more practical than the second. The peculiarity of the first option is that there is no need to dismantle the fillet when changing the wallpaper, and it is also quite convenient to seal the gaps between the baseboard and the wall, especially if there are significant unevenness of the walls.
Let's consider the technology of gluing ceiling skirting boards using putty.
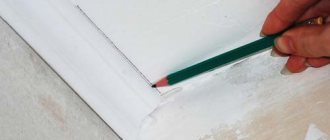
- Using a special building level and a pencil, you need to mark the lower border on the ceiling for installing the plinth.
- Mix the finishing putty in the proportions specified by the manufacturer. After you have mixed the solution and it is ready for use, they need to go over the places where you will attach the baguette. After this, it is necessary to moisten the treated areas with a primer and begin gluing the ceiling plinth. All actions must be performed until the wall surface is dry.
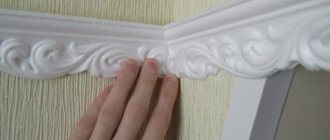
- Using a spatula, apply putty thickly along the entire length of the fillet on the back side of the ceiling plinth. After this, you need to press the plinth to the ceiling and wall, and remove the protruding putty from the ceiling plinth using a spatula.
- If there are gaps between the wall and the baseboard, they are well coated with putty.
- After the finishing solution has dried, be sure to coat all existing cracks well with it, and also hide the joints of the ceiling plinth sections.
- After the putty has dried, you can begin painting the fillet.
- How to properly glue ceiling plinth to wallpaper
Properties and features of baguettes
First of all, baguettes are needed to add elegance to the edges of the ceiling. If there are any imperfections on the surface of the walls or ceiling, for example, relief or cracks, then you can hide them with the help of baguettes.
During installation, there is no great inconvenience or error, even for beginners in the field of repair, since the installation process itself is quite easy. There are no problems even when combining baguettes with different types of ceiling materials.
To have an idea of how advisable it is to use baguettes for finishing ceilings, their main advantages are given below:
- Manufacturers offer a huge number of different options in shade and material, which gives a lot of scope for choice.
- Hide the appearance of bumps or depressions.
- The installation process is not at all difficult and even a beginner can easily cope with it.
- Any ceiling renovation will become much more beautiful if you add baguettes.
- Even though baguettes are used in expensive designs, their availability remains at a high level.
- It is easy to calculate the required number of baguettes, which results in large savings due to the lack of remaining materials.
- Carrying baguettes will not cause much difficulty, since they are very light.
As can be seen from the above advantages, using baguettes is very beneficial both from an aesthetic and economic point of view.
[adsblock]
In the second chapter of the step-by-step instructions, we will learn how to properly glue the ceiling plinth to the wallpaper. To do this you need to do the following:
- For this work, you need to use a special glue, for example, “Moment Installation”, as well as white silicone sealant.
- On the reverse side of the ceiling plinth you need to apply a special adhesive solution in a continuous strip.
- The ceiling plinth must be pressed well against the corner between the ceiling and the wall.
- If gaps have formed between the baseboard and the wall, it is necessary to carefully treat the joints using white silicone sealant. Experts recommend sticking masking tape onto the adjacent part of the wallpaper to protect it from the adhesive solution.
- The fillet joint areas must be generously coated with acrylic sealant.
After the glue has dried, it is recommended to paint the ceiling plinth with water-based paint.
You can offer an alternative option: paint the ceiling skirting boards before gluing them. To do this, you need to cut out and prepare all the parts in advance with maximum precision, then paint, and after that start gluing the ceiling plinth to the ceiling.
Methods for insulating the ceiling in a wooden house, as well as the materials necessary for this, are described here.
Which laminate is better to choose for different rooms, what are the features of this choice and what does it depend on, you can find out by reading our article.
What wallpaper is best to use for pasting a stream?
High-quality repairs are impossible without carefully selected materials. This fully applies to ceiling trellises. There are several important nuances here.
- The variety of wallpapers on sale does not mean that all of them can be glued to the ceiling. Any wall will be suitable - if you follow the technology, they will hold up perfectly. For the ceiling you need ceiling ones that are lighter and denser. A corresponding inscription about this is placed on the packaging label. What if you really liked the wallpaper, but there is no inscription? Another type of marking will help here: the weight of the wallpaper sheet. For gluing to the ceiling, this figure for trellises should not exceed 110 g/m2. Through trial and error, experts have found out that it is best to buy wallpaper weighing 150 g/m2 for painting - it does not stretch or shrink under a layer of paint, and also hides minor irregularities well.
- Wallpaper should not be thick. Even if they are light, it is better to refuse such a purchase - they quickly get wet and tear during operation, and are also less well held by glue.
- Wide wallpaper on the ceiling is very difficult to work with. Therefore, finishing specialists recommend buying trellises with a width of 53 or 60 cm.
- You shouldn’t look for products from foreign brands on sale - they simply don’t produce ceiling wallpaper. The exception is tapestries for painting. You can use wall panels weighing no more than 150 g/m2.
- Designers do not recommend buying trellises in bright colors for your apartment. They look out of place in any interior, regardless of the design style. The most acceptable options: white or pastel colors of other colors.
- When performing finishing work alone, you only need non-woven trellises - they do not need to be coated with glue, which simplifies gluing the sheets to the ceiling (under the non-woven base, the adhesive mass is applied to the ceiling surface).
The type of wallpaper affects the technology and quality of gluing.
Types of ceiling trellises
For the ceiling, manufacturers offer paper, non-woven, vinyl on a paper or non-woven basis and textile wallpaper.
Paper. Paper trellises belong to the cheapest category of this type of finishing material. However, the cost of the material fully corresponds to the quality (thin, when applied to an uneven surface, they highlight all the defects of the ceiling) and durability - they will last about 5 years.
Non-woven. In everyday life, non-woven wallpaper is called vinyl and textile wallpaper with a non-woven base, as well as purely non-woven wallpaper. Here we are talking about non-woven wallpaper itself. They are multi-layered, with a relief pattern. They are bought mainly for painting. The gluing technology is unusual - glue is applied to the surface to be glued. Ideal for ceilings:
- do not require preliminary cutting;
- hide surface imperfections well;
- Allows you to do the work alone.
Prices are significantly higher than those of paper trellises, but are affordable for the middle class of the population.
Vinyl. Vinyl trellises can have a paper or non-woven backing. The type of base determines the gluing technology: the type of glue and the method of its application. They are durable, hide minor imperfections in the ceiling thanks to their dense structure and relief texture. The price is affordable for the mass buyer.
Textile. Textile trellises are fabric (linen, silk, viscose, etc.) applied to a paper or non-woven base. They are glued using the base technology. Creates a feeling of a very rich finish. Due to the high price, they are available only to wealthy consumers.
What if wallpapering precedes painting?
You can paint trellises on the ceiling in the same way as on the walls. Manufacturers offer non-woven and vinyl wallpaper for paintable ceilings. Practice shows that it is much easier to paint non-woven trellis sheets on the ceiling.
Vinyls begin to bubble after applying a layer of paint, which is tolerable on walls and is a critical drawback on the ceiling. Immediately after applying the paint, you have to roll the wallpaper to the ceiling with a rubber roller.