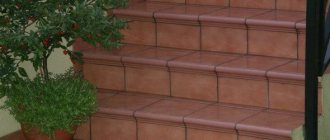
Ceramic tiles are the most hygienic material for flooring, meeting all requirements for strength and moisture resistance. It is believed that laying tiles yourself is quite difficult, but if you know the details of the technology and follow the rules, then the work can be done by a novice master and any owner. The bathroom is just the right room for a beginner to start with; errors here will not be as visible as in the hallway. We tell you in detail, with calculations and advice.
Selection of tiles and related materials
The range of flooring materials for the bathroom is so large that it is not always possible to immediately choose something suitable in terms of performance characteristics, price, and design.
What tile adhesive should I use?
To cover the floor you need to use glue specially designed for this purpose.
It can be in the form:
- ready-mixed polyurethane-based mixture;
- dry mixture requiring preliminary dilution with water.
Ready mixtures can be opened immediately before use.
Special compounds are produced for flooring that have increased plasticity, but before purchasing you need to make sure that the mixture can be used in bathrooms.
For the bathroom, it is recommended to choose an adhesive with water-repellent properties. It is more expensive, but it will increase the life of the floor covering in a room with high air humidity.
Read more about tile adhesive in the article - Knauf Fliesen tile adhesive: application features
If the tiles will be laid on a concrete screed or fiberglass, any adhesive will do, but you need to select the strength. It is important that its grade does not differ too much from the strength grade of the base. The permissible difference is 50 units. For example, the screed is filled with M150 solution, the brand of adhesive for laying tiles can be from M100 to M200. If the floor was leveled with self-leveling compounds, be careful - they are of high grade. And the glue should be either the same strength grade, or slightly lower/higher.
Tile selection criteria
Experts identify 11 criteria that you should rely on when choosing floor tiles for a bath:
- Durability . The flooring material must have a compressive strength of at least 300 mPa. This will prevent deformation and bending of the material structure.
- Fire resistance . Ceramic tiles do not burn and do not emit toxic substances.
- High thermal conductivity . When installing a heated floor, it will be comfortable to move on such tiles.
- Thickness _ For the bathroom, you can use material with a thickness of 9-11 mm.
- Low moisture absorption and antistatic . These properties allow the finishing material to be used in rooms with high humidity and electrical appliances.
- Frost resistance . For interior work, the use of group III tiles is allowed.
- Size . A minimum deviation from the nominal parameters is allowed (for example, the indicated size is 20 cm, and the actual size is 19.8 cm).
- Tone and drawing . Tiles from the same collection, but from different batches may differ slightly from each other.
- Texture . For the floor, it is better to choose a material with a matte surface.
- Slip resistance . Preference should be given to material that has a special anti-slip coating.
- Weight . Proportional to the dimensions, the weight of floor tiles should be 15-25 kg per 1 m² (glazed ones are heavier than matte ones).
Floor preparation
This stage is mandatory, and both the final result and the service life of the finishing material can largely depend on the quality of surface preparation.
Before starting work, it is necessary to dismantle the old coating, if any. To do this, you can use a hammer drill (if the old tiles will not be used) or hand tools (for example, a hammer and chisel), which will keep the cladding elements intact. After dismantling, the surface must be cleaned of debris and dust.
Floor waterproofing
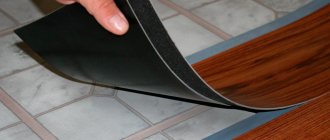
Waterproofing is an essential part of the work cycle, especially if you are laying tiles on a wooden floor in the bathroom.
For this type of room you can use the following materials:
- adhesive - roll waterproofing based on bitumen (can be glued, fused or laid mechanically using nails);
- coating (preferred for the bathroom) - ready-made bitumen-polymer or bitumen-rubber mastic.
They need to be applied not only to the floor, but also to the lower part of the walls to protect surface joints from moisture penetration.
Leveling the floor
Laying tiles on an unprepared floor will result in excess adhesive use. It is therefore recommended to level the base using:
- cement-sand screed;
- self-leveling mixture.
Beacons that need to be placed using a laser or water level over the entire surface of the floor will help simplify the work. Now you can pour the cement-sand screed, which is then leveled using the rule. The coating must not be touched for 3 days.
When using a self-leveling mixture, you do not need to set beacons, but you will need a special needle roller. This tool allows you to evenly distribute the mixture over the floor surface and remove all bubbles from the thickness of the screed.
Marking the working surface
Before marking, it is recommended to complete a detailed project, on the basis of which you can mark with a marker.
All marking lines must be smooth; distortions and unevenness must not be allowed during cladding (a laser level can be used).
Before gluing the tiles, it is recommended to lay them out according to the markings to check the evenness of the lines and the correctness of the laying pattern. It is better not to skip this stage, since after applying the glue the master will have no more than 20 minutes to correct the defects.
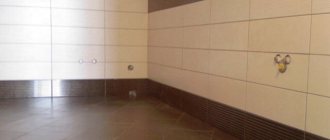
Walls
The difference with the horizontal base in this case begins with the installation of the laser level. It is required to install this device in such a way that the vertical laser beam is at an equidistant distance from the entire surface of the wall (parallel to the wall).
The adhesive mixture must be specialized for vertical surfaces. It has stronger adhesion. But at the same time, it sets faster. Therefore, it is usually bred in portions, for one row.
Start laying from the bottom row.
Choosing a method for laying tiles
There are 3 ways to lay out tiles on the bathroom floor, which differ from each other by where the tiling begins.
From farthest visible angle
This type of cladding is considered traditional. Work begins from the corner of the room opposite the door. This part of the room is the most visible and immediately catches the eye of a person entering the bathroom.
It is not advisable to choose this type of cladding if a shower or bathtub is installed in this corner.
The trim elements are laid first, and the solid tile is glued between them.
From the threshold
This method is the most common. This is due to the fact that in small rooms this area always remains visible, while the rest of the room is filled with plumbing fixtures.
Work begins from the corner located near the door.
From the center mark
This type of tile layout is suitable for spacious rooms in which there is an open central area. You can determine the center of the room using special markings. To do this you need:
- determine the middle of the walls and put marks;
- stretch a cord between them, previously rubbed with chalk;
- mark the intersection of the cords, which will be the center of the room.
The center point should be the point where the four tiles meet. This is where the floor covering begins.
Additionally, you can draw a diagonal line dividing the right angle in half, which will allow you to lay the tiles at an angle.
What is the most convenient way to lay tiles?
From the cornerFrom the threshold
Types of tile layouts
When tiling the floor, 4 types of layout (pattern) are used:
- Straight or classic. With this installation method, the tiles begin to be laid out along one of the walls. The most economical option: as a rule, waste from pruning ranges from 5 to 10%.
Straight layout. - Diagonal. The tiles are laid in a diamond pattern - diagonally in relation to the walls of the bathroom. Material waste increases to 15–20%.
- Chess laying: squares are laid along the walls, with a symmetrical offset of each row. Depending on the size of the pruning, waste can range from 10 to 25%.
- Artistic installation is the most difficult option. Most often, tiles of different sizes are used, which are laid in a certain way to obtain a pattern. In addition to special material, the experience and skill of the installer is required.
Note! Each owner chooses the choice of installation independently, but for small bathrooms the best option is a regular straight or checkerboard layout. Diagonal or artistic styling looks better in large rooms.
Trimming
The last element of each row is almost 100% guaranteed to require trimming. To do this, use a tape measure to measure the required size and subtract the thickness of the crosses. Please note that there will be crosses on both sides.
Using a marker, mark the cutting line. Having fixed the tile, using tile cutters and a ruler, draw along the marked line with a smooth movement and pressure. By using the “breaking knot”, complete the operation.
Using a grinder with a cutting disc simplifies the task.
It is best to sand the cut edges with sandpaper or a file.
Second and subsequent rows
The sequence of actions is the same, but more crosses will be installed. And the last element in the last row will most likely need to be cut and adjusted on both sides.
Pre-layout
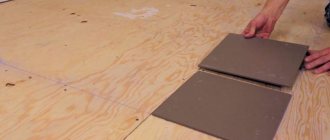
Before laying the tiles on the adhesive, it is recommended to lay them out on a dry base surface. This will allow:
- Decide on the optimal layout option.
- Visually look at the final appearance of the flooring.
- If necessary, make adjustments.
- Understand where it is most convenient to start laying with glue.
Important! Dry laying of tiles is carried out after leveling the base with cement screed, sheet materials or other available methods.
Preliminary layout allows you to clearly see the appearance of the future floor covering.
During the dry laying process, the location of the rows of tiles is marked. A marker or construction pencil is used for marking so that the lines are not erased during preparation of the base. Marking makes it easier to glue the tiles and avoids skewing and moving away from a straight line.
Let's look at some of the nuances of how to make a straight (classic) tile layout the most attractive:
- It is calculated how many whole products fit into one row. One element is removed from this quantity, and the rest are laid out from the center.
- Along the edges near the walls, trims are used for laying, which with this option should yield at least half of the whole tile.
This scheme increases trimming waste by 10–15%, but makes the distribution of tiles uniform, without small trimming at the corners, which significantly spoils the appearance of the coating.
Even distribution gives attractive coverage.
In this case, the location of the plumbing should be taken into account. For example, if a bathtub or shower tray is being installed, the installation is distributed evenly between the free wall and the bathtub screen, and the undercuts near the second wall are closed after the plumbing fixtures are installed.
Algorithm for a novice master
Required Tools
Laying tiles on the bathroom floor must be done in a clear sequence, strictly following the technology. It is required to prepare the tool in advance:
- spatulas (flat, serrated, rubber);
- tile cutter (you can also use a grinder, but it is recommended to practice first);
- building level;
- rubber hammer;
- mixer.
How and with what to cut tiles
There are special devices for cutting tiles - tile cutters. But to cut good large-format floor tiles evenly, you need a professional tile cutter. A regular one won’t do the job or the cut will be uneven. Porcelain tiles are generally cut with a grinder and a concrete disc; professionals have special cutting machines. But no one will buy expensive equipment in order to lay tiles in the bathroom. You can get by with a mediocre tile cutter. If it is important that the cut be even, it can be achieved using sandpaper attached to a block. If the tiles are very dense and durable, you can even process them with flat files or install a grinding disc on an angle grinder.
You need a good tile cutter to cut floor tiles.
But there is an easier way. You need a good glass cutter - with a diamond cutter, a metal ruler/square and a wooden beam about 80 cm long, a section of 60*60 is suitable. First, let's prepare the timber. You need to grind down one of its edges so that it becomes sharp. Maybe with an axe. On the other side, we fasten three to five pieces of boards across - to give stability.
Next, the process is simple: on the front surface, using a ruler, we make a cut with a glass cutter. We try to cut deeper. Next, we take the tile on the sides of the cut and sharply lower it onto the cut beam. We try to ensure that the cut falls exactly on the edge of the beam. It must be lowered sharply, from a height of 7-10 cm. The tile splits along the cut. With sufficient skill, the cut turns out clear.
Crosses for tile joints
Laying tiles on the bathroom floor is not difficult. In addition to glue and a spatula, you also need a bubble level and crosses. Using crosses, gaps between tiles are set. Their thickness is the thickness of the seam between the fragments. So they are selected completely randomly. Some people like wide seams, others prefer minimal gaps.
Crosses for straight seams
The number of crosses is one on each side. They are sold in packs of 100 and 200 pieces. If the size of the floor tiles is large, 100 pieces are enough; for medium-sized ones, 200 pieces are better. They cost very little, and it is very difficult to work without them.
In general, it is convenient to lay tiles on the floor with crosses. You insert them into the seam and don’t worry about it being narrower or wider. But this is only true with ideal geometry. If the sizes of the tiles do not match even a little, there will be a problem. In this case, some people prefer to use matches. They can be pressed down a little so that the seam is a little narrower, but the rows do not run apart. The second option is to sort all the fragments and arrange them by size.
Cleaning
Cleaning is carried out both before and after screeding. The floor surface must be cleaned of large and small debris and dust. This is required by the technology of laying tiles on the floor.
Floor primer
The primer increases the adhesion of the floor surface to the glue and increases the strength of the coating.
For the bathroom, it is recommended to choose a composition with antibacterial properties, since in this room there is a high risk of fungal growth.
Apply the primer with a wide brush (brush brush), and then allow at least an hour to dry.
Preparation of glue
When preparing tile adhesive, it is important to follow the manufacturer’s instructions, especially regarding the amount of water added, since not only the consistency, but also the physical and mechanical characteristics of the finished adhesive directly depend on this. The general technology and sequence of mixing dry mixtures is as follows:
- A measured amount of water is poured into a clean, deep container.
- The dry mixture is poured into the water. If you have an assistant, it will be better if the mixture is added while mixing the water.
- The composition is mixed until a homogeneous mass is obtained, in which there are no lumps.
- After a technological break of 5–10 minutes, the solution is mixed again.
With the correct consistency, the glue has good mobility and ductility, but it does not float on the surface, and when applied to a spatula, it remains on it.
Applying adhesive to floors and tiles
You need to apply the adhesive to the floor in sections. The process itself looks like this:
- Apply the prepared adhesive solution onto a small area of the floor that will be covered with tiles.
- Using a notched or comb spatula, smooth the mixture, moving in one direction.
- Collect excess adhesive with a spatula.
Glue must also be applied to the tiles:
- Before laying tiles on the bathroom floor, its front side must be inspected. Material without chips, dents or other defects is suitable for masonry.
- Moisten the reverse side of the elements.
- Apply the adhesive composition to the prepared surface of the finishing material, spreading it with a notched trowel. In this case, you need to ensure that the ridges on the tiles and the floor are at right angles to each other.
Laying tiles
Now you can lay the tiles according to the markings. It is necessary to strictly ensure that the right angles strictly coincide (checked with a square), since even small deviations can lead to visible distortions, which will be impossible to correct after the glue has hardened.
In order for the adhesive on the tiles and floor to adhere tightly, each element must be tapped with a rubber hammer or fist. Excess glue extending beyond the tiles must be removed with a spatula.
All finishing materials are laid in the same way. It is necessary to leave a gap of 2-2.5 mm between adjacent elements. Special crosses or spacers will help simplify this work. The glue must be removed from the resulting seams with the corner of a spatula.
The evenness of the installation must be constantly adjusted by level. After finishing, the glue should be given a day to dry.
Another nuance - on some types of tiles there is an arrow on the back side indicating the direction of installation. When laying such series, make sure that all arrows are in the same direction.
Having laid the entire tiles in a row, they begin trimming to fill the entire row. To properly perform trimming, the entire element is placed on the remaining free area near the wall and the cutting line is marked on both sides. Next, the tiles are cut with a tile cutter or grinder, and the required section is laid on the glue using conventional technology.
Grouting joints
Grouting of joints should be done with a rubber spatula using special compounds. It is possible to choose a mixture that matches the color of the floor design.
You must first remove the crosses or spacers. Using a spatula, you need to fill the seams with grout and then remove the excess from the tiles. Leave the mixture for 30 minutes to harden. After this time, wipe the tiles with a damp foam sponge to remove traces of grout, then look at the seams and add the mixture to the places where it is needed. Wash the entire floor surface and wipe with a dry cloth until it shines.
Don’t forget to also read about - How to properly grout the seams on floor tiles
Prepare the glue
- Pour water into a basin or bucket and add the required amount of adhesive in strict accordance with the instructions on the package.
- Stir well until smooth using a hammer drill or drill at low speed.
- After 10 minutes, stir the solution again for a more uniform consistency and complete saturation of the settled mixture.
- Do not prepare a large amount of solution at once. If you don’t have time to use it, it will dry out and lose its properties.
- You cannot add water to already prepared glue: this will impair the strength.
Useful tips
There are several recommendations given by finishing specialists. Even a novice master will be able to lay tiles correctly if he:
- Use material from different packages at the same time (even if it was the same batch). This will ensure a more uniform surface color.
- At the grouting stage, use water with the addition of fat-free detergents. At the end of the work, the floor should be rinsed with plain water.
- Leave the seam between the floor and the wall without grouting. The baseboard or threshold will be located in these places.
- Wipe the seams with a damp cloth before grouting to ensure stronger adhesion of the materials.
Another rule that must be followed: you cannot walk on newly laid tiles.
Laying tiles correctly
In order to lay the tiles, you will need tools. An example set might look like this:
- Pencil and tape measure;
- Construction level (preferably laser);
- Device for cutting tiles;
- Hammer with rubber tip;
- Putty knife.
In addition, you need to take care of a container for mixing glue, plastic crosses, grout and primer. Having prepared everything you need, you can begin to carry out the work.
Laying tiles can be divided into three stages:
Common mistakes when laying floor tiles
Even a master who knows how to lay tiles correctly and is not doing this kind of work for the first time cannot always avoid mistakes.
Tile selected incorrectly
To lay the floor in the bathroom, you cannot use tiles intended for walls, since they do not have the necessary performance properties. Such a coating will be impractical (it is easy to slip and get injured) and fragile (will not withstand heavy loads). If the first drawback can be corrected using rubber mats, then to eliminate the second one you will have to make repairs and change the tiles.
Incorrectly selected and prepared mixtures
Using the wrong adhesive for bathroom floor tiles can lead to wetness, cracking, and poor adhesion.
The same consequences are possible if the mixture was prepared incorrectly. This error is easier to prevent than to correct, so you need to choose glue for:
- wet areas;
- negative temperatures;
- walls and floor.
The surface is not prepared correctly
Any surface must be thoroughly cleaned and leveled, even if at first glance there are no flaws. It is worth double-checking the correctness of preparation using a building level.
It is also not recommended to abandon the primer, as it will prevent the decorative elements from peeling off.
Incorrect measurements during operation
This oversight can lead to incorrect marking. It will no longer be possible to correct the distortions, and everything will have to be completely redone.
In addition, it is necessary to control the horizontal level with a special tool so that the surface is free of hills and dents.
Laying sequence is broken
You need to start work either from the corner of the room or from the central point (depending on the type of decorative installation). All trimmed elements are placed in invisible corners and parts of the room, otherwise the overall appearance of the room will be sloppy.
If you plan to cover the entire room, then first you need to cover the walls, and then the floor. The screen must be installed after finishing work.
The seams are carelessly worn
Improper grouting of joints can lead to cracking and penetration of moisture into the lower layers of the floor. For the job, it is recommended to use the right tool and strictly follow the technique of applying the mixture.
You can lay tiles on the bathroom floor yourself. To do this, it is enough to strictly follow the technology and not disrupt the sequence of work.
Several life hacks from practitioners
If you choose a simple tile laying pattern - seam to seam, it is better to lay it not in rows, but at an angle. Lay two or three horizontally, several vertically, start the next row by laying out a corner. Then add a few pieces in the first row, then in the second, start the third. And so on. With this method, it is easier to maintain the surface, and you can control the “care” of the rows. If anything, you can adjust it due to the width of the gap.
Second practical point. Constantly check the evenness of the tiles. Not only each tile individually, but also how it is positioned in relation to those next to it.
Another trick - if tile adhesive gets on the front surface of the tile, remove it immediately without leaving a trace. As long as it is wet, it washes/puts away normally. As soon as it sets, you will have problems. The same goes for grout, by the way. Especially polymer ones. In general, you need to work with her quickly. And so that there is no whitish residue left on the surface of the tile, after the grouted tile has been wiped with water - the excess polymer grout has been washed off, forming a seam - we wipe each tile dry with a soft cloth. In this case, we do not touch the seams. They should be smooth.
Grouting joints
This procedure is performed after the adhesive composition has hardened. For grouting, a special composition is used - fugue, which is diluted in a separate container. To apply the grout you will need a rubber spatula. The fugue is scooped up with a spatula and applied to the joint between the tiles; residues from the surface are immediately removed.