Choosing a collection of tiles for your future interior and thinking through the design is half the battle. When it comes to implementing an idea, many questions arise:
Which tile will be more convenient to work with?
How many tiles should I buy?
How to prepare the walls?
Is waterproofing required?
How to apply glue and grout?
How long after can I use the bathroom?
We asked Cersanit brand tile laying specialist Vyacheslav Mazur to answer all our questions and also tell some professional secrets. We share everything we have learned ourselves so that your renovation is perfect.
Preparing walls for laying tiles
The old coating must be removed, since the base for the new tile must be smooth and prepared. Uneven walls are leveled using plaster or drywall; walls and corners must be checked for slope; a building level is used for this.
If the wall has blocked corners, this can lead to uneven and large gaps, problems with the installation of plumbing, and so on. The preparation stage can take much longer than the tile laying process itself.
- To remove the old coating, tools such as a hammer drill, drill, chisel and hammer are used.
- There should be no old paint or loose plaster left on the walls.
- After the dismantling is completed, no fragments of the old coating should remain on the walls.
When treating walls, you must use a liquid primer, which serves as additional protection and improves adhesion.
Sequence of work
Most homeowners when planning a bathroom renovation wonder where to put the tiles first. In most rooms, professional builders work “from top to bottom,” that is, they first line the ceiling, then the walls, and finally the floor. This technology is not used in the bathroom .
To lay ceramic tiles evenly, you first need to level the floor. If you start cladding from the wall, it will turn out crooked, and joining the floor to it will be problematic. Finishing a bathroom with tiles is done as follows:
- First, remove the old coating from the surface of the floor, walls and ceiling of the room using scrapers, spatulas or a grinder with a flexible grinding disc.
- Using moisture-resistant concrete, the walls are leveled, and the floor is filled with a leveling screed. Acrylic putty is used to fill minor defects.
- Then a waterproofing layer is created, for which the walls are treated with liquid waterproofing and the floor with rolls.
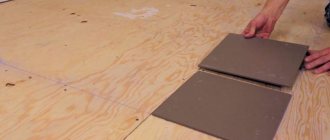
- First, lay the floor tiles, not forgetting to check the correctness of the laying using a building level.
- Cover the floor with a protective film, and then proceed to tiling the bathroom walls.
Tile laying sequence
Important! When tiling the floor, its level increases due to the thickness of the tiles, as well as due to the layer of tile adhesive; in general, it can become 2-3 cm higher. This explains why experienced craftsmen do not start tiling the bathroom from the walls.
Waterproofing the floor before installation
When laying tiles on the floor, it is important to waterproof the base in advance. This procedure will help prevent flooding of neighbors below in the event of a water leak.
Waterproofing eliminates any possibility of leakage; the following are used as waterproofing materials:
- Bitumen
- Ruberoid
- Bulk polymer composition
The floor is treated with bitumen mastic, before which it must be treated with a liquid primer. The roofing material is rolled out overlapping, the joints are coated with a torch so that the canvas is complete and airtight.
If a self-leveling compound is used as waterproofing, it is poured according to the screed principle, in a thin layer.
Features of choosing tiles
The durability of ceramic tiles is influenced by the correct choice.
You will need to consider the following:
- The tiles have a moisture resistance class. Not every group of the 8 existing ones is suitable for use in conditions of high humidity. Information about this is given on the packaging. For rooms with high humidity levels, tiles of groups A1 and B1 with a water absorption level of no higher than 3% are suitable.
- One of the important criteria for choosing floor tiles is abrasion resistance. There are 5 classes, of which materials belonging to classes 2 and 3 are chosen for the bathroom. A higher class of material is more expensive and is used for public spaces.
- It is important to use tiles in accordance with their intended purpose. Wall tiles are thinner than floor tiles and have a palm-shaped pictogram on their packaging. The floor tiles are marked with a foot icon.
- Floor tiles must be marked indicating the presence of an anti-slip surface of the material. Typically, such tiles have a rough surface.
- The shape and size of the tile is one of the most important selection criteria. The most common products are rectangular or square in shape with dimensions of 10*10, 15*15 and 20*30 cm. The size of the cladding is chosen depending on the area of the room. Large tiles are used in spacious and medium-sized rooms. If there is a lack of square meters, small tiles or mosaics are used to visually increase the space.
Marking characterizing the material
Wall tiles
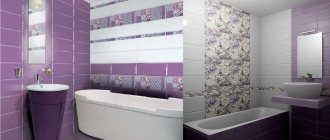
The main criterion for choosing wall tiles is their size and shape, on which the visual perception of the room directly depends - the correct choice of these parameters allows you to visually make a small bathroom lighter and more spacious.
The shape, size, color and pattern of the tiles affect the appearance of the room
Experts advise, before proceeding with the actual cladding of the walls, to make a sketch, plan or project of the future premises, which will reflect the main points of the upcoming work: redevelopment, location of the doorway, partitions, places to install plumbing equipment, connection points for water supply and sewerage, hatch providing access to shut-off valves. Here, a scale sketch of the tile layout is made, taking into account the thickness of the tile seam, in order to clearly determine the locations of the undercuts.
A sketch will help you understand what the final result will look like.
Wall tiles are divided into several types according to size. The smallest one is a mosaic. Typically, the fragments are glued onto a square or rectangular base, which allows you to quickly complete wall cladding work. Completely mosaic walls throughout the room will look too colorful, so experts recommend laying it on an accent wall or lining other structures, such as columns or niches. You can line the bathroom, the lower part of which is covered with sheets of moisture-resistant plasterboard. The size of the mosaic varies from 1*1 to 5*5 cm.
Mosaic on the wall in the bathroom
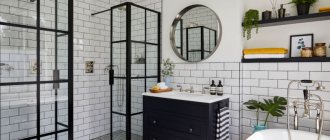
For small rooms, small tiles are recommended; for spacious ones, combining them with larger fragments. Just like mosaics, tiles ranging in size from 6*6 cm to 20*20 cm can be laid on accent surfaces. The cladding made from rectangular elements, where the long side does not exceed 30 cm, looks original. The advantage of small tiles is that they can be used to cladding any curved surface: an arch, a column, a niche. This type of cladding is less demanding on the evenness of the surface for installation, but requires more effort and time to form even seams and their high-quality finishing.
Note! A large number of joints reduces the waterproofing of the wall as a whole and requires more careful maintenance.
Chalk tiles in the bathroom interior
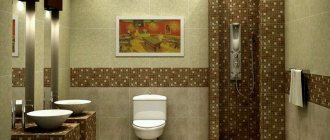
A universal solution for a room of any size is medium format tiles from 20*20 cm to 30*30 cm. Rectangular elements have a long side of no more than 40 cm. The peculiarity of installation is careful leveling of the base. The advantage is the convenience of laying tiles of exactly this size and the optimal number of joints between the tiles.
The most common sizes of medium-sized tiles include the following: 20*30, 25*30, 25*35 cm
For large rooms, large tiles are chosen. Thanks to its use, glue consumption is reduced and the work process is accelerated. This cladding can also be used in medium-sized rooms as decorative inserts. The nuances include the need to create the most even base possible.
Large format tile inserts
Floor tiles
Floor tiles differ in thickness (9-12 mm) and size. Some interior solutions involve the use of small tiles and even mosaics, but more often these are large-format square elements from 30*30 to 6*60 cm.
Floor tiles create the main accent
It is important to purchase special tiles of the required thickness and wear resistance for floor cladding. Also, its surface should have an anti-slip effect - usually these are products with a matte surface.
The main qualities that floor tiles have are as follows:
- Minimal water absorption.
- Resistance of the front layer to cleaning products containing abrasive particles and chemicals (AA - high resistance, A and B - medium, C and D - low).
- Anti-slip surface (R-value no less than 9).
An original solution - tiles that imitate wood
Tile laying options
You can start laying tiles from the floor or walls. If work begins with laying walls, it is necessary to make a small indentation, which is intended for the convenience of further laying floor tiles.
Layout options may vary.
- Direct method. The tiles are laid parallel to the walls; this is the simplest option, suitable for beginner tilers.
- Brickwork. The tiles are laid with a half offset, resulting in the appearance of brickwork. This method involves more pruning.
- Diagonal method. The tiles are laid at an angle of 45 degrees regarding the joints of the floor and walls. This is a rather complicated method that is best left to the professionals.
- Modular way. Laying tiles of different shapes and sizes.
Additional tips and advice from professionals
If you do not have the knowledge and skills to lay tiles, use the advice of experienced craftsmen.
Where is the best place to start laying tiles?
Bathroom tiling can start from:
- visible corner farthest from the door;
- from the threshold - if the far corner is closed by a bathtub or shower, this method is more suitable;
- from the center - this method is suitable for large bathrooms. If a shower drain is installed in the middle of the bathroom, you need to lay the tiles from this element. The trimmed fragments will be located along the walls, where they will be successfully hidden by furniture and plumbing.
How to cut tiles correctly
The quality of the cladding itself depends on the quality of the cut of the ceramic tile. For cutting tiles use:
- glass cutters;
- manual or electric tile cutters;
- Bulgarian
The choice of tool depends on the scope of work and the required functionality. When using a glass cutter, mark the line with a pencil or non-waterproof marker. Attach a metal ruler to the strip and run the glass cutter once in the direction from the farthest point towards you. After this, place the tile on the table so that the cut line and the edge of the tabletop coincide, and gently press on the tile. The tile will split to form a smooth edge that can be sanded down with sandpaper.
For this work, use a roller tile cutter - it is more convenient to use.
A manual tile cutter is a special device for working with tiles. Markings are applied to the tile, after which it is placed on a base with tubular runners. A carriage equipped with a cutting roller made of durable alloy runs along them. The roller is aimed at the tile and the handle is used to make a cut. To break we use a T-shaped heel.
An electric tile cutter is professional equipment that can handle even thick tiles. The design is reminiscent of a modern circular saw. The devices are distinguished by cutting discs and the presence of baths for collecting water. These machines can be used to perform decorative cuts with an angle, which allows the tiles to be joined at an angle of 45 degrees without the use of mounting angles.
Grinder – you can cut not only in a straight line, but also make wavy and round cuts. A damaged cutting blade can leave many sloppy chips in the gloss. For the same reason, it is recommended to cut from the back side.
How to join corners
There are different ways to join tiles in corners.
- Perpendicular - when the edge of one of the tiles is hidden behind the adjacent element. It will not be difficult to hide the cut edge. This option is suitable for external corners.
- Connecting tiles at an angle of 45 degrees. A special device is required - an electric tile cutter. Carrying out this work requires special skills - the cuts must be flawless. Small irregularities can be hidden using tile adhesive and grout.
Using Tile Corners
There are special corners - profiles made of plastic, aluminum or brass for laying tiles in the corners - trims. They can be U-shaped, L-shaped, or a concave arc. The outer corners are decorated first, the inner corners second. They allow you to connect fragments of the coating as neatly and aesthetically as possible, and easily lay tiles on uneven corners, completely hiding visible defects. Trims are fixed with tile adhesive, which does not contain cement, sealant, or liquid nails. If the edge of the corner is hidden under the tiles, laying on a cement-containing composition is allowed. Trims guarantee neat transitions from one wall to another, do not allow moisture to pass into the seam and prevent the formation of fungus and mold in them.
Cross pads
To ensure that the seam sizes match and are perfectly even, special crosses are used.
- Cross pads can be of different widths, ranging from 1 mm to 5 mm.
- Crosses of 3-4 mm are used for wall tiles, and 5 mm for floor tiles.
The crosses must be of good quality and not break, otherwise they may get stuck in the seams and be difficult to get out. High-quality crosses are very elastic, but at the same time, they do not break.
Selection of glue and grout
When laying wall tiles in the bathroom with your own hands, it is important to choose the right adhesive. It is different for ceramic tiles and porcelain stoneware. The tiles are less demanding; they can be laid on any adhesive suitable for a particular type of room. More elastic compounds are produced for porcelain stoneware, since this non-porous finishing material is not able to absorb the adhesive composition. Porcelain tile adhesives with additives tend to be more expensive. Universal glue will help you make no mistake - it is suitable for all types of facing materials.
The grout is also designed for different types of work: for installing wall tiles, porcelain tiles. And just like glue, it can be universal. This type of grout is optimal in terms of price, quality and ease of use.
Step-by-step instructions for laying tiles in the bathroom
Before laying, you need to measure the height of the wall and divide it by the height of the tiles. The tiles that will be trimmed should be in the most inconspicuous places and corners.
When calculating the rows, it is necessary to take into account the width of the seams, which will be about 3-4 mm. It is advisable that the cut tiles be located at the bottom.
Instructions for laying tiles include the following steps:
- Preparation of the solution. The solution (tile adhesive) is mixed in a container using a drill or a construction mixer. The consistency should resemble thick sour cream, the glue should not flow, but at the same time it should be elastic. The quality of adhesion of the tile to the wall depends on the quality of the glue.
- Laying tiles on the wall. To apply the solution, a notched trowel is used, the mixture is applied to the tile, it must be evenly distributed over the surface. The tile is pressed against the surface with uniform force; you cannot put too much pressure on the tile, otherwise it may crack. Laying begins from the second row of the wall, so that the tiles do not slide down, a wooden strip is attached to the wall. A tile cutter is used for cutting.
- When starting to lay tiles on the floor, you need to move from the far corner to the exit. A rubber hammer is used to press the tiles to the floor.
What you will need. List of required materials and tools
The key to successful installation is not only the meticulous alignment of the tile fragments relative to each other. Of course, a lot also depends on the quality of preparation of the wall base. Therefore, we have also included in the recommended list of all necessary tools and materials those items that will help you achieve the ideal surface.
Tools
- chisel;
- sponge;
- brush;
- chisel;
- level;
- construction mixer with whisk;
- glue container;
- Master OK;
- tile cutter;
- spatula (notched);
- hammer (rubber);
- ceramic tile;
- crosses.
Materials
- primer;
- plaster or putty;
- tile adhesive;
- fugue.
Instructions for grouting tiles
The seams between the tiles must be grouted. It protects walls and floors from moisture penetration and also adds aesthetics to the final appearance of the bathroom.
It is better not to skimp on grout; it must be of good quality; you can choose any shade of grout. The mixture is sold in powder or mastic form and is applied to the seams with small flexible spatulas.
Remaining grout must be removed from the tiles immediately; you can use a damp sponge to do this. When the grout has dried, you need to smooth the seams with sandpaper.
Laying around the tabletop
When gluing tiles around a countertop or a sink attached to a wall, the most important thing is to cut the ceramic correctly. Cracks, chips and other visible flaws are unacceptable here. If errors are made during cutting, the cut part should be replaced. And don't rush to glue it. It’s better to try everything on several times and first, without glue, lay out the cut tiles in the intended place.
Covering the countertop starts from the corner
Useful recommendations from the master
Useful tips for laying tiles will help you achieve the best results.
- Laying tiles should begin from the second row from the floor.
- Professionals advise applying glue not to the tiles, but to the surface of the wall.
- Glue residues can be easily removed with a sponge, but this must be done immediately.
- The width between the seams should be completely the same.
- For convenient work, you can use a tile leveling system, which consists of a wedge and a clamp.
- When laying one row, it is recommended to take tiles from one box.
- When gluing the tile, you need to move it a little in different directions so that the glue fills the entire space and there are no voids.
Laying tiles may seem like a simple process, but it has many subtleties and nuances that must be taken into account during work.
Proper surface preparation and sequence of actions will help achieve a positive result.
Wall covering
The technology of tiling walls has its own characteristics, on which the final result of the work and the service life of the finishing material depend. Professional craftsmen begin gluing the tiles from the bottom up to get an even coating. Contrasting grout for seams makes minor flaws in the cladding noticeable, so for beginners it is better to use grout that matches the tile.
Finished wall tiling
The laying technology is as follows:
- Laying tiles on the wall begins with row 2. To do this, measure the height of one tile from the floor and draw a line at this level. For convenience, the craftsmen temporarily attach a metal profile or a wooden slate in this place, set strictly according to the level.
- First, lay the first two tiles in a row, and then the first tile in the next tier. Plastic crosses are placed between the tiles to make the seams even.
- At a time, glue is applied to a small area of up to 1 square meter so that it does not have time to dry.
- Periodically, the correct installation is checked with a building level in order to correct shortcomings before the glue sets.
- The first row is laid out last. Before installation begins, dismantle the temporary metal strip that was used as a level.
- After the glue has dried, the plastic crosses are removed, and then the seams are grouted with a special grout.
Note! It is better to entrust complex layouts of tiles with decor to the professionals, as they can correctly calculate and carry out the installation so that the tiles look beautiful and even.
Photo of laying tiles in the bathroom
Grouting joints
To give aesthetic and sanitary properties to the bathroom, when finishing, you need a special mixture - grout for joints or jointing. It is necessary to select a color composition that is in maximum harmony with the color of the tile. Before grouting, it is best to go through the seams with a vacuum cleaner and remove all possible dirt from the surface of the tile.
If you decide to use a silicone or epoxy compound, the front enamel along the edges of the seams must be taped with masking tape.
It should be noted that the technology for laying small mosaic tiles with your own hands requires the use of an epoxy fugue to further strengthen the surface.
You can learn how to grout the joints in detail by studying our instructions, but here we will describe briefly. The grout is diluted with water according to the instructions and stirred until the desired consistency is obtained. It is best to apply the fugu with a special rubber spatula. After filling the joint with the mixture, several passes are made with a spatula along the joint groove, which should deepen it and create a smooth, aesthetically completed surface. After the grout has completely dried, it is necessary to remove all auxiliary products and wash the tiled surface in the bathroom.