A day after laying the slabs, the joints are grouted. For grouting, a mixture of liquid glass or a frost-resistant special solution is suitable.
When a person enters a house, the steps receive the heaviest load. That is why it is necessary to give the porch maximum strength and wear resistance. Just covering the steps with tiles helps to cope with the problem.
Laying tiles with your own hands
Next, we will tell you how to choose slabs for finishing the stairs, and in what sequence to carry out the work. We will also provide recommendations that will help you quickly and efficiently complete the repair and arrangement of the porch.
Next, you need to check and level the plane of the ceramics according to the building level, ensuring that the planned slope is maintained and the same plane as the previously laid specimens. Experts recommend taking tiles from several packs one at a time.
Important preparation points before laying tiles on the porch
Working with laying the facing layer on the concrete surface of the porch requires attention and accuracy. Therefore, many owners often do not undertake to lay tiles with their own hands, but turn to specialist builders. This approach is justified if you have to lay complex surfaces or work with expensive materials. For a simple porch with several steps, it is quite possible to lay the cladding with your own hands, if only you had the desire and time.
You shouldn’t delay laying tiles, especially if the rainy season is coming. Soft rain moisture can dissolve some of the calcium salts in the concrete monolith, thereby reducing its durability and strength. This can be easily seen from the muddy rain puddles around the freshly concreted buildings on the street.
Before starting work, you should pay attention to several fundamental points:
Important! From the moment the concrete steps are cast until the tiles are laid, the outer edges and edges of the steps must be protected.
Otherwise, additional restoration work will be required to align edges and corners that have chipped or cracked under stress.
Laying tile on your porch yourself may seem like a simple task. This is what most people who are far from the construction industry think. In fact, a good tiler is rare. It takes a lot of experience, diligence and talent to ensure that the cladding is done well.
The process of laying tiles in stages:
- Preparatory work. The base is being processed. It should be as even as possible. Otherwise, problems will arise during installation. You can try to correct the situation by using glue in an uneven layer, but there is a high risk of cracks;
- Performing a screed to create a slope. The slope is necessary for rainwater drainage;
- Preparation of steps. The work is focused on the ends. Welded profile pipes – “stencils” – are often used. The corner is applied to the edge of the platform and shifted along the end, removing excess glue. The protrusion of the cladding from above should not exceed 10-12 cm. There must be glue under the overhang. If there is a void, it will lead to destruction under the influence of load;
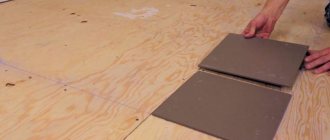
- Laying tiles. First you need to lay out the tiles dry. It is worth starting with whole tiles of the end part of the site. If possible, you should avoid trimming, which reduces the size of the tile by more than half. The reason is simple - small pieces will quickly peel off and also ruin the appearance of the porch.
The process of laying tiles on a concrete porch is the same as when using another surface:
Tools
The process of tiling a porch is a step-by-step work that requires attentiveness and patience from the master.
Tools
Materials
Work process
Calculation of the number of tiles
Preparing the base
Attention! It is necessary to create a slope for water drainage by installing beacons. Beacons are made from a mixture of ST 29 or tile adhesive and sifted sand.
Attention! If the beacons are higher than the screed, it is necessary to reduce their height (with a grater or a block with sandpaper).
Marking work
Attention! If mosaic is used to finish the end part, then the thickness of the end recess can be 5 mm (depending on the thickness of the mosaic).
Attention! Installation of tiles begins from the outer corner from the end of the porch and the edge of the top step towards the door.
Porch surface cladding
Attention! During the laying of tiles, it is necessary to periodically remove excess adhesive with the smooth side of the spatula.
Attention! The adhesive must be applied to the entire recess of the end, except for 10 mm for laying tiles or mosaics under steps.
Attention! Observe the order of cladding!
Attention! Grouting begins from the top horizontal surface, gradually moving down.
Clinker tiles owe such positive qualities to a specific manufacturing technology, as a result of which the surface is covered with a protective layer that does not lose its attractiveness and can be cleaned with any chemical cleaning agents.
Cutting methods
Many people wonder how to cut clinker tiles without chipping. There are special tools for this. It should be understood that depending on the device, one or another type of cutting will be performed. Most often the following are used for this:
- tile cutters (manual or electric);
- roller glass cutters;
- hacksaws for metal;
- grinders or hole saws;
- tile cutters and nippers.
Types of cuts are divided into:
- Straight cuts are made using an electric diamond or manual tile cutter, roller glass cutter, tile cutter tongs and grinder.
- Shaped cuts are made using hacksaws with diamond strings or wire cutters.
Recommendations for finishing
Laying tiles on porch steps
To improve the quality of cladding the area near your home, we want to tell you some secrets:
- install the slabs at a temperature of about 20 o C;
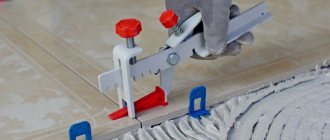
- keep the width of the joints between the tiles from 3 to 4 mm;
- to apply glue, use a trowel with teeth;
- to firmly fix the slabs, use a rubber hammer, which can be used to knock on the surface of the slabs to “compact” them;
- Immediately remove the glue if it gets to the wrong place with a soft foam sponge, after moistening it with water.
That's all the secrets! We hope that with our advice, your renovation will be as comfortable as possible for you and that a positive result will not take long to arrive.
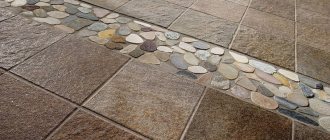
This option for cladding a street porch is considered the most popular for many reasons. Natural stone slabs are strong, visually attractive, durable, resistant to wear, frost and ultraviolet radiation. They can last about a hundred years without losing their aesthetics.
Are there any disadvantages?
To line the steps with porcelain stoneware, the following nuances should be taken into account:
Do not put a large amount of glue. Its layer should be no more than 10 mm. If it is thicker, the glue will take a long time to dry, and will also crack during use, forming voids under the finish.
Most often, the question of cladding a round porch arises when the concrete base is already ready. Time passed, the concrete became familiar and began to deteriorate. You need to do something, plus you want change.
Most often, the question of cladding a round porch arises when the concrete base is already ready. Time passed, the concrete became familiar and began to deteriorate. You need to do something, plus you want change.
This is a standard situation. And the most dead-end one. Concrete steps (round and non-circular) are usually made by some people, and finishing (tiled) is left to others. This is where the delayed explosion charge is placed. And it will have to explode. Because the fundamental rules were not followed.
When building a round porch, it is important to determine the center of the future structure. This point must be the same both when installing formwork and when tiling. Concrete workers never adhere to such subtleties. It is rare that even the correct calculation of steps in height and width is made.
Therefore, when the tilers begin work, the concrete work is resumed or, often, when this is not possible, everything is left as is. In this case, it is difficult to call such a structure round.
Remodeling a finished round porch
The second problem when tiling a round porch is “How to lay tiles on round steps and what to use to cover the riser of an oval staircase?” (The riser or tread is the vertical portion of a step or the vertical distance between two adjacent horizontal planes of steps.)
When laying tiles on the horizontal part of round steps, you can repeat an oval from whole tiles ground into a cone. The disadvantage of this method is a large number of non-factory (cut) seams and the absence of one seam line - which creates disharmony in the porch.
The first method of cladding an oval porch
But there is another way. The direction of the seams of the tiles laid on the upper landing of the staircase is continued and coincides along all steps of the porch. A disadvantage of this method may be the appearance of small pieces of tile in the cladding.
The second method of cladding the porch
To cover the riser, the tiles have to be cut into strips. The narrower the stripes, the smoother the oval on the steps. But you can fill this part of the stairs with mosaics. The mosaic perfectly follows the oval surface of the oval steps. The only problem is to choose the color of the mosaic to match the tiles laid on the horizontal part.
Discrepancy between tile and mosaic can be minimized by using the same grout.
For a round porch, it is necessary to initially construct a circle (semicircle) or oval, correct in geometry, in place. Moreover, the opportunity to mark the circle should be at any stage, from concrete work to the end of the cladding.
You can make a porch with round steps yourself. The main thing is to know the details and sequence of all processes, to follow the technology. When building a porch, there are important points that, if missed, cannot be made up for later. For example: waterproofing the base , installing reinforcement with corrosion protection, correct proportions of concrete and screed.
The most common mistake in the construction of porches is the low strength of concrete and screed. The reasons for this phenomenon are different: old cement, improper care of concrete , the wrong sand.
Due to seasonal fluctuations, the tile comes off along with such a screed. Incorrect grouting of joints can also ruin all efforts.
The site has previously shown the reconstruction of the old oval porch.
Where the oval steps had to be re-filled with concrete and a screed was installed at the same time.
SOME MOMENTS OF CONSTRUCTION OF A ROUND PORCH ^^^^^
All stages of the construction of the round porch are recorded in detail. (73 photos and several videos). With a detailed explanation of the details. get it here.
Questions from letters and consultations on Skype:
1. Is it necessary to slope the steps when building a porch?
The inclination of the step is required. If you do not do this, then in some places a reverse slope is possible. It is difficult to trace horizontality. The error can be noticed after rain. The water sits for a long time in the depression on the steps. When it gets cold, this water freezes. Walking on such a porch becomes dangerous. Penetrating under the tiles, in places with poorly done grout, frozen water undermines the porcelain tiles. Therefore, an inclination of the tile of 3-5 mm (per the length of the tile) will eliminate these surprises.
2. In what order should the tiles be laid on the steps?
First lay out the steps. Then (in two days - when the glue gains strength) - under the steps. This is true when facing with ceramic tiles or porcelain stoneware. In the case of facing steps with clinker tiles (in some variants), the manufacturer recommends the initial installation of the riser, and then the steps with gaps.
3. How to install a corner and which one, on round steps?
The corner can be installed. It may be approximately the same or similar to it.
oval corner for tiles
But, at the junction of the corner and the tile, a gap will appear through which water will constantly penetrate. If in the summer this has no effect on the tiles, then in the winter the water freezes. When water freezes, it becomes ice and expands. The fate of such a tile is shown here .
In any work, certain conditions must be observed, which are the key to quality. The service life of this product entirely depends on them. As for the cladding of the porch, these conditions include the following.
How to make steps for a porch: technology for proper tiling
In order to more fully understand the seriousness of the approach to the matter, we will cover the question of how to lay tiles on a porch, point by point. Naturally, special attention will have to be paid to the nuances.
Steps for the porch photo
- We upholster the porch with a metal mesh with a large mesh - maximum 50x50mm. We fasten it with a Berbach dowel, but it is better not to use plastic plugs. The advantage of this dowel is its flat, wide head, which does not interfere with the use of the comb. We install them at the intersection of the mesh rods.
- We prime the surface of the porch with the standard composition ST17.
- We prepare glue for the tiles and putty the porch with it. The task is to fill all the cells with glue and place the mesh inside it. Particular attention should be paid to the inner corners of the steps - there should be no voids there.
- We leave the porch puttied with glue to dry - we say goodbye to it until tomorrow.
- We prime the surface. During the drying time, it was sure to be covered with street dust, which needed to be neutralized.
- Laying the tiles. In order to qualitatively veneer the steps for the porch with your own hands, at this stage of the work you will need to observe some nuances. Firstly, you need to apply glue to both the porch and the tiles themselves. If you noticed, the back side of the tile has a corrugated surface - this may sound strange, but it is intended to increase the gluing surface. All this corrugation must first be filled with glue, and then only applied with a comb. Secondly, when laying the tile, it must be carefully nailed to the base with a rubber hammer - if glue comes out from under it on all sides, this is very good and indicates that there are no voids under the tile. Thirdly, this is grout. There is no question of any colored seams on the porch - the seams are rubbed down with the same glue on which the tiles are laid. It is better to do this immediately during the installation process - in this way you can get a monolithic structure of the seam and the base (that is, glue).
Laying tiles on the porch photo
DIY porch steps
And finally, one little piece of advice - when tiling steps for the porch, try to lay the tiles so that they have a slope directed away from the entrance to the house - then water will not leak under the door and disturb it with its presence. In addition, it will not spoil the facade of the building - mold and fungus will not grow on it.
According to technology, non-standard tiles should be calibrated and trimmed before laying steps from clinker tiles. If this is not done, the width will “walk” and the accuracy of installation will be impaired.
In what sequence are the works performed?
Do-it-yourself tiling
The laying of slabs and facing of steps is carried out using a certain technology, which we will discuss further.
Cladding the stairs requires preliminary preparation of the surface, which consists of the following steps:
- the porch needs to be sloped and leveled with a screed;
- repair significant damage.
To give the stairs a slope you need to:
- a metal mesh is placed on the surface of the slabs;
- beacons are displayed;
- mortar and glue for slabs are applied to the resulting frame, moving from the doors to the steps;
- leave the surface to dry, usually for a day.
When 24 hours have passed since the concrete was poured, the stairs are sanded, rubbed down and defects, if any, are covered up.
Subsequent cladding and laying of tiles with your own hands is carried out in the following order:
- the surface is cleaned of debris and other contaminants;
- a primer or a PVA-based water-adhesive solution is applied;
- work stops for half an hour to allow the surface to dry;
- the tiles are laid out along the perimeter of the stairs (start the layout from the door, so that the trimmings are at the edge of the steps, and not at the entrance to the house, so they will be less noticeable).
In order for the tiles to lie flat, the adhesive layer should not exceed 10mm, and all gaps between the sheets should be filled with mortar.
Please note that if the tile is not fixed well enough, it must be removed, the old adhesive removed, a sufficient amount of new adhesive applied, and then pressed back to the surface.
After the design of the area in front of the house is completed, you can proceed to laying the slabs on the steps, which is done in the following sequence:
- so that the joint of the slabs is strong, you can use a stencil to cover the first riser - a corner with a cutout to suit the thickness of the slab;
- if the riser is more than 30mm, it must be reinforced with scraps of reinforcement or metal mesh;
- when the end dries, you can mount the slabs on horizontal planes;
- when laying tiles, maintain a certain slope so that water flows down unhindered;
- When the steps are lined, you can decorate the ends.
A day after laying the slabs, the joints are grouted. For grouting, a mixture of liquid glass or a frost-resistant special solution is suitable.
Corners and protrusions can be trimmed with metal corners, protective rubber bands or anti-slip finishing.
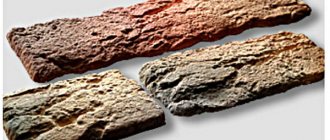
Features of clinker tiles for cladding porches and steps
If you wish, you can find large quantities of materials, namely information on how to properly lay clinker tiles. But many of these tips are based only on theory, whereas if you do not take into account the specifics of the material, you can simply ruin it.
Before you undertake this task, you should take into account the following:
The flight of stairs or porch steps will experience heavy loads during operation. For example, the tearing force of moisture frozen in a joint can even split a very durable material 2 cm thick. For this reason, the installation technology requires the purchase of a special glue with increased strength.
Helpful advice! If you try to save on glue, grout or impregnation, there is a 90% chance that you will ruin the whole job.
According to most experts, the main cause of defects and chips is precisely the poor quality of the adhesive mixture or non-compliance with the technology for laying clinker tiles on the steps. When tiling, it is worth remembering that any glue, especially that intended for clinker tiles and ceramics, has a high shrinkage.
For some brands of tile adhesive, the shrinkage value can be up to half the shrinkage value for fresh concrete. If you guess the thickness of the glue and follow all the technology, then thanks to the high level of adhesion of the rough tile surface you can get high-quality and durable cladding for 25 years. But for porcelain stoneware, regularly gluing up tiles that have come off is quite normal.
However, the process is simple in name only. In reality, the work is very painstaking and requires a lot of experience. When designing a porch, you must consider:
The porch in the house is its absolute calling card, since it is the porch that completes the composition that forms the final impression of the entire house.
Porch repair - photo of steps facing
At the same time, the most luxurious exterior of a building can be ruined by poorly executed steps on the porch.
Features of building a porch for a house
- We build a frame from boards, lay reinforcement and fill it with concrete.
- Then, when the concrete hardens, we line it with clinker tiles or porcelain stoneware.
- Afterwards we rub the seams and apply a special impregnation.
However, the process is simple in name only. In reality, the work is very painstaking and requires a lot of experience. When designing a porch, you must consider:
- its area should allow the doors to be opened and closed freely
- lay at least 75 cm from the edge of the porch to the edge of the door when open
Dimensions and number of steps
The risers of the stairs (vertical surfaces of the steps) of the porch must be closed so that dirt does not fall on the porch itself and cause rot. It is important to maintain the correct proportion of step and riser . The ideal ratio for convenience and safety is 29 cm / 17 cm (a simpler option is 30 by 15). In any case, the width of the step should be more than 25 cm, and the height should be between 12 and 20 cm).
The total number of steps on the porch should be odd (so that you step on the porch itself with the same foot that you used to step on the first step). If at a standard height there is an even number, then it is better to slightly increase the height of each step and make an odd number than to build more even and low steps.
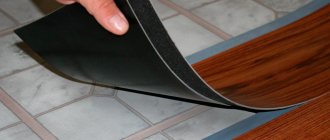
Facing concrete stairs with laminate or parquet boards
Another suitable option for finishing the stairs is laminate or parquet. These materials are also excellent heat and sound insulators. Laminate can have plank thicknesses from 6 to 12 mm. In this case, when choosing, you must be guided by the rule, the thicker the better. This will ensure both easier installation and higher reliability and durability of the coating. Another important recommendation is to choose a laminate from a commercial series. Its laminated surface has a thicker protective layer, which provides higher abrasion rates. Ideally, the width of the panel will be equal to the depth of the step.
For work,
- Edge profile, the required amount of which can be easily calculated by measuring the length of the step and multiplying the value by the number of steps;
- Decorative overlays on the profile;
- Self-tapping screws and dowels;
- Screwdriver;
- Special glue.
It is very important to leave the facing material in the printed state in the room where the facing will be done for at least a day. the process is simple:
the process is simple:
- The concrete surface is pre-leveled, cleaned and primed;
- First of all, the edge profile, which is made of aluminum, is glued. Moreover, on one of its surfaces there are holes for self-tapping screws. This part should fit into the bottom step. The glue is applied only to the edge of the upper step. Next, holes are drilled at the location of the above-mentioned holes, a dowel is inserted and a self-tapping screw is tightened. Under no circumstances should the screw head protrude over the profile;
- Next, the glue is applied to the laminate plate, which is glued first to the top plane of the step, and then to the end plane. In addition, there are protrusions on the profile that repeat the shape of the laminate lock. Therefore, the locks on the slats must be positioned accordingly. And after gluing them, they also need to be snapped together;
- Make sure that excess glue does not protrude anywhere. If necessary, remove them with a damp cloth;
- Finally, the glue is applied to the decorative trim that covers the aluminum profile.
- For clarity, watch the video:
Advantages of this type of finishing:
- Use of natural, safe materials;
- Possibility of self-installation;
- Maintainability of the coating;
- Variety of laminate colors and textures;
- Easy to care for;
- Noise insulation;
- Light weight;
- High thermal insulation characteristics;
- Affordable price;
- Complete imitation of real wood;
- Possibility of selection for any interior.