Externally, the decorative brick after the sticker is practically no different from the usual one. The difference is visible when looking at the material that has not yet been laid. The thickness of the decorative brick is only a little more than one centimeter. The laying technology also differs accordingly. When laying classic brick, the adhesive mortar holds the individual bricks together. Decorative bricks are laid like ceramic tiles, attached to the load-bearing surface, and there may be no connection at all between individual tiles.
Decorative brick
Material for decorative bricks
Nowadays there are many materials for cladding. It can sometimes be very difficult to choose just one thing. Even if you settled on decorative bricks, you still have to choose the material from which they are made:
- Clinker;
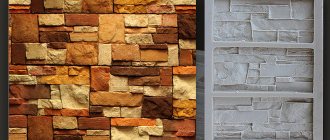
- Gypsum;
- Polyurethane;
- Styrofoam.
Clinker
The main component is clay. It is pressed and fired. Such cladding will not be afraid of any conditions. Clinker bricks are used for both interior and exterior work. Brick is durable and not easy to damage. It is not affected by ultraviolet rays and chemicals. Not afraid of water. Not only does it practically not absorb moisture, but it can also be in contact with water for a long time without losing its appearance. It is not susceptible to cold temperatures, and this is important for our climate zone.
The coloring pigment is added to the brick at the clay mixing stage. This way the paint lasts much longer and does not fade or fade. There are many colors on the market, you can choose the right one for every taste. Clinker is harmless. The main component is clay, a natural material. One of the disadvantages is the price. This is an expensive cladding option that will cost you a lot of money. But the brick is durable, it will serve you for many years, you will forget about the cladding for a long time. There is practically no need to care for it.
Another drawback is the adhesive mixture. Laying clinker is not so easy. It is heavy and puts stress on the building. Not every master makes a special composition for styling. They may refuse you or increase the price.
Gypsum
Gypsum is widely used for all types of repair work. It is easy to work with and easy to install. No one will have any problems here. The material is very light. All work can be done independently. Laying is possible on gypsum board sheets. You can even make gypsum bricks yourself. The price of gypsum is one of the cheapest among other materials for making decorative bricks. Gypsum is easy to process, so the color spectrum is much wider than that of other materials. Gypsum is safe, it contains no toxic substances, it is a natural material.
Plus it has thermal insulation and sound insulation properties. However, despite its strengths, gypsum is afraid of water and cold. It cannot be used in unheated rooms or in rooms with high humidity. The surface needs to be cleaned; it will collect dust and become dirty. Typically, gypsum bricks are varnished to prevent dust from accumulating. Gypsum is easy to fake, so check quality certificates with sellers.
Polyurethane
Budget cladding option. Most often it is used for finishing public places. It is used much less frequently in residential areas due to its appearance. Upon closer inspection, the polyurethane reveals itself; it does not look like stone if you look closely. In addition, he is afraid of the sun, the paint fades.
Styrofoam
It will cost pennies, but does not have high performance. He won't live long, he's very fragile. It can be easily damaged.
Once you have chosen the material, you should not relax. After all, for high-quality repairs, not only the type of cladding is important, but also the adhesive composition on which it will be applied. The choice of construction adhesives is large and you need to choose the right one.
What compositions are suitable for installation:
- Cement composition;
- Plaster;
- Silicone.
Cement-based adhesive adheres well to concrete or brick surfaces. The plastered wall is not a hindrance to him either. Cement is not afraid of moisture. Its use is suitable for both heated and cold rooms. Gypsum and clinker bricks are glued onto it. The cement composition is used most often because of its high adhesive properties.
Gypsum-based putty is suitable for interior finishing. If you plan to create a decorative seam, then you should use this particular composition. The gypsum composition will withstand clinker bricks and is also suitable for gypsum and foam products. Silicone is suitable for all materials. It is widely used for finishing rooms with high humidity, since silicone glue is not afraid of moisture and temperature changes.
Interior ideas
The finishing material gypsum brick is an excellent option for the interior design of any room. Today there are many options for using it in design, the most common of which are:
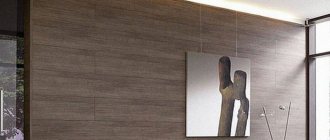
- In the living room. A great option is to decorate wall surfaces with decorative bricks in warm colors, such as sand shades. The atmosphere will become cozy when you place a corner, large-sized sofa and a small coffee table against the backdrop of a brick wall. A wall decorated with bricks, complemented by elements of the same material in the corners in the shape of a column, will look more organic;
A great option is to decorate wall surfaces with decorative bricks in warm colors, such as sand shades. - In the corridor. Partial decoration in the form of wall edgings and light-colored baseboards will make the corridor more spacious;
Partial decoration in the form of wall edgings and light-colored baseboards will make the corridor more spacious. - In the bedroom. A brick wall free of furniture with a restrained color scheme or in 2 colors of white and sand looks ideal. To add originality, you can use products with an aging effect against the background of furniture made of natural wood and glass decor.
A brick wall free of furniture with a restrained color scheme looks ideal.
Types of installation
- Block;
- Gothic;
- Cross.
Working with bricks involves not only the choice of material, but also a certain type of installation. Now there are many ways, but we will analyze the most common ones. Block masonry is the easiest way. The bricks are laid evenly without a pattern. This is the fastest way to lay the elements, but make sure you watch the seams so that the blocks don’t move to the sides.
Gothic masonry places a solid brick first and then a small element. The next row is located slightly to the right of the previous one. The seams are at a short distance. Cross laying is complex. The bricks are placed alternately on different sides, with the seam of the new row moving slightly.
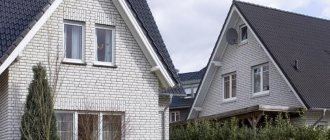
Cladding in the apartment and outside the house
Most often, it is the outer corners of rooms that are lined in this way to protect elements from mechanical damage. After all, it is often the outer corners that are involuntarily affected by clothing, interior items when rearranged and in other ways. Stone cladding is characterized by high abrasion resistance, strength, and other important characteristics.
Two finishing technologies:
- cutting individual straight tiles to the required size at the joint;
- complete masonry with special corner elements.
You will have to practice so that the cladding turns out neat , beautiful, without flaws or irregularities.
Internal corners also require similar skills, since maintaining a certain thickness of the seam is a whole skill. Most often, stone fragments are laid asymmetrically, that is, not like ceramic tiles in a bathroom or kitchen with even longitudinal or transverse seams. Then mandatory trimming with a grinder with a diamond blade will be required.
How to prepare walls
Any type of facing work involves preparatory work with the surface. The elements must be glued onto a flat and clean surface. If you use a cement composition, the walls will need to be reinforced with reinforcing mesh.
Remove all old trim from the wall. Check the surface for cracks and crumbling. Correct them if any. The installation allows for minor unevenness, but if the walls are curved, they will first have to be leveled. For leveling, you can use plaster and then cover it with plasterboard.
When is this required?
Previously, in order for the corner to have a completed beautiful shape, it was trimmed with plastic or other special corners. Today this method is considered outdated and is viewed with doubt. A more sophisticated, organic solution is required. Similarly, tiles of adjacent walls placed end to end on the outer corners do not give the desired picture.
It is best to use special corner elements . Even if their price is slightly higher than standard material, the visual effect will be much richer and more refined: it will suit any interior style. In addition to the beautiful appearance, the absence of seams in such problem areas will ensure a long service life of the cladding and will protect the ends of the tiles from destruction.
Advice
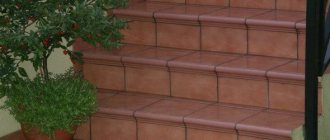
The need to create an even, beautiful angle arises when finishing niches, door or window openings. If the end part of the workpiece is cut at 45°, you will get a continuous connection of individual contacting elements. This technique is very difficult to perform, since it requires the ability to fine-tune an electric tile cutter.
Laying decorative bricks on the wall
Laying bricks is not a complicated procedure, but it must be done carefully, otherwise the entire structure may turn out uneven. First, prepare the glue. Most often it is sold in powder form, so it must be diluted according to the instructions on the package. Pour water into the powder and stir until a homogeneous mass is obtained. The glue is applied with a spatula to the wall and then to the brick in a thin, even layer. It is better to smooth the layer with a notched trowel, and apply it with an ordinary one.
Laying starts from the bottom. The very first row is the foundation of the structure, so it is this that must be laid especially carefully. While working, check the evenness using a level. Press the brick against the wall, but do not press too hard. The glue should not come out from behind the surface. Use special plastic crosses at the joints. Fill the entire wall like this. If you need to cut a brick, use a hacksaw.
After complete installation, you need to sand the seams. This can be done using grout. If you have elements made of plaster, then you can coat the wall with a special composition that repels water.
Preparatory work
Installing decorative tiles on the wall
The rest of the work progress and, ultimately, the quality and reliability of the masonry depend on the quality of the preparatory work.
The first priority is preparing the foundation:
- Cleaning the surface of old coating, wallpaper, paint, whitewash. If the surface of the wall is covered with loose plaster, then it must be completely removed, since the primer, designed to strengthen the surface, will only strengthen the thin top layer, under which there will be loose and weak plaster;
- Removing swelling and peeling of old plaster. The surface of the wall needs to be tapped; if dull sounds are heard, this means that in this place the plaster has fallen behind the load-bearing surface and must be completely removed;
This needs to be removed
- Leveling the surface. Large unevenness on the wall will force you to increase the consumption of expensive glue and reduce the strength of the adhesive. With a large thickness of the adhesive layer, it is difficult to ensure the alignment of the tiles, and it is possible that they will bulge under the influence of the weight of the layers of masonry lying on top. The walls are leveled using ready-made plaster mixtures based on cement and gypsum. It all depends on the material of the wall and whether the work is being done indoors or outdoors. The best quality is provided by cement-based mixtures, but they have a slightly longer curing time. If a large thickness of the plaster layer is required for leveling, then it is cheaper to do it using a conventional cement-sand mortar prepared using the classical method. For convenience and more accurate maintenance of the required thickness, you can use construction beacons;
- Carefully inspect the walls, especially at the bottom, for mold and mildew. In such places, the plaster must be completely removed, regardless of its strength, since mold will subsequently spread to the surface. The cleaned areas are treated with an antifungal compound and then plastered as usual;
- The prepared surface must be treated with a deep penetration primer and after it has dried, you can begin to work;
- For more reliable gluing, a reinforcing mesh is laid on the surface.
What tools and equipment are needed to glue decorative bricks with your own hands:
- Container and construction mixer for preparing the adhesive mixture;
- Water level for marking the first horizontal row;
- The answer is to control the verticality of laying;
- Construction square for controlling the laying of corners;
- Notched and regular spatulas for applying glue;
- Crosses or spacers of the required thickness to control the thickness of the joints between the tiles;
- Rubber hammer to lay the tiles in one plane;
- Hacksaw for cutting gypsum or plastic tiles;
- Grinder and tile cutter for cutting clinker, porcelain stoneware or ceramics;
- Depending on the installation height, a table, trestles or scaffolding for laying tiles at a height.
Water level
Notched trowel
What difficulties may arise?
Attention
The most important task during finishing is leveling the surface of decorative stone tiles at the corners. In this case, the solution must be of the required consistency, since too thick will not allow the elements to be aligned freely, and too liquid will absorb the tiles and “float”.
To ensure easier and more reliable installation of corner elements, it is necessary to extend the finishing coating in this area. If the linings are heavy or made of natural stone, then you need to use special adhesives and prepare the surface more responsibly.
Finishing corners with decorative stone is the most difficult part in installing decorative stone. If natural materials are used, then specially made corner elements are not always used. This makes installation slightly more difficult, since it requires an electric tile cutter and the ability to operate it. If all the requirements for finishing with decorative stone are met, you can install such cladding on the corners yourself.
Glue preparation
Created according to instructions in an old container. Tile and gypsum adhesive are suitable. It is important to achieve the formation of a mass with a dense consistency based on a thick paste.
But for each stage of laying decorative tiles, it is necessary to prepare a new portion of glue. It is designed to be used for 20 - 30 minutes, since later it will dry out and become unsuitable for installation.
How to veneer a corner with decorative stone - recommendations, photos, simple step-by-step instructions
Corners in a room have always been the most difficult surface elements to finish. If gluing wallpaper or other materials somehow managed to ensure their uniform coverage, then laying decorative stone has many difficulties. Special elements are produced in some series of stone finishing for corners, but such elements are more expensive and more difficult to install.