The modern world does not stand still - it is improving, making new discoveries that simplify human life and make it brighter. The wall finishing technology industry is also developing and offers a variety of decorative materials. Liquid wallpaper appeared on the market in 1997, but has already gained popularity all over the world. They have many advantages: a high degree of wear resistance, fireproof, do not attract dust, wall decoration has no joints or seams, and do not fade over time.. Anyone can apply liquid wallpaper to a wall.
Tools and materials
Before you start decorating the walls, you need to purchase all the tools and materials that will be needed when applying liquid wallpaper to the wall.
How to apply liquid wallpaper on walls, see this video.
Materials:
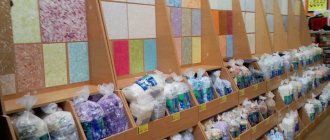
- Liquid wallpaper. You need to calculate the area of the walls in advance and buy the required number of packages of material, taking into account the fact that one package is consumed for 3-4 square meters. m. It’s better to play it safe and buy wallpaper with a reserve. In a separate article, you can read more about the types of liquid wallpaper.
- Plaster or putty. Both materials are actively used for the last stage of wall finishing, but the purpose of their use may be different. If putty is necessary to seal cracks and level the surface layer, then plaster can even out deviations from the level of up to 15 cm. Everyone can choose the desired type of dry material and prepare it themselves.
- Primer. Application of this composition is necessary to strengthen the surface and reduce moisture absorption. If the surface is too smooth, then choose a primer with sand.
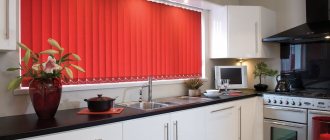
- Acrylic lacquer. The solution will protect the wall in the kitchen or bathroom, covered with liquid wallpaper, from exposure to water.
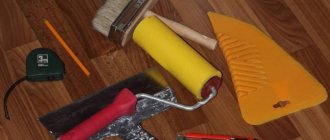
Tools:
- Deep containers. Containers are needed for preparing liquid wallpaper, so their volume must be at least 7 liters per package. A bucket or basin works great.
- Putty knife . It is necessary to choose from organic glass or stainless steel with a smooth surface.
- Trowel (transparent grater). A special tool for applying liquid wallpaper.
- Spray. Needed when applying material to a wall by spraying. It can be replaced by a special gun or Hopper spray gun.
- Putty . To prepare high-quality material, you will need a mixer, and to putty the walls, spatulas of different sizes.
- Paint roller or brush for applying primer to the surface.
- Structural roller. This tool will allow you to leave beautiful patterns on the wall.
- Pencil, eraser, ruler , if you plan to create a pattern on the wall.
Important points
It is advisable to apply the mixture to all surfaces at once, but in reality this is difficult to do. If the room is large, cover at least one of the walls at a time. When you still have to break away from work, before continuing it, you need to generously moisten the edge of the coating with water. When the wallpaper has softened, begin to apply a fresh portion - connect the boundaries of the old and new coating and level it with a grater.
Liquid wallpaper is good because it can be applied to any surface (except glass). The material covers slopes, arches, columns, fireplaces and other structures. Since liquid wallpaper tolerates temperature changes well, even radiators and pipes can be decorated with it.
The undoubted advantage of the material is its unpretentiousness to the quality of the base. The only factor that needs to be taken into account is that the coating absorbs moisture well and releases it just as well:
- surface areas “decorated” with stains of rust, copper sulfate, old water leaks must be covered with a waterproof layer (oil or alkyd enamel). If this is not done, all the “beauty” will appear on the new liquid wallpaper.
- The same property of the material also works in the opposite direction - wooden and upholstered furniture cannot be placed close to walls with liquid wallpaper. Moisture from the coating can damage them. Therefore, furniture is placed at some distance from the walls or the surface is covered with special overlays. You can simply not apply wallpaper in such places, painting the walls to match.
The excellent moisture and vapor permeability of the coating is used for the benefit of:
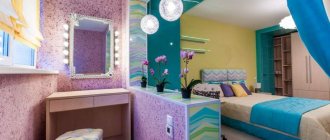
- If liquid wallpaper decorates the walls of a nursery or bedroom, there will always be a comfortable microclimate there. If the air humidity in the room is high, the coating will absorb excess moisture and release it back when the air becomes dry or too hot.
- In the bathroom, the shower glass and mirrors will never fog up if the walls are decorated with a material such as liquid wallpaper. The coating will absorb all the steam. At the same time, its appearance will not change in any way, the wallpaper will not swell or become stained. Of course, after using the bathroom you need to ventilate well or turn on the hood.
Recommendation! Although liquid wallpaper is not “afraid” of wet steam, direct contact with water is contraindicated for it.
Coatings may swell and peel off walls. Where splashing of water is possible (near the bathtub, washbasin, kitchen sink), it is better to decorate the wall with a waterproof material (tiles, for example).
There is another way - to open the liquid wallpaper with varnish. Acrylic varnish is used for these purposes - it is safe for health and absolutely non-toxic. The colorless composition is simply applied to the dried coating - the wallpaper becomes moisture resistant and can even be washed. Walls protected with varnish do not absorb odors, so they can even be used in the kitchen. However, there is one “but” - the walls lose their breathability. In addition, removing varnished wallpaper will be much more difficult than regular wallpaper.
Mixture consumption
The packaged mixture contains all the necessary components, so you can immediately pour it into a container and gradually fill it with warm water up to 40 degrees, stirring constantly. 1 package of liquid wallpaper weighing 1 kilogram requires 6 liters of water . However, these indicators may vary among different manufacturers, so before preparing the material you should definitely read the attached instructions. It will also be useful to read the article, liquid wallpaper at home.
A mixture of liquid wallpaper in a package
Asterisk IMPORTANT! For more convenient application to the surface, the solution must be left for 8-12 hours and thoroughly mixed again before starting work.
General information
Due to the similar application technique, the material in question is often confused with decorative plaster. The tool used for liquid wallpaper is the same - a spatula. The main difference lies in the composition of the applied mass. Lime and cement are used as a binding component in any plaster. Liquid wallpaper contains cellulose, cotton and silk fibers. They use glue as a binding component. Acrylic paints are used to give liquid wallpaper a tint. To obtain surface relief, elements such as pieces of mother-of-pearl, mica, threads and other artificial or natural materials are used. Such additives are also called glitters.
Surface preparation
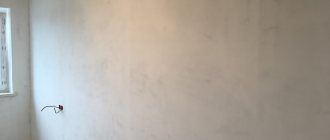
In order for the work to be of high quality and last a long time, you need to properly prepare the surface . First of all, old wallpaper and layers of paint are removed. If there are any unevenness or other defects, putty. After this, apply a primer to the wall. If you do not follow these recommendations, then when the liquid wallpaper dries, all the imperfections will be visible. It is better to take care of this in advance and do the job efficiently.
Priming walls before applying wallpaper
If there are any unevenness, the walls are puttied
Preparing the composition
How to properly dilute liquid wallpaper is a question that interests many. In construction stores, such mixtures are usually sold in dry form. Before applying to the walls, you need to add a certain amount of water and mix well. The specific volume of liquid is usually indicated on the packaging. For work, it is best to use a regular 12-liter plastic bucket. You can take more. Pour the contents of the bag into it and add water. The mixture is stirred until smooth. The result should be a composition with the consistency of minced meat. Since liquid wallpaper does not contain chemically hazardous additives, it can be kneaded even with bare hands. If you find it unpleasant to touch the resulting mass, you can use gloves. The finished mixture is usually transferred to a bag, twisted and left to swell evenly for 4-5 hours.
It should be borne in mind that the wet mixture is noticeably darker than the dried composition. Therefore, do not be afraid to use color for liquid wallpaper. Also try to prepare the mixture to decorate the entire room at once. If the coating is applied in pieces, the boundaries will be noticeable. On light shades this is not critical, but with brighter colors the overall picture can be spoiled. If it seems to you that the boundaries are noticeable, but the wall is not yet dry, you should not take any action. Once completely dry, the defect may not be noticeable. If transitions still remain, then experts recommend removing the composition with a spatula, soaking it for several hours and applying it again to the wall. In this case, the result will be excellent.
How to glue correctly?
Wall decoration with liquid wallpaper has several methods of gluing . The structure of the material resembles a putty solution, so to say “glue” is somehow incongruous, so this process should be called “applying to the surface.”
Applying liquid wallpaper with a transparent trowel
Knowing all the nuances, rules and sequence of actions, each person will be able to not only finish the walls, but also do it efficiently.
Coating for liquid wallpaper
Liquid wallpaper can be deformed from exposure to moisture, so they need to be covered with special products that will not allow moisture to penetrate inside. Acrylic varnish acts as such protection. This component is often used to protect any other materials, as it insulates from moisture. Moreover, you can even use it on paper wallpaper.
The main component of acrylic varnish is the acrylic binder. The varnish has a clean and environmentally friendly composition, as it contains only organic substances, which means it does not harm human health.
Liquid wallpaper can remove minor wall defects
The liquid wallpaper itself, as already mentioned, is durable and resistant to dyes. But with acrylic varnish, their wear resistance becomes better: after its use, the wallpaper does not deform even under strong mechanical stress.
Step-by-step instructions for beginners
Let's take a closer look at each of the methods of applying liquid wallpaper to the wall.
Method 1. Spatula
The mixture is already ready and has stood for about 12 hours . Immediately before work, you need to mix it thoroughly and perform the following steps:
- Step 1. Using a small spatula or simply using your hands, take the finished material from the container and applied to the wall.
- Step 2. Using a spatula you need to level the liquid wallpaper, the layer of which will be 1.5-3 mm.
- Step 3. The composition is applied in small areas, and after filling the surface area of 1-1.5 meters you need to level it with a transparent float or trowel, having previously moistened the instrument with water from a spray bottle;
Hand Right IMPORTANT! It would seem that this is the end of the step-by-step instructions, but you need to know the following rules:
- Liquid wallpaper should be leveled at eye level ; it is not recommended to bend over or stand on tiptoes to avoid defects and unevenness;
- you can take a spatula made of plastic or metal , the main thing is that it has a flat surface;
- movements to distribute the mixture should be short and directed in one direction.
After completing pasting the entire area of the wall, you should wait until it dries completely, which lasts up to three days , depending on the humidity in the room.
Method 2. Spray bottle
This method is used more often by specialists than by ordinary people. The main reason is expensive equipment. However, when using it, consumables are spent 2 times less and, accordingly, time too.
The video will show you how to apply liquid wallpaper with a spray bottle.
- Step 1. Fill the spray bottle with a mixture that should resemble liquid sour cream, so when making the solution you need to add a little more water than indicated in the instructions (for example, instead of 7 liters - 8.5).
- Step 2. Point the tool at the surface and smoothly, without stopping in place, move to the side, paying attention to the absence of empty areas.
- Step 3. After applying the wallpaper, you need to smooth it with a grater or trowel..
Star Half (Inverted) IMPORTANT! To prevent the appearance of empty or transparent areas, after the first layer has dried, you can apply a second one.
Method 3. Drawings
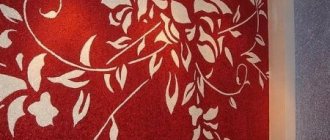
The advantages of liquid wallpaper are that with their help it is possible to implement any design idea , pattern or pattern on the surface. This method will require more time and patience.
- Step 1 . A drawing is drawn on the wall with a pencil.
- Step 2. The space inside the picture is filled with a mixture 2 mm wide , extending 1-2 mm beyond the boundaries, which is then moved with a spatula to create boundaries.
- Step 3 . After complete drying, liquid wallpaper is applied to the remaining surface, not reaching the edges a few millimeters.
- Step 4 . Using a small spatula, you need to move the layer towards the drawing to form a clear outline. Level the surface with a trowel.
Appearance
Many people today prefer to use liquid wallpaper for decoration. Reviews of this finishing material confirm that it is a cross between paper wallpaper and plaster. You can purchase dry mix in construction stores. Before application, a certain amount of water must be added to it. The resulting mass is subsequently applied to the wall. Due to the elasticity of the material, the coating is seamless. In addition, due to its texture, liquid wallpaper easily hides surface defects - cracks, gouges, and so on. Due to the plasticity of the material, you can easily form a special pattern or design.
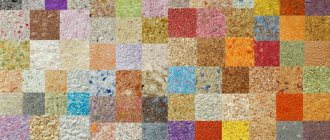
Liquid wallpaper in the interior of an apartment can look different. The differences depend on the composition. If a silk-based variety is used, the finished surface will have a characteristic matte sheen. This composition is also called liquid silk. Cotton and cellulose-based options allow you to achieve a matte surface. However, when adding decorative elements, the wall will look different. There are also combined compositions - cotton-silk or cellulose-silk. They do not have a very pronounced shine.
Protective varnish
Applying protective varnish to liquid wallpaper has many advantages:
- the coating becomes stronger , so its service life is extended;
- imparts moisture-repellent properties , which is a huge plus when the wallpaper was applied in the kitchen or bathroom;
- a layer of varnish fixes the original colors of the wallpaper, which does not threaten burnout in the future.
Protective varnish is applied after the wallpaper has completely dried with a wide brush, roller or spray . This type of varnish is almost invisible on the surface, so the material looks natural.
Pattern application
How to use liquid wallpaper to get a beautiful pattern on the surface? It is unlikely that beginners will be able to make any complex pattern. But a simple geometric pattern can work quite well. First you need to select an image. Then the outline of the drawing is transferred to the wall. If you have artistic ability, you can easily do this by hand. You can also try working with paper templates. To do this, the required drawing is printed on paper or cardboard, cut out and mounted on the wall. The space around the template is filled with one color of wallpaper. When the composition dries, the paper can be removed. After this, you will need to fill in the empty area. Here you should work carefully so as not to damage the finished drawing.
A rigid barrier can be used to apply simple geometric patterns. In this case, beacons for plaster are well suited. They are fixed to the wall and filled with liquid wallpaper of the same color. When the composition dries, the beacons can be removed and the second composition can be carefully used.
There is another method that can be used to transfer complex images. To implement it you will need glass, a lamp and a black marker. On the glass, using a felt-tip pen, you draw the outline of the figure on the wall. After this, a lamp is shined on the glass. As a result, an outline of the figure should appear on the wall. You can fill it as you like, but experts recommend treating large areas first, and then smaller areas.
How to remove it yourself?
There are several types of removing wallpaper from the surface, but the simplest and most cost-effective option is to use water.
This short video will show you how to remove liquid wallpaper from a surface.
In this case you will need: warm water, a brush, a scraper or a metal spatula .
Dip the brush in water and brush it over the wall section several times. After 7-10 minutes, the material will be saturated with moisture and soften . After this, you need to carefully remove the layer using a spatula. If the process causes difficulties, then it is necessary to soak the liquid wallpaper with water again.
Varieties
Liquid wallpaper differs in composition. As mentioned earlier, natural fibers are used for their manufacture.
Based on their type, the following types of liquid wallpaper are distinguished:
- cotton;
- cellulose;
- silk.
Liquid wallpaper differs not only in composition, but also in appearance. Differences may include brightness, degree of gloss, visual looseness or smoothness of the finished surface. Silk options are considered the most expensive. Cellulose and cotton wallpapers are much cheaper.
What it is?
In fact, it is a plastic material, the structure of which resembles sawdust or flakes. You can buy such products in transparent bags weighing 1 kg or more. The composition contains natural cotton or cellulose fibers, acrylic components, dyes, and an adhesive substance. Sometimes additional ingredients include silk fibers, gold or silver threads, sparkles and quartz chips.
After final drying, their texture resembles hard foam. In other words, the surface will become rough, but at the same time warm and soft.
There are several varieties of liquid wallpaper on sale, but they can only be distinguished by applying a fairly thick layer. Some wallpapers end up being thin and smooth, while others are voluminous, reminiscent of fabric in their texture.
Preparatory work
An important stage in the process of gluing liquid wallpaper is preparation. Pre-treatment of the wall is carried out to achieve the following results:
- The surface for applying the mixture must be uniform. Combining different materials is undesirable.
- The base is given a white color by painting or putty. Such a base will not show through and change the color scheme of the wallpaper.
- The surface should not have cracks, chips or gouges. The structure of liquid wallpaper does not allow masking such imperfections.
- The foundation must be strong. It is necessary to strengthen weak areas with falling plaster and remove peeling on wooden surfaces.
Let's consider the process of preparing walls for working with liquid trellises step by step:
- if the walls are plastered and the quality of the base is not strong enough, the plaster is removed;
- all metal parts on the concrete wall are painted over with white oil paint;
- if the old plaster has been removed, a new layer is applied in its place and leveled;
- bases made of concrete and brick are puttied with gypsum mortar. Gypsum prevents moisture absorption, which allows for better adhesion;
- The prepared and leveled surface is treated with a primer. The primer is chosen in white to set the desired tone for the liquid wallpaper for the walls. Priming is performed twice, the second layer is applied only after the first layer has completely dried;
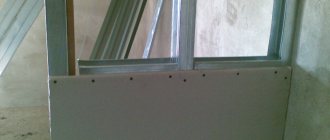
- Plasterboard bases must be completely puttied. Reinforcing tapes are glued to uneven joints and putty is applied. After the putty has dried, the surface is painted with white water-based paint;
- the wooden base must be strengthened so that deformation does not occur in contact with wet wallpaper. When treating wood, a deep penetration primer should be used. The base saturated with soil is painted with white alkyd or water-dispersed paints.
When performing work with putty and primer, it should be remembered that subsequent operations can only begin after the already applied layer has completely dried.
When planning renovations in an apartment, work on preparing walls for installation of wallpaper is combined with replacing door frames and arranging slopes.