Bark beetle plaster: photo examples of successful use of the material
Bark beetle plaster is in wide demand due to its external qualities; it is a decorative plaster for the facade and interior of a house. Note! Finishing made from this material has many advantages - it is durable, environmentally friendly and pleasant to look at. Its distinctive feature is its grooved texture.
Bark beetle plaster
The material has found widespread use throughout the world and remains one of the most sought after of its kind. There are two types of bark beetle on the market: acrylic and gypsum, and both of them are quite versatile in terms of application. To decorate walls yourself, you will need to purchase a considerable number of tools and materials for preparing surfaces, applying lower layers and the plaster itself. Then, after the initial stage of work and creating a base for the bark beetle, it remains to decide how exactly to design the coating. Special techniques have been developed for creating textured ornaments and decorative designs. At this stage it is also recommended to use your own imagination. The result can be a unique and stylish design.
Photos of textured bark beetle plaster clearly reflect this, and today it is one of the most popular and sought-after facing materials, which is easy to apply and can create not only a beautiful coating, but also protect the base from negative environmental influences and mechanical damage. You can learn more about this universal material from this article.
Application technology
Now we will analyze in detail how to correctly apply protective and decorative plaster “under the bark beetle”.
- The solution from the bucket is applied to the trowel.
- Apply the material using a bottom-up motion, starting from the corner of the wall. The thickness of the created decorative layer should not exceed the thickness of the filler grain. The entire amount of mixture on the trowel should be distributed over the surface in one movement of the hand. The remaining solution from the tool is thrown back into the bucket, because they contain fewer marble grains.
Leveling the mixture on the wall - It takes 20-25 minutes to plaster one area. Then you need to rub over the plaster - give it texture, create grooves. To ensure that work is not interrupted and the prepared solution does not dry out, it is recommended that two people complete the finishing process. One person applies and levels the mixture, the second one rubs it in after him.
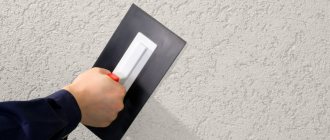
- The texture of the bark beetle is created using a PVC grater. The tool is applied to the wall and, with light pressure, made in a circular motion. Marble granules are rolled under a grater and leave grooves on the surface of the plaster. To get the “rain” effect, you need to rub vertically or at a slight angle. Horizontal movements of the grater will, accordingly, leave horizontal stripes on the surface.
Grout options - The finish is left until completely dry. Can be painted after 48 hours.
Finishing the facade using insulation
It is possible to finish the external walls of a house using this decorative plaster not only on load-bearing bases. Often plastering is carried out using the “wet facade” technology, when the material is placed on a layer of insulation.
You can learn more about this technology using the link above. Briefly the process looks like this:
- Thermal insulation (mineral wool, polystyrene foam, Penoplex) is attached to the hard surface of the wall using a special adhesive for insulation.
- The adhesive composition is applied again on top of the insulation. The reinforcing mesh is pressed into it, smoothed, completely immersed in the solution.
- Use a trowel or a tile spatula with jagged edges to create horizontal stripes on the surface of the adhesive. This is necessary for better adhesion to the decorative layer.
- After three days, the facade can be plastered “under bark beetle” using the technology described above.
For external walls, it is better to choose mixtures with a coarse grain of 2.5 mm or more, so that the texture of the finish is not lost at a distance.
Decoration of the facade
Video master class
The video tutorial below shows how to decorate façade walls with your own hands. Pay attention to the master’s comments; he talks about important nuances in working with this textured plaster.
Features of bark beetle plaster: photo examples and description of composition
Among the main distinguishing features of the material is its grooved structure. The use of bark beetle is an opportunity to save money and time on finishing, speed up and make the task easier for the craftsman. The decorative pattern is obtained without a creative process; all that is required is an even distribution on the surface. Although the master will not be able to significantly influence the final result, the type of bark beetle itself and the thickness of the inclusions already guarantee a certain appearance.
The main distinguishing feature is the substance used to create the base. This is either plaster or acrylic.
Helpful advice! It is better to choose a more specific variety from the photo in the catalog in order to roughly understand how the cladding will look up close and from a distance.
The mixtures necessarily contain granules to create a structural pattern and smaller fractions as a filler with a binding function. There are ready-made solutions and mixtures available for sale that are designed to add water.
The texture of bark beetles is created by applying several layers of plaster and a special tool - a plastic sanding float.
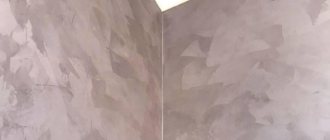
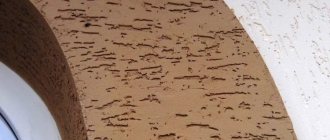
The material got its name due to the fact that it creates a surface that resembles the structure of a tree eaten away by bark beetle larvae. The surface of the plaster has a grooved structure. These
Plaster consists of two fractions: small, in the form of filler, and large, in the form of granules. Granules are round stones of approximately the same size. They determine the width of the grooves, the thickness of the layer and the consumption of bark beetle plaster. The number of granules in the material determines the accuracy of the pattern.
Note! It is the size of the granules that determines the parameters of the grooves on the finished surface.
The principle of applying bark beetle plaster, the video clearly shows the sequence of actions, is as follows: when a material with a thickness approximately equal to the size of the coarse fraction is applied to a flat surface using a metal spatula, these same granules begin to push the filler apart, creating grooves. You can make the granules move horizontally, vertically, crosswise or in a circle using a rectangular plastic trowel. This creates a pattern that resembles wood eaten away by bark beetles.
When applying decorative bark beetle plaster to the surface, you should not put too much pressure on the trowel, since the longer and more carefully the material is rolled out, the less noticeable the characteristic pattern will be. In this case, the surface will become glossy, as when using Venetian plaster in the interior of a house, the photo of which displays this effect on the surface of the walls.
On a note! Do not lay the material in a layer that is too thick, as this will cause cracks to appear on the surface soon.
The plaster contains granules of a certain size, which determines the marking of the material. The size of the fractions can be from 0.8 to 3.5 mm. Based on this, you can determine for which work this mixture is suitable. For example, if the package is marked K20, this means that there are granules 2 mm in size.
In order for the surface of the “bark beetle” to be durable and have a presentable appearance, it is necessary to properly knead the mixture.
In order to prepare the surface for the bark beetle, it is necessary to apply a base layer of plaster and let it dry.
The finest-grained plasters with fraction sizes from 0.8 to 1.5 mm are suitable for interior decoration, and material with large fractions from 2 to 3.5 mm is used for plastering facades. Photo examples clearly show the resulting textured effect.
Note! The size of the granules affects the depth of the furrows in the finishing and the consumption of plaster per 1 m2.
Thus, compositions with larger fractions have higher consumption than those with small inclusions. Plaster with 2 mm granules consumes 2.5 kg per 1 m². While the consumption of material with 0.8 mm granules is about 1.8 kg per m².
Depending on the force of pressing the grater on the surface, you can get different textures and depths of grooves.
It is worth considering that the price for a bag of bark beetle plaster with smaller fractions will be significantly higher. This is due to the complexity of grain filtration technology.
Disadvantages of the material
- If the coating is damaged, it is very difficult to repair it. To do this, it is necessary to remove the damaged layer of plaster and reapply it.
- Application technology requires professionalism. In this case, a special trowel is used.
- It is quite difficult to remove contaminants from a surface plastered with “Bark Beetle” and having a complex topography.
Advantages and disadvantages of bark beetle plaster
Bark beetle plaster is durable and environmentally friendly. It contains only natural ingredients. Thanks to the mineral filler, the mixture turns out to be light - this, in turn, relieves the surface of the building from unnecessary load. Natural phenomena such as direct sunlight and low temperature do not have a significant impact on the material. Heavy rains, snow and hail will not damage the coating. Fire-resistant qualities also provide protection from sun exposure: the color retains its original brightness. In addition, plastered surfaces are easy to clean. It is acceptable to use water and detergents for these purposes. The bark beetle is resistant to mold formation - this is an important plus under any circumstances.
Note! This coating is difficult to damage mechanically, but if this has occurred, it will not be possible to hide the defects. The disadvantages are also the difficulty of application. An inexperienced person may need outside help.
Textured bark beetle plaster combines beautifully both with clinker tiles and with natural or artificial stone.
The advantages of this facing material are:
- the possibility of using bark beetle plaster for exterior and interior decoration;
- high viscosity and good adhesion of the material to the base, due to the presence of mineral additives and polymer materials in the mixture;
- environmental safety of the material;
- light weight of the surface formed by the facing material, which does not create additional load on the wall and foundation;
- has increased resistance to mechanical stress;
- the material does not shrink during the hardening process, which eliminates its cracking;
- has increased frost resistance, can withstand temperatures down to -55°C;
- the material is resistant to UV exposure and the influence of precipitation;
- able to withstand exposure to aggressive environments;
- has good vapor permeability, which allows the walls to “breathe” and prevents the formation of fungus and mold on the surface;
- possibility of easy painting with various paint compositions;
- long period of operation without loss of original appearance;
- fits well on brick, concrete, chipboard, plasterboard bases, sandwich panels and polystyrene boards, but requires the creation of a base layer based on cement or gypsum plaster;
- affordable price.
Note! It is not recommended to apply bark beetle plaster to wood, metal, plastic or glass surfaces.
Additional advantages of finishing the facade with bark beetle are:
- The material is available and widely distributed;
- There is a large selection of shades;
- Among other things, if the coating was originally white, it can be painted.
If you do not have the necessary skills for applying plaster, it is better to entrust the application of “bark beetle” to specialists.
Decorative bark beetle plaster is easy to paint, which is very convenient if there is a need to frequently renew the surface.
Material advantages
- Mechanical strength and no harm to the environment. The starting components of plaster are only natural materials.
- Light weight. Reduces the load on the supporting structures of the house due to light mineral fillers.
- The ability not to lose strength, moisture-proof and color characteristics over a long period of operation.
- Fire resistance, ability to withstand open fire.
- Variety of colors. Choosing the right bark beetle color for the facade will not require significant labor costs. Ability to resist mold fungi.
- Attractive prices and a wide range of pricing solutions.
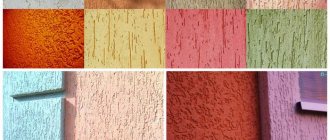
Types of decorative plaster for walls: photo examples of finishing
There are two common types of bark beetle plaster on the market - gypsum-based and acrylic-based. In addition to the base element, additives are used in the compositions: polymer, granite or marble chips with a fraction of up to 3.5 mm. These additives form a unique relief surface. The finishing technology with acrylic putty involves preliminary tinting to the desired shade. Mixing is done by proportionally adding liquid color to the container with the mixture. It is tinted in bulk, which allows you to choose the most suitable color and create an effective and durable surface.
If necessary, an electronic tinting machine will help. To use it, you should contact large retail outlets. Due to the technical difficulty of creating identical shades in different containers, the latter option is considered optimal.
Note! Relief gypsum plaster is not tinted, but painted after application and hardening.
The acrylic-based mixture has good adhesion and increased moisture resistance. Therefore, acrylic textured plaster is widely used for cladding rooms with high humidity: showers, bathrooms, swimming pools. This material has good elasticity, hydrophobic and moisture-resistant properties, as well as high adhesion to any substrate.
The composition for bark beetle plaster may have additional additives in the form of mother-of-pearl or reflective particles.
The main disadvantages of the material are considered to be low vapor permeability, which makes the use of acrylic plaster advisable only for non-breathable surfaces. In addition, this coating is fire hazardous.
Note! To obtain the required color when tinting the composition, the mixture and the tinting material must be from the same manufacturer.
Mineral bark beetle plaster consists of a mixture of cement and quartz chips. It has high vapor permeability, fire resistance and frost resistance, which makes it an indispensable material for finishing the outside of a house. Decorative bark beetle plaster, photos clearly demonstrate this, can be applied in several ways and can create a complete and noble look for a building. However, the material cannot be tinted in the finished solution, which requires additional work to paint the finished base.
Silicate bark beetle plaster has good vapor permeability, water-repellent, hydrophobic and protective properties. The material has high adhesion to mineral substrates, where it creates a crack-resistant coating. Plaster is easily tinted and comes in a variety of colors and shades, which allows you to create a presentable and unique surface. This is proven by photographs of the plaster finishing of the facades of private houses and interior spaces.
Among the disadvantages of the material, one can highlight the high cost. Also, before carrying out work, it is necessary to prime the surface using a silicate mixture. Silicate plaster sets very quickly, so all facing work should be carried out very quickly.
Finishing
Bark beetle finishing is mainly used in low-rise construction. This finishing method allows you to give the building a unique look.
To make an error-free choice of coating technology and design, it is recommended to familiarize yourself with photos of beautiful bark beetle facade decoration posted on the Internet. For example, giving the house an "antique" feel. To do this, use plaster of dark colors and create the appropriate surface texture. The effect can be enhanced by a brick plinth, columns and a wide staircase.
A classic design will require understated elegance and simplicity. The coating is carried out with acrylic plaster of light colors. A tiled roof and brick gazebos will complete the impression.
For small buildings, a combination of plaster with natural materials is recommended. For example, inserts made of wood and natural stones harmonize well with a tiled roof, flower beds and shell paths.
Designers recommend plastering all loggias and terraces in the same way, but using different colors. This will highlight every architectural detail of the building and emphasize its individuality. At the same time, they stick to brown and light beige shades. Each floor of the house can be painted in different colors, and a wide staircase with carved railings will give the building an original and attractive look.
Acrylic plaster bark beetle
It is a composite material with abrasive granules, just like gypsum plaster. The difference lies in the degree of readiness. Acrylic bark beetle is used in finished form, while gypsum bark beetle must be diluted with water. Manufacturers use different substances to create granules. The most popular among them are minerals and marble chips. The grain size varies depending on the thickness of the abrasive (1-3.5 mm). Due to this, the thickness of the finishing layer and the depth of the furrows are adjusted. Acrylic retains its properties for a long time. It lasts more than 15 years indoors, and about 10 years on external walls.
Click on the photo to enlarge.
Click on the photo to enlarge.
The acrylic used in the solution gives it plasticity. As a result, when the acrylic bark beetle dries, no cracks form. Acrylic is applied in a small layer at the finishing stage of work. After just a few days it can be painted with silicate paint or after 2 weeks with acrylic paint. Applying acrylic material in a thick layer will cost a large sum.
Let's see what are the main mistakes made when applying bark beetle
Before applying the bark beetle, the ambient temperature must be at least 5 and no more than 30 C. You cannot work on the facade in summer under direct sun or in rainy weather. It is also necessary to make sure that the wall before applying the bark beetle is dry, has no hidden voids, puttied and primed in the color of the bark beetle. The bark beetle plaster in the jar should not be too dry; you can add 10% water to make it moderately thick. When applying bark beetle, fallen material cannot be reused. When forming a pattern with a plastic trowel, places are formed with a slightly visible pattern or with a very intense one, since it is difficult to maintain the same layer over a large area. To even out the pattern, use a spatula to remove some of the material from places with a light pattern and add it to places with a very pronounced pattern, while rubbing these areas with a plastic trowel. To avoid the formation of joints, you need to be able to calculate your strength and the number of finishing craftsmen. If you understand that without a joint it will not work, you need to make the edge of the material torn and indirect, you can also use masking tape and glue it along the joint. The wall finished with bark beetle must be passed with a wet plastic trowel until the material has set, or after the bark beetle has dried, it must be sanded with medium sandpaper, removing sharp edges.
Gypsum plaster bark beetle
This type of putty is not tinted, but painted after application and hardening. Gypsum-based plaster is excellent for decorative finishing of internal walls and is less suitable for external cladding. The material is sold as a dry mixture in bags. It is diluted with water. A plastic bucket with 2-3 liters of water at a temperature of 23-25 °C is used as a container. The substance is mixed with a construction mixer to the required consistency.
However, if the plaster will be used outside, then you can use a wooden stick for mixing. Decorative gypsum putty is applied to the walls after leveling with a cement-sand mixture or plasterboard sheets. The first is to apply a uniform starting layer of material. After it hardens, the surface is treated with an abrasive mesh. To increase adhesion, a penetrating primer is applied.
Coloring
In the case of gypsum-based plaster, any coloring substance can be added to the dry mixture. If the plaster is acrylic-based, then painting should be done with great care, otherwise the color may be overly saturated.
After plastering, the surface can be coated with enamel on a base similar to plaster. Today, brown, beige and yellow colors are popular.
However, the color of the house should be in harmony with the color scheme of the entire site. Experts recommend using several colors when painting your home, including gray and green.
Color variety of bark beetle plaster
There are various shades for tinting on sale - from standard to noble. Therefore, there is a place for bark beetle putty in any design, both elegant and simple. A dark or deep color will successfully highlight the recesses and visually “improve” the walls. Indoors, light shades of brown, blue, gray and purple, as well as white, yellow and beige, are predominantly used. Some irregularities in the form of lighter or darker areas look beautiful.
The facades, in turn, are painted in both light and dark colors, depending on one’s own preferences and the surrounding environment. Pigment is sometimes added to the primer to give it a certain sheen. The shade of the coating, or rather its perception, additionally depends on the material. Both acrylic and gypsum putty look attractive in this regard. When tinting a mixture, the biggest danger is creating an overly saturated or muddy tone.
Note! There is also a special coloring agent “bark beetle” for use on metal surfaces to give the desired effects without plaster.
Color variety of bark beetle plaster.
Non-standard methods of applying bark beetle
For those who think that bark beetle coating can only be applied classically, it will be interesting to learn about the many application methods
Travertine technique - We apply the bark beetle as usual, but when rubbing with a plastic trowel we make short chaotic movements in different directions
Cork method - Apply bark beetle, but rub it not with a plastic trowel, but with a polystyrene foam trowel, making intense circular movements with a small radius in one direction
Non-uniform application method (carpet) - Apply bark beetle but rub it in with a plastic trowel in a checkerboard pattern, a cross-shaped pattern comes out especially well
World map method - We apply the bark beetle, but after forming the pattern with a plastic trowel and the first layer has dried, we apply the bark beetle in the form of small sections in different directions with gaps, smoothing them with a Venetian trowel (This method requires creative thinking)
Rain method - We apply the bark beetle as usual, but when rubbing with a plastic trowel, we make diagonal movements from the top right to the bottom left; the result should be long and short lines. A stencil design looks especially good on this surface (Portrait of Putin)
We will tell you about all the methods of applying bark beetle at our master classes.
Which plaster is better: features of popular compositions
Depending on the type of textured mixture for “bark beetle” wall plaster, there are distinctive features of the technology for applying the material to the surface. A mineral mixture requires minimal plastering skills, while it is better to entrust the application of polymer plaster to a professional, since working with these mixtures is much more difficult and requires some experience.
Polymer decorative plaster on the walls, the photos clearly confirm this, looks much more aesthetically pleasing and attractive than simple mineral plaster. It is sold in the form of a ready-made solution, completely suitable for application. You just need to paint the material with paint of the desired color.
Click on the photo to enlarge.
Click on the photo to enlarge.
Mineral plaster is produced in the form of dry powder in bags, which requires the preparation of a working solution, but its cost is much lower than acrylic. Another indisputable advantage of the polymer mixture over the heavy mineral composition is the relatively low consumption of bark beetle plaster, which is about 3.2 kg per m². While mineral material will need about 4.5-5 kg per m². They also do not require subsequent painting of the finished surface, which reduces the work time.
Polymer plaster is more elastic, which eliminates the occurrence of cracks during thermal expansion of the material and shrinkage of the building. The mineral mixture is not flexible enough, so it is better to apply it after the building has shrinked.
High-quality compounds from well-known manufacturers allow you to obtain reliable coatings that meet all quality and safety standards.
Note! To prevent the occurrence of bubbles and peeling on the facing surface, polymer bark beetle plaster should be applied to a completely dry base.
Polymer compounds are more durable and resistant to any type of mechanical damage and type of contamination. However, the cost of the material is significantly higher than its mineral counterpart.
Purpose and application
Where can you apply bark beetle putty? The range of applications of this material is wide. This can be the facades of a wooden house or its interior (walls and even ceiling). It has proven itself well in the restoration of old buildings. The most important thing is that the putty is applied to the material with which it will adhere well. These include brick, stone, concrete or drywall.
Attention!!! It is important! Putty should not be applied to glass or iron; it does not adhere to such material.
Calculation of consumption of decorative plaster mixture
The putty is applied together with the fractions in the composition. Their size affects the material consumption: the larger the diameter of the particles, the more voluminous a layer must be applied. For finishing facades, larger fractions are used - from 3 mm. The average consumption of the mixture in such cases is about 3.5-4 kg per square meter. meter. If 2 mm fractions are used, the consumption will become much less - 2-2.5 kg per square meter. meter.
The thickness of the putty layer also depends on how smooth the facade is. For example, if we are talking about 10 square meters of wall with a “blockage” of several centimeters, then first you will need to install beacons at 3 points. Then the deviations for each of them are summed up, and the result is divided by the number of beacons (in this case, 3). The resulting indicator is the required thickness in centimeters. Paint consumption in kilograms is determined by multiplying the consumption rate indicated by the manufacturer by the above-mentioned value in centimeters.
Read the continuation of the article on the next page. To move to the next part of the article, use the page navigation numbers.
Peculiarities
The construction market offers the buyer two forms of plaster - ready-made paste or dry polymer-cement plaster, which should be diluted with water. It is logical to assume that 1 kg of dry composition after dilution with water will give more weight than the same 1 kg of paste mixture purchased.
A huge advantage is that the dry product has an affordable price, which is covered by some inconveniences in its use.
All ready-made solutions are divided into several categories:
- acrylic;
- silicate;
- silicone.
Tips and recommendations for use
The technology for applying putty is not complicated, therefore, following the recommendations described below, the putty process will not cause significant difficulties.
Before you get started, you should choose the right mixture. We remind you that when choosing, be sure to look at the type of putty and its grain size. The paste mixture is immediately suitable for use, but its cost is much higher. And the mixture that needs to be prepared will cost less. You should know that properly prepared plaster putty is not inferior in quality to acrylic putty. As for the cooking recipe, the manufacturer, as a rule, always writes it on the packaging itself.
To work you will need a certain set of tools:
- the mixture itself;
- bucket (volume depends on the amount of solution being mixed);
- a drill with an attachment or a construction bowl (needed for mixing so that the resulting mixture is homogeneous, without lumps);
- a set of spatulas (narrow and wide, but always made of stainless steel);
- grater (must be plastic).
Surface preparation
Preparatory work for plastering the surface occurs according to the standard scheme.
- the surface is initially cleaned of dirt, mold, protruding mortar deposits, falling old plaster, etc.;
- if necessary, the surface should be leveled, but the procedure depends not only on the wall itself, but also on its location:
| No. | Wall location | Wall location |
| 1 | Facade wall | The surface is pre-insulated with polystyrene foam (mineral wool), then tightened with glue and then reinforced with plaster mesh. In the case where there is no need for insulation, the surface is leveled with cement mortar (it can be replaced with facade plaster). |
| 2 | Internal walls (brick, blocks) | It should be leveled with plaster. If there are minor irregularities, then you should first set up the beacons, and then just finish and level the base for the bark beetle. |
| 3 | Plastered surface with irregularities | Seal with putty. In the case where work takes place in a damp room, a special composition will be required. |
| 4 | Walls – concrete slabs | The seams should be sealed so that a smooth surface is obtained and cracks do not appear in the future due to knocks. |
| 5 | Drywall | You should also start by sealing and strengthening the joints and only after that apply a thin layer of putty to the entire surface area. |
- The next stage is primer. To do this, you will need a special primer paint, which should be tinted only with white.
Attention!!! It is important! If you use colored polymer plaster, then the color of the primer should match the color of this decorative coating.
Priming technology
This procedure depends on the foundation, or more precisely on its condition:
- oil paint (if any) should be sanded or scraped off;
- if there are metal elements on the surface (screws, staples, nails), then they are first treated with waterproofing primer in order to avoid the appearance of rust in the future;
- A porous base that absorbs moisture well will need to be coated with a deep penetration acrylic primer.
Advice. Choose a primer from the same manufacturer as your putty. Materials from one manufacturer will ensure not only quality, but also reliability of finishing.
Preparation and application of the composition
To prepare putty from a dry mixture, you should follow some rules:
- the water temperature should not be less than 15-200C;
- putty is added to water, but in no case vice versa;
- using a construction mixer, mix the mixture thoroughly (use minimum speed);
- after all the lumps have been separated, the mixture should be left for 5 minutes, after which the stirring process is repeated.
Once the solution is prepared, it is recommended to start working immediately and work until it runs out, so you should prepare only the amount you plan to make. When working, take into account the application features:
- Take the solution in small portions and quickly spread it over the surface in a thin, even layer.
- The composition on the treated surface will thicken in half an hour. After this, it should be processed with a grater with light movements, which will give the surface texture.
- It's better to work together. One applies the composition to the wall, and the other immediately rubs it over.
- Temperature in the working room +10 -+250С.
- It is better to make the surface in 1 pass. If this does not work, it is recommended to seal the edge of the plaster with special masking tape, which will prevent the composition on the edge from hardening and the boundary line will not appear on the finished surface in the future.
Grouting the surface
The simplest and most common patterns created by grouting are:
- Rain - a grater pressed to the surface, drawn diagonally from top to bottom;
- Crosses - with a grater a long continuous movement is made from top to bottom, then small horizontal “strokes”;
- Lambs - use a grater to make circular movements.