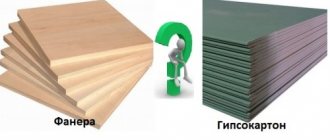
If the walls in your house are not straight enough and you want to correct this situation, then we can help you. There are many ways to level the walls in your home, but the most common is with drywall. Drywall is a universal building material, which is a sheet consisting of two layers of construction paper and a core of hardened gypsum with fillers. With the advent of this material, the construction industry moved away from the long and difficult method of leveling walls with plaster and putty. Today we will tell and show you how to level a wall with plasterboard without much difficulty.
We have described for you the entire process of leveling the wall from start to finish. We will teach you how to calculate the required amount of material and reduce waste to 0.1%. Our craftsmen have prepared detailed author's step-by-step photographs for you, which, in more detail, will help you figure out what's what. Leveling a wall in this way is very easy, even a beginner can do it. No specialized equipment or tools are needed. Our step-by-step instructions are available to everyone in need. Let's not pull the cat by the tail, ears and paws, but let's proceed to a more detailed consideration of this interesting issue.
Pros and cons of the frameless method
To attach gypsum boards, they use an adhesive instead of screws.
Each type of finish has both advantages and disadvantages. What are the pros and cons of leveling walls with plasterboard? Using gypsum plasterboard to level walls without a frame has the following advantages:
- no need to spend money on profiles and screws;
- no need to look for metal scissors, a screwdriver, a drill and other tools that are necessary to create a frame;
- no useful area is lost, which is hidden by the frame design;
- there is no need to cut sheets of drywall so that their joints fall on the profile.
However, the lack of a frame leads to certain inconveniences. Therefore, it is worth considering the disadvantages of the frameless method of leveling walls.
- Leveling the walls with plasterboard without a frame can hide only a slight curvature. If the unevenness of the walls is too great, then this method will be too costly and time-consuming. If the difference is no more than 4 cm, then there will be no problems during operation.
- It is necessary to carefully prepare the wall, because the drywall will be in direct contact with it.
- It is not possible to make insulation using the same mineral wool.
- After all the work, a lot of dirt remains from the solution.
- For additional cable routing, you will have to groove the wall to create gutters.
- You will need special adhesives to attach drywall. You will need to dilute them yourself using a mixer.
- The wall will not be as smooth as with a frame.
Self-tapping screws can act as beacons that help to install gypsum boards evenly.
As you can see, leveling walls with plasterboard with your own hands has more disadvantages than advantages. However, all the shortcomings are usually overlooked due to the fact that it is easier to work with the adhesive solution yourself than with profiles for the frame. Although this is very relative. It will be much easier for someone to do the sheathing than to work with a spatula and mortar.
In wet rooms, moisture-resistant plasterboard is used. It has a greenish color. It is also used in rooms where there is increased dampness due to heating problems in winter.
What you need to know when choosing a material
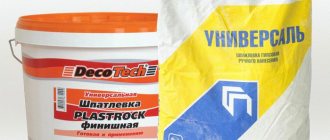
To get a good result, you need to choose the right material. So, not everyone knows that plasterboards are different. They differ in the composition of the filler, therefore they are intended for different types of finishing. Let us briefly describe all the varieties.
GKL. Standard version without any additives. Designed for any type of interior work in rooms with normal humidity levels. Surface color: light grey.
Drywall 12.5 mm
285
Buy
GKLO. Fire-resistant board, which contains fire retardants. Designed for installation near fireplaces, stoves, heating boilers. Resists elevated temperatures for a long time. It has a light pink color.
Fire-resistant plasterboard 12.5 mm
607
Buy
GKLV. Moisture-resistant variety with hydrophobic additives. Used for finishing wet rooms: bathrooms, kitchens, toilets. GKLV is available in green.
Drywall moisture resistant 12.5
387
Buy
GKLVO. Combined fire and moisture resistant material. Installed in boiler rooms, bathhouses, and similar premises. Leaf color is dark gray-blue.
The required number of sheets is determined based on the total area of the walls. In this case, door and window openings are excluded. First, the area is calculated, then the resulting value is divided by the area of one sheet. 10-15% of the “stock” is added to the result. This is necessary because the material will have to be cut, and overspending cannot be avoided. If the final result is a fraction, it is rounded up to the nearest whole number.
Preparing the wall
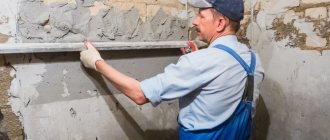
Before leveling the walls with plasterboard without a frame, they must be carefully prepared. The first step is to remove all old coverings from the wall until a solid base is obtained. All old putty and loose plaster must be removed. Work only with a strong base. The surface is also cleaned of dirt, dust and grease stains. This is done to improve adhesion.
Using a rule and a plumb line, they determine how large the difference in heights is. It is necessary to identify how crooked the wall is and where its protrusions are located. After this, it will be clear what will be aligned and where. It is along the maximum protrusion that the entire surface will be leveled. Perhaps there are small protrusions that would need to be cut off with a chisel or an ax. The smaller the height difference, the cheaper all the work will be.
If the old plaster does not adhere well, it also needs to be removed.
To know how to level a wall with plasterboard without a profile, you need to know how the working surface absorbs moisture. Depending on how strongly the wall absorbs moisture, a special primer is selected. Various primers may or may not reduce liquid absorption by the wall. For example, concrete and monolithic surfaces are coated with a “Betonokontakt” type primer. For highly hygroscopic surfaces I use Tiefengrund type primers.
For better adhesion, you can coat the back side of the plasterboard sheets with the same primer that is applied to the wall.
The dry wall is treated with a primer. The easiest way to do this is with a roller. Depending on the material chosen, two coats of primer may be required. The packaging always indicates such information, as well as how long the wall should dry out after such a procedure. Leveling walls with plasterboard without a profile is carried out on a dry surface, so you will have to wait for the primer to dry.
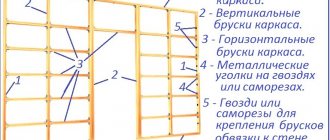
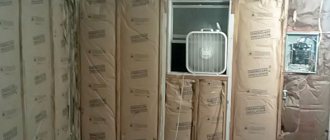
Creating a wireframe
If you have already dealt with creating a frame for plasterboard structures, then you should not have problems with this stage.
The procedure for constructing the frame is as follows.
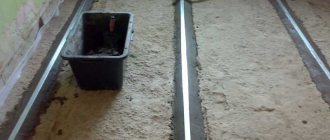
- First you need to find out the zero plane from which the entire wall will be measured. Select the most protruding corner and drive a nail there so that it sticks out the length of the profile (4 cm). Now you need to take a plumb line, lean its cord against the edge of the nail so that the weight hangs above the floor without touching it. After waiting until the plumb line stops swinging, use a tape measure to measure the distance from the sinker to the wall and drive in another nail with the desired reach. Repeat the procedure on the other edge. You should end up with a square, which you need to mark by pulling the fishing line.
- A starting UD profile is installed along the perimeter of the new structure (on the floor, walls and ceiling). It is fixed with dowels directly into the concrete, so you will definitely need a hammer drill. The edges of the profile must extend outward in order to later insert jumpers into them.
- The main CD profiles are set within the resulting boundaries. The sheet of drywall will be fixed directly to the profiles, so they are installed with their edges facing the wall.
- The first profile is located at the very corner of the wall in a vertical position, and the next ones - in increments of 60 cm. The last profile is mounted in the same way as the first, even if the distance from the penultimate lintel is less than 60 cm.
- To impart rigidity to the structure, the transverse profiles are additionally secured to the wall with hangers. After fastening, the hangers are bent in a “P” shape and allow you to secure the profile to the required width. Be sure to check the evenness of the structure using a level. For convenience, first install the hangers, and then mount the transverse profiles.
Note! It is necessary to retreat 60 cm from the center of the profile. This distance allows you to attach a 120 cm wide sheet of drywall at the edges and in the center.
- If your walls are higher than the standard 250 cm height of plasterboard, then you need to cut and fasten strips of plasterboard on top. At the same time, add a series of horizontal jumpers at a height of 250 cm. They will allow you to secure the strips along the edge.
This video shows the process of covering walls with plasterboard on a frame made of profiles:
Installation technology
Before starting installation work, it is recommended to keep the plasterboards for a couple of days in the room where they will be used. You also need to calculate in advance how many sheets you will need. You can draw a simple installation diagram on a sheet of paper to calculate how many whole sheets will be needed and how many sheets will be needed for the remaining sections. But if the height difference is too great, then additional sheets of drywall may be required.
Leveling walls with plasterboard without a frame can be done using several methods. They depend on what height difference needs to be compensated. Let's consider three main cases.
Leveling walls with differences of up to 4 mm
The adhesive should not be on the very edge, so as not to get into the joints of the sheets.
Such a small difference indicates that the wall is almost flat, which means it is very easy to level. Most often, a metal profile frame is abandoned precisely in such cases. The most common gypsum putty is suitable for attaching gypsum boards. It is sold dry, so you will need to stir it with water until you get a thick paste-like substance. So there is no need to buy more expensive adhesive.
In principle, you can opt for acrylic putty, which is sold ready-made. There is no need to mix with it and calculate the proportions of the required water.
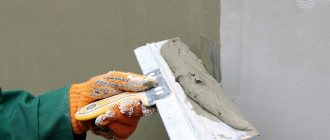
Apply the composition with a spatula to the back side of the drywall. Moreover, the putty is applied in small beds around the perimeter and in the center. They are leveled across the sheet so that their thickness is the same. It is important to know how to properly level walls with plasterboard under tiles. Due to the heavy load from ceramic tiles, the entire plasterboard is treated with putty, and not just around the perimeter.
Now you can press the gypsum board against the wall. Someone taps with a rubber hammer, and someone presses the sheet with their hands. By this point, you should know where the biggest bulge on the wall is and where the biggest depression is. The amount of putty and the force of pressing the gypsum board against the wall will compensate for the difference of up to 4 mm.
The solution can be applied directly to the wall
You can also apply the putty directly to the wall, but you need to know exactly how the sheet will lay. Regardless of where the adhesive is applied, you need to work with a spatula. It helps to distribute the putty evenly over the surface.
Leveling walls with a difference of 4-20 mm
Leveling walls with plasterboard using glue is carried out when the height difference is 4-20 mm. Perflix or a similar product is usually used. This method differs slightly from the previous version:
- piles are applied in 4 stripes in increments of 20-30 cm;
- the diameter of the pile is up to 15 cm, and the height is not more than 3 cm;
- the adhesive mass is applied to the wall, and very rarely to drywall;
- It is convenient to pour the solution with a ladle.
All further work is no different from those described earlier. Sheets of drywall should be attached as tightly as possible to each other. The lowest sheets can be installed on original supports (gypsum plasterboard scraps) so that they do not touch the floor. After a couple of days, the supports will need to be removed and the gap sealed with sealant.
Leveling walls with a difference of 20-40 mm
If the height difference is no more than 4 cm, then it is still possible to level the walls with plasterboard without a frame with your own hands. If the surface falls more than 4 cm, then you should think about a frame.
Strips of drywall are used to fill depressions in the surface. GCR is taken and cut into 10-centimeter strips along the length of the problem area. The strips are attached vertically to the same glue in increments of 40-50 centimeters. This way we can cover a significant difference in height, which is compensated by strips of drywall.
Such strips must be pre-treated with a primer on both sides
These strips will serve as a kind of frame, to which sheets of drywall will then be attached using the technology described earlier. Remember that such pieces of gypsum board must be firmly fixed, so you will have to wait up to three days. Now you know how to level walls using drywall without using metal profile sheathing.
Sheet cutting
Before proceeding directly to leveling with plasterboard without a frame with your own hands, it is necessary to correctly cut the sheets. Their standard height is 2.5 meters, but the ceiling in the room can be higher. Then you will need additional pieces, which we recommend preparing in advance.
Drywall is cut according to the marks made with a pencil or marker. Using a construction knife, make an incision, then bend the sheet and carefully break it, making a similar cut on the reverse side.
If during your work you need to make shaped inserts from drywall, use a jigsaw for these purposes.
Keep in mind that it is necessary to leave gaps of 1–1.5 cm between the ceiling and the floor. To create such gaps, it is convenient to use drywall cuttings as a substrate.
Making the finishing touches
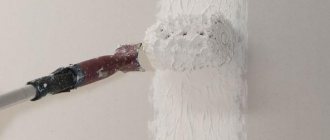
When the work is completed and the wall is leveled, you need to wait for the mixtures used to dry completely. This will take 2-3 days. Then you should putty all the joints. All places where gypsum from plasterboard protrudes must be covered with putty or acrylic sealant. This is done so that moisture does not penetrate into the sheet and it does not swell in the future.
Since no self-tapping screws were used, there is no need to putty them, which is a definite plus. Everyone will decide for themselves what to do next with a flat and smooth surface. The choice should depend on what finish will be used.
When is the best time to use drywall?
If repairs have already been completed in all other rooms of the apartment or house, it is preferable to use drywall, since working with it will not be accompanied by the formation of dust. It is better to use it if the walls need to be made more sound and heat insulating.
This material is also good because it will absorb excess moisture and release it into the interior atmosphere of the room, if necessary. Therefore, plasterboard is also applicable in cases where it is necessary to regulate the humidity level. Sheet material is also “prescribed” when the design of the room is supposed to be supplemented with curved structures. The final application recommendation is the speed of work. If you're short on time, drywall is for you.
Leveling wooden walls
I would like to separately consider the question of how to level walls with plasterboard in a wooden house. Usually in this case the walls are almost flat, so you can work using the first method. However, wood has its own nuance. You can use less adhesive, and additionally fasten the sheets to the wood with self-tapping screws. Some people recommend using nails, but you can overdo it and drive them in too hard, bending the drywall.
Self-tapping screws should be used carefully. They are driven flush with the gypsum board, but the screw will first attract the plasterboard to the maximum, and then only “drown” into the sheet. Therefore, it is worth considering whether it is necessary to use self-tapping screws in this case.
Also, do not forget about special primers for wood with antifungal additives. Before leveling work, the wooden base itself must be covered with a special waterproof mixture to prevent rot and mold.
Which profile to choose for drywall - advice from craftsmen
For a person far from construction and repair work, the specific terms that sellers of the relevant stores and specialists use when choosing metal profiles may seem like gobbledygook.
Agree, the words “pawns”, “udeshki”, “tsedeshki”, “crabs” are some kind of nonsense, and in general, are they really different from each other?
There are a lot of profiles, I guess.
It’s a piece of metal, and in Africa it’s a piece of metal.
But as it turned out, the profiles really differ from one another in at least three parameters:
In order to understand the issue of choosing metal profiles, this instruction was compiled. From it you will learn not only how to choose a profile for drywall, but also what tools you will need for the job, as well as useful tips and little tricks when working with these materials.
Materials and tools
To eliminate the curvature of the wall using gypsum board sheets without using a frame, the following materials will be required:
- GKL sheets, thickness from 8–12 mm.
- Adhesive mixture.
- Serpyanka.
- Primer.
- Dry gypsum powder.
To carry out the work you will need the following tools:
- Spatula: wide (200 mm) and narrow (40 mm).
- Rubber mallet.
- Roulette 5 m.
- Pencil.
- Typically, a length of at least 2000 mm.
- Construction knife.
- Level.
- Brush, roller.
- Twine.
- Container for preparing the adhesive mixture.
Before purchasing materials, it is necessary to make accurate measurements of the area of the walls that will be leveled.
The fastening of plasterboard sheets using the frameless method is carried out in steps, so you should estimate the location of the material in advance, transferring the dimensions to the drawing.
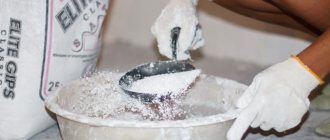
Preparing the mixture
The technology for preparing adhesive compositions is reflected on the packaging of any material. Manual mixing of gypsum-based materials in large volumes is not recommended - it will be difficult to achieve the desired result. A high-quality mixture is prepared using a hand mixer or a regular electric drill with a special attachment.
The finished mixture should not have clots or dry suspensions. The consistency of thick sour cream is considered optimal.
Most materials for gluing gypsum board sheets retain their properties for 60-90 minutes, so it is necessary to calculate the volume of the prepared adhesive mixture and the speed of working with drywall.
The final strength gain of the adhesive mixture occurs within a week.
Types of profiles for plasterboard partitions (video)
The frame for the partition made of profiles is securely attached to the floor and ceiling, the surface is perfectly flat. The doorway has the same width along the entire perimeter, which facilitates the installation of doors. There are a great many options for further finishing of a plasterboard partition, so such a wall is in no way inferior to brick walls.
How to treat the surface → Room decoration → How to choose the right paint → Surface treatment technologies → Leveling and finishing the walls → Selecting and applying a primer → Removal from the surface → Stretch ceilings and technologies → Reviews and testimonials