Today, apartment owners in multi-storey buildings are increasingly moving away from standard home finishing methods. New materials are appearing on the construction market that are not inferior in performance properties to proven products. In the bathroom, instead of tiles, the walls are increasingly covered with moisture-resistant, odorless paint. High-quality compositions are able to retain their positive properties for a long time. Thanks to the variety of shades of such materials, any room design can be chosen.
The methods of painting bathrooms are also quite diverse. This is due to the cheapness of the material. Its price is significantly lower than what modern tiles are sold for. However, you should not pay attention to overly expensive formulations. It is better to learn more about reliable and proven products. What kind of paint should be for the bathroom and what is better to choose for your apartment - you should understand in more detail.
What paint to paint the bathroom
Not all areas of the bathroom can be painted. Walls that will not come into contact with running water and various detergents can be painted without fear. However, areas that are located directly near the bowl and sink are better tiled.
The basic rule that applies when choosing paint for the bathroom is that it must have moisture-resistant properties. In addition, it is better to choose formulations with antibacterial protection. Thanks to this property of the paint, it will counteract the development of various microorganisms. Such rooms should be painted with the following colors:
- Water-based, odorless bathroom paint. It is developed on different bases, including silicone, latex and acrylic.
- Chlorinated rubber bathroom paint – it is often used in the construction of swimming pools and does not promote moisture penetration.
- Oil paint for the bathroom - it was used in the last century for painting walls. However, it may smell unpleasant even after some time has dried. In addition, it can become covered with cracks during operation. This property makes it difficult to remove paint during repairs.
Such paints have many positive properties and disadvantages, so each type of coating needs to be considered in more detail.
Features of paint for wet rooms
Wet area paint is advertised as a special type of paint product, different from the usual paint product used for home interiors. In fact, some manufacturers or sellers do not separate regular interior products from specialized ones.
For painting, wall paint in wet rooms can be completely ordinary, but then, if you want the coating to last and last a long time, you need to follow at least a few rules:
- the quality of the product must be very high; you should not expect high quality and moisture resistance from a large ten-liter bucket with a low price;
- paint for walls in wet rooms must be waterproof and have a water-repellent effect;
- direct contact with water is not recommended (for non-specialized products);
- exposure to and ingress of water at elevated temperatures is not recommended;
- if we are talking about the bathroom itself, then there must be good and proper ventilation or regular airing;
- there should be no accumulation of moisture on surfaces, especially in corners;
- steam generation is not recommended.
If you decide to buy Flugger wet room paint, we recommend that you purchase specialized products that will meet all the necessary performance requirements in areas with access to water. The Flugger company has developed a special product that can withstand not just splashes, but can be used to paint any surfaces where there is constant exposure and interaction with water - Flugger Wet Room Paint.
Water-based compositions
For bathroom walls, an excellent option is to use water-based products. When choosing such paints, it is necessary to study their properties in detail. They are divided according to the component that is the basis:
- Acrylic. Odorless paint based on this material is very often used in bathrooms. The solution perfectly envelops the surfaces of the walls. The composition has a low price.
- Latex. After this component dries, a film is formed, which allows you to protect the treated surface from various types of contamination.
- Silicone. Compositions based on it are among the most modern. They are distinguished by moisture-resistant and vapor-tight properties. Most often it is used when finishing the facade. Such paints for bathrooms are being used more and more often.
- PVA. This type of paint is inexpensive. It is used more when renovating dry rooms and creating ceilings.
Advice! It is better to choose water-based compositions, latex and acrylic bath paints for the bathroom. They are more capable than others of protecting wall surfaces from moisture.
Pros and cons of painting bathroom walls
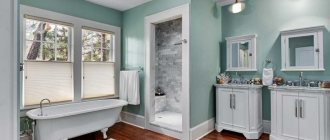
Painting the bathroom ceiling or walls has its positive and negative sides. To make a final decision whether to choose this finishing option, you should study these points. Among the advantages are noted:
- Simplicity of the process and the ability to quickly update the coating;
- You can use decorative elements to obtain an original design;
- Wide range of shades and textures.
Disadvantages of coloring:
- In the absence of high-quality ventilation, fungus and mold may appear;
- The ceramic material provides more protection against moisture than the paint layer.
You can use decorative elements to achieve an original design.
Advantages of water-based paints
The use of such compositions is more reasonable when performing finishing work in the bathroom, since they have many advantages:
- Such paints are harmless to humans. This applies to both the time after painting and the application process.
- Ease of operation. You don’t need to spend a lot of time and effort to cover the walls.
- Uniformity of the applied material.
- High drying speed of the composition.
- There is no unpleasant smell.
- Due to the long service life of such compositions, you can forget about finishing painted surfaces for a long time.
- Ease of care. This property allows you to forget about using expensive cleaning products.
- High antibacterial protection.
Such advantages indicate the high versatility and reliability of water-based compositions.
We extend the service life of acrylic coating
The acrylic coating is resistant to scratches and cracks, but it is extremely sensitive to major damage such as breaks. Therefore, handle it as carefully as possible, avoid strong impacts on the surface, and wipe everything dry after each use.
Also, do not allow the surface to become heavily contaminated, because abrasive agents, as noted earlier, cannot be used. A solution of dishwashing detergent or simple washing powder does the job perfectly. Do not soak laundry in the bath with bleach; also avoid salt baths, as they contain a lot of dyes. Finally, do not allow aggressive chemicals to come into contact with the restored surface, as this will inevitably lead to damage to the entire structure.
As a result, we note that restoring a bathtub with acrylic paint is quite simple, the main thing is to buy only high-quality material and strictly adhere to the manufacturer’s instructions. But if you are not confident in your abilities or do not want to do everything yourself, then it is better to turn to qualified specialists. Read how to choose the right acrylic bathtub on the website.
Selecting a shade
When the choice of bath paint is made, you can decide on the shade of the composition. Most hardware stores have machines that can create the desired tone. If you wish, you can create the color yourself. To do this, bath paint must be mixed with a color of a certain tone.
The choice can be made depending on the size of the room. For example, small bathrooms should be painted in light shades. Such walls will fit perfectly into the overall interior. For larger rooms, various experimental options can be chosen. It’s great if the walls are painted in contrast. However, the location of household appliances and hot tubs should also be taken into account.
Advice! It should be remembered that water is better visible against a dark background.
Many apartment owners do not understand which surface to choose - glossy or matte. However, such a decision can significantly affect the overall appearance of the room. The gloss shines beautifully, but can only be chosen in the case of very smooth walls. Matte surfaces turn out to be more versatile. Under them you can hide various imperfections of the walls. At the same time, matte paints are more easily damaged by an accidental blow.
Manufacturer
There is one condition that makes it possible to choose high-quality bath paint. It can be purchased quite easily. Such compositions are usually purchased at regular hardware stores.
It is worth highlighting several companies specializing in the production of moisture-resistant paints for bathtubs. The following manufacturers have performed well in the modern market:
- Tikkurila. This famous Finnish brand quickly gained popularity among Russian consumers. This company has quite a lot of production experience. In its assortment it is quite easy to find bathroom paint, as well as a base with water-repellent properties.
- Dulux. This company is a world leader in paint production. It offers products at a relatively low price, but with fairly good performance properties.
- Jobi - a German manufacturer offers customers very high quality paint. However, the price is decent.
- Tex. The Russian company has in its assortment compositions from the budget line. Tex paints fit perfectly on the surface of the walls in the bathroom. However, first it needs to be treated with a primer.
When choosing such options, you can not only update the room profitably, but also make it more comfortable. This opportunity opens up thanks to technology. Particular attention should be paid to preparation for work and the painting process itself.
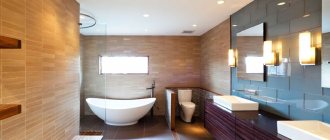
Colors and textures
When choosing, pay attention not only to the protective properties, but also to the color and texture. You can get a beautiful design if you skillfully combine shades. Paints have different effects.
You can get a beautiful design if you skillfully combine shades.
Matte compositions
It is distinguished by aesthetic beauty and is used more often in modern design. The surface will look more impressive. Although not as stable as glossy.
It is distinguished by aesthetic beauty and is used more often in modern design.
Glossy texture
Such coatings withstand mechanical stress better than matte options. However, they highlight the smallest flaws in the base, for this reason they need to be applied to well-leveled walls.
Such coatings withstand mechanical stress better than matte options.
Invoice products
Textured materials will create an unusual interior; the coating looks beautiful and impressive. Also, the paint will be able to cover the imperfections of the base, so you won’t have to carefully level the surface.
Textured materials will create an unusual interior; the coating looks beautiful and impressive.
Preparing for coloring
Before painting, certain preparatory measures should be carried out. They are very important. Even latex compositions for the bathroom cannot hide various unevenness of the walls. Because of this, the finishing process becomes significantly more complicated.
The procedure is divided into several stages:
- First, the old coating is removed. For this purpose you need to have a grinder and a flexible disk. Solvents, a sander, and a scraper are used as additional tools.
- You can remove dust with warm water.
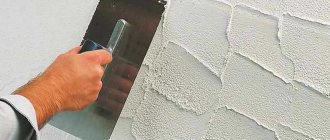
- All wall defects that are found are covered with acrylic-based putty.
- If fungus is detected, the wall is treated with bleach.
- After preparation, the wall is treated with a primer. It is usually applied in 2 layers.
Each stage of preparation requires certain attention, so the instructions must be followed strictly.
Selection of tools
Various tools can be used to paint walls - a spray gun, a roller or a brush. Unscented bathroom paint can adhere perfectly to walls using any of the suggested tools. However, when working with each of them, certain subtleties must be observed:
- When working with a brush, the surface is covered with the coloring composition more densely. This ensures greater material consumption. The cost of construction brushes is very low, and you can buy them at any construction supply store.
- The composition is applied with a roller quite well if the surface is smooth. The paint is distributed in a thin layer. This allows you to save on material. However, when working on corners, you should use a brush. If walls are painted with water-based compositions, felt rollers should be used.
?Advice! The width of the roller should be selected based on the area to be painted. The larger it is, the wider the roller should be.
- The sprayer is able to paint the surface very evenly. However, it requires some preparation. After using the device, you must rinse it thoroughly.
If you are painting a small area once, it is better to use a brush or roller. In addition, they can be easily washed from water-based paint.
Tool for the job
Tools for painting can be brushes, rollers, or spray guns. If the area is large, then using a spray gun is advisable; in other cases, its cost is not justified. You need to dilute the paint for the spray gun to a more liquid state.
Brushes are necessary for treating hard-to-reach areas; rollers will allow you to paint the ceiling without using a stepladder. There are paints in spray cans, but they have a small volume, so they are only suitable for small jobs, for example, what you can use to paint an acrylic bathtub.
Brushes are necessary for treating hard-to-reach areas; rollers will allow you to paint the ceiling without using a stepladder.
What to putty on
Two types of putty solutions are suitable for the bathroom: water-resistant cement and polymer moisture-resistant. The use of gypsum is not recommended; they are destroyed by exposure to even a little moisture.
Two types of putty solutions are suitable for the bathroom: water-resistant cement and polymer moisture-resistant.
How to plaster
Plastering agents are also selected with water and heat resistance properties. An economical option would be cement types, which are also suitable for laying tiles on the surface.
An economical option would be cement types, which are also suitable for laying tiles on the surface.
How to level
If the walls are very uneven, then profile strips are erected to eliminate deviations. You can also use plasterboard sheets, but they must be of a moisture-resistant type, or additionally protected from exposure to water.
You can also use plasterboard sheets, but they must be of a moisture-resistant type.
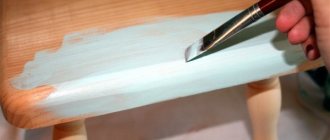
Painting
When the surface of the walls is prepared, minor painting work remains. Such a process can be captivating after just a few minutes of work. However, it is worth remembering that not every paint is suitable for the bathroom.
The procedure is quite simple:
- It is necessary to apply the coloring composition to the surface in a double layer. The first part can be diluted with water. Moreover, its percentage should not be less than 15% of the total solution.
- Excess is removed from the tool. This condition must be observed so that they do not end up on the wall. To do this, use a special tray equipped with grooves. First you need to pour paint on its bottom. Then the roller is moistened in it and rolled out onto the tray. If you ignore this advice, unsightly smudges will appear on the walls.
- To prevent waterproof paint from ending up in areas where it shouldn't be, you should resort to using masking tape.
- Painting the surface should begin with hard-to-reach places and corner areas. Then paint is applied to the entire remaining surface of the walls. If unevenness is found, the first layer must be applied with a brush. In this case it will be more dense.
- The second layer of paint is also done using a roller. This work must be done after the first layer has completely dried.
You can add variety to the painted areas. This work is done using various methods:
- Paint of a different shade is applied to the pre-marked squares. To form the boundaries of the lines, you will need to apply masking tape.
- Painting is done using stencils. They are usually bought in special stores. Such elements can be made with your own hands.
- An already painted surface can be finished with special stickers.
Advice! When buying white paint with color, you should mix it in large quantities. This is necessary so that there is enough composition for all the walls that are planned to be treated.
If you purchased several cans of paint, you need to mix them in one container. This is due to the fact that their shades may differ. If you compare jars, you may not notice this, but such a difference will be reflected significantly on the wall when the surface has already dried.
Painting walls is a fairly affordable and cheap method of decorating bathroom walls. By choosing this method, you can update your interior without any extra effort. It is important that water-based paint is of high quality. It should not be forgotten that careful preparatory procedures should be carried out first.
Is it advisable to paint everything?
Of course not. For example, glass is not painted with all compounds. It is more profitable and more aesthetically pleasing to provide inserts made of frosted, colored and other types of opaque glass (including acrylic). These glasses look very modern. Moreover, glass inserts can be combined, modified, and replaced.
Painting concrete is also rarely done, since concrete can be easily plastered with decorative compounds. As the original surface, concrete remains mainly in basements and cellars. In addition, due to the porosity of concrete, paint consumption increases.
There is practically no point in painting plastic and tiles. Painted plastic looks much worse, since only painting with thick paints can avoid streaks. When painting plastic, you have to increase the layer of coloring composition, and its durability on plastic will in many cases be minimal due to low adhesion. If the need for painting is great, then the plastic should be treated with emery cloth before painting.
Plywood (as an element of arrangement of covered balconies and loggias) can also be painted. Plywood is processed in the same way as wood. Since plywood often serves as a substrate for floors made of wood, laminate, etc., it is enough to paint it in one layer.
It is better not to paint wood (in particular, parquet) at all, but to varnish it. Well-dried wood is not prone to rotting, so it is easier to extend the service life of wood coatings using less drastic methods. In addition, old paint from wood is quite difficult to remove.
How to remove old paint
In order for the repair results to be positive and the painted surface to last for a long time, you must follow the advice of experienced painters. The surface is carefully prepared before work. If you want a quick-drying composition to perfectly hide surface defects, you need to figure out how to remove old paint from walls. This work includes several stages:
- First you will need to remove the previous layer of paint. To do this, use a flexible disc with sandpaper. Special solvents may be used.
- It is necessary to remove the dust that remains after removing the old surface. Warm water is used for this. The surface is then primed before applying paint.
?Important! It is imperative to prime the walls and eliminate unevenness with acrylic putty. This will create a smooth surface without defects. In addition, such walls will not be exposed to various contaminants. The long-term coverage will be impressive.
- Eliminate surface unevenness by sanding.
- Use bleach to remove the fungus.
- The walls should be treated with a latex-based primer. It is better to cover the surface in three layers.
When performing such work, you can perfectly protect the walls from various microorganisms. After completing each layer, you must wait until it dries.
Bathtub renovation with acrylic paint
The most unusual and at the same time the most useful way of using the paints described in the article. If the surface of the old bathtub is cracked and yellowed, then it is not at all necessary to buy a new one, because restoration work can be carried out using acrylic. As a result, the bathtub will look no worse than if it had been replaced with a new one.
There are 3 main recovery methods:
- put an acrylic liner;
- apply new enamel;
- apply acrylic paint.
Acrylic liners
Bathtub restoration with liquid acrylic
The latter restoration method has recently become increasingly popular mainly due to its undeniable advantages. Let's get to know them.
- The method is suitable for any bath. There are, for example, thin-walled bathtubs in which a liner cannot be installed, as this may cause the structure to become deformed.
- When the paint dries, the surface becomes even and smooth.
- There is no need to disconnect the overflow or drain when applying paint.
- The work does not require special skills or special equipment.
- There is no need to look for a model that fits geometrically, as is the case with the same acrylic liner.
- Acrylic hardens completely in a maximum of 3 days, while enamel takes about a week.
Acrylic restored bathtub
There are essentially no disadvantages as such, if you do not take into account the relatively high cost of the material. In addition, when using the bath after restoration, certain restrictions must be observed.
- Do not use cleaning products that contain abrasives.
- The painted surface must be protected from sharp objects, otherwise scratches may appear on it.
Now, having familiarized yourself with all the nuances of using acrylic, you can start working directly. The restoration procedure consists of several main stages, let’s get acquainted with them.
Stage one. We prepare everything you need
After purchasing suitable acrylic paint (the exact amount of material depends solely on the consumption of a particular brand, and there should always be a small supply left), proceed to a very important and responsible stage - preparation.
To begin, prepare:
- the paint you mix before applying;
- gloves, overalls, safety glasses, respirator;
- electric drill, a special attachment for it (grinding wheel) for removing the old coating;
- hardener specified by the manufacturer;
- soda (for degreasing);
- syringe or measuring cup;
- mixing spatula;
- watering can;
- containers for diluting paint;
- flexible spatula.
You also have to complete a number of preparatory activities. First, remove all auxiliary elements, i.e. drain and overflow of water. The installation/disassembly method depends on the type of bathtub, but often the work can be done with pliers and a screwdriver.
Prepare a set of screwdrivers for dismantling and installing drain grates
Place wide containers on the floor, directly below the holes in the tub, into which the paint will drain.
Prepare a container where the paint will drain
If the auxiliary elements cannot be dismantled, then simply insulate them with mounting tape, and then think about how to decorate them so as not to spoil the look of the entire bath.
Masking tape
Stage two. Preparing the surfaces
When everything is ready to go, start processing the work surfaces.
Step 1: Sand the previous layer first. Try to do everything as carefully as possible, because the reliability of the adhesion of acrylic paint to metal and the remnants of the previous enamel depends on this. For sanding, use an electric sander or electric drill with a grinding wheel.
Don't forget to remove the drain grate and trim
Surface preparation
On a note! During the work, the room will become very dusty, so do not forget about personal protective equipment.
Cleaned bath
If you don’t have the necessary tool at hand, you can resort to a more labor-intensive method of sanding - using sandpaper (the grit of the latter should not exceed 40).
Advice: if the bathtub has rust, use a converter after cleaning
Step 2. If local damage is found on the old enamel (deep chips and cracks down to the metal base), then it is unlikely that it will be possible to clean them by grinding. In this case, repair all these defects with quick-hardening automotive putty, and after hardening, thoroughly clean the treated areas with sandpaper.
Step 3. Next, carefully clean all surfaces from dust and dirt that remain after sanding. To do this, simply wash off all the dirt with water.
Step 4. Treat the bathtub with solvent to clean it of grease stains. As a rule, acetone is used for this, but if you wish, you can replace it with a solution of baking soda, diluted to a mushy consistency.
We also note that remnants of old enamel and insoluble dirt often accumulate in hard-to-reach places in the bathtub. You can clean such areas with acid. Upon completion of treatment, rinse everything off with hot water.
Stage three. Preparing acrylic
To obtain liquid acrylic, it is necessary to mix the hardener with the polymer base.
Liquid acrylic and hardener
For this purpose, pour the white mixture from the factory container into a mixing bucket. Make sure that no dirt gets into the mixture. Next, for a short time - no more than a few minutes - and slowly mix the mixture by hand, using a spatula or a small wooden block. Do this until you get a homogeneous mass. You can also use an electric tool, but this is not advisable at this stage, as air bubbles may appear when mixing quickly.
Mixing hardener and acrylic
Then, while continuing to stir the mixture, gradually add the hardener from the can into it. It is advisable to add in several portions, and after each of them mix thoroughly for about 2 or 3 minutes.
On a note! It is very important that the proportions specified in the manufacturer's instructions are strictly observed. In most cases, the hardener should be 9.5% of the volume of the acrylic paint itself.
After pouring all the hardener, mix the resulting mixture for at least another 10 minutes. Leave the finished acrylic for 15-20 minutes, after which you can proceed directly to painting.
It is also worth noting that the color of liquid acrylic paint can be changed at will. So, to obtain the desired shade, you can add color paste to the mixture, followed by thorough mixing. It is important that the color is no more than 3% of the total mass.
The procedure for mixing liquid acrylic for a bath
Stage four. Apply coating
The acrylic coating should be formed by pouring. Below is an algorithm of the required actions.
Step 1. The mixture will be distributed more evenly over a warm surface, so first fill the bathtub with hot water for about 15 minutes.
Step 2. Drain the water and quickly dry the surfaces with a hairdryer. Alternatively, you can use a dry, lint-free cloth.
Step 3. Pour the acrylic into a large container from which it can be easily poured in a thin stream. It is most convenient to make a special channel at the edge of the container, although you can use a watering can instead.
Step 4. Pour the mixture in a thin stream onto the edges of the edge that is adjacent to the wall. Push the acrylic under the cut of the tile using a rubber putty knife.
Acrylic pouring process
Do not skimp on acrylic, the layer should be of high quality, without drips or voids
Step 5. The technology for forming an acrylic coating is based on paint flowing under its own weight. Pour the prepared mixture onto the inner edge of the side, and it, in turn, will gradually flow down the walls.
Acrylic is poured onto the side and flows down the walls
Pouring acrylic and distributing it over the surface of the walls
The volume of material used is determined based on the fact that the thickness of the layer should be 5-6 mm, and it (the material) itself will reach approximately the middle of the bottom. While pouring the acrylic in a thin stream, slowly move around the perimeter of the bath until the circle is closed.
Pour acrylic evenly onto the walls
The photo shows the process of distributing black liquid acrylic
Step 6: Next, apply acrylic to the bottom. Make spiral movements with the paint container so that the entire surface is covered as evenly as possible. Typically, drips and sagging do not need to be removed, since they will disappear after the end of the process and during the curing period.
Step 7. If there are any uncovered areas, seal them with a flexible spatula (but in no case with a paint brush!). The excess mixture will flow through the drain hole into the container that you placed at the preparatory stage.
Restoring bathtubs with liquid acrylic involves applying acrylic to the surface and then polishing it. Layer thickness reaches 6 mm
Correct pouring of liquid acrylic
The coating will harden in approximately 8-24 hours, the specific timing depends on the brand of paint. This indicator must be indicated in the manufacturer's instructions. You can put the grate on the overflow before the material dries, while on the drain - only after the paint has hardened. 48 hours after pouring, you can begin to fully use the bathtub.
Bathtub restoration before and after
Video - Filling a bathtub with liquid acrylic
How to restore a bathtub with liquid acrylic is described in detail below.
How to remove old paint
You can find many recommendations regarding the use of various tools for removing old coatings. It is most effective to choose the following:
- Special chemicals applied to the wall being treated. Each chemical element has a rather specific smell, so when cleaning the bathroom you need to use a mask.
- Curling iron or hair dryer. This method of removing old coating is quite traumatic. In addition, the heated surface becomes a source of toxic fumes.
- Electromechanical method. When choosing this method, use a grinder or drill. Each of these devices is equipped with a nozzle. To ensure the highest quality result, it is necessary to select a special brush of the required level of rigidity. It is with the help of such a product that the old coating will be removed as quickly and efficiently as possible. However, this method is “dusty” and noisy.
Knowing these features of removing old wall coverings and their further processing, you can easily decorate your bathroom with odorless paint.
Reviews
User reviews can help you determine which odorless bathroom paint to choose. For example, the paint “Dulux Dazzling White” for the kitchen and bathroom is characterized by users as follows:
- Olga. The paint quality is good. Dries quickly, there is almost no smell. The ceiling in the kitchen needed to be painted. I chose this brand intuitively because I heard flattering reviews about it. To paint the walls, I added color. The paint color is really white, even snow white. If you paint a large area at once, the smell is noticeable, but quickly dissipates. I used a roller for the job - painting the ceiling was convenient and quick. The only drawback of the paint is that it is too expensive.
- Alexandra. I was choosing paint for the interior decoration of a country house. I bought the paint on the advice of friends. The store was confused by the high price. But the seller praised the paint from all sides, so I chose it. Now I know for sure - I didn’t make a mistake. The color is somewhat silky, and the ceiling is easy to clean.
- Eugene. We were renovating the kitchen, so I decided to choose white paint color. I thought about taking such a composition so as not to update it for several years. I chose Dulux Dazzling White. I was surprised how thick the paint is. Lays down smoothly and has almost no odor. And it dries very quickly. The only thing that was a little disappointing was that the price was a bit high.
As you can see, reviews about this product are more often positive. This is explained by the high demands placed on modern paints and varnishes.
Recommended Posts
How to paint walls with water-based paint without streaks
Quick-drying floor paint
Mixing colors
Decoding paint markings
Wood varnish for exterior use
Paint for painting on walls
How to choose the right paint material
How to choose the right enamel for your bath
In order to find out what is the best way to paint the bathtub, you need to determine the degree of damage to the plumbing and the appropriate type of paint and varnish products. Many people wonder: how to paint the inside of a bathtub if the damage to the enamel layer is significant (there are deep chips and cracks).
- Firstly, in such a situation, plumbing needs to carry out thorough preparatory work.
- Secondly, in order to achieve smoothness of the previously primed surface, and in this case it is simply necessary, the paint for painting the bathtub must be thick.
Conclusion: Answering the question of what kind of paint can be used to paint a bathtub, it is worth saying that latex and two-component enamel materials are best suited. In the second option, the composition is diluted with a hardener, so the consistency of the paint should be thick. Such paint for bathtub repair will help hide minor defects and uneven surfaces of the plumbing fixtures.
A frequently asked question from consumers is what paint can be used to paint a bathtub if the surface of the plumbing fixtures has become matte?
If the inside of your plumbing fixture does not have any flaws, except for the lack of a mirror shine, this only indicates that the plumbing fixtures have not been properly maintained. Most likely, the enamel surface was exposed to acids or alkalis, so its top layer was simply “eaten away.”
Is it possible to spray paint the bathtub in this case? Yes, such minor damage can be easily repaired using paints and varnishes in cans, but you need to figure out what kind of paint to paint the bathtub with. Metal, cast iron, and acrylic plumbing fixtures can be treated with latex paint in the form of a spray, but enamel materials cannot be used to restore acrylic plumbing fixtures.