Why remove the window sill?
Reducing the width of the product may be necessary if for some reason it begins to interfere or the builders initially installed a structure that is too wide and inconvenient. Why might a window sill get in the way? The reasons may be as follows:
- We bought furniture that clings to the protruding part of the window sill: for example, there is a refrigerator near the window, the door of which opens towards the window sill.
- Another reason may be improper distribution of warm air; if the radiator is located under a structure that is too wide, the air accumulates under the window and does not rise upward, causing poor heating of the room.
- It may be necessary to remove the plastic window sill to replace it, for example, during repair work if the window sill has been damaged. When replacing windows, they change it too.
- It may be necessary to remove the product when insulating the structure. If you do this carefully, you won’t have to buy a new one; you can clean the foam from the old one and install it in place.
Removing the plastic window sill to reduce its width
Tips and tricks
If you plan to replace wooden products with modern windows, dismantling must be carried out in such a way that the window opening is preserved in its original condition.
Careful work will save extra time on leveling if the surface is damaged.
If errors are discovered after dismantling, they should be eliminated before starting the process of installing new windows.
Improperly installed structures provoke a violation of the tightness and lead to the appearance of drafts.
It is better to do without unnecessary destructive actions, that is, breaking out or cutting. These old windows can then be reused.
If you follow the rules and instructions, dismantling will not take much time and will not take much effort.
https://youtube.com/watch?v=kFN3J-XOrHc
Ways to remove the structure
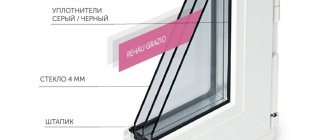
Removing a window sill from a plastic window is a simple task that can be done by an amateur if armed with a simple set of tools and patience. First of all, you need to remove the trim, if any. If they are made of plaster, then using a drill or other tool you need to carefully knock it off in the area of the window sill. Carefully inspect the structure: old window sills may not hold very firmly and may wobble; this will make dismantling much easier.
Cutting through the foam
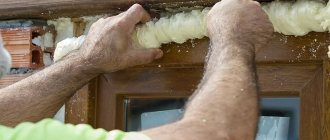
The joints between the structure and the window profile are usually filled with polyurethane foam. The window sill needs to be freed from it first. To do this, you will need a stationery knife; excess foam is cut off. If possible, raise the window sill, insert a metal saw blade under it and cut through the foam, being careful not to touch the plastic. In addition, under the window sill you need to destroy the old putty; a special cut is made for this. You can use a jigsaw to cut the window sill.
If you can’t lift the window sill with your hands, you can carefully push a crowbar under it: by creating a lever, you can easily tear it away from the remaining foam. After this, you can carry out all the necessary procedures. If the window sill is intact, it can be removed from the foam, the window opening can be cleared of it and other debris, and the part can be installed back.
Removing the window sill
Painting wooden windows
Most often, repair and restoration of wooden windows ends with painting. To do this, it is recommended to use special compositions that are well resistant to temperature changes and precipitation: oil paints, acrylic and alkyd enamels.
The coating must be applied in 2-3 layers
It is advisable to cover the windows with two or three layers of paint, spreading it as you finish. Optimal density will create a uniform, non-spreading layer. Initially, it is better to work with thinner paint. You should not try to immediately cover all visible defects on wooden windows, since the bulk of the initial layer will still be absorbed. The second layer is applied only after the first has completely dried.
It is advisable to paint the window frame with the glass removed. This will allow you to skip the unpleasant procedure of removing smudges. But if the glass has not been pulled out, then to protect it you can use a special masking tape glued close to the frame.
How to install the window sill in place?
Dismantling the plastic window sill is easy, the instructions for it are clear. But what to do with the installation of the structure, since you will need to install the part in place? To do this, first of all you will need to prepare the place by clearing it of old foam, which simply needs to be cut off; remove excess debris and dust. You can place the window sill on polyurethane foam, but do not forget that you will need to press it down on top with something heavy, otherwise the foam will lift the window sill and you will have to remove it again. Make sure that the foam is evenly distributed, this is necessary so that the plastic structure does not bend.
We put a press on it on the newly installed window sill
In order to secure the window sill, you can use any mounting foam sprayed from a can. It is not at all necessary to purchase a gun for this purpose, since you will need a little material, and this will only be an extra expense.
After the polyurethane foam has completely hardened, the press can be removed from the window sill. It is better to fill the voids of the window sill with putty, only after that install decorative plugs. This will help to insulate the structure. The joints between the frame parts and the slopes can be filled with PVA glue or polyurethane foam, but the excess will have to be cut off. You can also use plaster, especially if you knocked it down in order to remove the window sill.
If the product needed to be reduced, you need to cut off its excess length from the part that is adjacent to the window; this can be done conveniently using a jigsaw. Pre-measure the structure and carefully draw it out so that there are no distortions. Reducing the width will solve problems with furniture or installing batteries. You don't need to use a grille for ventilation.
Preparation
Before you begin, you need to clear the room of things and furniture, and, if possible, cover all surfaces with film or tarpaulin, leaving space for access to the work area. This stage is quite dusty, so the fewer items left in the room, the easier it will be to clean up after the work is completed.
It is better to cover the floor with film in several layers. In this case, it will be possible to wrap all construction waste in the top layer and take it out of the room.
Make sure there is electrical power in the room. Work is carried out with tools powered by the network.
Dismantling plastic window sashes
It is best to get rid of all unnecessary elements before starting work. Understand correctly, if it is winter outside the windows, then remove the glass as late as possible. Take care of the cladding and even the window sills first. But the work starts in the summer, and therefore there is no point in delaying this matter. Let's see how sashes and double-glazed windows in plastic profiles are removed. It must be said that this type of product is not very diverse. Whether it is balcony windows or doors, there are only two types of plastic profile cells:
- Hinged doors sitting on hinges. This also includes doors.
- Conventional “dead” plugs from double-glazed windows.
It must be said that the set can be anything, and the price depends on it. That is, all cells can be hinged or blind. The first ones are more expensive. The point is that the design is the same, but! It is easier to remove a hinged cell from its hinges, while it is better to remove a double-glazed window from a blind cell. It will be easier. Let's see how both processes are carried out.
The doors sit on two hinges. We emphasize once again that the design is of the same type, so what has been said is also true for doors. Whatever the appearance of the loop, it is all a prop in the form of a cover. The top one completely covers the rotary connection, and the bottom one is just a cap, on the side of which there is often a hole for an adjusting screw with a TORX head. Both covers need to be removed.
Now the axis of the upper loop is carefully knocked down. At first glance it seems that this is not possible, but in fact the steel rod is quite easy to tap. All this must be done with the sash closed. And when the rod falls out, the window swings open and the frame falls right into your hands. The main thing here is not to drop it and not get hit on the forehead with an edge. The dismantling of the sash is completed. If you also need to remove the double-glazed window, then read on, because this is what the entire “blind” cells of the plastic window consist of.
As in wooden frames, there are glazing beads. Somewhere it was said that they come out with a slight click, but this is not entirely true. You need to bend them, starting from any of the sides with a hard knife, helping yourself with a screwdriver, from the middle to both edges. Gradually the glazing bead bends in an arc, and its ends can be removed from the corners of the frame. The profile is hollow, equipped with a rubber gasket. It is better to sign each bead where it was located, because if you turn it over, you can insert it from the opposite side. It is, of course, better to mark from the inside.
So, they are removed smoothly, with light effort. And with a click, the glazing beads pressing the glass unit are put on. That is, their tooth has unequal sides. One is cooler. The screwdriver must be slotted and thick, otherwise the process will be significantly delayed. That's not all. There are defective spacers under the glazing beads. These are plates of different thicknesses, standing on platforms (rebated inserts) running along the perimeter of the frame. The design is so interesting that you won’t be able to remove the glass unit right away. It simply won’t give in, and if you press it, it can break.
The problem is that the glass unit is sealed with high-quality rubber, the friction force of which on the plastic pads is very high. But breaking, as they say, is not building, so the following algorithm is proposed:
- The platform (seam insert) with the plate moves along the perimeter to the point where it begins to sag. Let's say right away that this will not work for everyone. You need to patiently find the one you need, push it until it can move freely, and then carefully pry off the plate with a knife. It’s better to put on glasses before doing this so that glass chips don’t get into your eyes if something happens.
- Several plates are removed one by one, preferably from the sidewalls and the top; the bottom can be left untouched. We will understand if someone starts to help themselves with strong words. It’s really difficult to do without this here.
Architectural features
Balcony options
There are several types of structures. They differ:
- According to the form. There are ordinary ones (their outlines may differ slightly depending on the project, being straight, rounded or beveled), forged ones - with a metal openwork lattice (usually without glazing) and French ones, which are characterized by the absence of a platform. The latter type is more of a decorative decoration than a functional extension.
- By design.
A) Attached - typical for one-, two-story buildings or on the corresponding floors of multi-story buildings. The supports of this type are placed on the platform directly under the balcony.
B) Attached - as if built into the wall of a building using load-bearing consoles. The load on the wall is reduced due to the front supports. Also used at low altitudes.
C) Wall mounted ones are attached to the wall using special devices. This option does not require any additional supports, which allows such a structure to be placed on any floor.
According to the presence and method of glazing. There are glazed and unglazed (closed and open, respectively). In this case, glazed ones are divided into two subgroups - cold glazing and warm glazing. With warm glazing, double-glazed windows with high thermal insulation properties are used. Cold glazing is much cheaper, although it also provides basic heat and sound insulation.
What exactly does a balcony consist of?
The most universal structural elements are the platform, fencing and fastenings (supports).
Standard width parameters are approximately 0.8 meters, lengths are about 2.5–3 meters, depending on the type of building.
The height of the fence for a building up to 30 m high is not lower than 900 mm.
If the building is taller, the height of the fences should also be increased by another 100 mm.
Types of loggias
Design features are divided into three types - built-in, remote and corner. The built-in structure is closed on three sides. The base slab is supported by load-bearing walls. The extension rests on the beams of additional walls. The corner is closed on both sides. The possible dimensions of the loggia are mainly limited only by its type and design features of the building.
Removing plastic window cladding
The elements of the internal cladding of a plastic window include:
- The slopes cover the cross section of the wall in the area of the window opening from the sides and top. They are usually made of plastic, although no one prohibits the use of laminate scraps, MDF panels and other materials for the same purposes.
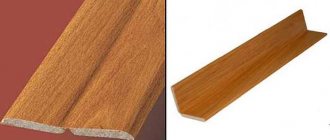
- Platbands. These are corner elements at the internal junction of the room wall and slopes. They serve a purely decorative function, hiding the sheathing underneath.
- The starting profile is adjacent to the perimeter of the plastic window frame and serves to fasten the slopes on one side. It is a profile in the shape of the letter P, one of the legs of which is slightly longer than the other
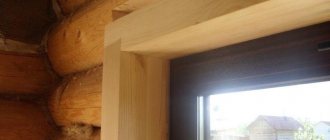
- The sheathing is laid along the inside of the perimeter of the window opening. And it is used to fasten the side of the slopes farthest from the window. It is made from a strip of such thickness that the slope fastening screw fits inside. Mounted on the wall using dowel-nails (concrete). In the case of a log house or glued beams, you can do without this element. In this case, the profile shape of the platband changes to angular.
It is logical to continue dismantling plastic windows by removing elements of the internal cladding. As we indicated above, in winter you can even start with this step. The platbands come off first. They are usually held together with silicone glue and do not fit very tightly. They themselves typically represent an F-profile. The slopes are unscrewed next. Heads are either cross or TORX. Both are easy to find today at the market or in a store. Go for it.
The sheathing needs to be torn off only if it is no longer needed. That is, the windows are installed wooden and using a completely different technology. If you are not sure, then it is better not to touch the dowel-nails, but simply continue working without touching the bar around the perimeter of the window opening. The starting profile is the easiest to remove. Often attached with half-cylindrical screws to the frame. We recommend that when dismantling the entire internal lining, you mark the parts from the inside, so that you can then carry out the installation in a new location without any problems. If the outer section of the cladding or frame is accidentally painted, then using solvents from the Cosmofen line, the problem can be quite easily resolved. The main thing is to use gloves, and for long-term work, a respirator. Not a construction one, but a real one, which protects against harmful fumes, so that the dismantling of plastic windows does not end sadly for the master.
Removing a window sill is often a special concern because in some cases cement mortar is used during installation. But the cheap option usually involves the presence of glue or foam. So take a knife, a chisel, and get to work! A crowbar will also come in handy. To avoid breaking the window sill, start pulling it from the center, tearing it off and moving to the sides gradually and in both directions at once. Before dismantling, you can remove the side plugs. Let’s immediately say a few words about the external window sill of a plastic window. Usually it is attached with ordinary screws. Take a cross-head screwdriver in your hands and begin dismantling.
Repairing window slopes with your own hands - myth or reality?
Required tools and materials
So the issue with windows began to be resolved. But the installation of such structures will one way or another make you rack your brains about how to repair the window slopes with your own hands in a timely manner. Don't worry - we will help you with this!
Repairing window slopes – it’s possible to do it yourself!
This is proven by numerous examples that can be seen on the Internet, when the question “how to repair slopes on windows?” ordinary apartment owners boldly demonstrate their skills. You too can cope with such a task on your own! So, let's start with the fact that the process of finishing the slopes is essentially the last, final stage - it comes after installing the window profile and, if specified by the customer, then the window sill. We offer you a major repair of slopes - an option when it is not possible to cope with minimal effort. So, let's start working with slopes that cannot be cosmetically restored and require complete replacement.
How to repair window slopes with your own hands - step-by-step diagram
Step 1: Prepare the work area
Most likely, by this moment you can see pieces of foam (this is polyurethane foam) and the mounting plates are visible to the naked eye. But that’s okay – let’s get down to work with confidence. So, using a knife, we make something like hollows in the foam - about 1 centimeter in width and depth. Having made such indentations in the foam next to the window (you will have to apply this along the entire perimeter), you can later install the slope itself without any problems.
Step 2: Installing the slats for finishing the slopes
Next you will need a strip, screws, a wood saw and a regular tape measure. Using a tool, a construction tape is best suited here, we take measurements. Then we install the rail in its place and fix it using a hammer drill and self-tapping screws (four will be enough for a medium-sized window). Just don’t tighten the screws all the way at this stage. The rail itself should run clearly along the edge of your wall. After we have secured the first rail, we move on to those on the side. Now we measure the distance from the window sill to the already installed top rail, cut off the required piece and fix the next one - again we also do not completely screw it onto the screws. And so on until we reach the end.
Step 3: Level the slats
Now it’s the turn of the building level - with its help we set up all the slats. Now you understand why at the previous stage the screws should not have been screwed to the base. It is better to start working with the level from the top rail. Now you can tighten the screws all the way. Experts advise using pieces from the slats to line the resulting cracks. In this case, it is best to do this maneuver in close proximity to the screws - this will help avoid deformation of the rack. The next stage is to apply foam around the perimeter, which will allow the rail to avoid bending.
Step 4: Install the profile
In any case, you will need to install the profile - this is necessary so that the plastic slopes rest against our profile. You can buy the profile in construction stores. By the way, you can also buy decorative corners there. When choosing corners, it is better to take those that snap into place, since they are stronger than regular ones (adhesive). It is also necessary to start working with the profile from the top rail. To do this, we measure the distance at the very top of the window, after which we cut off the profile of the size we need and use the latch (nose) to direct it towards us. We apply it to the rail and fix it with a stapler. We do the same with the side profiles. Advice - to be able to snap the corner, it is better to fix it with a stapler quite often.
Step 5: Working with sandwich panels
In order to get the correct plastic slopes, you will have to purchase sheets of “sandwich panels”. We need to measure from the recesses that we made in the foam to the end of the profile (latch nose) and compare the numbers, taking into account the readings of different angles (right and left). Advice - you need to subtract about 5 mm from the values, this will make it more convenient to snap the corner. Once the dimensions are obtained, we transfer them to the sandwich panels. You should end up with a regular rectangle. Now we take a pre-prepared saw that works with plastic and cut out our version of a plastic slope. Advice - it’s better to cut it off and measure it in order to bring it to the required size on the spot, rather than overdo it and throw it away. The slopes should fit tightly into place.
Step 6: Fixing the slopes
To fix the slope, we use small nails that should be driven into the rail. The deepening of the plastic slope should be about 2 centimeters. Next, you start by measuring the side slopes. Advice - it’s better to experiment with a material such as cardboard so as not to make a mistake. Once all the measurements are ready, we take a marker, plastic corners and a tape measure, as well as a plastic saw.
Step 7: Working with Decorative Corners
Now you need to measure and saw off the corner, and it should extend beyond the window by 5–6 cm (on each side). The inner part of the corner must be adjusted so that it can fit particularly tightly to the side slopes. Working with the side corners will also require you to leave some margin. The corners should be snapped together carefully so that they do not accidentally burst right in your hands. After fixing the corners, take a knife and cut the plastic along the guide.
Step 8: Finishing work
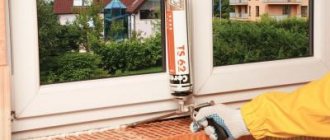
In order to cut plastic with a construction knife, you will need to run it several times. The plastic is quite dense and usually this maneuver does not work the first time. After this, you need to go over the entire window and along the existing joints with silicone. All cracks should be sealed. To avoid getting the window profile too dirty, use a damp cloth.
Dismantling window blocks
When removing the window block of an already installed plastic window, it will not be possible to knock out the spindle, since they have slopes that will prevent this action from being performed. This requires pulling out the spindle from below. For this purpose, you can use ordinary pliers.
Before you start pulling the spindle with pliers, you need to press something flat on top of the spindle. For this purpose, you can use a chisel or a wide screwdriver.
After you feel that the spindle has moved, you need to pull the second spindle from below with pliers.
When removing a window block from the outside, you must first remove the glazing bead that blocks it. To do this, you need to insert a chisel between the bead and the frame and knock it out as carefully as possible. Initially, the vertical bead is knocked out, and then any other elements.
To control the mobility of the glass unit, the top bead is removed last. After removing the glazing beads, you must gently press on the window block. This step is the last stage of dismantling.
Requirements for the installation seam
Assembly seams of junction units of window and door units are made in accordance with the requirements of GOST 30971-2012 according to design and technological documentation approved in the prescribed manner (clause 5.1.1 of GOST 30971-2012).
Options for constructing an assembly seam according to GOST 30971-2012 are shown in Figure 2.
Figure 2 GOST 30971-2012 - Construction seam option
Conventions used in the figure:
- I - outer waterproofing, vapor-permeable layer;
- II - central heat and sound insulating layer;
- III - internal vapor barrier layer;
- IV - additional water and vapor barrier layer.
Requirements for the dimensions of installation gaps are established in section 5.2 of GOST 30971-2012.
According to clause 5.2.1, the minimum dimensions of installation gaps for window blocks of various designs are taken in accordance with Table 2, Figure 3, as well as from the condition of ensuring the possibility of free thermal expansion of the window block without the occurrence of bending deformations of the profile elements.
Figure 3 GOST 30971-2012 - Location of installation gap
| a |
According to clause 5.2.3 of GOST 30971-2012, the deviation from the vertical and horizontal sides of the opening should not exceed 4.0 mm per 1 m.
The check is carried out in three ways:
- building level, while measuring the width and height is carried out at least three times;
- measuring the diagonals of the opening;
- laser plane builder.
In accordance with clause 5.3.1 of GOST 30971-2012, the edges and surfaces of openings should not have chips, cavities, mortar overflows and other damage with a height (depth) of more than 10 mm. Surfaces contaminated with oil should be degreased. Loose, crumbling areas of the opening surfaces must be strengthened (treated with binders or special film materials).
Removing a window sill from a plastic window
Dismantling the window sill of a plastic window is a simple procedure. Initially, it is necessary to knock out niches at the ends of the window sill, the depth of which should be about 10 centimeters. Niches are knocked out along the entire length of the window sill. A hammer drill can be used for this purpose.
Next, you need to knock out the window sill slab using a hammer drill. If the plate is not firmly installed, it can be removed by hand. The next step is to carefully remove the window sill from the niche. From the space that has formed, it is necessary to remove the remaining solution, dust and debris.
If there is no hammer drill, you can knock out the window sill with a chisel. Using this tool will require a lot of time and effort. That is why the master will need to be patient.
Technologies and materials used
When installing plastic windows, our installation teams use the latest technologies and the best materials. Our company uses the latest licensed development for sealing butt seams of its own production.
The use of this latest system when installing PVC windows allows for additional air exchange while maintaining moisture resistance. In addition, our specialists have extensive experience in successful complex installation of structures with additional frame structures and other complicating issues.
You can read more articles about windows here...
In what cases is the procedure necessary?
In houses and apartments from previous years of construction, old wooden windows are preserved. In some cases, further use of such structures becomes unacceptable. In this case, they will have to be replaced, and the old ones must be dismantled.
Low thermal insulation
If it becomes colder in an apartment or private house in winter, outdated structures are to blame. The wood dries out, cracks, and cracks form through which cold air penetrates from the street.
Bad appearance
After years of use, wooden products begin to lose their appearance, the paint peels off, and the material becomes covered with cracks. Updating them won't be easy. Just painting it won't make the cracks go away. Major renovation will be required.
Low sound insulation
Every year, wooden frames gradually move away from the platbands. The sounds of what is happening on the street are heard louder and louder inside the apartment. They will interfere with concentration at work and sleep at night.
The importance of correct measurements
The manufacturer usually offers the services of its own measurer. This service is free. The product is manufactured on the basis of a measurement sheet, where the measurer indicates all the necessary parameters. If, when installing a window, difficulties arise due to an incorrectly manufactured product, the manufacturer will bear responsibility.
As a rule, window measurements are carried out by the manufacturer
If the customer provides the dimensions himself, then at the stage of signing the contract for the provision of services for the manufacture and installation of plastic windows, he signs the measurement sheet, which is drawn up by the manager based on the provided dimensions.
With his signature, the customer confirms the correctness of the dimensions indicated in the measurement sheet, in his words, which means that if the window does not fit during installation, the customer will bear responsibility and all financial costs for remaking the product will fall on his shoulders
When taking measurements yourself, it is important to approach this matter extremely responsibly
Removing a glass unit
The first step when dismantling a plastic window, both in the case of fixed windows and casements, is to remove the double-glazed window, since it is the heaviest and most fragile component of the entire structure. This work must be carried out with great care and precision to avoid damage to the latter.
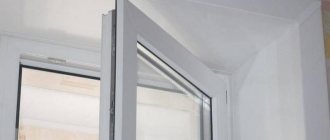
In the case of a sash, you must first remove it. Window hinges—the connections between the sashes and the window frame—are of several types. The most convenient for disassembling are the hinges of the usual design. You need to pull out the metal rod holding it from the top hinge of the sash, then, carefully lifting it, remove the sash from the bottom hinge. Removing the window in this way has the advantage that when the window is subsequently installed at its destination, there is no need to adjust it. If the design of the hinge does not allow you to remove the sash, or you cannot get to it, then in all cases you should unscrew the screws that secure the hinge to the frame and carefully remove the sash.
In the case of a fixed window, remove the glass unit, which is attached to the frame with plastic beads from the inside. Beads should be removed starting with the longest one. A small spatula with rounded edges is ideal for removing glazing beads. The tool must be carefully inserted between the bead and the sash, starting from the middle.
The glazing beads, as a rule, fit perfectly to the sash, and to each other at an angle of 45 0, but do not be alarmed, when lightly squeezing with a spatula, a gap will form. After removing the last bead, very carefully remove the glass unit. As mentioned above, a double-glazed window is the heaviest and most fragile component of the entire structure, so working with it requires special vigilance. If possible, use mounting suction cups.