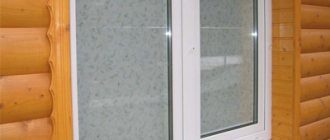
In the modern world, a person can choose the most comfortable place to live. Increasingly, the choice falls in favor of not only apartments, but also cozy country houses, where you can take a break from the bustle of the city and enjoy nature in comfort. Windows in a wooden house require a special approach to finishing, so you need to know how to make slopes for windows in a wooden house.
Installing PVC windows based on your own preferences and the size of the room is not everything. For maximum comfort and visual appeal, it is necessary to correctly select and install slopes and casing. Decorating windows in a wooden house in a certain style will highlight the design of the room inside the house and its facade.
Finishing window slopes in wooden houses
Korovin Sergey Dmitrievich
Master of Architecture, graduated from Samara State University of Architecture and Civil Engineering. 11 years of experience in design and construction.
In the modern world, a person can choose the most comfortable place to live. Increasingly, the choice falls in favor of not only apartments, but also cozy country houses, where you can take a break from the bustle of the city and enjoy nature in comfort. Windows in a wooden house require a special approach to finishing, so you need to know how to make slopes for windows in a wooden house.
Installing PVC windows based on your own preferences and the size of the room is not everything. For maximum comfort and visual appeal, it is necessary to correctly select and install slopes and casing. Decorating windows in a wooden house in a certain style will highlight the design of the room inside the house and its facade.
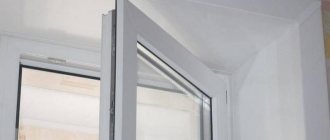
Fastening slopes to polyurethane foam
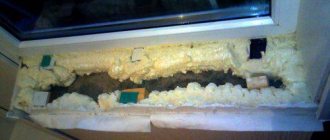
You can finish slopes using foam in a wooden house after 12 hours from the moment the window block is installed, since the foam needs to dry completely. At the end of 12 hours, you should begin installing the cashing and do not delay the work, since under the influence of moisture, temperature changes and wind, the foam can become loose and even begin to collapse.
It is recommended to install the slopes 12 hours after installing the window
You need to measure and cut the wooden planks to the required shape and size. The corners should be as straight as possible. Based on experience, it is worth noting that even with ideal design, a house cannot have two absolutely identical window openings: therefore, in each specific case, the design of slopes and casing will have certain features.
Having installed and secured the finishing strips at the corners of the frame, using self-tapping screws and a screwdriver, you should make sure that the corners remain even, since you will no longer be able to influence this in the future. The resulting opening must be foamed; the amount of foam must be taken into account, because its volume will increase by approximately 2.5-3 times. Any polyurethane foam that turns out to be excess is cut off immediately after drying using a stationery knife. The main thing is that after finishing the slopes in a wooden house and installing cashing, there are no cracks or holes anywhere for exposure to moisture or wind.
Installation of PVC panels in a blockhouse cottage
External window decoration made in a frame cottage with plastic looks respectable. It is easier to do than in a brick building. Initially the bevels are even and smooth
Window holes are carefully cut out. If the structure is made of rounded logs, then the process of installing PVC may be a little more complicated due to the uneven, protruding surface of the walls
How to make slopes on plastic windows from the inside in a blockhouse cottage:
- Fastening a special strip on a modular system. PVC panels will be installed in it. The walls of frame buildings are not thick, and the paneling will also not be wide. You can save on finishing and trim the bevels with one thick strip that will cover the entire edging.
- Plastic panels are mounted using self-tapping screws. They are screwed from below and from above with a screwdriver to hide them under the internal corners.
- Plastic windows in a wooden house are also finished at the top of the opening. When using several thin strips, they are attached using a groove and tenon system.
- The joints are filled with sealant. The slopes in a log house must be sealed; the timber absorbs moisture and gradually deforms.
After the finishing of the window slopes inside is completely completed, you need to move on to the plastic corners. They are secured using liquid nails and assembly glue. Internal parts can only be fixed in this way; elastic foam is suitable for external corners (to protect against insects, dust and moisture).
Installation work
In order for the external and internal finishing of window slopes to be reliable, everything must be installed according to the rules. Before you begin the step-by-step installation of wooden or plastic window slopes, you should check the quality of the materials. The finished surface will be smooth and without cracks only if you install plastic or wood that has not been subject to deformation. Exclusively with this option, external slopes will provide reliable protection for windows and openings.
Plastic panels are secured around the perimeter using self-tapping screws
To begin installation work with your own hands, you will need the following materials and equipment: slope strips made of wood or PVC, corners, screwdriver, sealant, stapler, screws. Having acquired all the required building materials and tools in advance, you can begin to work. Such instructions will be relevant for creating both external and internal cladding.
External finishing of slopes with plastic panels in a wooden house is not difficult work - this is due to the clear and even cut of window openings in such buildings, which means they are quite smooth.
Sheathing work using screws is carried out in this way: the external and internal finishing of the window usually begins around the perimeter by securing a strip, called the starting strip; the panel is mounted using self-tapping screws, which are screwed into the bottom and top of the entire structure using a screwdriver; this is necessary for maximum camouflage capabilities.
Following these instructions, you can install the panels at the top of the opening. If the width of the slopes to be finished is significantly greater than the width of the panel itself, you need to use several panels, the fastening of which occurs using the tongue-and-groove technique.
After installation is complete, you need to move on to securing the corners. They are installed using a special installation adhesive or liquid nails.
How to choose the right finishing element
The functions of a window sill are known, but not everyone knows why slopes on windows in a wooden house are needed. Slopes in a wooden house not only add completeness to the interior, but also provide a kind of protection for the materials used to install the plastic window:
- protect window frames and openings from water ingress;
- help cover the mounting foam, prolonging its service life for as long as possible;
- visually improve the appearance of the window.
Slopes prevent moisture from entering the window opening and frame.
Based on the type of window that will be installed (metal-plastic or wood), it is necessary to consider various methods for creating window slopes. There is a huge range of products on sale that will not only effectively protect materials, but also decorate the facade and the inside of the room. Materials for installing slopes must have several basic characteristics: moisture resistance, strength, practicality, long service life, ease of installation and dismantling. To install the slopes, you can hire specialists or make and install slopes on a wooden house with your own hands.
In a log house or timber structure, a plastic slope, as well as cladding inside and outside with wooden panels, will look harmonious. The most popular options for a log house:
- plastic;
- lining made of natural panels;
- tree.
The most practical material for constructing slopes is plastic.
Despite the use of a wide variety of finishing options, when choosing plastic windows in a wooden house, it is best to create the finishing of the façade window opening using practical materials that do not absorb atmospheric moisture. In the best case, PVC window slopes are recommended to be installed from plastic. In a house made of timber, you can make slopes inside yourself and choose the material based on your own taste.
Features of PVC and wood material
Finishing plastic windows in a wooden house with PVC slopes is a fairly popular option. This practical material will serve you for a long period of time; the plastic has an attractive appearance and is resistant to moisture.
Finishing slopes in a wooden house from the outside on the facade side will last for many years without losing its functions. The main advantages of plastic include the following:
- reliable protection of wood;
- resistance to temperature changes;
- variety of shades: from natural to bright;
- ease of care: without additional chemical cleaning agents, you can quickly remove dust and various types of dirt.
Plastic slopes reliably protect wood from moisture.
Wooden materials have their advantages:
- attractive appearance;
- natural material that does not cause allergic reactions;
- durable, has a long service life, subject to proper installation and maintenance;
- the ability to paint the slope in any color based on the color of the interior or facade of the building.
External window trim with siding
Vinyl siding is ideal for finishing exterior windows. It is presented in the form of hollow plastic panels that are attached to each other using special locking systems. The material allows you to quickly create an aesthetic coating that has a certain level of thermal insulation and soundproofing.
The slats do not require additional finishing or complex maintenance. As additional insulation, it is recommended to fill the space between the siding and the wall with mineral wool or foam, and decorate the joints with decorative corners.
Advantages of vinyl siding:
- DIY installation is possible;
- slopes are easily cleaned of dust and dirt;
- no fungal growths appear on the plastic;
- many color options;
- will last a long time if handled carefully.
Disadvantages of finishing slopes with siding:
- color change may occur with intense exposure to ultraviolet radiation;
- insufficient shock resistance.
Insulation
An important part of the repair work associated with the installation of slopes is the insulation of the window frame. Of course, you can do without this, but in winter it will be much colder in an uninsulated room
The following are considered as insulation:
- Styrofoam;
- penoplex;
- mineral wool.
Styrofoam
Budget insulation, which is in great demand among consumers. It is easy to work with, it costs a penny, and in terms of thermal insulation it is not much different from other competitors.
Penoplex
An expensive analogue of polystyrene foam, which differs from its “younger brother” in energy-saving properties. Among other advantages of the material, the following are noted:
- more dense structure;
- less tendency to absorb moisture.
Mineral wool
It is used in the case of insulation of frame structures, as it is extremely convenient to install
When purchasing material for insulation, pay attention to moisture resistance. Brands that tend to absorb excess liquid are not suitable for insulation.
Interior window decoration
Depending on the interior design used in the timber house, the choice of material for slopes and casing indoors will be determined.
The interior decoration of windows should be combined with the design of the room in which it is located. Source layout-lidea.ru
In interior decoration, the choice of materials is more diverse, since it is not exposed to the aggressive influence of the external environment.
Finishing options may include wooden lining and cladding, which is a classic in wooden architecture.
Not inferior in beauty and functionality to MDF panels, which are easy to install and have a wide selection of colors and textures.
A popular solution for finishing slopes are plastic panels. They are low maintenance, easy to install, and last a long time. They have a large selection of colors.
Internal finishing of slopes and casing not only gives a finished look to the window, but also protects the fastening elements and polyurethane foam from destruction when exposed to sunlight and changes in humidity. Any type of finish can cope with these functional tasks. The use of one or another option depends on the taste preferences of the customer and his financial capabilities.
Finishing windows inside a house made of timber is detailed in this video:
How to install casing
This is what the casing installation technology looks like:
- You need to cut a window opening in the wall; this is the most critical stage, requiring accuracy, compliance with dimensions (especially if the windows have already been ordered), checking the horizontal and vertical. The opening must be soaked with an antiseptic.
- Insulate the opening with jute tape. Why use jute tape - it is an excellent wind barrier in itself, and this material will also improve the sliding of a log or beam in the casing during shrinkage of the house. The jute is secured in the opening with a construction stapler.
Trojan1User FORUMHOUSE
The tow is stuffed only from the top; jute is laid from the sides under the casing.
Olegos33FORUMHOUSE user
Between the casing and the wall - tow/jute. Between the window and the casing - professional mounting foam.
- Select a groove on the sides of the opening, or, conversely, form a tenon.
The groove is selected for a T-shaped casing; its width should be 1 cm larger than the width of the casing tenon. The tenon is made for a U-shaped casing, and it should be a centimeter narrower than the casing groove (in both cases, you need to leave space for laying two layers of jute tape).
Master FORUMHOUSE user
I did this: a groove is cut out in the wall, a block is driven into it, wrapped in jutolene for tightness. A box is placed on the bars, and a foam window is already inserted into it.
- Mount a wind block on the bottom of the opening; it also needs to be insulated with jute fabric or an analogue. How to do this: lay a layer of jute, mount a wind block on it, and another layer of jute on it.
- Mount the window sill;
- Install risers;
- Mount the top;
- Seal the gap between the top and the opening with soft insulation. The size of the gap is determined depending on the material from which the walls are made. If they are from an array of natural moisture, the gap should be large, even 60-70 mm per linear meter of wall. If the situation is not so dangerous, then:
Serg89 Moderator FORUMHOUSE
You can increase it to 80 mm, and that’s enough.
The foam has very good adhesion to wood, so the gap is sealed with it when the house has definitely undergone shrinkage, and by this time the enlarged fence may disappear naturally.
You can also close the gap like this:
Olegos33 Member of FOUMHOUSE
You need tow and a pipe for thermal insulation of water pipes (approximately 100mm). You wrap the tow around the pipe (in a dense layer), push it into the gap (so that the pipe insert is compressed by a third) and stuff a little more tow (without tamping) into the upper part of the junction of the pipe to the wall and to the casing.
To fill the gap, you can take any materials common on the market: mineral wool, tow, flax wool.
The side gaps also need to be filled with soft insulation, and not foam - it will simply tear when the wall moves relative to the frame during shrinkage.
The house will shrink and press against the insulation for about 3-5 years, so during this period it is better not to install platbands on the side of the room in order to control the process, or to install them so that they can be quickly removed.
In frame houses they do not make staking.
When buying windows, you need to start from the size of the opening. The height of the opening is 120 cm - which means the frame is 116, so that there is somewhere to insert the sweet clover, a supporting plastic profile. It is necessary to check that the sweet clover is included in the package; it is needed to correctly install the window sill; You need to check the entire package and its quality so that there are no minor damages. Pins almost always have to be purchased separately.
Types of wooden slopes and their properties
The slope is part of the window opening both inside and outside the window structure. They are made from different wood species, as well as from cork oak bark, and their function is mainly to mask traces of installation of window frames, such as polyurethane foam and unsightly joints. High-quality and correctly selected, they can become a worthy interior decoration and a beautiful frame for windows.
Wooden slopes give the window nobility.
In addition to the decorative function, slopes for window openings function as a kind of window insulation, since they cover joints and cracks. So, let's look at the main functions that wooden window slopes carry:
- Provide protection against freezing. Wooden slopes can save you from poor-quality thermal insulation when installing windows, since they cover the gap formed between the frame and the window opening. At the same time, slopes significantly improve the thermal insulation of the room. Also, wooden slopes prevent the appearance of condensation on the window frame, because it is condensation that contributes to the formation of mold and rot.
- Protect from wind and drafts. Polyurethane foam used to seal seams when installing windows loses its properties when exposed to ultraviolet radiation and water, which is why it quickly collapses. By installing slopes, you can prevent the destruction of the polyurethane foam, which, in turn, will eliminate the appearance of drafts.
- They have high decorative properties. In addition to masking polyurethane foam, chips and joints, wooden slopes look very impressive in the interior and give the window frame completeness.
During the manufacture of wooden slopes, special glued boards are used, which are treated with special compounds to prevent exposure to the environment. To make slopes, it is recommended to use the same type of wood that was used to make window frames - in this case, both the color and texture of the window block will completely match, and wooden windows with slopes will look seamless.
Different types of wood, such as larch and pine, have different textures, and even if the same varnish is used to finish the window and slopes, the original color will still differ.
As a rule, wooden slopes are not installed on the same day as windows in a wooden house; this is done so that the installation foam has time to dry and become durable. At a minimum, 11-12 hours should pass between installing windows and wooden slopes. But it is not recommended to delay the installation of slopes, because environmental influences gradually destroy the polyurethane foam.
Manufacturing technology
Tools and materials
To install panels with our own hands, we need to use a whole arsenal of tools.
I usually prepare the following set for work:
Polyurethane foam is used for sealing
hammer drill with concrete drill;
- screwdriver;
- jigsaw;
- awl for MDF (hacksaw, disc or reciprocating);
- a breadboard knife with a long, strong blade;
- hammer;
- foam glue gun;
- level;
- roulette;
- pencil or marker.
I make the slopes themselves from MDF panels 10 mm thick.
In addition to decorative materials, I use:
For work we take fairly thin panels
- wooden slats for the frame;
- antiseptic primer;
- repair composition for concrete or brick;
- decorative corner overlays;
- platbands;
- "liquid Nails";
- self-expanding polyurethane foam.
Along with the installation of slopes, the installation of platbands is also carried out
Preparing the opening for installation
MDF slopes can be mounted both on the opening itself and on a frame made of wooden beams. The first technique is used relatively rarely: for its successful implementation it is necessary that the edges of the doorway be sufficiently smooth.
Measuring the opening
That is why I almost always mount panels of decorative material on a frame made of beams rigidly fixed to a solid foundation.
The work is carried out according to the following scheme:
- Using a hammer drill with a chisel attachment, I knock off pieces of old plaster from the slopes that remain on the surface after replacing the doors.
- I clean the walls of the opening from dust and debris, and then check for the presence of gaps and cracks in the load-bearing surface.
The lower part of the slope, ready for cladding
- If defects are found that reduce the strength of the base, I repair them using a cement-based or epoxy-based composition.
- To avoid the appearance of fungus or colonies of pathogenic bacteria, I treat all surfaces that will be hidden under the cladding with an antiseptic primer.
- Next, I install a frame made of wooden beams, also impregnated with an antiseptic, on the inner surfaces of the opening. I level the beams and fix them to the wall with express-installation dowels with plastic sleeves. To prevent the parts from moving, I hammer wooden wedges into the gaps between the frame and the opening.
Metal profile frame option
- Slopes for entrance doors and windows can be additionally insulated. To do this, I either put thermal insulation material in the cells of the frame (foam plastic is enough, but if finances allow, feel free to take mineral wool), or I blow out the space between the beams with self-expanding foam.
Installation of slopes
Now all we have to do is make the slope strips themselves and install them on the prepared frame.
I act like this:
- I cut out three blanks from an MDF sheet: two for the vertical parts and one for the horizontal.
- I apply the blanks to the opening and mark on them the lines along which the trimming will be carried out.
Part fitting
- I trim the parts strictly to the size of the door or window opening.
- I apply “liquid nails” to the underside of each panel, and then glue the MDF to the frame.
- I carefully align the panels, ensuring that the gaps between them are minimal.
Scheme for installing additional panels on foam
- Additionally, I strengthen the fastening with self-tapping screws, tightening them at the top and bottom. I hide the screw heads in pre-drilled secret holes, covering them with decorative caps to match the panel.
- I fill the gaps between the parts with either tinted wood putty or (if they are not wider than 1 mm) with transparent sealant. In the second case, I make sure that the sealant does not remain on the front surface of the slopes.
- I complete the finishing of the opening by attaching platbands to the ends of the slope strips and to the walls located next to them.
At the final stage we attach the platbands
This is interesting: The plastic door does not press well - we outline it in detail
Varieties
Plastered
Plaster is a traditional material for finishing a window opening. In its original version, the method was used to save money and in conditions of shortage of finishing materials. The process consists of leveling part of the wall using a primer, applying plasters and then painting the slopes. Thus, the slopes could become a full-fledged continuation of the walls, but at the same time they did not have a tight connection with the window frame. Because of this, after some time, cracks formed, and the thermal insulation was practically zero. The windows needed to be insulated from the outside, and not always using aesthetic methods - cotton wool, moss and even plasticine. At the moment, the technology for applying plaster mortar has changed a lot, and now this type of slopes is considered the best and most stylish option.
Drywall slopes
This method is quite economical, and also modern for cladding a window opening. Drywall retains heat perfectly, is inexpensive in itself, and its texture will be an excellent basis for applying any type of decor. Pieces of drywall are often left over after a modern renovation of a room has been carried out, and to save money they can be used as materials for slopes. Among the disadvantages, it is worth noting that this type of finish is unstable to dampness (if you use the usual option), and also has a tendency to deform at the junction of the wall and window.
Plastic slopes
This type of cladding is the most popular today. The plastic used for slopes can have different textures and modifications, and can also be used as decoration, or stylized to resemble any other material. Plastic panels are practical and durable, easy to install. Using thin sheets, you can hide all the ugly “insides” of the window opening - insulation, foam and missing pieces of the wall.
In addition, plastic can be easily washed using household products that are found in any home, and the material is not afraid of moisture and prevents drafts. Among the disadvantages, it is worth highlighting that it is expensive and also fragile at low temperatures in an unheated room. In the construction materials market, plastic panels are presented in variety and different shades. It will not be difficult for you to choose any shade of beige, white, milky color to match the frame, as well as any other pattern or color to match the wall, wallpaper or accent in home design.
Wooden slopes
What is even better for finishing the slopes of plastic windows inside? It is not for nothing that wood is considered an elite type for slopes, but also has a high cost and requires high-quality care. As a rule, wood panels are left in their original natural color, and then simply coated with a varnish. It makes sense to install wooden slopes as a continuation of a frame made of wood material, which in themselves will be indicators of respectability, or as a continuation of a brightly accented log wall. For example, this is an excellent option if the interior is made in a chalet, country or rustic style.
The main advantage of wood is its environmental friendliness, beautiful appearance, which is often called “warm,” and durability. Among the disadvantages, it is worth noting the high cost, as well as the requirement to follow special rules for caring for wood.
Cork slopes
Cork as a facing material has a number of advantages in the form of a high level of thermal and noise insulation, and it is also available in various natural shades and is very pleasant to the touch. But the high price of cork panels in combination with not very good durability, simple appearance and difficulty in maintenance is a huge disadvantage. Due to such circumstances, cork slopes are not so popular and therefore are extremely rare. But they can be taken as a pencil to develop various style directions indoors.
What materials are most often used for installing slopes?
Slopes on windows are not simply installed to hide all traces of installation; they are also used to isolate extraneous noise from the street, as well as for thermal insulation and eliminate fogging of windows. The basic rule is correct installation, otherwise about 40% of the heat will escape through the window. Slopes are not just a beautiful attribute of the interior, but also protect the polyurethane foam that is used in installing windows. Without a slope, the foam will crack, absorb moisture and collapse, due to which the insulation will deteriorate every year.
Plastic window without slopes
There are a wide variety of materials for window cladding, but the main ones are:
- Plastic.
- Drywall.
- Plaster.
- Sandwich panels.
Increasingly, during repairs, plastic is used on slopes, for plastic windows, working with your own hands. It is not only easy to wash and care for, plastic also has other features, but all this can only be seen in a comparison of materials. Below are the advantages of the materials:
| Plaster: | Plastic: | Drywall: |
| Easy to seal windows. | Installation is carried out very quickly. | Durability when using GVL. |
| The design is very cheap. | Cleaning the surface of the plastic slope is easy. | It is possible to insulate the window opening using cotton wool or polystyrene foam, thereby increasing the thermal insulation properties. |
| You can change the color of the window opening using paint. | The material does not fade in the sun. | |
| They can last about 20 years or more. | ||
| With the right color selection, you can achieve harmony with the window itself. | ||
| Good insulating qualities. |
As for plaster, it has more disadvantages. Over time, such material will lose its color due to sunlight. In a few years, restoration will be required, because plastering is not durable, cracks appear, and sometimes the plaster simply comes off the walls in pieces. The thickness of the plaster will be large, since several layers are applied to the window opening, and the technology takes a long time, because each layer dries. After plastering, the surface is treated with primer and paint. This material does not imply the use of a heat insulator, due to which the windows will fog up.
Drywall slopes on windows
The disadvantage of drywall is that not all types of gypsum boards can be installed in wet rooms, and it is also necessary to use paint and a primer during work. You can also finish the window using the following materials:
- Tiles.
- Metal or metal profile.
- Siding.
Some people create a wooden slope, but it is better to use the material inside the house and treat it with additional means to prevent mold and mildew from appearing. In general, there are many materials for finishing windows, some are used as external cladding materials, and some are used as external ones.
Dismantling an old wooden window creates large holes in the opening, even after installing a new metal-plastic window. In this case, it will blow from the windows and you will need to foam the holes. In addition, additional sound insulation and thermal insulation will be obtained using insulation if the frame method of slope design is used. In this case, insulation is placed in the frame and covered with finishing.
Slope insulation with mineral woolAmong the available and modern insulation materials and methods are:
- Filling voids with mineral wool when installing window sills and slopes on plastic windows.
- Coat the joint between the window and the wall with foam to prevent freezing.
- Place the trim on the slope, and also install the flashing if installation is carried out from the street.
In addition to cotton wool, you can use other materials:
- Penoplex.
- Expanded polystyrene.
- Sandwich panel.
- Izover.
The choice of insulation depends on the width of the gaps and the characteristics of the window opening, as well as the junction of the walls with the polyvinyl chloride frame. If the gap is up to 50 mm and the surface is smooth, then polystyrene foam or isover up to 3 cm are used. For unevenness, mineral wool is suitable, it is also suitable if the defects are very strong after the old window has been removed. Having familiarized yourself with the materials used for windows, as well as insulation, you need to understand the method of installing slopes on plastic windows with your own hands.
Why are slopes needed?
The basic technology for installing PVC windows assumes that they are not installed close to the casing, but with the creation of a small installation gap. After centering the window, the gap is filled with polyurethane foam, and waterproofing and slopes are installed to isolate it from the external and internal influences of the atmosphere.
In general, two goals should be highlighted that are achieved by installing slopes:
- decorative concealment of construction irregularities and communications;
- additional thermal insulation of the window.
The listed goals can be achieved both simultaneously and separately.
Plastic window in finishing casing
For stone houses, the specified installation scheme is unchanged, but in wooden houses, solutions are possible when installing slopes is not necessary. A typical example of this approach is when plastic windows are installed in a finished frame with a reverse quarter, in which the casing frame, window sill and slopes are integral elements of one wooden structure.
In modern construction practice, it is customary to use a universal option, when the slope is not only a decorative panel, but also additional protection for the window from freezing.
It is traditionally believed that the slope is an element of interior decoration. Indeed, if the window is installed in compliance with all the rules for installing waterproofing, then the internal slopes will completely eliminate heat loss through the installation gap.
However, in cases where the window has a deep seat in the reverse quarter, it is not possible to close the installation gap using the platband alone, and in such cases it is necessary to install an external slope.
At first glance, the slope is just a panel covering the construction cavity of the window. But from a technical point of view, this is far from such a simple design, consisting of several elements:
- decorative protective panel;
- internal filler, which plays the role of thermal and sound protection;
- devices for fastening the outer edge of the slope;
- decorative corners for external finishing of joint areas.
Slope design in section
Both polyurethane foam and mineral wool can be used as an insulating filler.
In the example given, the filler serves as the basis for the decorative panel, but it must be taken into account that for some models of slopes it is necessary to install a more complex supporting structure.
Separately, we note that if the window opening is wide enough, then the window sill area can be used as an additional useful area, and elements of household infrastructure (sockets, network communicators, etc.) are introduced into the decorative panels.
Installation on wooden blocks
If the slopes are purchased with a window block, installation is simplified. Grooves are cut into the frames. They are installed the day after the window is installed. The necessary measurements are taken and the boards are cut to length.
Wooden ends are treated with a fine file or sandpaper. If the base of the opening is wooden, holes are drilled in the panels, inserted into the grooves (installation begins from the top panel), pressed tightly, and screwed with self-tapping screws.
When the frames and slopes are not included in the kit, the ends are adjusted. The correct fit is checked with a square. Next, the procedure is the same as in the previous version.
When the base is brick or concrete, a sheathing is made from thin wooden planks. They are mounted using self-tapping screws and dowels. A level is used to check for plane deviations. Insulating mineral wool is laid in the sheathing, finishing is placed on top, and screwed to the planks.
Internal slopes made of plaster for a plastic window - step-by-step instructions
When decorating plastic windows indoors, owners of houses and apartments have a desire not to resort to plastic or metal products - these stand out too much inside the room and are more suitable for the outside. In this situation, the slopes are made of plaster - it can later be painted either in a neutral white color or to match the design of the living room or kitchen.
Step 1: Protect glass and frames from plaster by temporarily covering them with plastic film. It is also advisable to use masking tape in some places - this way you will free yourself from the need to subsequently clean the window from any pieces of plaster that have fallen.
The window is sealed with film
Step 2. Using a pencil, take initial measurements of how the plaster will be applied. The mixture should partially cover the plastic window frame itself - this will minimize any possibility of a draft. In this case, plaster slopes are also made at dawn - the surfaces are located at an angle, expanding from the window into the room. This ensures better illumination of the room.
Performing initial measurements
Step 3. Complete the marks using a laser level or its regular bubble equivalent. In this case, it is necessary to indicate several points for screwing in the screws and drill holes there - the fasteners will become a kind of substrate for the beacons installed in the middle of the opening planes.
Drilling holes
Prices for popular hammer drill models
Hammers
Screwed screw
Step 4. Treat the surfaces of the window opening with primer, preferably in two layers. It will ensure better “adhesion” of the plaster to the main wall.
The surfaces of the opening are treated with a primer
Step 5. Prepare the beacons for insertion into the opening. In this case, purchased factory-made products are used, which are quite cheap, but at the same time very convenient to use. Trim them to the appropriate height or width of the window opening.
Preparing beacons
Step 6. Prepare a sufficiently dense and good solution for attaching beacons to the surfaces of the window opening. Apply several “cakes” of the mixture onto each of them with a spatula. Then mount the beacon using the heads of the screws that were screwed in earlier as a backing - the metal product will not pass beyond them. Lightly drown the beacon in the solution.
The screw head acts as a backing
Step 7. Using the same principle, install the beacon on the top of the window opening.
Installation of the upper beacon
Step 8. Install “formwork” around the perimeter of the window opening, along which the edges of the surface with the “dawn” will be aligned. In this case, the master applied the old rule for these purposes, fixing it with screws and dowels.
"Formwork" from the old rule
Step 9. Prepare the plaster mixture to form the slopes. Mix all its components in a bucket using a mixer or drill with a special attachment.
Preparation of plaster mixture
Step 10. Perform an initial sketch of plaster on the surface of the window opening, but without much leveling - just form the required amount of sweep on the top and side parts.
Initial sketch of plaster
Step 11. Take a wide spatula and, leaning it against the plaster, the beacon on one side and the rule on the other, level the mixture and make it smooth. Repeat this operation on the other sides of the window opening.
Leveling the plaster mixture
Step 12. Work out small details and defects using narrow spatulas. After this, you can leave the plaster to dry. Then remove the protective plastic film from the window. The final touch is painting the new plaster slope in the desired color.
Using a narrow spatula
Installation Features
Before installing the window, they must be insulated with mineral wool and the material must be insulated from moisture.
The peculiarity of wooden walls is that the opening for installing the window always has a rectangular shape without distortions. The hole for installation is cut to size in the vertical fence, or the binding is placed in a ready-made casing box with verified dimensions.
I provide insulation in any slope design. In frame cladding, it is easier to install the insulating material between the frame slats. For wet finishing layers, protection from the cold is also installed; a plastic or metal mesh is placed on it and a solution is thrown over it.
Installation of slopes begins after fixing the window sill inside. The ebb from the outside is installed after finishing the slopes. On surfaces made of plastic and siding, the joining seams are treated with sealant, this is especially important for external cladding. Construction foam or liquid nails can be used to fasten panels and sheet materials.
How to do it yourself?
Material selection
Tip When choosing a material, attention should be paid to products that contrast with the overall decoration of the room and the texture of the window frame. Common materials are larch, oak and pine.
Main criteria:
- Species should be chosen similar to those used for wall cladding or window installation, since combining different wood textures has a negative impact on the aesthetics and functionality of the structure.
- Coniferous wood gives products increased strength, wear resistance, and resistance to atmospheric or mechanical stress.
- Choose products made from seasoned wood with a smooth grain and no visible nicks or irregularities.
- For fragmented wood finishing, larch products that are resistant to microbial and destructive processes are suitable. The material is available and its price is reasonable.
- Choose products with a thickness of 12 to 15 cm, taking preliminary measurements of the window opening.
Manufacturing of panels
To process wood you will need a jointer, a circular saw, and a planer.
- Level the surface of the board on both sides using a jointer, getting rid of any unevenness or roughness.
- Place the board on the thicknesser with the wrong side out and process until the required thickness is obtained.
- Wane the rib with a circular saw until a 90-degree angle is formed. If the board is edged, then use a jointer, pressing the plane against the guide.
- Set the circular saw guide to the width of the future slope, cut the board.
- Make transverse cuts to form an inclined angle of repose, round the longitudinal edge on a jointer to join the board to the window sill.
Important Do not level the board on both sides with a thicknesser, as after removal the wood will return to its original shape and bends. The jointing machine provides systematic processing of planes, making them symmetrical.
About fixed windows
Windows are ready-made for installation in homes. Making a good and beautiful window is not an easy task even for an experienced carpenter. But sometimes - in an attic, in a barn, a garage or in a country house - you need to make a small blind window. You can make such a window yourself by making a frame from beams and slats.
What should be the profile of the window frame can be seen in the figure
Note the highlighted protrusions at the bottom that are the lightest. These are teardroppers
Their purpose is to prevent water from flowing into the frame. They must be made on the lower cross member of the frame, but in no case should they be done on the top: there they will turn into moisture traps. But they are useless on the sides.
***
So, now you know how to install a wooden window in any window opening of any building. As you can see, the work itself is not complicated or difficult, but it requires preliminary consideration of many different factors, and when performing it, intelligence and accuracy.
Installation of window sills and slopes
After completing all work with the installation of plastic double-glazed windows, you can begin installing the window sill and technical slopes. You should start with the window sill, which should be covered with a protective film
It is important to remember that this window element is attached using an adhesive binder and not mechanical couplings. Its dimensions are slightly larger than the window itself, since it is mounted directly in the walls
In particular, the width should be 5-7 cm longer than the window. Care should also be taken to ensure the proper distance to the heating battery.
Scheme for installing a window sill on a plastic window
The following materials can be used for the window sill:
- PVC window sills. The fairly light, but at the same time durable multi-chamber structure is covered with a special PVC film. Often, owners prefer the traditional white color, but modern products can imitate the surface of any other material;
- Window sills made of wood. There are certain requirements for the operation of these products, since natural wood is sensitive to changes in moisture in the atmosphere. The advantages of the material include the ability to give any aesthetic shape. At the same time, it must be covered with a protective layer;
- Window sills made of stone. They are used quite rarely, since the high cost and heavy construction are not originally intended for plastic windows. However, in pursuit of a beautiful design, many agree to such an original window sill.
The first stage of installation can be considered adjusting the size of the window sill so that its location is optimal and the edges do not hang over the slopes. The location of the window element can be either strictly perpendicular or with a slight slope to ensure drainage. After joining the window sill in the wall recesses, the voids are filled with polyurethane foam. After all installation work is completed, it is time to finish the internal surfaces. And only after all these procedures the protective film is removed and the fastening of the slopes begins.
Attention! It is much easier to install a window sill in a frame-type house than in a building made of natural wood. Possible deformations will be minimal.
Window slope in horizontal section: diagram of its components. An important point is also the vapor barrier layer inside and outside the opening
The installation of the double-glazed window itself involves fastening in the form of anchor plates
An important point is also the vapor barrier layer inside and outside the opening. The installation of the double-glazed window itself involves fastening in the form of anchor plates.
Platbands
Platbands can serve as interior decoration for window slopes. They may be based on different materials, but these products perform the same role - they protect the seam and give it an aesthetic appearance.
Types of platbands
The side walls near the window should look attractive. To do this, you can use different platbands, which differ in shape, texture, and base material. The simplest and cheapest are flat products. They look inexpensive, but are quite functional. Another type of finishing is profiled products that have a convex surface. The decorative function is enhanced here, but such platbands are somewhat more expensive.
If you feel that you may have difficulties installing slopes, you can easily install shaped products with complex terrain with your own hands. Such cladding can imitate natural materials, such as wood. If you do not want to finish the slopes with plasterboard, you can choose carved platbands, which are more expensive than others, but can have individual dimensions and are made to order.
Materials for production
In order to finish the slopes of the windows of a wooden house, you can use platbands made of different materials, for example:
- plastic;
- wood;
- metal;
- MDF.
When choosing a tree, you must be prepared for the fact that you will have to take care of the products all the time. Every few years the material requires blocking or painting. Only then will the products not dry out and retain their original appearance. The advantage of such products is that they can be different, are environmentally friendly and look quite presentable. But the most logical way to finish the slopes of plastic windows is with PVC. All maintenance will be reduced to wiping the surfaces from dirt; no other manipulations will be required. Plastic platbands are resistant to external factors, do not fade and tolerate freezing and thawing well. The advantage of this material is its low cost, but the decorative function here is not performed very successfully.
The inside of the slopes can be finished with MDF. Externally, this material will not withstand exposure to moisture and sun. The surface of the products is covered with a laminated film, so the base can imitate different materials, for example, stone or wood. If you don't want to use plastic, but don't have enough money for wood, MDF is just for you. This is a budget option and a compromise of two solutions.
Finishing windows with metal slopes is done quite often. This cladding does not look very presentable, but it will last much longer than wooden products. The metal can be periodically renewed and also coated with compounds that will protect it from corrosion and external negative factors. When choosing window trim with metal slopes, you prefer a budget option that will last for decades. This window design is suitable for houses in a modern style.
Fastening
When finishing windows with metal slopes, you will need to prepare the surface by removing all excess from it, including polyurethane foam. The seams are filled with silicone sealant, only after which can we proceed to installation work.
The next step is to measure. If you make the slopes yourself, you can cut them from a metal sheet. Next, the installation of ebb tides should be carried out, the horizontalness is checked by the building level. The joint between the frame and the wall should be supplemented with thermal insulation tape to protect against moisture and noise. In those places where the slopes will come into contact with the frame, sealant is applied. The side elements are installed first, while maintaining an outward slope.
But when renovating an apartment, you can finish the window slopes with wood. The material can be lining. At the first stage, you need to prepare slats according to the size of the opening. These elements will be necessary to create the sheathing. They are installed around the perimeter on dowel-nails. When finishing windows with clapboard, the frame is positioned perpendicular to the cladding. The frame can be insulated with foam plastic or mineral wool.
Finishing window slopes with laminate is carried out according to the same principle, which cannot be said about stone. Masonry begins from the bottom of the slope. As soon as these elements are strengthened, you can proceed to the next row so that it does not slide down. Corners are formed by trimming the end elements at an angle of 45˚. Before finishing the window slopes with decorative stone, the surface must be leveled and coated with a primer. The preparatory stage can be carried out using drywall, which will act as a leveling layer.
How to install a plastic window sill
Construction companies that install windows often do not complete the job. After work, there remains a bare window opening that needs finishing. In order to save money, many try to install a window sill and make slopes themselves.
It is important to install the window sill board correctly so that it holds tightly and does not freeze. The quality of the installation determines whether there will be condensation on the windows, which leads to fogging and mold. Read our guide below to get the job done.
Rules for installing a window sill for a plastic window
Installing a window sill is a complex technical process that has a number of nuances. Even if you have no experience, familiarize yourself with the process to avoid problems in the future.
There are several window sill bases on the market:
- Natural stone in the form of marble, granite, artificial option - quartz, acrylic.
- Wooden products (larch, cherry, oak or pine).
- Made of composites – chipboard, MDF.
- Plastic boards.
In general, the installation instructions are identical in all cases. But each material has its own characteristics. And knowledge will allow you to install a window sill in your house yourself.
Window sill options (in more detail)
The slab in the window sill should fit neatly into the existing design of the room. At the same time, it has other useful functions. Can serve as a practical element - a shelf for flowers, a kitchen countertop, a book stand, etc. Try to choose the optimal type of surface material so that there are no problems during operation.
A natural stone
Window sills made of this material are a furnishing detail that demonstrates the wealth in the house and the taste of the owners.
The advantages include:
- Beautiful view.
- A large number of patterns and colors.
- Good strength. At the same time, granite and marble are second only to diamonds in strength.
- Resistance to temperature fluctuations, moisture, direct rays of the sun.
- Long service life.
- Easy care.
Along with the advantages, there are also disadvantages:
- The surface of granite may be scratched by sharp objects.
- Marble reacts to food acids. Coffee and tea stains are difficult to remove.
- Accumulates radioactive radiation.
- High thermal conductivity.
- Limited dimensions (a large slab is difficult to cut, polish, transport, or install).
- If chips and cracks appear, the surface cannot be restored.
- Heavy weight. Moving the slab is not a problem for your home. In apartments you will have to lift the surface with a crane.
- Granite has a small number of colors. But the print of the natural material is beautiful.
- High price.
Fake diamond
It is considered a good alternative to marble and granite. Produced on the basis of acrylic or quartz agglomerate.
The finished product has its advantages:
- Light weight, easier to attach and transport.
- Any sizes (width, thickness).
- High strength. Higher than wood or PVC slabs, but lower than natural stone.
- Long service life.
- By adding different components to a product, you can get an unusual color or pattern that will imitate natural material.
- The surface is not afraid of moisture, does not absorb kitchen odors, and is easy to clean.
- The window sill feels like natural wood, warm.
- Easy to restore using grinding, heat treatment, and glue.
The disadvantages include:
- No resistance to high temperature. Traces of hot dishes and cigarettes remain.
- Destroyed by chemicals with abrasive composition.
- The plate is easy to scratch. Typically, abrasion marks are visible on a black, gray or chocolate surface.
- High price. Sometimes higher than a natural window sill.
| Advice! The above shortcomings can be easily corrected by specialists on site. There is no need to dismantle the stove. But these are additional costs. |
Tree
Like stone, wood products are natural materials. They are in demand when installed in a window structure. With the advent of practical artificial materials, wooden products fell sharply in the consumer ratings, but retained their fans.
It is convenient to use such material if the window is also made of wood. The design looks solid and creates the impression of comfort in the room. The main disadvantage is the fear of moisture. To extend the service life, you need to apply enamel, wax, oil, after cleaning the surface. For home window sills, pine, ash, oak are suitable, sometimes cherry is used.
The advantages of wooden window sills include:
- Environmentally friendly.
- High strength. Withstands the weight of a person and flower pots.
- Durability during operation. They do not break like natural stone, they are resistant to hot dishes, like polyvinyl chloride or acrylic boards.
- Excellent thermal insulation performance.
- Original texture, beautiful color. The surface can be made glossy, giving the appearance of old wood.
- Natural warmth.
- Afraid of moisture. The plate is deformed and swells. Be sure to treat the material with varnish or paint.
- Requires careful care.
- Does not tolerate contact with radiators well. Ensure sufficient distance from the surface to the heat source.
The cost of a pine slab does not differ from that of plastic, and that of an oak slab does not differ from the price of natural stone.
Composite
Products made from MDF or chipboard can replace the array. But they are much inferior to other types of window sills. The main problem is the swelling of the surface upon contact with moisture. For protection, use a waterproof film. But it is easily damaged when in contact with hot objects, from sharp objects. Laminated MDF is more expensive and is considered a higher quality material.
Popular due to its affordable price. Installation of the structure is easy to do with your own hands. You can order the slab in any color, which makes the product universal for any room design. Service life - over 25 years.
The material is resistant to moisture and can withstand heavy loads. You can stand on it while washing windows. It is easy to change the color of the coating if you apply a decorative film of the desired shade on top. The thickness of the product is at least 2cm. The product consists of 2 thin sheets (top at least 3mm, bottom at least 2.5mm). The layers are connected to each other by stiffening ribs. The thicker the sheets, the stronger the structure.
Installing a plastic window sill in a house with your own hands has its positive aspects:
- Budget savings. At a price lower than wooden window sills and stone products.
- The service life coincides with the service life of a plastic window.
- You can get an element of different design that will fit into any interior. There is imitation wood and stone.
- Correct installation of a window sill on a plastic home window will help ensure high-quality thermal insulation in the room.
- It’s easy to install a plastic window sill on your balcony or loggia yourself.
The disadvantages include:
- No resistance to high temperatures. There will be traces of use from hot pots and cigarettes.
- Low structural strength.
- Accumulates dirt. But it can be easily removed with detergent and a sponge.
With proper use, such shortcomings do not appear.
All types of window sills are easy to install with your own hands. Using a step-by-step example of installing plastic window sills, we will consider the general principle of attaching a slab to a window made of other materials.
What tools and materials are needed for work?
Before inserting a plastic window sill into a home window, you should stock up on the following materials and tools:
- Construction level.
- Polyurethane foam.
- Jigsaw, hacksaw.
- Pencil, tape measure.
- A hammer drill with a set of chisels and drills.
- Foam gun.
- With a chisel.
- PVA glue.
- Wooden blocks.
- Acrylic sealant.
- With a hammer.
In addition, you may need special PVC gaskets and perforated plates for fastening the plate.
Preparatory work
Installing a house window sill on plastic windows with your own hands should be done so that it fits tightly into the side wall. It is necessary to cut connectors up to 2cm deep in the slopes. First, attach the plastic window sill to the wall, make the necessary marks on it with a pencil, and then select the grooves.
| Advice! The procedure for fitting a window sill to an opening in the wall requires precision and accuracy. Otherwise, it will take a long time to restore the slopes. To ensure minimal damage on the slopes, you should treat them as carefully as possible during the installation stage. |
Next we will make the indentations. We choose an option depending on the wall material:
- Slopes made of gypsum plaster. To do this we use a chisel and a hammer.
- Concrete slopes. The recess for the plastic structure should be made using a hammer drill.
After completing these steps, you need to clean the substitution profile and the bottom of the window from plaster and dust. Afterwards, the treated area is moistened with a primer. It strengthens the surface.
| Advice! To prevent drafts from the window, it is necessary to seal the cracks in the opening of the window frame well. |
How to take measurements of a window opening
The main rule for high-quality installation of a plastic window sill is that the product should protrude no more than 8 cm. Take preliminary measurements. The appearance and strength of the entire structure depend on the accuracy of the calculations. Consider a number of parameters.
To begin with, this is the installation of a plastic window sill at a certain distance from the battery (vertical distance of at least 10 cm). Otherwise, air circulation will be disrupted, and this will worsen the microclimate in the house.
| Advice! If the plastic plate extends too far behind the radiator, the heat from it will not be able to rise to the window. As a result, the window will begin to fog up, and mold and mildew will appear. To solve this problem, builders often drill holes in the plastic and seal unsightly holes with a lattice overlay. |
Modern models are equipped with a special profile for fastening the ebb. The plastic plate has standard dimensions. Element length 6m, width from 20cm to 100cm. The excess can be trimmed off.
Grooves are knocked out
The board of the plastic plate should extend 2-3 cm inside the slope. To do this, use a hammer drill to knock out a 50x50mm groove at the level of the base of the window opening. If there are no tools, we use a chisel and a hammer.
If we are dealing with a concrete slope, then you will need a grinder. Using a cutting wheel, make 2-3 cuts in the area where the groove will be. To avoid damaging the frame, press the spatula tightly against it. It is easier to work with cut concrete than with a monolithic base.
Preparing the base of the wall
We clear the opening of excess debris. The polyurethane foam must come into direct contact with the wall material. We cut out the sealant from under the lower window profile to a depth of 2-3 cm to partially pinch the slab with the structure of the window opening.
If the distance between the plane of the plastic window sill and the wall is less than 1 cm, then you need to make a recess in the wall up to 70 mm wide and 20-30 mm deep to form a foam seam on which the plastic panel will lie. Such manipulations will allow you to install a plastic window sill in your apartment with your own hands.
Installation instructions
Fixation is performed using 2 methods. Let's consider the most popular option when you need to use sealant and wooden spacers. This is the most reliable way to install a plastic window sill at home with your own hands.
The operating procedure is as follows:
- We insert the plate into the prepared place. For fitting we use wooden beacons and a building level. We arrange the elements in increments of no more than 80cm.
- We place wooden support blocks at the front end. The distance between them is no higher than 50cm, and from the side slopes to the blocks - 10cm.
- Checks the angle of inclination a second time with a level. If there are discrepancies, then we adjust the thickness of the bars.
- We fill the hole between the slab and the concrete base with sealant. There is no need to completely seal the opening; we simply fix the aligned product.
- We place the load evenly on the window sill board so that the foam does not lift the window sill. Enough for 3-4 tanks of 5 liters each.
- Blow out the free space with foam. We use a construction gun to do the job neatly.
Advice! The slab should fit tightly with the window, and the gap between the wall and the window sill should not be higher than 4mm. - We give the structure 2-3 days for the foam to dry. Remove excess with a utility knife.
- If you find any cracks, seal them with acrylic sealant.
- We close the ends of the plate with plugs. For fastening you will need regular PVA glue.
All that remains is to remove the protective film from the product.
Installation of window sills from other materials
Replacing a slab in a wooden window is similar to installing a plastic window sill. We remove the old canvas and carry out preparatory work. We level the slabs, put the slopes in order so that the board fits securely into place.
If you have certain knowledge of how to install a plastic window sill at home, you don’t have to invite specialists. The work is easy to do on your own.
Material advantages
PVC windows appeared on the domestic building materials market a long time ago and during this time they managed to receive an appropriate quality assessment. And with the advent of more suppliers, prices for the material dropped significantly and became affordable to the common man. Each manufacturer offers customers products of various sizes and modifications, various colors and designs. Therefore, the sales market for metal-plastic windows continues to flourish.
The advantages of this material are obvious. Along with low cost and universal availability, the products have the following qualities:
- resistance to temperatures and atmospheric conditions;
- ease of installation;
- reliability of the structure against burglary;
- thermal insulation;
- reliable waterproofing.
The attractive aesthetic appearance of the products makes them suitable for any type of facade and interior design.
Wide range of slopes from
Please note that you can always use the finishing interior finishing service for slopes. It is carried out by installing decorative trims on the slopes.
| WOODEN SLOPS* | |||
| width, mm | pine shield class A | larch | oak |
| 100 | 900 | 1200 | 1800 |
| 150 | 1100 | 1500 | 2400 |
| 200 | 1 250 | 1 800 | 3 000 |
| 250 | 1 400 | 2 100 | 3 600 |
| 300 | 1 600 | 2 400 | 4 300 |
| 350 | 1 800 | 2 700 | 4 900 |
| 400 | 2 000 | 3 000 | 5 500 |
| 450 | 2 200 | 3 300 | 6 100 |
| 500 | 2 300 | 3 600 | 6 700 |
| *The cost of manufacturing slopes per 1 linear meter/rub. (without installation). | |||
Why do we make wooden products? What is the difference between the proposed slopes?
Wooden products have a number of advantages that distinguish them from all other alternative offers on the domestic market.
- The slopes are environmentally friendly. Many modern materials used in the finishing process contain potentially hazardous substances released during operation. Slopes made from natural wood, like the wooden window itself, are 100% free of toxins. Modern modifications of slopes do not harm either human health or the environment.
The slopes are hygienic. During the production process, the slopes of any window are subject to mandatory antiseptic treatment. Thus, the structure of the tree is reliably protected from destruction and deformation. The integrity of the slopes is not threatened by the formation of mold or mildew. Window slopes are resistant to rotting, and therefore are considered the most durable finishing option.
Practicality of slopes. The window element does not require complex maintenance and frequent renewal of the decorative and protective coating. The potential service life of the slope, which is demonstrated by wooden slopes, is at least ten years. The special impregnation that products have for wooden windows eliminates the risk of surface deformation as a result of exposure to humidity or temperature changes. This means that various modifications of wooden products are almost universal in terms of their application.
Availability. You will not overpay for window designs sold by us. We have set the optimal price for all products. Thanks to her, anyone can order a wooden window from us. It is also important that we not only sell products at a competitive price, but also provide discounts on wooden windows and components for them.