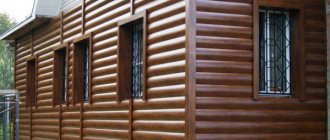
Finishing a bathroom with plastic panels is not the best method of solving the problem, but due to its cheapness and simplicity it is often used.
Bathroom finishing with panels
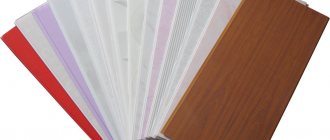
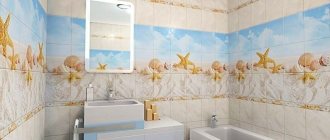
Today, there are panels for bathrooms that imitate ceramic tiles, with various patterns, etc. In cost, these materials are almost the same as tiles, and the savings are achieved due to the low cost of installation.
Panels with tile imitation
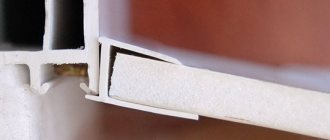
Plastic panels
Plastic panels can be mounted in various ways; the specific choice depends on the wishes and capabilities of the customer. In this article we will give step-by-step instructions for all options for finishing walls and ceilings.
Before starting work, you need to purchase materials, and this is where inexperienced builders make mistakes.
Equipment and additional elements
We will discuss how to calculate the number of panels and additional elements below, but now we will tell you what is included in the package for finishing walls with PVC panels. Select the appearance and specific dimensions taking into account the parameters of the panels.
| Name | Brief description and purpose |
Universal corner | It looks like a plate bent at an angle of 90°. Used for finishing internal and external corners of the room. |
Ceiling and floor plinth | Complex profile, part is installed under the panels, the outer side hides uneven cuts or surfaces. |
Outer corner | Consists of a corner, the inner part is wider than the outer. Hides unevenness of the outer corner. |
Inner corner | Differs from the external one in the width of the sides. The wide one is installed under the slats, the outer narrow one hides the unevenness of the inner corner. |
Connecting profile | Allows you to connect lamellas without a lock, used if the length of the lamellas is insufficient for finishing the surface |
Start/finish profile | Installed first and last, sometimes can be used instead of a universal or special corner. |
F-profile | Installed at junctions, can be used as a platband. |
Sheathing mounting strip | The supporting element of the frame can be plastic or made of metal profiles. |
| Klyammer | Made of metal, it presses the panel to the mounting plate. Allows you to dismantle panels without losing factory quality. |
pvc panels for bathroom
The panels are fixed with self-tapping screws with a press washer, staples using a stapler, clamps or liquid nails. The choice of method depends on the materials used to manufacture the supporting frame and the quality of the walls and ceilings.
Methods for installing PVC panels on walls
Fastening panels
So, let's look at how to glue plastic panels in the bathroom. As a rule, finishing a bathroom with plastic PVC panels is carried out in the following way:
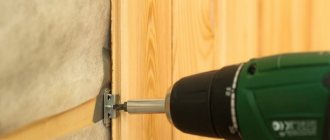
- The ceiling cladding is made using galvanized CD profiles and direct hangers. This type of lathing well compensates for surface irregularities that are traditional for buildings with slab floors, and also allows for hidden wiring of the lighting system to be placed.
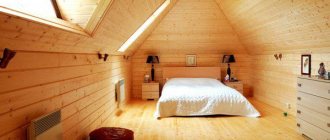
- wall cladding is made using plastic sheathing and fixed with clamps. It is not advisable to use a wooden version of the lathing in the bathroom, since wood can quickly deform under the influence of temperature fluctuations and high humidity.
Lathing under the panels
One should take into account the fact that fixing plastic finishing panels using adhesives can negatively affect the repairability of the finish.
Ceiling plinths based on modern foam plastics are perfectly installed even in the presence of curved surfaces, and the resulting cracks can be easily eliminated with ordinary putty.
Not so long ago, bathroom panels gained popularity in our country. All thanks to the low price and good decorative capabilities. Bathroom panels for tiles - you can see photos of the finish in our selection.
Why you need a safety valve for a water heater, we will tell you in this material.
How to process the material
One of the advantages of PVC panels is manufacturability. You can cut the material in one of three simple ways in two directions.
Method 1. Using a mounting knife. Use only new inserts, the tip should be as sharp as possible.
How to cut and bend PVC panels
| Cutting direction | Execution method |
| Along the panels | Place the panel on a flat place and mark the cut location. When cutting, you need to use a long, even blade. Press it firmly against the surface of the panel and use the end of a knife to cut the lamella on one side along the entire length. Then turn the panel over and bend the cut area. Cut the remaining plane in a bent position. |
| Across the panels | A more complex case requires certain skills. Mark the location of the cut. Using the tip of a knife, carefully cut the jumpers between the planes one by one. After the entire width has been passed under the ruler, make a continuous cut of one plane. Bend the cut part and cut the second plane from the opposite side. |
Method 2. Grinder. You need to work with a disk for cutting metals. The disc thickness is minimal. Cutting is very easy and quick; the only requirement is that you have minimal experience working with an angle grinder. Be sure to follow all safety rules; injuries from an angle grinder are very dangerous. The burrs on the opposite side of the cut break off easily after cooling.
Bulgarian
Method 3. Using a hacksaw. Undesirable option, work is difficult and long. But in extreme cases you can use it.
With a jigsaw you can make any cut on a plastic panel
It is worth using a file with a minimum tooth
Cutting a panel with a saw
The quality of the cut depends on practical skills. But don’t be upset if the cut edge is not very smooth; additional elements allow you to hide problems up to one centimeter in width. The cut can rarely be worse, the panel will be suitable for installation.
How to cut several PVC panels at once
Methods for installing wall and ceiling plastic panels
There are mainly two methods used for installation:
- 1) Frame - cladding with sheathing.
- 2) Frameless - glued without framing the frame.
The most profitable and convenient method is frameless. For the first method of fastening, it is necessary to make a special metal frame, which takes up additional space. In addition, in the resulting void between the wall and the frame, a favorable atmosphere arises for the emergence of microorganisms. But the adhesive method is suitable for perfectly flat surfaces.
Cladding with lathing
When working with this method, it is initially necessary to install the sheathing. It is made from:
- wooden blocks. Before installation, it is best to treat them with an antiseptic and anti-mold solution. The material is attached to the frame using wood screws, nails with a wide head, or staples from a construction stapler;
- metal profile. Galvanized metal is better suited for a bathtub. Fastened with metal screws.
Having installed the frame, fasten the panels tightly to each other so that there are no gaps. It is best to start from the far corner from the front door. For a socket or switch, the required hole in the material is cut out in advance and then secured.
On glue without frame sheathing
With this method, the material is attached to the surface using glue. It should be borne in mind that the method is only suitable for a perfectly flat surface.
The glue is applied in a zigzag motion, and the panels are attached to the surface, tightly adjacent to each other. At the end of the work you need to install skirting boards (ceiling and floor).
How to calculate the number of panels and additional elements
The bathroom has a small area and many different transitions and corners. It is for this reason that professional builders are not very willing to finish these rooms; it takes a lot of time to take measurements, install sheathing and adjust panels, and the output is small. Builders are paid by the square footage, not by the time, so they choose large premises.
The more corners and transitions, the more unproductive waste there will be. Their number increases if panels with decorative patterns or asymmetrical patterns are selected. Such material does not allow the use of segments in other places. For ordinary panels, the quantity should be increased by 10% of the area of the surfaces to be finished. In bathrooms, the supply should increase to 15%. In addition, if there are complex patterns, the panels will have to be counted individually, taking into account the location of the pattern.
Measure the total length of the internal and external corners, the length of the baseboards on the floor and ceiling. Decide how much starting profile you will need, whether you need a connecting profile, and what elements you will use to finish the corners (simple or complex). If you have the skills to work with PVC panels, you can use simple corners; if not, buy complex ones. They allow you to hide errors during cutting or taking measurements. Take your time, think through everything carefully, and always buy with a reserve. It’s very annoying to go to the store again for a meter or two corner, and time is wasted in vain. Additional elements cost pennies, so don’t skimp on them.
Additional elements
When counting the number of slats or mounting strips, keep in mind that the distance between them should not exceed 50 cm. In addition, they must be mounted at the junction of the floor and the flow as close as possible to all corners, window and door openings. The slats in these places are installed regardless of the location of the last row. Measurements and calculations can take several hours, use them wisely. It will never be possible to accurately count the number of clamps or screws. Buy them in packs; the seller will tell you the approximate number of pieces, taking into account the width of the PVC panels.
PVC mounting plate
Expert advice
To make the work go quickly, you should listen to the advice of experts:
- if the toilet or bathroom is small in size, then it is recommended to carry out renovations with cladding in light colors in order to visually increase its area;
- If you want the renovation of your toilet or bathroom to look spectacular and unique, use panels of various sizes or colors for cladding. For decoration, you can take panels with drawings, but the main thing here is to fit them together harmoniously;
- before you start tiling the room with your own hands, take the purchased panels into the bathroom and leave them there for about an hour to avoid their deformation;
- you need to fasten the material from the farthest corner from the front door, in this case you can complete the most visible places without errors or flaws;
- Before making repairs yourself, look at all problem areas where pipes or plumbing are located, this will help you install the frame and plastic panels faster. For the frame, we usually make markings, observing the horizontal and vertical lines along which you will attach the sheathing;
- To disguise water and drain pipes in the toilet, it is recommended to make a fake panel, which will only improve the interior design.
When thinking about renovation, we always want to get an excellent result, without unnecessary expenses and within the minimum time frame. Another important point is that repair work does not cause a lot of trouble, does not leave behind dirt and does not greatly disturb the neighbors.
An excellent solution in this case would be to install plastic panels. Our instructions will help you understand how to attach plastic panels. They are easily mounted on walls or ceilings and do not require leveling the surface in advance.
Plastic panels are easy to clean and ideal for rooms with high humidity (bathroom, sauna, boiler room). A variety of colors and textures will help create a unique and cozy interior. To install such panels, it is enough to have several tools on hand.
General requirements for surfaces
One of the advantages of the technology of finishing walls with plastic lining is low requirements for surfaces. There is no need to specially plaster or level the walls with putty; only large cracks are repaired. The height of the unevenness can be up to 1–1.5 centimeters; anything larger needs to be cut down.
Large potholes can be filled with cement mortar or putty.
Repair of major defects
Check the evenness of the walls using the rule
Important point. It is strongly recommended to treat the surfaces under the panels in bathrooms with antifungal compounds and use steam and moisture protection.
Mold Prevention Products
Wiping the walls with an antifungal agent
The climatic parameters between the wall and the cladding are the most favorable for the growth of fungi and other microorganisms; it is then impossible to destroy them. You will have to remove the casing, do disinfection and vapor protection. Only after such events can you begin to install plastic panels. No matter how carefully you remove the skin, you cannot do without damaging the materials. If you manage to buy the missing ones with the same characteristics, great. If not, you will have to buy new materials for the entire scope of work.
What to look for when choosing glue
In order for plastic panels to last a long time and have a presentable appearance, you should take the choice of adhesive seriously. It is worth noting that in construction stores you can find adhesives that are intended specifically for installing PVC boards. However, a situation may arise when there is no such product or the owner of the premises has some preferences.
Usually, those who are planning to do repairs themselves are puzzled of what kind of glue to use The choice of means for fastening is, of course, important, but we must not forget about other conditions.
The adhesive composition for PVC panels must have the following properties:
- After drying, it should be transparent so as not to spoil the appearance of the finish.
- The composition used must be well resistant to moisture, temperature changes, cold, and the like.
- It is important that the glue sets quickly.
- The quality of gluing should be as high as possible.
- It is also worth considering the durability of the fastening.
- The glue used must be safe for health, so you should avoid toxic compounds that have a strong odor.
It would be useful to have antibacterial additives in the glue . A correctly selected composition will ensure that the finishing material is well attached to the wall and the panels will decorate the room for many years, despite the aggressive effects of water and temperature changes.
Installation of panels on walls on wooden lathing
We will give step-by-step instructions for the vertical arrangement of the panels. In the future, we will talk about the technological differences between vertical and horizontal placement.
Step 1. Calculate the surface area of the walls minus window and door openings.
If necessary, the area of window and door openings is subtracted from the area of the walls.
How to calculate wall area
Make a reserve taking into account the above notes. We will fix the slats with a stapler and staples; this is the fastest and fairly reliable option. Self-tapping screws take a long time, self-tapping clamps take even longer, and liquid glue will not allow you to replace a damaged panel if necessary. The lathing is fixed to the wall with dowels. If you have special plastic mounting strips, then the slats are attached to them only with clamps; they are inserted into special grooves. The advantages of clamps are that the fixation area increases and the lower mounting plate of the panel is not damaged. Due to this, the strength of the fastening increases; it is recommended to use clamps when covering the ceiling with spot lighting. They allow you to withstand the increased weight of the structure.
Step 2. Clean the wall from large irregularities and seal the cracks.
How to repair a crack
To check the surface, use a large, flat rod, apply it in different places and check the clearance. At the same time, check the horizontal position; if the deviation is more than a centimeter, you will have to plaster. If the spread is smaller, then the position of the slats is adjusted by various pads.
Checking the flatness of a wall using a rule
Determining the evenness of walls using a two-meter strip
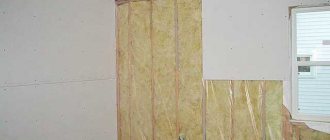
Step 3. Saturate the surface with an antiseptic, make vapor and waterproofing. You can use aluminum foil or plastic wrap. It is possible to impregnate walls with liquid insulators, just make sure that they are for indoor use. Wood slats also need to be treated with solutions.
Bathroom waterproofing
Antiseptic for wood
Step 4. To speed up the work, mark the position of the slats, using a rope with blue, beat off horizontal lines at the required distance.
Step 5. Fix the first rail at a distance of no more than 10 cm from the ceiling. Check its position carefully with a level. Use wedges if necessary. The rail is secured with dowels. First make a hole on one side and secure the dowel, and then on the other. Next, dowels are installed along the entire length, the distance between them is approximately 20–30 cm. Secure the rail near the floor in the same way.
Trimming strip
Lathing scheme for plastic panels
Step 6. Stretch ropes between them, two at the ends and one in the middle. The ropes serve as beacons; you use them to install all the other slats. Be sure to frame around window and door openings. Check the position of all slats again and make sure that the sheathing around the openings is installed correctly. If the slats are not in the same plane, this will have a negative impact on the panels; the backlight will reveal their incorrect position. To correct the defect, you will have to dismantle the slats and repeat the installation from the beginning.
Installation of sheathing
We fix the slats with dowels
Frame
Step 7. Secure the corner in the corner, start covering from the far corner of the room. Fix the corner with a stapler, staple length 6 mm. During fixation, carefully control its verticality along two edges. Not only the quality of work, but also the speed of installation depends on the correct position of the corner. If the angle is not 90°, then you will have to adjust the size of each panel, which will take a very long time.
Cutting the element to length
Fastening the inner corner
Installation of the starting rail
Mounting the rail at the bottom
Step 8. Measure the width and height of the wall in several places. The parameters must be the same. If the spread is less than a centimeter, then all workpieces can be cut to the same size. Count the number of panels, measure the required length and cut off the excess. This will be a template; use it to make marks on the remaining slats.
Panel cutting
Open the panels lengthwise
Step 9 . Insert one edge of the lamella into the corner and secure it to the sheathing on the back side. Don't forget to check the position. The first panel is installed - continue installation in the same way to the opposite corner of the room.
Installing the first panel
Installation of plastic wall panels
Panel installation
Step 10. The last panel needs to be cut to width depending on the remaining space. Make it about 1 cm narrower, this will make installation easier. First install the last lamella in the corner, and then move it towards the penultimate one until the lock snaps into place.
Installing the last panel
Snap the panel into the profile
Use the same algorithm to finish all wall surfaces. A little more work around the openings; in these places you need to measure and cut each element separately.
Installation of a metal frame
The advantage of a metal frame made of profiles is that it allows you to accurately align the position of the slats, regardless of the unevenness of the wall. How is it attached?
Step 1. On the wall, draw lines for the placement of U-shaped hangers. The algorithm of work is the same as for wooden slats.
Frame diagram on a wall with a door
Step 2. Secure the hangers with dowels, the distance between them is approximately fifty centimeters. If, while drilling a hole in a reinforced concrete slab, the drill bit hits the reinforcement, do not use excessive force. Firstly, building codes strictly prohibit damage to the reinforcement belt. Secondly, not every drill can withstand such efforts. Thirdly, the hole can be shifted slightly, this does not affect the quality of the sheathing.
Wall-mounted direct hanger
Direct hangers fixed to the wall
Installation of wall frame
Step 3. Cut the U-shaped supporting profiles to length, count their number.
Step 4. Begin installing the supporting profiles. The vertical position is adjusted using holes in the hangers or by slightly extending the profiles. If they do not allow you to accurately install the sheathing, then straighten the hangers. Such actions do not worsen the load-bearing performance of the elements. The loads from the lamellas act perpendicular to the bending. The elements are fixed together with self-tapping screws.
Attaching the profile to the wall
Further, the installation process does not differ from the usual one, only to fasten the panels instead of a stapler you need to use self-tapping screws with press washers.
Self-tapping screw with press washer
Important. If significant errors were made during the installation of the sheathing, they can only be corrected after dismantling the PVC panels. It is not only expensive, but also time-consuming. Do not forget to constantly monitor the position of the load-bearing elements. Remember that the most accurate instrument for measuring vertical position is an ordinary plumb line. You can buy it or make it yourself. The level can distort readings by up to 2 mm per meter. And if it fell from a great height, then it is impossible to install a sheathing on it.
Installation instructions
If you do not understand how to cover a bathroom with plastic panels yourself, you need instructions that will describe the installation process step by step. Manufacturers claim that PVC panels for tiles, plain or with a pattern, can be easily attached with your own hands if you have basic construction skills and basic tools.
This is interesting: Types of mirror ceilings for the bathroom and their advantages and disadvantages
Paneled bathroom
Bathroom renovation with plastic panels is carried out using a hacksaw, a screwdriver, a building level, a ruler and a marker. The work will also require guides for assembling the frame, adhesive if the installation is carried out by gluing, or fasteners. Installation is carried out in the following sequence:
- Before making a frame for covering a bathroom with PVC panels, it is necessary to prepare the walls of the room. Before installing the sheathing, it is necessary to remove the old finish and then level the surface of the walls to the building level.
- To glue sheathing made of plastic elements, the surface of the walls must be additionally dedusted, degreased, and dried thoroughly so that the glued plastic adheres better.
Installation of panels on a metal frame - Before installing the panels, you need to assemble the frame on which they will be attached. The lathing is made of metal guides or wood, fixed to the wall with self-tapping screws. The finished installed frame is checked with a building level to ensure it is level.
- They begin to fix the plastic sheets from the most visible corner in the room. If it is necessary to change the length of an element, trimming is carried out using a hacksaw or a sharp knife. The plastic is fixed to the frame with self-tapping screws every 35-30 cm.
- The polyvinyl chloride tiles are connected to each other using a tongue-and-groove lock, so the attached plastic looks like a seamless, smooth fabric.
- After installation is completed, the ends are covered with a finishing profile, and the joints with horizontal surfaces are covered with plastic corners.
Please note that plastic panels for bathroom tiles, installed taking into account thermal expansion, unlike ceramic tiles, do not crack when the house shrinks.
PVC panels for bathrooms are recommended for use in new buildings in the first 3 years from commissioning. After the completion of the shrinkage process of the structure, at the request of the homeowner, you can tile the walls of the bathroom or leave everything as is, because the operational potential of the plastic will last for decades.
What is the difference between vertical and horizontal laying
Example of vertical panel arrangement
The only difference is that for horizontal laying of panels, the frame must be vertical and vice versa. For bathrooms, horizontal laying of panels is strictly not recommended. Water easily gets into the locks and then penetrates into the space between the panels and the wall. If there is a lot of it there and it is constantly there, then no amount of steam or moisture protection will help. The appearance of mold and mildew cannot be avoided. To destroy them, you will have to completely dismantle the wall covering, carry out a set of special preventive and construction measures, and re-cover the walls. Such work costs approximately twice as much as proper wall cladding.
Installing panels horizontally
Practical advice. Don’t invent a bicycle, don’t create problems for yourself with your own money. In bathrooms, install PVC panels only in a vertical position.
Vertical and horizontal way of arranging PVC panels
Installation by frame method
You can mount plastic panels with your own hands using a frame method. The work begins with the installation of horizontal plastic guide rails along the entire perimeter of the wall. To do this, you need to apply markings on the walls to install metal profiles. Using a hammer drill, drill holes in the places on the markings, hammer in dowels there and, placing the guides against the wall, attach them using self-tapping screws.
At the same time, it is not recommended to use wooden panels, since ideal joints cannot be achieved, which will lead to the destruction of the wooden frame due to constant humidity. The frequency of horizontal slats depends on how strong you want to make the cladding, but in general, it is customary to use the following distances:
- when facing the ceiling - 30-40 cm;
- when facing walls - 40-50 cm.
In this case, the distance of the first and last slats from the floor surface should be about 5-7 cm. And the end parts of the profiles should fit exactly into the corners of the room. The slats of the future frame must be attached perpendicular to the panels being installed. In most cases, the panels are placed vertically, which means that the slats should be perpendicular to them and parallel to the floor. The vertical arrangement of the panels not only visually increases the height of the ceilings, but also better removes accumulated moisture, since drops of water will flow down, and with horizontally installed panels, water will linger on them.
Having completed the frame, you can start attaching the panels, but how to do this correctly? The panels must be mounted on the frame using self-tapping screws, which can be easily screwed into them. In this case, you need to start from the corner farthest from the front door. To avoid moisture getting between the panels, it is recommended to seal their joints with sealant.
In order for the panels to fit beautifully in the corners of the room, it is necessary to use a device such as an external and internal profile, which in appearance resembles the English letter L. You can use a plinth at the junction with the floor, then an additional profile will not be required.
Having installed the side profile, one panel is inserted into it and secured to the frame rail. The remaining panels are inserted into the gaps of the previous one, very tightly. If you have provided an outlet on the wall of the toilet or bathroom, then you need to cut a suitable hole on the panel to be installed and install it to the wall.
To give the room a more complete look, after installing the panels, attach floor and ceiling skirting boards; in addition to the aesthetic function, they will also perform a practical one, hiding minor defects.
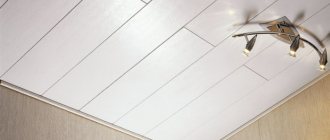
Installation of panels on a rough ceiling
For example, let's take panels that imitate a slatted ceiling. The rough ceiling does not require any preparatory work.
Step 1. Saturate the rough ceiling with antiseptic agents, give them time to absorb and dry. It is advisable to make a vapor barrier with aluminum foil or plastic film. Fix the material with a stapler, and carefully seal the joints with tape.
Attaching foil to the ceiling
Tape the joints with tape
Step 2. Measure the distance between the opposite walls of the room and cut the baseboard, making a 45° connection in the corners.
Cutting off the baseboard
Practical advice. Do not attach the baseboard to the wall with self-tapping screws. Under the weight of the panels, it will sag a little, and gaps will form between it and the wall finishing. In addition, this method of fixation requires perfectly flat planes. Self-tapping screws press the baseboard against the depressions, it bends, and the appearance deteriorates significantly.
Attach the elements to the wall using liquid glue; remove excess material immediately. Fix only three skirting boards, the fourth is installed after laying the panels. To guarantee, you can additionally fix the back part of the element to the ceiling with a stapler. Wait 2-3 hours for the glue to dry completely.
Step 3. Ceiling panels should be a few millimeters thinner than wall panels. Keep in mind that the panel can extend two centimeters into each baseboard. Measure the length of the ceiling from edge to edge of the plinth and add 1.5 cm to this value, the remaining 0.5 cm is left to facilitate installation. It is better to measure and cut each panel separately, this minimizes the likelihood of error.
Step 4. Double-check the dimensions and geometry of the ceiling. If there are minor deviations, they will have to be gradually eliminated by changing the width of the gaps between the lamellas. The magnitude of the changes should not exceed two millimeters, otherwise the adjustment will become noticeable. If the architectural features of the ceiling allow, then align the panels in places that are invisible to the naked eye. Open areas will already have smooth joints.
Panels inserted into the baseboard tongue and groove
Step 5. Insert the end of the panel into one baseboard, bend it slightly and insert the other end into the opposite one. Align the panel and tuck the long edge into the third baseboard.
Plastic guides will help hide uneven edges of the panels
Practical advice. What to do if the ceiling plane resembles a rhombus? Such cases happen among hack builders, but this can be corrected. Install ceiling panels diagonally. There is nothing complicated, you just need to cut the end of each panel at an angle. We will tell you how this is done below. The negative consequences of a crooked ceiling are that the amount of panel waste increases significantly.
Step 6. Press the panels tightly together and secure them with a stapler. The closer the locks come together, the stronger the connection. If the ceiling is not very level, then when attaching the panel at the end, a gap may appear between it and the baseboard. To prevent this from happening, push plastic scraps into these places and only then fix them. Under force, the plastic will compress to the required thickness, and the gap will close. There are difficulties with bending short slats. In such cases, make them another centimeter shorter; the width of the skirting boards allows this. The best option is to immediately lay the panels on the wider side of the ceiling. During installation, do not use excessive force, do not damage the baseboard, scratch the walls, or break the panel.
Installation of plastic panels
Step 7. Once all the intact panels are installed, measure the width of the remaining uncovered ceiling. To these dimensions, cut the material using one of the possible methods.
Step 8. Using the method described above, insert the panel into two skirting boards, connecting one edge into a lock. The rest will have to be fixed separately. There are two options. The first is to lubricate the reverse side with liquid nails before installation and glue it. The second is to drill a hole in one plane to the diameter of the self-tapping screw and use it to screw the second plane to the ceiling.
Installation error
Step 9. Cut the base part from the fourth ceiling plinth. Spread the remaining surface with liquid glue and attach it to the wall in the right place.
This completes the installation of the ceiling panels. Of course, during work you need to leave space for electrical wiring, ordinary or spotlights. If after installation there are visible gaps in some places, they can be sealed with sealant of the appropriate color.
Ceiling made of PVC panels
Ceiling made of plastic panels
Basic installation errors
Despite the simplicity and convenience of installing plastic panels, some installation errors can make the finish short-lived and unattractive:
- bending finishing elements;
- removing the protective film before installation;
- cutting panels with the wrong tool or cutting from the wrong side;
- use of organic solvents or aggressive chemicals for care.
PVC panels are a practical and convenient finishing material, but non-compliance with installation technology becomes the main reason for obtaining a result that differs significantly from the desired one.
Installation of panels to the ceiling on a metal frame
This method is recommended for use on uneven ceilings; the ceiling can be reinforced concrete or wood.
Step 1. Mark a line for installing supporting profiles around the perimeter of the room, making sure that the ceiling is horizontal. At a distance of approximately 50–60 cm, fix the remaining profiles. If the ceiling is very uneven, then use hangers. They are fixed and adjusted in the same way as on the wall. The difference is that the ceiling frame is more difficult to check with a level: it is more difficult to work, your hands are raised up and you get tired quickly.
Frame for PVC panels
Frame
Step 2 . Glue three skirting boards with liquid nails and file them at 45° at the corners. If the ceiling plane does not have right angles, then each cut will have to be adjusted. Glue the plinth both to the wall and to the metal profile. When gluing, follow the technology. After the plinth is attached, remove it and wait 2-3 minutes, then press the element again. Check its position with a rule or level. The rule is applied to the lower edge of the baseboard. If there are gaps, then use your hand to carefully move the baseboard down until it stops with a straight edge. Give it time to harden. The cracks in the corners are sealed with liquid sealant, but for professionals the fit should be tight right away. The bathroom ceiling is very hot and humid. You can be sure that the sealant will peel off in 4-5 years and will have to be removed and the cracks re-sealed.
Attach the skirting board to the guide profile
Practical advice. Sometimes when the glue hardens, the baseboards move a little in the corners and they end up at different levels. To prevent this from happening, insert trimmings into the corners; they will constantly hold the two elements at the same level.
Step 3. Insert one end of the slats into the baseboard, bend it slightly and push the other end into the opposite baseboard. Align the panel and slide it into the third baseboard. We have already mentioned that you should check the exact dimensions of the ceiling before installation. If one side is longer than the other, then the difference must be gradually leveled by adjusting the gap between the lamellas. The method, of course, is not ideal, but there is no better one. Always install panels along the long side of the ceiling. Due to this, it will be possible to reduce the number of cuts and make it easier to bend the lamellas during installation.
Installation of plastic ceiling
Step 4. Each panel is fixed to the profiles with self-tapping screws and press washers. This is quite difficult; hardware often falls out of the drill or screwdriver.
PVC panels are attached to the metal frame with a self-tapping screw and a press washer.
Panel fastening
Constantly check the position of the slats. To prevent a screwdriver that comes off from damaging the end of the panel, place a clean, wide metal spatula between them while screwing; it serves as reliable protection. It is not necessary to twist the press washers into the tail of the panel, this is difficult and increases the risk of damage, the main thing is that the head presses it against the profile.
Installing panels on the ceiling
Step 5. The last panel needs to be cut to fit the remaining gap. To make installation easier, make a gap of about 1–1.5 cm; it will then hide in the baseboards.
Step 6. Cut off the back plate of the plinth, spread the remaining surfaces with glue and glue it to the wall. Do not forget that gluing must be done in two stages. If the plinth creeps down under its own weight, then hold it for a few minutes or come up with any temporary stop.
At this point the work is completed, you can begin installing the lighting fixtures. Before you start finishing, you should know the type of appliances and where they will be installed; cut holes of the appropriate diameters in the panels in advance.
How to position and connect lamps
The hole for the lamp can be cut with a knife
Drilling a hole with a crown
Lamp mount
Plastic ceiling
Adhesive for PVC panels in the bathroom
Most often, the installation of plastic finishing panels in the bathroom is carried out using the “liquid nails” composition, which allows you to save the usable area of the room.
This installation method has many advantages:
- no damage to the plastic;
- no corrosive changes;
- quick drying with the ability to easily adjust the position on the surface within a few minutes;
- resistance of the adhesive to high humidity and frequent temperature changes.
However, a feature of the neopropylene composition is chemical aggressiveness, so all work must be carried out using a respirator and protective gloves, and at the final stage the room must be well ventilated.
Currently, neopropylene and acrylic “liquid nails” are used, but the second option is safer and more environmentally friendly, and therefore is often recommended by experts for use in residential premises.
Don't plan to spend a lot on decorating your bathroom, but want it to look neat? Moisture-resistant wall panels for the bathroom are a cheap material that will allow you to create an interesting decor.
Types of PVC panels for the bathroom and their properties are described here.
Read all about the pros and cons of finishing a bathroom with wall panels in the following article.
How to install panels when mounted on a ceiling diagonally
Let’s say right away that such work is much more complicated; you will have to lose more time on installing the sheathing and adjusting each individual lamella.
Step 1 . Calculate the ceiling area and determine the maximum panel length. Everything is clear with the ceiling area, but to determine the maximum length of the panel you need to use the formula A2 + B2 = C2. A and B are the length and width of the bathroom ceiling, C is the diagonal. Hence C = √ A2 + B2. Keep in mind that this method of finishing the ceiling increases the amount of waste, buy about 15% more materials.
Step 2. Attach three skirting boards to the ceiling, the method is described in the article above. Take measures to ensure that the baseboards do not diverge in height while the glue is drying in the corners.
Step 3. Cut a piece of lamella from one of the ends at an angle of 45°. From the intersection point, cut a second piece at the same angle. The result is a launch panel, the shortest one, installed in the corner.
Step 4. Insert it into place, measure the length of the larger part. This will be the size of the smaller edge of the second lamella. Apply these parameters to the new panel and cut both sides at a 45° angle.
Installation of suspended ceiling
Using the same method, cut and install all remaining slats. As we already mentioned, the amount of waste is increasing.
Diagonal arrangement of panels
PVC material selection parameters
There are a significant number of products on the market, which can confuse the consumer. To avoid buying unsuitable material, read the certificates and labeling in advance. Cheap sheets made from low-quality PVC easily break during installation, and their texture fades.
Types of PVC sheets
Standard panel dimensions are:
- Width – 20-35cm;
- Length 270-300cm;
- Thickness 8-10mm;
Standard panel
Structurally, between the front and rear walls in one panel there are stiffening ribs, on which maximum strength depends. Therefore, when choosing, you need to check for strength. It is enough to press down the panel with your hand. If the bend is noticeable, it is better to refuse to purchase this sheet.
Do not purchase panels in the following cases:
- If damage is noticeable on the sheets, or stiffeners are broken;
- The texture of the facial wall is blurred or blurred;
- The surface has a different tone from one edge to the other;
- Different panel sizes;
- There are some scratches.
Answers on questions
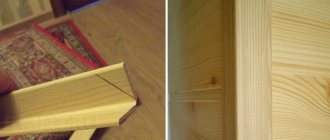
How to make a corner from a plastic panel? Wall cladding without purchased corners looks much better; professional builders often use this finishing method. Take a tape measure and measure the distance of the last panel to the corner, transfer this parameter to the panel that is planned to be installed at the corner, draw a line. Draw two more parallel lines from it to the left and right. Use a sharp knife along them and be sure to use a ruler to make cuts on the underside of the panel. Hold the edge of the knife at an angle of 45°, be careful not to damage the front edge of the panel. If you do everything correctly, when you bend it you will get a nice, smooth, rounded corner. There is no need to use additional corners, which can fall off over time. This method can be used to make both external and internal corners. Only for internal corners you will only need one longitudinal cut, not two. Bend the panel gradually along its entire length.
How to bend panels
Important. Not all types of lamellas can be bent; low-quality materials will crack. You can try warming up the area a little with a hair dryer before bending.
What to do if the corners of the bathroom ceiling are rounded? Such options for finishing flows are found in houses of old construction. There are two options to solve the problem.
- Lower the plastic casing to the bending distance. The option is simple, but not suitable for everyone. The fact is that in some rooms the height is reduced by 10 cm or more. If the bathroom is already low, then it is not worth reducing its volume. And one more disadvantage of this method is that the height of the rooms in one apartment will not be the same. And this immediately catches your eye.
- Align the ceiling angle. You will have to chisel the old plaster in the corners to the height of the new flow. Then use putty to level the corner. Of course, such work should be provided before the panels are laid on the walls.
Is it possible to drill a hole of any diameter in a plastic panel without a special crown? It is possible, it will not be ideal in shape, but it is quite suitable for subsequent installation of lamps. All lamps have a decorative body, the diameter of which is larger than the size of the mounting socket. To make a hole you will need a drill and an ordinary drill bit with a diameter of approximately 3-5 mm.
Making holes for spotlights
- Draw a hole of the required diameter on the panel and in the selected location.
- Insert the drill bit into the drill and adjust it to high speed.
- If you have an assistant, great, he will place the panel on its edge and hold it firmly. If you have to work yourself, then hold the panel with one hand and use the drill with the other. This is inconvenient and difficult, the hole will turn out uneven.
- Drill a hole on the circle line, press the drill against the line and move it around the circle. Friction will melt the plastic, and the drill will “cut” a hole in it.
That's it, remove the burrs and the hole is ready.
What are the features of installing panels on the ceiling under spotlights? No matter how light the lamps are, a large number of them creates additional load on the panels; over time, the ceiling may sag a little. To prevent such consequences, you need to install intermediate jumpers more often; professionals recommend making the distance between them no more than 30 cm. In addition, choose durable lamellas for the ceiling, pay special attention to the characteristics of the locks, they are the ones that hold the weight.
How to choose ceiling lights for a ceiling made of PVC panels
Can dismantled panels be reused? A lot depends on how you shoot them. Cheap materials can cause long longitudinal cracks when the fixation points are torn off. To prevent this phenomenon, use the sharp end of a mounting knife to cut the junction of the lamellas with the frame along the entire perimeter of the hardware. Before re-laying, you will have to move the supporting frame a few centimeters in any direction so that the fixation is done on undamaged areas. Read the step-by-step instructions for installing a bathtub yourself on the website.
Dismantling of PVC panels
Putty and primer
The bathroom is a specific room, so it is necessary to use special construction and finishing materials that increase adhesive characteristics and serve as additional protection against high humidity.
Applying the finishing coat of putty in the bathroom
The primer and putty must be:
- antifungal;
- moisture resistant;
- moisture-proof;
- moisture-repellent;
- deep penetration;
- strengthening the surface;
- increasing adhesion to other materials.
Primer of walls
Before applying putty and primer compounds, you should make sure that all dust and dirt are removed from the surface, and that high-quality degreasing is carried out.
It is important to note that a deep penetration primer solution is first applied, after which has dried, the surface is puttyed or leveled, and then the re-priming process is carried out.
Product examples
There are several trusted manufacturers that produce special glue for plastic:
Moment crystal
- Universal adhesive for plastic Kleiberit on synthetic resins. Sold in tubes with a convenient nozzle. It has an affordable price, but it fixes PVC well, is not afraid of moisture and dries quickly. The composition is safe.
- Glue "Moment-crystal". Also a universal adhesive, it can attach plastic panel The advantage of the composition is that it is transparent.
- Another Moment glue is liquid nails (“Installation”). Lives up to its name. It will firmly connect even poorly compatible materials. There are samples for both interior and exterior work.
- "Emphikol" is a special composition for working with polyvinyl chloride. Colorless, viscous, forms a strong connection between the plastic and the surface.
- MitreFix is an alternative composition that is moisture resistant. Forms a strong seam.
READ Wall decoration inside a wooden house
MitreFix