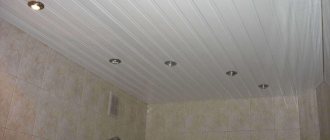
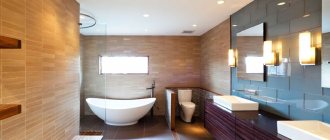
When carrying out renovation work in the bathroom, it is worth paying due attention to the choice of materials for finishing the ceiling. After all, the ceiling in the bathroom must be able to withstand temperature changes and high humidity well.
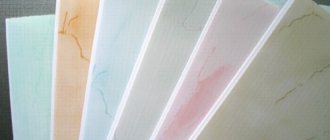
One of the most popular and well-established materials is plastic. There are a lot of photos of a plastic ceiling in a bathroom in different styles and designs.
You can use both glossy and matte plastic, in different colors. Plastic with marble and stone patterns looks very nice in the bathroom...
Brief overview of the article
Advantages of a plastic ceiling in the bathroom
Finishing the ceiling in the bathroom with plastic material has many advantages compared to other finishing materials:
- this material tolerates high humidity and temperature changes in the room;
- it does not swell when exposed to water;
- is considered a hygienic material and does not contribute to the development of fungus and mold;
- reflects light well;
- plastic panels can hide all unevenness and defects of the ceiling;
- quite low cost of material;
- long term;
- simple and easy care;
- easy to install;
- provides additional sound insulation and insulation.
Disadvantages of a plastic ceiling in the bathroom
Like any material, a bathroom ceiling made of plastic panels has some disadvantages:
- easily ignites;
- can easily burst from a mechanical shock;
- capable of burning out over time.
If you follow all the rules during repairs and do not expose the ceiling covering to various mechanical shocks, then all these shortcomings can be avoided.
Don't confuse ceiling panels with wall panels!
Building materials stores offer a very wide selection of PVC panels. They are of different lengths and widths, they come in varnish, glossy, matte, wood or marble. It's up to your taste; the main thing is not to confuse them with wall ones.
The modern market offers many varieties of ceiling panels. All that remains is to choose exactly what is suitable for your interior.
The difference is in weight.
Plastic wall panels are heavier and stiffer. Ceiling ones are much lighter, which simplifies the work. Their fragility necessitates careful handling: a dent can be left even by hand, not with a tool.
Stages of installing plastic panels on the ceiling
Installation of a plastic ceiling in a bathroom can be divided into several stages:
- Preparatory work for the foundation. It is necessary to remove the old ceiling covering, treat it with a primer and make all markings using a building level.
- Frame preparation work. For this purpose, so-called baseboards are used, which are attached to liquid nails. The entire plane of the resulting structure should not have any differences.
- Installation and connection of lighting devices.
- Assembling the entire structure from canvas. First you need to attach the starting strip, and then all the others one by one. You need to be careful with the last panel, as it will be the most fragile and difficult to attach.
On the Internet you can find a detailed video on how to make a plastic ceiling with your own hands without special skills.
Step-by-step instruction
Calculation of blanks
When going to the store, you need to determine:
- number of panels;
- footage of profiles: starting, sheathing;
- approximate fastener consumption.
The footage of the initial profile is taken 10% more than the perimeter. The factory length of the lamellas is divided by the width (longitudinal length) of the room to obtain an integer plus the remainder. Calculate results for different factory sizes.
Example:
Bathroom 1.6×0.7 m; range of plastic: 3.0×0.25; 2.7×0.25 m. Cutting width 2 mm. Choose a rational standard size.
The total number of segments required is: 1.6/0.25 = 6.4, rounded to the nearest whole number, we get 7 pieces.
For transverse laying, we determine the number of parts from the section: 3/0.7 = 4 pieces, the remainder of 0.2 m covers the allowance for the cutting width with a margin: 4 × 2 = 8 mm. From a section of 2.7 m, 3 blanks will come out, trimming 0.6 m.
Need to buy:
3 m: 7/4 = 1.75, rounded to the nearest whole number, we get 2 pcs.
2.71: 7/3= 2.33, you need 3 pcs.
Conclusion: the first standard size is more economical.
They also advise: determine the area of the room, add 15 - 20%, purchase the appropriate packaging of panels. The approach does not take into account the direction of laying or the actual output of workpieces from one factory product. Probably, whole sections will not be enough; the joined parts will be noticeable.
For the outline of the sheathing, a galvanized guide profile PN 28×27 is used, the footage is equal to the perimeter of the bathroom. Having retreated 0.5 m from the PN 28×27, crossbars from the PP 60×27 profile are placed in increments of 0.5 m. Additional crossbars are reserved for communications and lighting. If the PP 60×27 is held by suspensions, indentations from the partitions, the suspension intervals are 50 cm.
The wooden frame is made from timber 20×40 or 30×40, the spacing is identical to galvanized. The connections between the frame and the extended crossbars are reinforced with a pair of steel corners for each.
The bars, PN 28×27, are fastened with dowel-nails 6×60 or self-tapping screws 55 – 60 mm with plastic dowels, interval 50 cm, the hanger is nailed in two.
Dowel-nails
The number of self-tapping screws for fastening one cladding link is equal to the number of grille crossbars. The plastic is screwed to the galvanized sheet using self-tapping screws with a press washer and a drill. Metal components are connected in the same way or using screws with a drywall drill.
Ceiling level tapping
A laser level makes the task easier; in the absence of that, they make do with a tape measure, a bubble device, a square, or a marker.
Using a tape measure, mark the required position on the long partition; use a felt-tip pen to draw the horizontal line (base). Transfer the mark with a corner to the adjacent wall, draw a line, check the markings with a tape measure or spirit level.
Mark the border of the sheathing, setting aside the dimensions from the base. The correctness of the marking confirms the convergence of the starting and ending points obtained upon completion of the traversal.
Sometimes they deliberately deviate from the horizontal, aligning the ceiling along the tile seam.
The minimum clearance is limited by the size of the beam, the diameter of the corrugated hose of the electrical wiring, and the height of the hidden part of the spotlight or ventilation duct.
Assembling the support frame
Structurally, the frame can be spatial and single-tiered. The first represents a frame laid on intermediate supports or secured by means of hangers. Allows you to place ventilation and electrical equipment. A single-level sheathing is attached directly to the slab; the solution is simple and suitable for overhead shades.
The algorithm for a flat frame is as follows:
- Wall strips are attached around the perimeter.
- Place longitudinal or transverse beams (depending on the layout) every half meter.
The mounting holes in the boards are drilled in advance. The wood must be treated with moisture-repellent antiseptic and fire retardant compounds. Control the horizontal level by leveling the slats with impregnated pads.
The flat frame is attached directly to the ceiling.
The assembly of the space frame begins with the placement of longitudinal beams, maintaining an interval of 50 - 70 cm. Cross members are laid on top of them, spacers are used for the longitudinal slats, and the cross members are attached to wooden hanging posts.
Two-tier sheathing.
A common mistake is leveling profiles with unimpregnated wooden pads. The thickness of the wedge changes with changes in humidity, the structures shift, concavities and cracks appear.
The galvanized frame is assembled from profiles PN 28×27, PP 60×27. The first is used along the walls, the second - on the lintels. If the clearance is more than 3 cm, PP 60×27 is fixed on direct hangers. Local reinforcements for engineering equipment are connected with “crabs”. Operations are performed with instrumental reconciliation.
Installation of wall guides.
Fitting, adjusting crossbars.
Preparation, placement of hangers.
Fixing the crossbars
General form.
For cutting you will need metal scissors or an angle grinder with a cutting disc. Nodal assembly “on the ground” can be done with a riveter.
It is permissible to glue lamellas to smooth slabs using “liquid nails”. The method eliminates the laying of utility networks and the dismantling of cladding without damage.
In wooden cottages, the sheathing should not interfere with ventilation; fastening with a stapler directly to the ceiling is undesirable. When installing internal thermal insulation, the laid insulation is secured with additional slats, maintaining an air gap for ventilation.
Remember: the weight of communications and equipment is taken by the frame; it is not allowed to load the casing (with the exception of spotlights).
Ventilation system
The spacious ceiling allows for ventilation wiring. Diffusers are installed after installation of the cladding, having previously cut holes. The corrugated sleeve eliminates errors.
It makes sense to connect the vent located below the false ceiling with a pipe to the interceiling space. By equipping the panels with diffusers, they ensure constant ventilation of the structures, which is especially important after flooding by neighbors.
Ventilation of toilet, bathroom, ceiling.
Separation of the vent by a valve.
Start profile
There are several versions available for sale:
- U-shaped without plinth.
- Ceiling molding, cross-section reminiscent of Latin F.
- Composite ceiling: the plinth is detachable and does not interfere with the insertion of the panels.
The initial profile is attached to the wooden edging with a stapler. Stainless steel brackets are used, a long shelf is fixed, the connection is prone to weakening.
The screws ensure strong contact with the wall; the clamp bends the shelves, so craftsmen recommend gluing the molding or screwing it to the frame. Leaving the fourth side free, parallel to the layout, is an unnecessary precaution.
Attachment to PN 28×27.
Option for attaching to the partition.
In the corners the profile is brought all the way into each other. The lower shelf, which turns out to be the outer one, is cut at 45˚ with a construction knife or sharp scissors.
Angular mate.
It is advisable to cut the ends of the borders being joined in a miter box with a hacksaw, adjust the length, achieving a spacer of up to 1 mm.
Plastic sheathing
Elements are cut 5 - 10 mm shorter than the distance between the walls. To avoid errors due to distortions, measure dimensions along the entire room, making the necessary adjustments. Cutting is done with a hacksaw with a fine tooth, or a grinder with a thin cutting wheel. Carefully remove any burrs that interfere with the fit.
The actual width of the plastic may be less than the nominal width; as a result, an end gap is formed; when purchasing a product, take measurements. They eliminate the problem by adding a link, make the first and last planks identical, and spread them lengthwise, taking into account the overlap of the gap.
Insert the starting panel into the starting profile until it stops, bending the center and fitting the ends. Place symmetrically relative to the sides, help with a spatula.
Using screw heads, without punching through, pull the free edge to each intermediate beam. You will need an assistant to support and press the element while screwing.
Clamping to galvanizing.
Pull to the board.
Continue sheathing, insert the next components into the locks of the previous ones, and screw the free edges. Measure the distance between the inner wall of the initial profile and the penultimate part.
The end lining is made narrower than the gap by 5 - 10 mm, depending on the rigidity of the product. Insert the edge, pressing it firmly inside the profile, bending it, bring it in completely, and slide it into the lock.
Near the risers, cutouts are provided for pipes.
Lighting
The height of the ceiling for spotlights is taken with a margin of 2 - 3 cm over the dimensions, the holes are cut out with a crown in advance. For massive overhead models, additional crossbars and brackets are provided.
Point invoices.
Before the sheathing, the wiring is laid in a corrugation, fixed with clips. The lampshades are installed after sewing. Electrical safety requirements are established by Chapter 7.1 PUE.
Tips for a plastic ceiling in the bathroom
In order for the plastic ceiling in the bathroom interior to look beautiful and last longer, it is worth considering some recommendations from experts:
- For the ceiling in the bathroom, you should choose plastic that has a thickness of at least 8 mm.
- All material must be taken from only one batch, because there is a risk that another batch may be of a different shade.
- For the bathroom, it is best to give preference to plastic panels in light colors.
- White plastic will visually expand the bathroom.
- For a small bathtub, you don’t need to use profile guides.
- It is best to attach the starting profile only to 3 sides of the bathroom, this will make it easier to do the entire installation of the ceiling.
- For lighting devices, it is necessary to carry out parallel wiring from short to short.
- Self-tapping screws should be attached directly through the entire plastic panel, as close to the wall as possible.
Facing
Facing is done in different ways:
- direct fastening of panels to the ceiling;
- the use of intermediate guide rails, pre-set, leveled and connected to the ceiling;
- Pre-assembly of frames from wooden or metal parts and leveling them horizontally using the floor level is the best method, suitable for any ceiling.
Cladding is done in different ways
Wooden frames are made from slats with dimensions 50 x 20 mm. They are connected to each other with corners bent from tin, or wooden shorts with screws. Metal frames are most easily assembled from stock bent galvanized tin profiles used for plasterboard sheathing.
The flat frame structure is pre-assembled with alignment on the floor, then, after hanging, it is fixed in a horizontal plane using a water or bubble building level. The frame is attached to the ceiling using nails or self-tapping screws.
Advice When hanging and leveling, it is better to use galvanized sheet perforated strips, bent in the desired configuration.
The panels are attached to the frame in a standard way.
Additional attention should be paid to the design of transverse seams between panels, right and reverse corners at junctions with walls, door and window openings. For this purpose, elements called moldings are produced.
In the style of minimalism
To make frame slats, you need to take well-dried coniferous wood - pine, larch. This will make it possible to avoid warping and distortions of the ceiling surface during its operation. Before installing a wooden frame, its elements must be protected with antiseptics from rotting and fire retardants from fire. There are special deep penetration impregnations that combine these two most important protections for wood.
The voids created between panels, floors and frame elements are sometimes filled with mineral wool mats or foam sheets. This increases the sound impermeability and heat-insulating properties of the premises.
Practical material for ceilings
How to keep a plastic ceiling clean
In the bathroom, the ceiling should always be as clean as possible, so as not to breed dirt, mildew, or mold. Materials such as plastic panels are generally not conducive to mold growth, but they still require maintenance. With proper and systematic care, a plastic ceiling will last for many years.
When cleaning a plastic ceiling, it is prohibited:
- using abrasive cleaners, as they will easily scratch the plastic and erase all the gloss;
- sharp objects and brushes with hard bristles should not be used;
- when washing a plastic ceiling, do not put too much pressure on it, because such material is fragile and dents may occur;
- Do not use acetone under any circumstances, it corrodes plastic panels.
Simple means for cleaning plastic ceilings
A simple soap solution is best for cleaning a plastic ceiling. You can use both laundry soap (it’s better to grate it) and liquid soap. Wipe with a simple sponge, preferably the soft side.
Note!
Bathroom hood: overview of all types. Descriptions of the best manufacturers, as well as ratings of silent hoods
Linen drawer for the bathroom - an overview of original and modern ideas. Examples of open and closed baskets (100 photos)
Bathroom cabinet: TOP 100 photos of new designs and successful combinations in the interior
You can also use soda, namely, dilute the soda powder in a small amount of warm water so that it becomes a paste consistency. Gently spread this paste onto the ceiling, but do not rub or press. Leave for several hours, and then carefully remove the soda paste with a soft cloth or sponge.
If the plastic panels are plain and too dirty, then you can make a solution of water and vodka in a 1:1 ratio. Wipe heavily soiled areas with this solution using a simple cloth. Then wipe the panels with a wet sponge.
If yellow stains appear on a white panel, you can use bleach to remove them. For 5 liters of water, 1 tbsp is enough. l. bleach. Wipe the ceiling with this solution, and then rinse well with plain clean water.
For glossy panels, you can use regular glass cleaner. It will easily remove dust and light dirt from the plastic ceiling.
Lighting installation
It is better to make holes for built-in lamps during the installation of the ceiling, using a drill with a crown attachment. Or use a regular drill and trim the hole to the required size with a knife. In this case, the panel may already be fixed to the ceiling or not yet, as is more convenient for you. At this stage, the wires for the lamps are released through the hole, and it is more convenient to install them after the installation of the ceiling is completed.
We install lamps
The last panel usually requires cutting along its entire length. The width should be 1-2 mm less than the distance to the wall. First, the cut element is inserted all the way into the starting profile, and then it is moved towards the previous panel and the joining groove is aligned. If there are small gaps left in the starting profile, they are covered with sealant.