Apartment renovation involves many aspects. One of them is major floor finishing, which includes several types of work. This includes waterproofing, pouring screed, and, if necessary, laying a heated floor system and other communications, as well as finishing the surface. Each of these aspects is very important, because only by following all the technology for proper floor repair can you achieve a solid foundation and high-quality work. Waterproofing the floor under the screed must be done, as it can not only protect the concrete covering from destruction, but also protect the property of neighbors in the event of some unforeseen situations.
Waterproofing the floor under the screed
What is a screed?
Before we talk about waterproofing measures for the surface of a rough foundation, you should find out what a screed is and why it is needed. So, a screed is a special coating, a durable layer that will serve as the basis for the finishing floor covering. It is necessary to ensure that the surface on which the finishing will be laid becomes perfectly flat. In this way, it will be possible to protect the finishing material from premature deformation and destruction, and also to achieve a smooth horizontal surface.
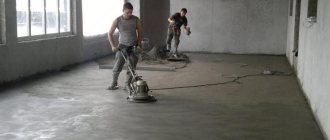
Concrete floor screed
There are several types of screed.
- Concrete or cement - one of the varieties of wet screed. The most familiar option for most apartment and house owners. It is carried out by pouring the rough foundation with a special construction mixture made from cement and water, sometimes with the addition of various polymer components.
Floor diagram with screed
- Self-leveling – also a type of wet screed. Only it is done with special mixtures, which themselves can be evenly distributed over the surface of the rough base in such a way that they will create a perfectly flat surface.
Self-leveling screed
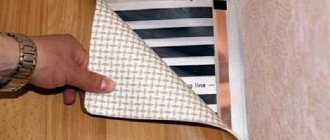
- Dry screed - performed using bulk materials without water, as well as using gypsum fiber laid on logs. The fastest way to level the floor.
Dry floor screed and installation of gypsum fiber boards
On a note! The drying time for the screed is about a month. It is necessary to wait this time, so it is not possible to continue finishing work immediately after pouring the screed layer. There are, of course, quick-drying mixtures that reduce the waiting time, but you still won’t be able to work on the base on the first day in any case. The fastest option is a dry screed, but it is not recommended to install it in rooms with high humidity.
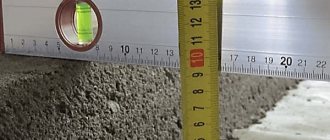
Checking the floor level
Screed is necessary in premises of any purpose, especially in residential buildings and apartments. This is the ideal base for any type of finish, be it a coat of paint or an expensive laminate.
Sick house or sick house syndrome
You may have heard of a phenomenon known as the “sick house.” In simple terms, it is a house that is filled with mold or other bacteria to such an extent that people cannot live in it. Very often, it is poor-quality or completely absent waterproofing that causes such houses to appear. When water penetrates the roof and walls, it mercilessly destroys everything in its path. This statement is true not only if you live in a wetland, but if your home is in a climate with average rainfall. If you are a victim of flooding, it becomes even more important to ensure that your home remains safe.
Is the waterproofing in a new building done incorrectly? Or do you have problems with waterproofing in an apartment or private house? Then they need to be resolved as quickly and without delay as possible! You should contact contractors in your area and ask them to inspect your home. The worst thing is to wait until the problem with waterproofing leads to irreparable consequences and not take any action. Removing water from your foundation, walls, and roof can be very expensive. Not to mention, extensive water damage can ruin your foundation. The best option is to take some preventive measures - this is better than waiting until it is too late. Your home and your family are the most valuable things that need to be protected. Take action!
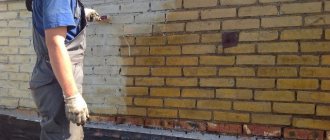
Waterproofing the floor before screed
Waterproofing is one of the activities carried out during floor renovation. It is done before pouring the screed and protects the room from moisture from the outside, and also protects other adjacent rooms from water from the renovated room getting into them. Waterproofing will also protect the concrete screed itself from the effects of moisture vapor, which is especially important if the room in which the repair is being carried out is located above the basement. If the cement base is constantly exposed to moisture, it will quickly begin to lose its performance characteristics - deteriorate, crack - and will last much less than it could.
Photos of cracks that have occurred
Attention! Waterproofing is especially important in areas where there is a risk of water leaks. For example, this could be a bathroom, kitchen, toilet, etc.
In the event of flooding of a room that does not have a waterproofed floor, the water will very quickly, under the influence of gravity, flow down through microcracks and pores, of which there are a great many in the structure of concrete. Thus, the liquid will seep to the lower floors and flood the neighbors or basement. Water can also get below the joints between the walls and the floor - usually in these places there are quite wide cracks.
Rolled floor waterproofing
Another advantage of laying a waterproofing layer is that it protects the health of people living in the apartment. If moisture cannot enter the room from the outside and accumulate in the area of the concrete screed, then the spread of fungi and mold, which so love a humid environment, will not occur. This means that they will not threaten human health.
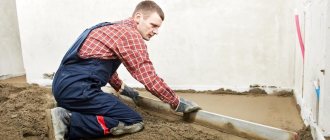
Waterproofing the base under the screed
The need to install waterproofing also lies in further high-quality work. If a waterproofing layer is laid, then the application of the mortar for the screed will be much better and smoother.
Attention! Waterproofing the floor is extremely necessary for those structures that do not have basements. They are extremely susceptible to moisture coming to them from the soil.
Some people believe that waterproofing is enough to do in the kitchen or bathroom, but this is far from true. A water-repellent coating must be laid in all rooms, because each of them has heating system pipes that can also suddenly leak.
Painting waterproofing
On a note! Materials for waterproofing are not that expensive, which means you can quite allocate a certain amount from your budget and still complete the protective part of the work. In the event of a flood, this will be more profitable than paying for damaged repairs to neighbors.
Options for waterproofing in a new building
There are several options that can be used to create a reliable waterproofing layer. The main ones are:
• Mastics are one of the most common options, since along with good quality waterproofing, the application of such materials will not require specific skills or tools from you; • Roll materials – also quite widely used in work; • Special mixtures based on polymers; • Penetrating waterproofing; • Rubber-based hydrobarriers.
If you plan to do the work yourself and want to achieve a reliable and high-quality result, then it is better to use mastics or rolled materials as a waterproofing layer on the bathroom floor. The installation process is somewhat different for these methods; it is better to analyze each in detail so that in the end it will be easier to decide. Waterproofing a bathtub with your own hands, the video will clearly show how installation occurs in each specific case.
Raw waterproofing sets very quickly
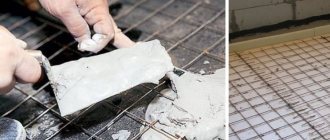
Mastics for waterproofing
The optimal solution for carrying out coating waterproofing work indoors is to apply mastic. In general, it should immediately be noted that waterproofing in a new building is made with the same materials as waterproofing in old housing stock.
It is worth preparing the following in advance for work:
• Primer – to improve the adhesive properties of the base; • Mastic – the material itself for waterproofing; • Brush and roller – will be used for applying primer and coating waterproofing; • Tape for gluing corners and connecting walls between each other and the floor.
Types of floor waterproofing before screed
There are several options for installing waterproofing indoors. They differ from each other in the design techniques and materials used.
Table. Methods of waterproofing floors.
| Method | Materials used |
| Rolled, pasted | In this case, various canvases are used to cover the subfloor, and the screed is poured on top. Previously, only roofing felt was used for these purposes. However, now there are a lot of more modern materials that differ in structure, properties, and substances used in production. Such waterproofing is a kind of protective membrane that can hold a sufficiently large amount of liquid if necessary. The advantages of this method include high speed and ease of installation, low cost of materials. Most often, filisol, isoplast, hydroisol, and other waterproofing films are used to protect against water. Bituminous materials or those made from fiberglass are also often purchased. |
| Liquid, coating | Waterproofing in this case is carried out with special mastics, often made on the basis of bitumen. The technique is often used in bathrooms, washrooms, and rooms with swimming pools. Waterproofing materials are applied with a brush or roller to the floor and walls. The most important thing is to prepare the surface to be coated well, that is, remove dust and debris. Otherwise, the integrity of the coating may be compromised. In general, among all types of waterproofing, this is the most reliable method. By the way, polymer resins are considered the most durable during operation. In order for such waterproofing to serve faithfully, it is also important to pre-treat the surface with a primer before application, and the material should be applied in several layers, changing the direction of movement of the brushes. |
| Using dry mixes | These mixtures are diluted according to the instructions on the package with ordinary water and turned into a kind of coating waterproofing. The material is applied in several layers (usually 2-3), each of which is well dried before applying the next. It is important that all layers are full and uniform. The mixture consumption for such waterproofing is about 1.5-2 kg/sq.m. This is quite a lot, but the mixture will also allow you to correct all the flaws made during the repair. |
| Impregnating | A simple but very effective method of protecting a room from moisture. Absolutely not afraid of water. It is produced using special solutions that are applied to the surface of concrete, interact with it and create a durable water-repellent layer. Solutions are made based on bitumen or polymers. |
roll waterproofing
Advice! Owners of private houses without basements are recommended to create a cushion of gravel, which is covered with sand. In this case, finely dispersed fractions of natural material will hold back moisture coming from the soil.
Video - Waterproofing. Types and applications
Rolled waterproofing
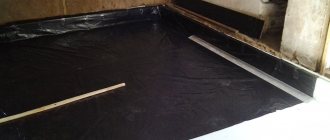
Rolled materials perfectly repel water and are often used during repair work. These include roofing felt. But you can accomplish the task assigned to you with the help of modern membranes. This is the most affordable method, characterized by ease and simplicity of operation. To install rolled waterproofing you will need to follow these steps.
- Spread the roll on a horizontal surface in several layers. Don't forget to overlap at the joints.
- The rolled material should extend onto the walls 15 cm from the floor.
- Carefully fold the material into the corners.
- For effective protection, the joints are coated with mastic.
Roll waterproofing is the most affordable in terms of price
Laying technology and materials
Installation of waterproofing is quite simple and is not difficult even for novice craftsmen. The most important thing is to follow the basic rules of work:
- methods of applying or laying a layer of waterproofing will directly depend on what technology is used and what materials are used;
- It is necessary to attach a damper tape around the perimeter of the room;
- joints between adjacent layers of waterproofing materials must be completely sealed;
- the surface to be treated must be perfectly clean;
- a primer should be used;
- The application of a waterproofing layer can only be done on a dry surface.
Bitumen mastic
It is worth remembering that the slightest mistake when installing screeds and laying waterproofing can cause large expenses. These procedures do not tolerate flaws. In some cases, it may even be necessary to completely dismantle all laid layers. However, it is extremely difficult to make a mistake during this work.
Rules for waterproofing in a new building
- Remember that the damper tape must effectively bind not only the mesh, but also the fiber, as well as the plasticizer of the thermal floor itself.
- The underfloor heating pipes should not touch the film.
- Waterproofing in new buildings should be done sparingly.
- The screed must be done immediately in a general layer (approximately from 50 to 75 millimeters - for a cement-sand screed).
- You can make a coating-type waterproofing or use a special film to seal all seams, but only in two layers.
- If the waterproofing is of the coating type, then you can use a simple construction primer and any ready-made mixture.
See also: Is it possible to make a floor screed in a Khrushchev-era building?
Preparation and some features
Before starting work on waterproofing a room, it is important to prepare the surface. To begin with, everything unnecessary is removed from the room - it should remain completely empty. Next, all debris is removed from the base of the floor/ceiling so that not even fine dust remains. All large protrusions on the surface are leveled, but this is usually done before the surface is cleaned. The joints between walls and floors, as well as all kinds of cracks, joints between floor slabs are sealed with cement mortar.
The floor surface must be carefully prepared
A layer of primer is applied to the prepared and dried surface. It dries quickly, so you won’t have to put off the main work for long.
Preliminary work
Cleaning the floor surface from dust before installing waterproofing
The room in which it is planned to install waterproofing must be completely empty. After this, the ceiling is completely “exposed” and cleaned (of dust, dirt and other debris). Next, a careful check of the slabs and joints begins.
Any cracks, every loose joint between the slabs is carefully sealed. Selective correction of defects in the future threatens heat loss and leaves ways for noise to enter the room. The most logical thing to do is to solve all the problems right away, rather than leaving them until the next repair.
If the base is a reinforced concrete floor, you cannot do without a penetrating waterproofing compound, for example “Betonokontakta”. Prices for it vary, starting from $1.3 per 1 kg. The costs will be relatively small, because impregnation is required only for rooms with high humidity: kitchens, bathrooms and toilets. It is recommended to cover the remaining rooms with simple primers. Thus, the floors will be protected from destruction and even the unpleasant smell of dampness will disappear after some time.
How much will you have to pay for materials?
Materials for waterproofing, of course, are not available for free, but among them there are a lot of affordable ones. The purchase of these materials for repairs is quite affordable even for a modest home owner.
Using paint waterproofing
Table. Average cost of some materials.
| Name | price, rub. |
| Hydroisol based on steklohost, 2.5 mm, 9 sq. m. | 400 |
| Uniflex TechnoNIKOL, 3 mm, 10 sq. m. | 1200 |
| Ruberoid, 15 sq. m. | 400 |
| Glassine, 13 sq. m. | 100 |
| Technoelast TechnoNIKOL, 4 mm, 10 sq. m. | 1400 |
| Aquastop - Perfecta, 20 kg (coating) | 650 |
| WaterStop SLIMS, 20 kg | 850 |
| Mastic Flachendicht, Knauf, 5 kg | 1250 |
| Bitumen mastic, 20 kg | 350 |
| Rubber mastic, 22 kg | 1350 |
| Construction bitumen, 25 kg | 600 |
| Bitumen primer, 20 l | 650 |
| Bitumen primer TechnoNIKOL, 20 l | 1800 |
Advice! For reinforced concrete floors in kitchens and bathrooms, it is recommended to use concrete contact and penetrating waterproofing.
Stage 5. Removing defects
Removing defects
Air bubbles formed during work, after hardening of the material, must be carefully opened with a construction knife and the air released. Then cover the coating cut with heated mastic, carefully pressing the area with a roller to the base.
Pasted and built-up roll waterproofing can be damaged when heavy objects fall on it, so immediately after hardening you can begin laying the concrete screed. The mechanism for laying a waterproofing coating may vary slightly depending on the purpose of the room and further types of work. For example, preliminary waterproofing under “warm” floors and preparing the premises for baths and saunas have several nuances.
The procedure for waterproofing with roll materials
Step 1. The base is pre-prepared and thoroughly dried. Rolls of material are rolled out parallel to each other. The material is partially applied to the walls of the room.
Rolls of waterproofing material are rolled out
Step 2. An overlap of at least 10 cm is required along the longitudinal edges.
The material is laid with an overlap
Step 3. Using a gas burner, the material is heated. This way it sticks to the wall.
Heating the material with a gas burner
Waterproofing material is glued to the wall
Step 4. The side seams are fixed in the same way.
The pieces of material are connected to each other in a similar way.
Step 5. At the end part of the sheets, the material is laid with an overlap of at least 15 cm. The end seams of adjacent rolls must be laid with a spacing of at least 50 cm.
The overlap is measured
Video - Foundation waterproofing
Cost of modern materials
The cost of waterproofing materials may vary. This factor is influenced by the online store chosen by the buyer, the manufacturer and the type of insulation itself. The most affordable in terms of price are: perforated films, membranes and roofing felt. Although they are more difficult to work with. Rolled materials require strong heating, so they require special equipment - a gas burner. And you need to work with the film very carefully so as not to tear it.
More modern hydrobarriers include liquid, dry and penetrating mixtures. They are somewhat more expensive, but are considered effective and versatile. Buyers can find out the specific cost of waterproofing in the price list of the selected online store. Here you can get advice from online consultants. Experienced specialists will help you choose a product, complete the purchase, and select a payment and delivery option convenient for the customer.
Using coating waterproofing
Table. Waterproofing using coating materials.
| Steps, photo | Description of actions |
| Step 1 | The surface of the rough base is carefully prepared. |
| Step 2 | The junctions between walls and floors are coated with a waterproofing compound. |
| Step 3 | Waterproofing tape is also glued to the joint. |
| Step 4 | The tape is completely covered with waterproofing material using a brush. |
| Step 5 | The surface of the base is treated with a waterproofing mixture. The substance is applied in 2-3 layers with preliminary drying of each. |
Why is insulation needed?
Installation of waterproof coatings is relevant not only for private houses and premises located on the ground and first floors, but also for basements, bathrooms, kitchens and storage rooms. High-quality waterproofing performs several important tasks:
- protects the concrete or wooden base from the harmful effects of moisture and temperature changes;
- prevents premature destruction of the foundation;
- helps normalize the level of humidity in the room, reducing the likelihood of the development of mold, fungi and pathogenic microorganisms.
A healthy microclimate is established in a waterproofed room, and there is no threat to human health.
Adhesive waterproofing of wooden floors
Waterproofing on the first floor of the apartment
The second task is relevant for apartments on the first floors, when there is freezing soil below the floor or damp and cold basements. But now the first floors in new buildings are most often given to representatives of small businesses. And it’s not uncommon for them to sit unused and unheated.
Or a cafe with a 24-hour kitchen or a beauty salon starts operating there, where water flows like a river from many taps. Then the same waterproofing measures as on the first floor are relevant on the second floor. Because the floor concrete, saturated with moist fumes, begins to crack. The process of destruction and soaking affects a thin layer of screed, and then laminate, parquet and similar coatings suffer.
This creates all the conditions for the active reproduction of fungal microorganisms. A floor affected by mold causes the air in living rooms to become musty and saturated with harmful particles of allergens and toxins from the finishing materials of the floor. This is dangerous for children's health, but adults also develop chronic respiratory processes. People become asthmatics without even understanding the causes of the disease.
Installation of insulation for tiles and self-leveling floors
Ceramic tiles are the most popular finishing coating for floors and walls in bathrooms, toilets and kitchens.
Facing work using tiles assumes that they will be laid on an absolutely flat and clean surface. As a rule, this is screed or cement-bonded particle boards.
That is, waterproofing of the floor under the tiles will be carried out either before pouring the concrete screed, or after hardening. The installation of insulation in front of the screed was discussed above.
General diagram of insulation under tiles
The installation of a hydraulic barrier after screeding for laying ceramic tiles is carried out in a similar way and consists of the following stages:
- The surface is cleaned using a vacuum cleaner.
- One or two layers of primer are applied to the floor surface.
- When using rolled waterproofing, the material is marked. For coatings with a self-adhesive base, remove the protective membrane and glue the first sheet of material with an overlap of 20-30 cm on the wall.
The use of bituminous mastics and coating compositions involves application in several overlapping layers
When waterproofing the floor only with bitumen or polymer compounds, they are treated with quartz sand. This is done in order to provide the best adhesion to the adhesive and cement compositions on which the tiles will be laid.
Sprinkling with sand occurs over the last layer that has not yet set. After drying, excess sand is removed using available means. It is recommended to lay the tiles no earlier than 24 hours later. When insulating in three or more layers, it is better to wait until 48-72 hours for installation.
Insulation under self-leveling floors in an apartment can be made using a similar technology using PVC film, roll coverings, and coating-cement mixtures.
Selection of waterproofing materials
It is necessary to select high-quality waterproofing materials taking into account the following factors:
- Humidity conditions in the room.
- Presence of underground levels.
- Type of subfloor (wooden, concrete).
- The type of insulators used (for the rough base or finishing coating).
There are situations when hydro- and vapor barrier materials must be selected based on what kind of heat insulator is used. There are varieties of it that lose their effectiveness when interacting with moisture. Accordingly, the thermal insulation layer made of such material must be reliably protected from moisture.
One of the following materials can be used as waterproofing:
- paints;
- mastics;
- insulating fills;
- backfill;
- roll
It is necessary to decide before purchasing all the advantages and disadvantages of the above materials, and therefore each of the above options will be considered further.
Types of insulating materials
All types of waterproofing materials can be divided according to the place of application - for external or internal. Division by composition is also valid. Then they are called bitumen, polymer, mixed (bitumen-polymer) and including mineral components.
In most cases, it is convenient to distinguish materials for waterproofing by the method of application. The most effective and therefore popular are:
- Roll, film (membrane, lining) materials ; including painting, coating, plastering compounds and mastics. These options are optimal for those who want to carry out the work themselves. Difficulties may arise with high-quality installation and connection of parts of the roll covering.
Roll materials are a reliable way to protect the floor Source myprofnastil.ru
- Penetrating waterproofing . Its use is accompanied by a number of conditions, and when applying it is important to strictly follow the instructions.
- Bulk waterproofing . A labor-intensive option used under screed. Upon contact with water, the granules form a gel (paste), stopping its further spread.
- Self-leveling polymer floors (3D floors) . A capricious and unpredictable material for floor waterproofing if there is no practical experience and equipment.
- Sprayed polymer coatings (polyurea) . For high-quality application, experience, special clothing and appropriate equipment are required.
See also: Catalog of companies that specialize in house design
Backfill insulators
Bulk materials are usually represented by a mixture of bentonite and water-repellent granules. In fact, it is an alternative to insulating wool. This coating has a minimal level of moisture absorption and excellent thermal insulation characteristics. Sometimes loose insulation is used not only for protection against moisture, but also as insulation.
You should be aware of the following nuances before starting work on backfilling the insulator:
- Preliminary finishing of the subfloor is carried out only with bentonites filled with water. Such a connection will lead to the formation of a kind of liquid, water-resistant gel-like layer.
- The resulting moisture-repellent material is poured over the rough base.
- Hardening occurs within a few days.
The advantage of this technology is that the material can also be poured into wooden houses between the joists at the base. The thickness of the layer can correspond to the level of the log.