Types of sealants
There are 3 main types of sealants on the building materials market:
- silicone;
- polyurethane;
- acrylic.
Each type has its own advantages and disadvantages that affect the specific application. It is worth considering them in more detail so that the choice of sealant for a warm seam is correct.
Silicone
Sealants based on silicone are:
- single-component (used in construction and repair work, including for warm joints);
- two-component (used in industry).
Two-component formulations, in addition to the silicone base, contain a catalyst. It promotes rapid hardening of the sealant.
Advantages of silicone sealants:
- plastic and “ductile”;
- have high strength;
- resistant to atmospheric influences (precipitation, temperature changes) and aggressive chemicals (can be safely washed and cleaned with any means);
- They can easily tolerate high humidity, so they are suitable for bathrooms and baths;
- “adhere” well to any surface (including wood);
- maintain protective properties over a wide temperature range (from -50°C to +300°C).
The only serious drawback is the fairly high consumption of silicone sealant. Sealing a log house using the warm seam technology will be expensive, but the durability makes up for it.
Polyurethane
Polyurethane sealants are also suitable for warm joint technology and are a common choice due to their wide range of shades. Their advantages:
- very elastic;
- easy to apply - the easiest option for beginners among all types of sealants;
- tolerate high humidity well;
- protected from aggressive chemicals and ultraviolet radiation (sun rays);
- have good waterproofing properties;
- withstands very low temperatures (down to -60°C);
- dry quickly.
However, polyurethane sealants have an undeniable drawback - they contain toxic solvents. Therefore, only sealing is possible on the outside of wooden houses - they are not suitable for interior work.
Acrylic
Acrylic sealants are the most popular currently. Their main advantages:
- cheap (sealing seams in a wooden house is no more expensive than caulking);
- after drying, a film is formed on the surface that does not allow wind, moisture and parasites to pass through;
- have an environmentally friendly composition (suitable for interior work);
- effectively fill even thick cracks - you can seal the seams in a wooden house that has already completely settled;
- have a wide color palette;
- allow steam to pass through (“breathe”);
- have excellent adhesion to wood.
The only disadvantages include a fairly narrow temperature range - from -10°C to +35°C. In winter, when the temperature drops below the limit, the acrylic composition loses some of its protective properties. Therefore, most often acrylic sealant is used for internal sealing of seams in a wooden house, and polyurethane or silicone for external sealing.
These sealants are an excellent replacement for caulk!
The functions of the open seam are:
- Compensation for changes in material dimensions. The temperature difference characteristic of winter and summer, combined with changing humidity levels, leads to drying out of the tree and a change in its volume. In the absence of an expansion joint, cracks may appear in the walls, their geometry may change, and waves may appear on the floor surface.
- Ventilation. In the absence of ventilation, the gap helps to freshen the air and reduce the appearance of mold.
- Drying the underground space. Penetrating through the gap, air helps dry out the underground space. This prevents the appearance of dampness. They are also trying to reduce the likelihood of destruction associated with rotten floors and the lower crowns of the log house.
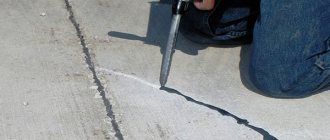
If there is a seam larger than 2-4 centimeters in size, a draft can cause the house to cool down, increase humidity, leading to mold. Such seams need to be sealed with the right materials, in compliance with technology.
Types of packaging
Special attention should be paid to the packaging options for sealants. Regardless of type, these drugs are available in several form factors. When choosing between them, you should focus only on personal preferences and benefits (large containers are cheaper if you need a lot of sealant).
| Type of packaging | Peculiarities |
| Tuba | The sealant is squeezed onto the seam directly from the tube, and then shaped and leveled with a chisel. But you have to work quickly - within 10 minutes the polymerization process begins, the sealant becomes harder and more intractable. |
| Bucket | In this case, the sealant is manually scooped onto a spatula and applied to the wood. |
| Box | Often equipped with a lid, which simplifies the work with the spatula. Sometimes there is an “adapter” to put the sealant into the caulk gun. |
| Cartridge | Specially shaped to be inserted into the gun. |
| Foam cord | Sold in rolls. It is used according to the principle of caulking with jute - the cord is driven into the crack with some hard tool. |
How our ancestors did
Previously, when there were simply no technologically advanced insulating materials on the market, our ancestors used moss, hemp or tow in their old log houses. However, even now many decide to use such authentic methods. Moreover, many masters still talk about their exceptional effectiveness. Finally, the advantages are that in this case we are talking about natural materials that are safe for health.
Moss can be placed in the cracks between logs without any additives. However, finding sphagnum in sufficient quantities today is not easy. As for tow or hemp, in this case the ideal solution is to add a solution of gypsum or cement to them. Moreover, some experienced craftsmen in this matter can compact these materials into the cracks so firmly that sticking an awl into them will be no less a difficult task than into the wood itself.
Instructions for sealing seams
High-quality sealing of houses made of timber is only possible if the person performing the work strictly follows the technology. There are several stages, each of which must be completed.
Tools
Before starting work, you should prepare the following tools:
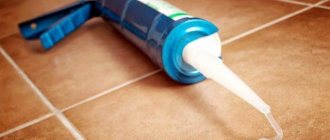
- a construction gun for installing sealant (if you don’t have a gun, you should buy sealant in tubes);
- metal spatula;
- polyethylene cord (for filling wide seams);
- chisel;
- masking tape;
- primer (wood impregnation improves the adhesion of the sealant and provides additional protection);
- paint brush (preferably with artificial bristles);
- soft cloth;
- container with water (it is much more convenient to level the sealant seam when the tip of the spatula is moistened).
Important! There is no need to buy the primer mixture separately. It is prepared as follows: the sealant is added to water in a ratio of 1:10, mixed thoroughly and left for 2-3 hours.
Preparation
Before you begin applying sealant, the surface of the walls should be prepared. This procedure consists of several stages:
- Remove previous coatings. It is highly advisable to remove old paint. And if the seams were previously caulked, then all materials must be completely removed.
- Cleans walls from dirt and dust. It would be a good idea to use a vacuum cleaner - even a small speck of dust creates an air bubble that prevents sealing.
- Prime the joints between the logs. It is advisable to cover all areas that will come into contact with the sealant. Dip a paint brush into the primer and coat the wood.
- Wait until the soil is completely dry. Only after this can you begin to apply the sealant.
Important! When you plan to impregnate wood with an antiseptic, the seams must first be sealed, and impregnated only after. It is impossible to apply impregnation before the sealant, as this greatly impairs adhesion.
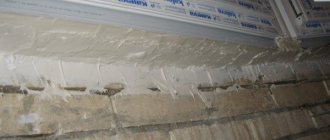
Application
It is recommended to work at positive temperatures, preferably above +5°C. The procedure for sealing a log house using the warm seam technology must be followed exactly:
- Cover the boundaries of the seams between the logs with masking tape. This is necessary to protect the rest of the logs from the sealant. Professionals don’t do this, but it’s better for a person without experience to play it safe so that they don’t have to clean off the dried product from the walls later.
- Hammer polyethylene cord into the seams using a chisel. It provides additional density and at the same time saves sealant consumption. To make the cord hold better, you can spray it with spray glue. But it is not advisable to nail it.
- Apply sealant to the joint area between the logs using a construction gun (or squeeze it out of a tube). The material should “capture” from 5 to 10 mm of each of the logs - this is the recommended volume to seal the log house using the warm seam technology.
- Moisten a spatula with water and use it to level the sealant. Also remove excess with a spatula. You can also moisten the seam itself by sprinkling a little water from a spray bottle, but this is not necessary.
- Level the seam more carefully using a paint brush. It should also be moistened a little in water.
- Wipe the logs on both sides of the seam with a dry cloth. Wet sealant stains must be wiped off immediately before they harden. Otherwise, it will be quite difficult to wash the wood later.
- Remove the masking tape.
After work you should wait 2 weeks. During this time, the sealant will dry completely. Most often, it dries faster, but it is better to play it safe by making allowances for the humidity, temperature and features of the purchased product. After 2 weeks, you can paint the warm seam with any paint and varnish preparation. But this is not necessary - painting has a purely cosmetic function.
Important! If acrylic sealant was used, then the paint should be acrylic.
Corners, cuts and joints
When sealing seams in a wooden house is carried out by a non-professional, the corners and cuts are the most difficult. The technology for sealing them does not differ from that described above, but there are nuances:
- the polyethylene cord should be measured and cut in advance - it will be more convenient to work with pieces of the required length;
- It is highly advisable to use spray adhesive to securely fix the cord;
- You should not save the drug in these areas - the main cold from the street comes through the corners;
- When sealing joints in a wooden house, you should pay special attention to the alignment of the seam, since unevenness in these places is very noticeable.
How to properly seal cracks in a wooden frame
Let's consider the process of sealing using modern methods, since few houses have a forest and a swamp near them in order to bring in moss. While the same polyurethane sealant and polyethylene foam cord can be purchased at any retail outlets.
- First of all, we place a cord in the hole between the logs, trying to drive it there as tightly as possible;
- We glue the edges of the logs with masking tape so as not to stain them during the process of applying the sealant;
- It is best to apply the coating with your fingers. However, if you do not have enough experience in this matter, then it is better to use a rubber spatula, which will help make the insulation more beautiful.
Common do-it-yourself sealing mistakes
Sealing carried out independently is often of poor quality. As a result, it is not possible to achieve complete heat and moisture insulation, and the work does not look very nice. To prevent this from happening, you should avoid common mistakes.
| Error | Description |
| Wrong choice of sealant | The selected product must be suitable for the operating conditions. So, only silicone composition is suitable for baths and saunas - it can withstand high temperatures. Polyurethane is only suitable for exterior decoration, and acrylic is best not used outside in regions where the winter temperature is below -15°C. |
| Careless wall preparation | The surface must be thoroughly cleaned. The remaining dust particles sharply worsen the adhesion between the materials, and complete sealing cannot be achieved. |
| No primer | With a primer, the sealant will last much longer and will adhere more reliably. |
| Careless seam alignment | When leveling the sealant is neglected, the seam looks crooked and unattractive. This spoils the appearance of the walls, and the situation cannot be changed if the sealant has time to harden. |
| Temperature violation | As mentioned above, you need to work with sealant at a temperature not lower than +5°C. But temperatures above +30°C are also not recommended. |
| Work during precipitation | Wet weather is especially harmful to acrylic compounds, but other types also suffer from waterlogging. It is better to carry out external work when it is dry outside. |
And finally, when creating a warm seam for a private wooden house, you should leave a little sealant in reserve. When drying, the seam may become deformed, and you will have to add a compound to straighten it.
If you want to add anything, we are waiting for your comments!
A few words about arrangement technology
We have already found out that acrylic or polyurethane sealants are best suited for sealing seams with your own hands. The instructions themselves are, in principle, simple. It is on every package, but it would not be amiss to repeat the general provisions.
Sealing technology.
Let's start with the fact that sealants are intended exclusively for sealing seams and cracks in an already constructed building. At the construction stage, the seams between the crowns are sealed with tow.
With this integrated approach, a so-called warm seam is obtained. There is a natural filler on the inside, and a reliable sealant on the sides, like in a good thermos.
Photos of the stages of arranging a seam.
A slightly different technology is used to seal large cracks and gaps in older buildings. Foamed polyethylene is tightly packed into the cavity, after which the seam is sealed with sealants from the outside. The result is a porous seal on the inside and an elastic membrane on the outside.
Applying sealant.
The video in this article provides recommendations for performing the work.