Not long ago I moved into a new home, in which everything turned out to be perfect, except for the cracked seams at the junction of the walls and floor in the bathroom. I could have suppressed my aesthetic sense, but the shower enclosure still required tightness, so I decided to figure out how to change silicone grout, and now I’m ready to share with you new knowledge and my own experience.
Use of sealants
Sealant is a modern composition for finishing work. The scope of its use is not limited to clogging cracks, but also extends to gluing certain materials.
But despite their versatility, sealants have failed to gain universal popularity due to their relatively high cost. Manufacturers are trying to eliminate this drawback; for example, sealants in soft packaging have begun to appear.
But regardless of the packaging, the sealant cannot be used without a specially designed device:
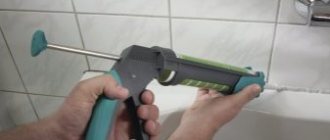
- For sealants in tubes, open or skeleton type guns are used.
- For sealants in soft packaging, closed tubular type guns are used.
The mixture from the tube is not transferred to the instrument, but is inserted along with the packaging. Before this, the spout of the package is prepared, and the tube is secured with a nut in the gun itself. And the packaging will replace the tool cylinder.
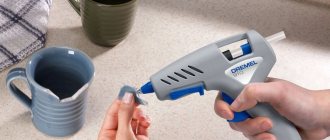
The soft pack also fits entirely into the gun. In both cases, after applying the composition, the pistols remain clean.
Many people do not want to buy sealant because... They are afraid that the composition remaining after the repair will dry out quickly and the money will be wasted. But this is a myth that was created due to the inconvenience of cleaning the sealant spout in tubes.
Hardening of the composition occurs only upon contact with moisture from the air. Accordingly, the sealant remaining in the package will dry only at the tip of the spout, and not entirely in the tube. Therefore, the shelf life of the started packaging of sealant can reach up to a month, and during this time there will always be somewhere to use it.
When is silicone grout required?
Every owner wants their kitchen and bathroom to look aesthetically pleasing after renovation.
But even the most beautiful tiles and drywall will look bad if the seams between individual segments look rough and sloppy.
In addition, drywall, even if perfectly adjacent to the wall, can crack at the joint. And in the bathroom and kitchen, it is necessary to protect the boundary between the sink and the wall from leaks.
Often, plastic corners or jointing (grout) are used for the inner edges of tiles. But the corners do not fit tightly, and dirt accumulates under them due to humidity. And the edge worn with jointing becomes cracked over time. In this case, silicone grout is the most reliable method.
Types of sealants
Sealants are a separate group of finishing compounds. The consistency can be from paste to ribbon. The main area of application is waterproofing seams and joints. But depending on the material from which the sealant is made, the scope and properties may differ significantly.
The composition is:
- One-component;
- Multicomponent.
Options with one component can be used immediately, but formulations with two or more components must be pre-mixed in the required proportions.
Based on how hard the sealant becomes, it is divided into:
- Drying after complete evaporation of the diluting component. Greatly reduced in volume;
- Hardening due to interaction with moisture from the air. After drying, they resemble rubber;
- Not hardening at all. Similar to plasticine.
According to the main component they are divided into:
- Acrylic;
- Silicone;
- Polyurethane;
- Bitumen;
- Thiokol.
Properties
The basis of the seal is silicone polymer. It determines the characteristics of the sealant:
- Elasticity. Thanks to this, the compactor can be used on moving bases. The composition compensates for deformation movements at the joints.
- Strength, resistance to mechanical and tensile loads.
- Good adhesion to ceramics, glass, metal, wood, concrete, plastic.
- Weather and UV resistant. Thanks to this, silicone sealant can be used outdoors.
- The temperature range at which silicone can be used is from -50 to +200˚.
What does it consist of?
For the production of sealants the following are used:
- synthetic rubber (silicone);
- a filler that gives the composition the required volume;
- plasticizer;
- vulcanizer, which imparts viscosity to the sealant;
- strengthening additive and adhesion modifier;
- pigment that gives color to a material;
- antiseptics that destroy harmful microorganisms.
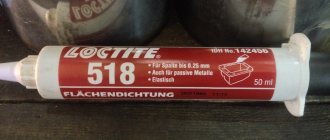
There are two types of vulcanizers added to the sealant. Based on this, there are two types of silicone sealant:
- Acidic compounds. They are easily identified by the specific smell of vinegar. These sealants are very durable. However, they cannot be used on marble, aluminum and cement mortar substrates due to their instability to acetic acid.
- Neutral analogues. They are used to work with any type of base.
Filling the sealant into the gun
Even a non-professional can handle filling hard tubes into a gun. But in filling soft packaging there are several nuances that you need to know and take into account.
When filling a soft package into a gun, the top part is cut off, the wire plug is removed, and only after that the package is inserted into the cylindrical body. After placing the bag, you need to tighten the nozzle with the end cap.
The tip of all sealants is cut off before use.
All solid tubes are inserted in the same way:
- Before use, you need to prepare the tip, which is cut at an angle of 45 degrees. The marking must be selected so that the hole is already of the required thickness of the composition. After trimming, screw on the included applicator.
- The piston and rod rise to the maximum position.
- The tube is inserted into the tool with its sharp end into the end hole.
- The rod is fixed on the cylindrical bottom of the tube and is firmly fixed. For the composition to appear, you must press the piston several times.
This is how sealants are put into a gun in a simple way.
Peculiarities
The sealant gun got its name because of the similar principle of operation to the prototype. In addition, this tool looks like a real pistol. The guide imitates the barrel of a weapon. There is also a special device called a trigger. There is also a comfortable handle.
The tool is focused on the ability to squeeze out a silicone substance from a tube , which is usually cylindrical in shape, or other packaging. The main difference with other mounting guns is its design. For example, a power mechanism is not necessarily present. Caulk tools come in a variety of varieties, but those that have a manual mechanism are just as effective as automated ones. Automated models are considered professional. For household use, they are more convenient when you need to seal a lot of small seams.
The design of the sealant tool is divided into types. However, a pusher, a compartment for a tube, and a holder are present in any product. Let's take a closer look at the features of household models that are equipped with manual mechanisms.
Since substances are mainly sold in tubes, a manual sealant gun is manufactured in such a way that this particular packaging option is suitable. A special feature of the tool is its movable bottom. It moves easily along the body of the product. The tip of the mechanism is universal, allowing you to place a variety of attachments inside. These parts give the extruded substance the desired shape.
The bottom of the gun moves due to the action of the piston. This mechanism is set in motion when the trigger is pulled. The pusher applies pressure to the bottom of the container, which causes the substance to move and be squeezed out through the nozzle. This pistol format is considered universal, and therefore can be used with different substances.
Sealant consumption
All construction and finishing materials have an expiration date. Therefore, it is better to buy the compositions exactly so that they are enough for the planned work. When calculating the quantity, take into account the recommended parameters:
- Thickness 3.5 mm;
- 300 ml per 17 linear meters.
Application area
Based on their area of use, the following types of silicone seals are distinguished:
- Sanitary acid sealant. It is waterproof and resistant to harmful microorganisms. Thanks to this, the composition can be used in damp rooms. The sanitary sealant has good adhesion to glass, ceramics, enamel, wood, brick, concrete and metal. With its help, joints and cracks around plumbing fixtures, on pipelines, and on wall, floor and ceiling cladding in wet rooms are sealed.
- Heat-resistant composition. It can withstand temperatures up to +300˚. Has good adhesion to glass, metal and ceramics. Resistant to technical oils, fuels and lubricants. Due to its characteristics, it is used in heating networks, air conditioning systems, kitchen and automotive equipment.
- Glass seal. Has good adhesion to smooth and porous substrates. Resistant to ultraviolet radiation and temperature changes. Used for ceramics, wood, bricks, glass elements and mirrors. This material cannot be used for acrylic and PVC.
- Universal silicone. It is designed to work with porous substrates, ceramic, glass and metal surfaces that do not rust. The composition cannot be used on acrylic, PVC and iron.
- Sanitary material on a neutral vulcanizer. Resistant to external influences. It is designed for working with building materials. This sealant cannot be used in damp areas.
- Neutral silicone for processing natural stone. The material is resistant to ultraviolet radiation and weathering. This sealant can be used to treat bases made of stone, glass, PVC and acrylic.
- General construction neutral sealant. It can be used outdoors and indoors, when processing hard joints. The material has good adhesion to all building materials.
- Roof sealant. The material is resistant to atmospheric influences. It is designed for sealing roof elements: cladding, chimney pipes, attic windows, etc.
Surface preparation before applying sealant
For a longer service life of the sealed layer, careful surface preparation is necessary. The better the preparation, the stronger the grip on the surface.
The entire preparation process can be divided into several stages:
- Removing all contaminants from the working surface;
- If necessary, thoroughly dry;
- Degreasing stage;
- Secure masking tape on both sides;
- Drying.
And after that you can apply the building composition.
We seal the interpanel seams
Sealing of interpanel seams must take place in several stages; this is the only way to achieve maximum quality. We will look at the “warm seam” method, the main difference of which is the application of special heat-protective foam at the base of the joint. This method has been used in many countries for several years, which indicates its quality and practicality.
Correct application of sealant
Many people think that there is nothing easier than sealing the seam. But when faced with this work personally, people have many questions: how to apply the mixture evenly, how to avoid flaws, how not to interrupt the line, and many others. Is it possible to avoid such questions? Let's consider all the nuances.
Required equipment:
- Putty tool;
- Stationery knife;
- Spray bottle;
- Lint-free cotton fabric;
- Sealant of a suitable type with a gun;
- Degreaser;
- Masking adhesive tape;
- Water;
- Soap;
- Paper towels.
Progress of finishing work:
- Select the appropriate sealant.
- The surface must be prepared according to all rules.
- To limit it, apply masking tape along the edges of the seam.
- Fill the gun with sealant.
- Begin application by holding the tool at a 45-degree angle relative to the surface to be filled. The angle should not change throughout the entire length!
- Start filling from the far corner, drawing a line towards you. The optimal speed of movement is 2 centimeters per second.
- After finishing application, do not forget to put the safety lock on the piston and put the protective cap on the tip of the tube.
- To remove excess solution, soak a spatula in soapy water. Use a spatula to remove excess from the seam using light pressure. After removal, wipe the spatula with paper towels for cleaning.
- The next step is to remove all masking tape.
- After spraying the cracks with soapy water from a spray bottle, smooth them out with your finger.
- The sealant is removed from the skin with warm water and soap.
If you follow all instructions exactly, your work will be indistinguishable from the work of a professional.
Adviсe
Pay attention to useful tips that will be useful for both beginners and professionals.
- When choosing a pistol for a one-time job, you can look at cheap options: skeletal, semi-body.
- It is clear that there is no way to check the ability of a tool to work, but higher quality tools are usually heavier in weight.
- If versatility is required from a tool, it is worth considering options among case models. They are also the most suitable for frequent use.
- If the sealant was purchased not in a tube, but in a soft package, it is enough to unscrew the fixing nut and remove the upper spout. The packaging is inserted into the housing device and the upper part is cut off with a knife. The spout with the fastening nut can be installed in its place.
- If the sealant is purchased in a cartridge, carefully examine the tube spout. On it you can see marks along which it is convenient to cut off this very spout. The marks initially set the thickness of the extruded paste.
Please note the recommendations for applying the paste:
- the seam being processed, for example, between a wall and a bathtub, must be thoroughly cleaned;
- surfaces are degreased;
- areas of surfaces that do not need treatment are protected with construction tape;
- the line of the extruded substance must be continuous;
- wait until the substance is completely dry, and only then remove the masking tape.
- 1 Design and principle of operation
- 2 Application procedure: instructions
- 2.1 Video: how to insert sealant into a skeleton gun
- 2.2 Video: features of using a frame pistol
- 3 Recommendations for using sealant and gun
- 3.1 Video: how to optimize a casing gun for sealant
Nowadays, the building materials market is so diverse that everyone will find what they need, both in quality and price. One of the most used materials in construction is sealant. With its help, you can protect the joints between materials from moisture, as well as eliminate some defects. The only problem with the sealant is the difficulty in removing it from the tube without a special tool. In this article we will tell you how to use a caulk gun. Using this tool will increase your work speed and make it more enjoyable.
How to remove sealant from a surface
You now know how to apply sealants to the surface. But we still need to figure out how to remove the sealant. Since the sealing compound is quite strong once it dries, it can be very difficult to remove.
If the layer of dry sealant is thick enough, then removing it will not be difficult: pry the mixture from the edge and pull it back, so you can remove the entire layer at once.
- But a thin layer or a missed stain is much more difficult to remove.
- The composition that has not had time to dry completely can be carefully cut off with a stationery knife, but if everything has frozen 100%, then you cannot do without solvents.
- The stores offer a large assortment of cleaners, after which the sealant is removed with a napkin or also with a knife.
But it is best to avoid missing sloppy sealing areas to avoid unnecessary expenses and unnecessary work.
Additional materials and tools
In order for everything to go smoothly and not have to be redone, you need to prepare the necessary tools. It is better not to skimp on this matter, since an uncured composition can be dangerous, and it is better to prepare carefully. For example, you can remove excess material with your finger, however, you should remember that if your skin is sensitive, irritation may occur. Consequences such as allergies, peeling of skin and nails are also possible.
A set of tools for working with silicone sealants:
- Construction gun, scissors.
- Paper wet wipes and soft rags with clean water.
- A special spatula for shaping silicone.
- Alcohol, professional degreaser or acetone.
- Spray bottle filled with soap solution.
- Mounting tape and tape.
How to avoid buying fake or low-quality sealant
But, like most high-cost goods, sealants are also counterfeited. In order not to be disappointed in this excellent material, study the tips for choosing:
- Labels must not be damaged;
- If possible, weigh the packaging. The difference between weight and volume should not exceed 30 grams;
- Do not take a composition with a suspiciously low price;
- No silicone sealant can consist only of silicone. Therefore, do not believe such inscriptions;
- Take a product with a density of 0.85 g. on cm;
- If you have doubts about the quality, ask the seller for product documents.
Follow these tips and the chance of purchasing a product of low or inadequate quality will be much lower.
If chosen and applied correctly, the sealant can greatly facilitate finishing work. Don’t be afraid to work with different materials, because many of them are much more convenient than the “old-fashioned methods.”
We use masking tape
Apply masking tape on both sides of the joint (professionals recommend using Eurosel, Tesa) and apply silicone. This method is also called dry grouting because the tiles are not wetted. If you accidentally missed any area, you can add more grout.
Using masking tape to create an even seam
The advantage of this method is that the surface around the seam remains clean. This is the best option for beginners as there is an opportunity to correct mistakes.
Photo instructions on how to apply sealant correctly
How to seal interpanel seams - step-by-step diagram
Step 1: Preparatory work
First, we clean the surface of dust, dirt, old paint and parts of peeling panels. We also remove old insulation and sealant. Next, carefully fill the seams with foam. We should not forget that this material tends to expand when hardening, filling the void inside the seams.
Step 2: Installation of insulation
To insulate seams, it is best to use Vilaterm, produced in the form of hollow tubes. The product is characterized by a high level of elasticity, dense structure, and ease of use. Lay the material on top of a layer of not yet hardened polyurethane foam. The installation of insulation should not have breaks, but it is also necessary to leave space for subsequent application of sealant.
Step 3: Apply Sealant
The very last step is to seal the seams with a water-repellent sealant.
It must be applied so that it completely covers the insulation laid in the seam. We told you how to seal seams with sealant. We hope that our recommendations for choosing a product and sealing will help you carry out all the work with the highest quality possible!
- Author: Mikhail Malofeev
Rate this article:
- 5
- 4
- 3
- 2
- 1
(0 votes, average: 0 out of 5)
Share with your friends!