Plastering for painting is gaining popularity; modern means allow this process to be carried out easily, without resorting to the services of specialists. And this significantly reduces the repair budget. At the same time, the painted coating looks fresh and beautiful. Next, we will tell you in detail how to plaster walls and ceilings for painting, the rules for choosing products and the intricacies of working with different materials.
Painting after puttying
Painting easily highlights all defects, so the preparatory stage of the base must be carried out carefully. The walls are plastered for painting and, under certain conditions, putty is applied to the surface. To prevent a novice master from making mistakes, he must study in detail all the nuances of the work; knowledge of them will help to obtain a finish that will be pleasing to the eye and will last a long time.
Painting easily highlights all defects, so the preparatory stage of the base must be carried out carefully.
Painting walls of various surfaces
The walls that are planned to be painted can be made of any material. The most common surfaces are:
- with a smooth texture after processing plaster and putty;
- surface coated with decorative plaster;
- walls finished with ceramic tiles, wallpaper, plastic or wood panels;
- textured coating.
The type of surface plays a huge role in the choice of paint. Not every composition can be applied to any surface, because there are paints created specifically for wood, for painting only paper surfaces, there are oil-based, nitro-enamel and water-soluble compositions with powder dyes.
Preparatory work must be carried out taking into account the type of paint you will use. In particular, the type of primer should match the type of paint and it is very desirable that they be the same src=»https://kraska.guru/wp-content/uploads/2016/06/steny-pod-pokrasku-4-600×450. jpg" class="aligncenter" width="600″ height="450″[/img]
- If the walls in the house are wooden, then at the initial stage you should sand the surface of the wood, and only then apply a layer of putty to it to hide all the small cracks. Since wood is a material susceptible to rotting, it is pre-treated with an antiseptic solution before painting. In some cases, it would be a good idea to treat the wood with fire retardants and then paint it.
- During preparatory work with a textured coating or decorative plaster, the walls are simply treated with a primer, since its surface is uneven and will remain so after painting.
- If you apply paint to wallpaper, then they are treated with a primer, or if the glue has the properties of a primer, then with a layer of glue.
How to prepare walls for paint
Work begins with preparing the workplace, tools and materials that will be used in the process. The base is cleaned; all types of contaminants must be removed; the presence of old coating requires checking its strength characteristics. If there are doubts about the reliability of the adhesion, then it is better to remove it from the surface. Any defects may result from a rapid breakdown of the integrity of the painted layer of the new finish.
Experts recommend always completely removing the old coating. They also check for the presence of self-tapping screws on the walls; they are removed to avoid injury during the work of the master. The resulting indentations after their removal are covered with putty.
Deep penetration primers are applied to the cleaned surface before plastering. This stage helps to obtain a higher adhesion rate and saves material.
The products have a chemical composition, so safety precautions are observed when working.
Experts recommend always completely removing the old coating.
Painting
Plastering and painting walls is carried out in any premises, but if we are talking about a bathroom, kitchen or unglazed balcony, then working with a gypsum compound is prohibited. The fact is that such a coating is not moisture resistant; on the contrary, it will actively absorb moisture.
To prevent defects in the wall from appearing after painting, carefully treat it with a primer and sand it with sandpaper.
Before painting, the walls must be treated with a special primer, which will ensure high-quality adhesion of materials to the surface, prevent paint absorption, and help reduce material consumption.
After priming, the walls are puttied, applying two or three layers of putty, including the finishing composition. This will fill all small cracks and voids, and after treatment with abrasive materials the surface becomes absolutely flat and smooth.
The walls, sanded with sandpaper, are primed twice and after complete drying they begin to paint. The peculiarity of the paint is that already its first layer will emphasize and reveal all the shortcomings made during the surface preparation process. For useful tips on painting walls, watch this video:
To paint plastered walls, certain paints and varnishes are used, applying them strictly in accordance with the instructions. First, they “retract” the corners and immediately roll the walls with a roller, directing the movement from bottom to top, preventing the previous layer from drying out.
Plaster technology
After the primer layer has completely dried, the ceiling is plastered for painting. It is applied gradually to ensure that all irregularities are removed.
The correct technology involves applying a finishing agent. The plaster mixture is mixed according to the instructions written on the package. It is important that it is not cold, this will help avoid the formation of lumps. It is better to use a construction mixer for mixing; the mixture is added in small portions, in the end it is necessary to obtain a homogeneous mass.
The finishing layer should dry within 4-5 hours.
After the coating has dried, a visual inspection is carried out. When defects are detected, they are leveled with a grater and moved in a circle. The grater should be wetted with water. When all the irregularities have been eliminated, they proceed to painting the surface.
The plaster is applied gradually to ensure that all irregularities are removed.
How a beginner can plaster walls with his own hands: video instructions
It is first necessary to carry out preparatory work aimed at cleaning the surface of various types of contaminants and removing old finishing materials. This stage is important because it determines how well the plaster will hold up in the future.
In order to ensure reliable adhesion, it is necessary to thoroughly clean the wall, removing anything that may be between its base and the plaster. The cleaning method is selected taking into account the characteristics of the material from which the wall is made. All cracks identified during the preparatory stage must be eliminated in order to prevent cracking of the plaster in the future.
Preparing the wall for applying the plaster mixture
There are various ways to repair cracks in a wall, each of which is suitable for a particular size of damage. Small cracks that extend deep into the wall will require widening to reach the narrowest part.
Having found its base, cleaning is carried out in order to remove dust and dirt. Then, using a brush, apply a generous amount of primer. When everything is completely dry, the crack can be repaired using putty made with gypsum or cement. Using a spatula, you need to try to level the “patch” with the wall surface as best as possible.
A shallow narrow crack can easily be sealed with sealant or silicone compound. Usually, the tube comes with a special nozzle with a thin spout, which allows you to easily carry out such operations by directing it deep into the crack.
If you need to eliminate really extensive damage, then you can use polyurethane foam for this purpose. Typically one coat of primer is applied and then the space is filled.
Helpful advice! If during work excess foam protrudes above the level of the wall, it can be easily removed by cutting it off with a sharp knife.
How to plaster a brick wall: surface preparation features
The best way to plaster brick walls inside a house is a controversial issue. However, regardless of the choice, a high-quality surface preparation procedure must be carried out.
Plastering a brick wall using beacons
Often you have to deal with the fact that there is already a layer of old plaster on the surface of a brick wall. In this case, it is necessary to get rid of it efficiently. To do this, you can use water and a sponge, wetting the surface several times and waiting until the water is absorbed. This procedure will make the task much easier.
After this, using a spatula, the thickness of the working surface of which is at least 1.5-2 mm, and also a hammer, the old plaster is knocked off. To do this carefully and at the same time effectively, you first need to carefully tap one of the sections of the wall with a hammer. As a result of this procedure, cracks will appear, which will allow the coating to be picked up with a spatula. If necessary, you can also tap the handle of the spatula with a hammer to facilitate the process of removing the old coating.
Related article:
Why do you need a mesh for plastering facade walls? Main types of mesh, principles of selection, areas of application, methods of plastering, application options, tips and tricks.
After removing a layer of old plaster, you need to walk over the surface with an iron brush or sanding machine. After this, you should start deepening the seams between the bricks. This will ensure better adhesion between the plaster and the wall. It will be enough to deepen them by 5-7 mm.
The final stage of preparing a brick wall is cleaning the surface with a soft brush and a damp cloth. Then all that remains is to apply a layer of deep penetration primer. Moreover, it is better to do this in two layers, first letting the first layer dry before applying the second.
Before applying plaster to a brick wall, it must be primed
Features of preparing the surface of a concrete wall
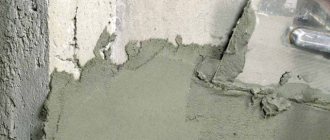
Compared to a brick wall, a concrete wall is much easier to clean. However, due to the smoother texture, it will be more difficult to apply the plaster in such a way that it sticks.
In order to remove a layer of whitewash from a concrete surface, you need to thoroughly moisten the sponge with water and wipe the wall. Then, using a wire brush, remove the unnecessary layer and thoroughly wipe the surface again.
Another way is to apply a thick layer of paste over the whitewash. After complete drying, using a regular spatula, the entire top layer can be easily cleaned.
Having completed cleaning, you can proceed to applying shallow notches on the surface. This measure will ensure traction. Despite the fact that applying them will require a lot of effort and time, this process is very important and determines the result of the work, so this stage should not be neglected.
Applying plaster to chain-link mesh
Some prefer to use a simpler method that does not require notching - priming and adding quartz sand, followed by plastering the walls with cement-sand mortar. Due to the fine fraction, it is held on the surface, creating adhesion between the plaster and the wall. However, this method is not always effective, and to ensure its effectiveness, it is recommended to first test it on a small section of the wall.
Helpful advice! A simple test will allow you to determine how effective quartz sand will be: a primer with sand is applied to the surface and left until completely dry. Then you need to run your hand along the wall. If the sand begins to crumble when touched, then you will have to worry about creating notches on the surface.
Features of preparing a wooden surface
The process of cleaning a wooden surface is the simplest of all the tasks considered. In this case, it is enough to knock on the wall with a hammer, and the plaster will simply crumble onto the floor. It is recommended to lay down plastic film in advance to avoid contamination and facilitate the cleaning process.
Preparing a wooden wall before plastering
To fix the plaster on a wooden surface, you will need to fill special wooden slats. People call them shingles. Using ordinary nails, they are driven all over the wall, oriented diagonally. This allows you to create not only an excellent basis for laying finishing material, but also at the same time solves the problem of the need to create beacons, which are required to level the surface of the wall.
If, after removing a layer of old plaster, shingles are found underneath, it must be knocked down and a new one made. Wooden elements quickly become unusable, succumbing to rot, insects and the influence of time. In addition, old shingles often serve as a source of unpleasant odors.
It is important not to forget about the need to apply protection to all wooden surfaces and elements. An antiseptic is necessary to prevent the appearance of fungi, mold, and harmful insects in wood. The composition is applied to each element and to the wall before the shingles are installed, and then again after the installation is completed. This allows for the maximum level of protection.
Lime based plaster composition
There are cases when, instead of wooden slats, a metal mesh chain-link is used for sheathing. This is also an acceptable option, however, its thickness must be at least 3 mm, and fastening should not be carried out to the wall surface itself, but to slats specially prepared for this.
How to properly plaster walls with your own hands: video instructions for placing beacons
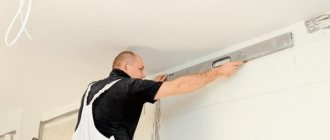
Since one of the main goals of plastering is to level the existing surface as much as possible, guidelines, otherwise called beacons, will be required. To understand how to plaster walls using beacons, you need to understand how and why they are placed. This is done using a building level in order to be able to make the surface as even as possible in the future.
Typically, metal guides are used for this purpose, fastened with gypsum mortar. This method is good because the plaster dries quickly and does not allow the profile to move, holding it in a given position. Such beacons should be placed at a distance of approximately 1.5 m from each other.
Drawing of room marking with beacons
Helpful advice! If the existing level is too short and its length is not enough, in order to check the evenness of the beacons, you can use a long block. It is placed against one of the guides until the solution is completely dry, and a level is applied to its center.
As an example, you can see the instructions on how to plaster walls with your own hands without beacons. The video will clearly demonstrate other surface leveling options.
Rules for applying plaster to the surface
Plastering the surface consists of three stages, in each of which a layer of mortar is applied. Each of them is different and is laid using a special technology that best suits its purpose. The first layer is the thickest. It is thrown onto the wall and actually serves as a rough draft, on top of which more even and smooth layers will be laid in the future.
The first layer is applied using a trowel or simply by hand. It is only important to remember that if the solution comes into contact with the skin, you must take care of protection in the form of rubber gloves. The thickness of the first layer depends on the base: for a brick or concrete wall 5 mm will be enough, but for a wooden wall you will need a layer of about 8-9 mm, taking into account the lathing.
A special mesh between the wall and the plaster layer ensures the best adhesion of the mixture to the wall surface
The second layer should be applied more carefully, but still it is not the finishing coat. It is applied using a wide spatula or trowel, bringing the solution to a dough-like consistency. The thickness of the middle layer should be about 7-8 mm.
The finishing layer is prepared with the addition of fine-grained sand, which does not contain large inclusions. The consistency of the solution should resemble sour cream in order to lie evenly and smooth out all the unevenness that remains after applying the first two layers.
For beginners in this matter, purchasing ready-made mixtures for each layer, which are available in any hardware store, will help eliminate the risk of error. Their compositions almost always promote good adhesion and provide a durable and reliable coating.
It is also worth first watching a video on how to plaster the corners of walls. Of course, it is easier to work with a flat surface, but leveling the corners may require some skill, especially considering how imperfect the initial data can be.
Methods for reinforcing corners before applying plaster
How to prepare a solution for plaster with your own hands
Despite the opportunity to save yourself the hassle and purchase ready-made compositions, many prefer to try to do everything themselves and prepare the plaster for each layer with their own hands. Let's look at a few of the most popular recipes that are widely used and have already gained trust:
- A cement mortar in which 3 parts sand must be added to 1 part cement.
- A lime-based solution in which 3 parts sand is added to 1 part lime.
- Cement-lime: 5 parts sand, 1 part lime and 1 part cement.
- Lime composition with the addition of gypsum: 1 part of dry gypsum is added to 3 parts of lime, mixed to a dough-like state.
Important! The resulting solution should be plastic and easily “spread” over the applied surface, but at the same time it should not flow down.
The finished plaster mixture should be plastic and easy to lay on the surface
Before you start mixing the mortar according to the chosen recipe, it is useful to know that the prepared amount should be used within an hour, since in the future the plaster tends to lose some of its qualities, for example, plasticity. In addition, such “expired” material does not adhere well to the surface.
Particular attention should be paid to a solution prepared with the addition of gypsum, since this component significantly reduces the shelf life of the plaster before application to the wall. This solution must be applied immediately, immediately after preparation. In addition, the drying time will be affected by the thickness of the layer: a thin layer will dry almost instantly.
In order to avoid mistakes and not spoil a portion of the finished mixture, you need to carefully study the instructions, and only after that proceed to adding water, since the setting and drying period may vary.
It is best to use the prepared mixture immediately, since over time its properties deteriorate due to drying
How to mix the solution yourself: rules and recommendations
To mix a high-quality mixture yourself, you must adhere to the following procedure:
- You need to pour water into the container intended for mixing the solution. Then, according to the instructions, pour 6-8 trowels of the finished mixture and mix everything thoroughly using a construction mixer;
- the rest of the mixture is added gradually and during thorough mixing, which avoids the formation of lumps and gives the plaster plasticity and uniformity;
- then it is advisable to wait 2-3 minutes and mix the solution again. At this stage, you can determine whether there is a need to add water or a dry mixture to make the plaster thicker or, conversely, more liquid.
Once again, it is worth noting that one batch should consist of such an amount of material that can be used here and now. The recommendation is as follows:
- for a solution containing gypsum, the shelf life is limited to 25-30 minutes;
- if a cement base was used, then this period will be 40-60 minutes.
The secret of a good plaster mixture is the correct proportions of all components
Wanting to give the surface a finished appearance, many people prefer to apply a layer of putty on top, which makes the surface perfectly smooth and serves as an excellent base for painting. The video on how to putty walls with your own hands tells in detail all the nuances of this process and allows you to effectively complete the finishing work of leveling the surface.
What kind of plaster should be used for paint?
Plaster for painting, what do the walls look like? Beginners often ask this question. The answer will not be clear; everything will depend on both the paint and varnish material and the plaster mixture. The following types of plasters for ceiling and wall coverings are distinguished:
- Gypsum, there is no sand in the composition, and the coating is smooth, suitable for finishing work in rooms, a safe composition;
The coating is smooth and suitable for finishing work in rooms. - Plaster with cement and lime does not provide an even coating, so this option is used when working outside the room.
This option is used when working outside.
You need to understand that the plaster look gives a smooth finish, but will not withstand the elements, so this is an option for interior decoration. The second type is resistant to external factors, but the coating is not so aesthetically pleasing in appearance, so it is suitable for working on house facades. The layer will be moisture resistant.
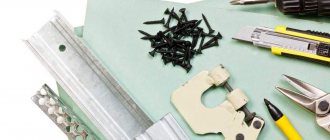
Features of drywall plaster
When planning to plaster plasterboard for painting, special attention should be paid to leveling the plasterboard sheets. Before plastering the plasterboard ceiling, prepare the gypsum board. They start by sealing the screw heads and connecting points.
First, the protruding screws are screwed in; they should not be screwed in too deeply. These areas are filled with plaster mortar. Existing defects on the surface are covered with putty or plaster, and a reinforcing mesh is used.
The surface is cleaned and primed. After all layers have dried, apply 2-3 layers of starting plaster over the entire surface. Plastering a plasterboard ceiling with your own hands requires care. After drying, it is necessary to sprinkle the base layer with water and rub it in with a grater. Be sure to apply finishing putty and sand the dried surface again to remove all imperfections.
When planning to plaster plasterboard for painting, special attention should be paid to leveling the plasterboard sheets.
How to putty walls with your own hands: video for beginners
You can learn how to properly plaster walls with cement mortar or a mixture containing gypsum by watching a thematic training video. The video on how to properly plaster walls tells in detail about the preparation and implementation of each stage.
In addition, in this way you can get answers to many questions of interest, for example, how to plaster the corners of walls and what needs to be done to further maintain the coating in its original form. You definitely need to pay attention to the finishing stage - puttying the walls and their further processing.
Features of preparing wooden walls
Working with a wood base is made difficult by the property of the material to absorb various mixtures well and poor adhesion. Therefore, work begins with pre-treatment of the base by covering it:
- Reed mats;
- Wooden shingles (thin planks intersecting crosswise, fastened to the walls with nails);
- Metal mesh, mounted with nails.
The shingles are installed by nailing them in a staggered pattern; the planks are not placed exactly end-to-end, due to the property of wood to swell over time.
When additional materials are installed, you can plaster the walls.
The shingles are installed by nailing them in a checkerboard pattern.
Nuances of preparing a brick base
Working with brickwork is also difficult. Therefore, it is necessary to carefully prepare the base. Experts recommend the following actions:
- To clean the surface from all types of contaminants, just wash the bricks with detergent or sweep with a broom. If there is an old plaster layer, it is eliminated by tapping with milk or a sharp spatula;
- Next, the horizontal and vertical surfaces are checked for evenness using a building level. The walls need to be hung. Here you need to study the method in detail; once you have mastered the rules, it will not be difficult to cope with it. When the vertical slats are installed, the surface is plastered.
To improve adhesion, you can make notches on the brick base.
It is enough to wash the bricks with detergent or sweep them with a broom.
How to renew an old layer of plaster
Often, beginners do not want to waste time removing old plaster, because it can visually stick well. However, applying a new coating will cause the solution to peel off. To renew the old coating, special grinding mixtures are produced. The basis is lime, water, fine-grained quartz sand.
Proceed as follows:
- Poorly adhering areas are identified, the surface is tapped with a mallet, and eventually such particles will fall off.
- Clean the wall.
- If traces of fungal formations are found, they are removed with a deepening, and then they are covered with antifungal agents.
- Wet the surface.
- Plaster is applied to defects, deep flaws more than a centimeter thick, and treated in a thick layer.
- Grouting work is being carried out.
To renew the old coating, special grinding mixtures are produced.
Installation of beacons
Installation of beacons
The next stage will be the installation of beacons. Construction beacons are slats or planks that are attached to the wall using self-tapping screws, retreating from it by the thickness of the layer, in a strictly vertical position at a distance 10 cm less than the length of the building code.
Painting must be done on a perfectly flat surface; in order to achieve this, the layer of plaster must be applied at a certain thickness, and, depending on the presence of depressions or protrusions, the thickness of the layer will be different.
In order to know exactly where to apply the plaster in a thicker or thinner layer, beacons are needed. By the way, their use is not mandatory: with the help of a building rule, a long, straight ruler, you can control the evenness of the surface of the walls, adding plaster where necessary and removing excess.
However, the use of beacons greatly facilitates the work at the stage of applying the solution.
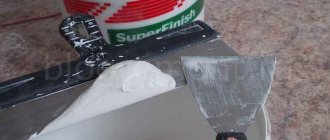
Is it necessary to apply putty?
Plaster has a porous structure, even if it is a high-quality finishing product. Therefore, it is advisable to also treat the surface with a putty solution. They are also starting and finishing.
What the walls will be treated with is chosen based on the purpose and its condition. It is possible to apply only the finishing look, or both at once. In the starting form, fine sand of 4-5 mm is used. In the final layer it is completely absent, so the layer is absolutely smooth, which is so important before painting the base.
The finishing layer is absolutely smooth, which is so important before painting the base.
Process technology
To successfully paint walls and ceilings, it is not enough to just properly prepare the base; it is also necessary to paint the prepared surface step by step:
- The paint is prepared, poured into a container, where it is brought to the desired consistency by simple mixing, and, if necessary, mixing with the pigment. To get the right shade. A solvent is added to oil and alkyd compositions.
- The prepared paint is poured into the roller cuvette, the roller is rolled in it, and the paint is applied from top to bottom.
- It is important to ensure that there are no streaks from the roller; this happens when too much paint is collected on the edges of the roller.
- It is better to paint hard-to-reach places and corners with a brush.
It is important to ensure that there are no streaks from the roller.
Mistakes when applying plaster
When doing a complete renovation of a room, you need to plaster the walls. However, mistakes are often made that can affect the final result.
Among the most common mistakes are:
- Incorrect mixing of the solution. The dry mixture is gradually added to the water. In this case, it is necessary to stir the solution evenly. Often builders make mistakes and pour water into the dry mixture, as a result of which the solution may have an uneven consistency.
- Installation of beacons on a continuous layer of mortar. In order to obtain a flat surface, beacons are mounted on dowels or by spot application of cement mixture.
- Thick layer. Beginners in construction believe that the thicker the layer, the more stable the repair will be. However, it is not. Too much mixture takes a long time to dry and may crumble over time.
- Laying the solution from bottom to top. The plaster is applied from top to bottom, but the layer needs to be leveled from bottom to top.
There can be a large number of errors.
Often, novice craftsmen begin to rub the surface before the mixture is completely dry. Such actions lead to the solution being drawn behind the sandpaper and depressions and cracks forming.
Mandatory work rules
The master must wear protective clothing, preferably protecting his head. The surface should not be exposed to ultraviolet light directly. When working, it is important to monitor:
- The quality of painting of all areas;
- To prevent foreign bodies from appearing on the roller, which will then appear on the surface and be visible;
- Proper preparation of mixtures, compliance with the ratio of components.
The master must wear protective clothing, preferably protecting his head.
Paintable plaster will help you simply update the interior of a room; there are various mixtures that look original. To get a high-quality result with your own hands, you should perform the work in stages, without neglecting surface preparation.