The wrong choice of material for wall repairs can discourage you from continuing work and lead to unsatisfactory results. To prevent this from happening, you should pay attention to special gypsum plaster for interior decoration.
Should you be afraid of uneven walls and how to deal with them? The answer is obvious - of course not. In this article I will tell you how to level walls with a rotating band with your own hands and get a result no worse than the pros.
What is a rotband
One of the oldest manufacturers of gypsum powders for the construction industry in Europe, the Knauf company, mastered the production of dry mixes (SS) intended for plastering walls in the last century.
In addition to gypsum, the mixture contains modifying additives, thanks to which the solution not only becomes more plastic, but also does not set longer and adheres more reliably to the base.
Practical Germans began to depict a red ribbon on the packaging of new products as a symbol of the brand. The SS itself was named accordingly - RotBand (red ribbon translated from German).
Gypsum plaster marked rotband is a universal material. Suitable for many types of substrates, not only for dry rooms or indoor conditions, but also for leveling walls in rooms with temporarily increased humidity.
In the latter case, it is necessary to use a coating that protects the plaster from moisture. You can level the wall with a rotband on a glazed loggia or veranda, since the coating can withstand 75 freezing cycles without loss of strength.
Possessing high adhesion, Knauf Rotband is especially suitable for manual application on dense concrete and ceiling surfaces, with which other compounds do not work well. The tenacity and strength of the composition allows the mixture to be applied to vertical surfaces in one layer up to 50 mm thick.
The plaster mass is easy to prepare and apply even to hard-to-reach areas, since the material is highly plastic. This increases the productivity of plasterers and reduces fatigue.
Other advantages include:
- ease of processing;
- non-flammability;
- the ability of the created coating to maintain a microclimate;
- the ability to achieve a smooth surface suitable for painting by simple processing.
In order for the coating to be durable and last a long time, plastering the walls with rotband should be carried out in accordance with the guidelines developed by the company’s specialists. Instructions are located on the packaging.
How to prepare the mixture
So, everything is ready to start working. All that remains is to prepare the mixture and arm yourself with the tools.
I would like to remind you about the rapid setting of rotband, and therefore the lifespan of the solution usually does not exceed 25 minutes. Therefore, it is necessary to knead the mixture little by little in order to have time to work it out.
I advise you to immediately decide on the areas where you can apply the residue. It is more convenient to knead the mixture in a container with rounded corners. A plastic bucket is ideal for this. Pure water is poured into it and then the dry mixture is added in a ratio of 2:3.
But it is better to use a smaller amount of dry plaster and, if necessary, add it at the end.
And there is a nuance here. Your solution will last longer if you use colder water. The consistency of the mixture should be such that it does not fall from the inverted trowel. You can quickly and easily mix the plaster with water using an electric drill and a mixer attachment. After this, the solution matures for 5 minutes and is mixed again. Now you can’t add either water or dry mixture to it. Having finished cooking, you need to very quickly wash the mixer or other tool used with water, since the rotband instantly sets and hardens. Otherwise, cleaning the tool will be problematic.
Rotband: step-by-step instructions for use for beginners
The instructions for use suggest that the sequence of plastering a room when Rotband plaster is used is similar to the procedure for working with other plaster compositions.
The order of work during plastering of the entire room:
- ceiling plaster;
- processing and leveling of walls;
- finishing of slopes, columns.
Next, we will consider in detail each stage of plastering with rotband.
Preparing the base
Regardless of the newness of the walls, before plastering the surface of the base is prepared, since conditions must be created for a strong connection of the two materials. The second purpose of preparation is to cleanse stains of a biological nature - to protect the plaster coating from the appearance of mold, rot or fungus in the future. And removing rust prevents brown spots from bleeding through the layers of finish.
Another task of the preparatory stage is to strengthen the weak near-surface layer and repair defects. In addition, if the base has a porous structure, then the open pores during plastering will take away the water needed by the solution, disrupting the hardening processes of the plaster. Therefore, the pores need to be clogged before starting work.
Before work, you should de-energize the wiring and protect sockets, windows and doors from damage.
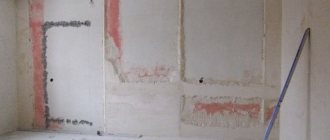
In the room being renovated, plaster, wallpaper, paint, peeling, unusable old plaster are removed from the walls. The resulting cracks and deep potholes are repaired. Remove old metal fasteners (nails, screws, hooks) from the walls.
If hardware needs to be left, they should be insulated (for example, painted) to prevent rusting. Stains of efflorescence, formed rust, grease, soot or any biotic growth are removed.
In a new building, preparation is also necessary. In brickwork, the seams are deepened to a centimeter and unstitched. The surface of the brick is scratched with steel brushes. Traces of grease are removed from the concrete, and notches are applied to smooth walls. Nodules and large protrusions are cut down. At the joints of plasterboard sheets, chamfers are cut off and screw heads are recessed. Before plastering, they are covered, for which a serpyanka is applied to the joints.
Primer
Before priming, be sure to remove dust from the surface and dry the base. The correct choice of primer for Rotband Knauf determines the result of all subsequent work.
The instructions indicate the brands of primers used for different substrates:
- easily absorbing water (cellular or expanded clay concrete, cement-lime plasters, brickwork) - primed with Tiefengrun or Mittelgrunt (dries in 6 hours);
- Dense materials that do not absorb moisture (concrete, polystyrene foam, cement plasters, tongue-and-groove slabs) are treated with Betonkontakt and dried for 12 hours.
Mittelgrunt (can be replaced with Knauf-Multigrunt, dilution proportions are given in the primer manual).
Displaying beacons and corners
To level the surface of a wall that has only slight deviations, you can do without beacons. When walls are littered or have a surface with large differences, beacons are used to create landmarks.
Before using them, ceiling and wall surfaces are weighed, the most protruding points are found, and the location of the auxiliary plane is determined. A mark (plaster) with a thickness of at least 5 mm is made on the site with a solution. They navigate by it by installing the slats. There is a detailed article about installing beacons on our website.
In addition to beacons, profile corners are mounted on protruding corners, aligned in the same plane with the beacon strips of adjacent walls.
Preparation of the solution
The instructions for use provide scant information about how rotband plaster is prepared for use. There are only four lines that may not be entirely clear to beginners. Therefore, we describe the process sequentially.
To dilute one (30 kg) package, you need to prepare a clean (without remnants of the previous batch, which is important) plastic container and pour 17 liters of water into it. So, out of the 18 liters specified in the instructions, there remains a liter of water, which will be needed if the resulting solution is too thick.
In the latter case, at the end of mixing, the density is adjusted by adding liquid. The capacity of the vessel depends on the number of plasterers involved in applying and leveling the mixture on the wall. If plastering is done alone, then a 90-liter container is enough to have time to work out the entire mass before setting begins (there are only 20-25 minutes left from the end of mixing).
The temperature of the air, as well as the base, is not lower than +5°C, not higher than +30°C.
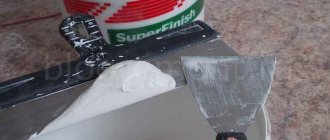
Open the bag, scoop out the powder with a dry trowel, pour 8-10 portions into water, and begin to knead the mixture with a mixer.
Mixing a small amount of powder creates a solution, which will take a couple of minutes. During this time, additive substances pass into the water, facilitating the correct flow of the subsequent chemical process.
After this, the rest of the material in the bag is gradually poured in. This is done while continuing to stir, after which the solution is left, allowing 5-7 minutes to soak. Mix thoroughly and add water if necessary. If the solution mass comes out a little liquid, add dry powder from another package. Naturally, stored water is not added to such a mixture. After the second mixing, the mass is used for plastering, and SS can no longer be added to it.
Mixing is performed at low mixer speeds.
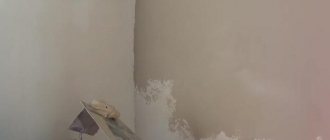
Tightening and leveling
The solution is applied in the same way as cement compositions. Use a spatula with a wide spatula or a wide grater. The mixture is used to fill the space from lighthouse to lighthouse. Having filled an area about a meter long, the solution is leveled along the beacons using a rule with an h-shaped profile.
If the thickness of the leveling coating is more than 15 mm, the plaster is applied in two layers. At the same time, having applied the first mark, it is “combed”, covering the surface with combs (for which a spatula with a comb is used). A day later (not earlier), when the applied mass has hardened, apply the next layer, which is leveled along the beacons.
The instructions warn that applying a second layer over a freshly laid one is only possible if another half hour has not passed since the start of its application. If they do not have time to meet this period, the layer is allowed to harden for a day.
To align, the tool bar is usually guided, leaning on the edges of the beacons, with small zigzags across the longitudinal line. The solution that accumulates on the rule is removed with a spatula, transferring it to unfilled areas. The rule is to do it one or two more times. After which they continue to fill the space between the beacons.
The slopes are plastered, maintaining the “dawn angle”. The correct plastering sequence is: the top one is plastered first, followed by the sides. For leveling, you can use a cut (short) rule, a wide spatula, or a specially made tool.
After approximately 45-60 minutes from the mixing time, the condition of the applied solution is checked by pressing it with a finger. If the set dough does not stick to your fingers, cut off the protrusions using a trapezoidal rule (the same can be done with a wide spatula). On slopes this is done with a “kantenhobel” (plane).
The result is a finish that has small (up to 3 mm) unevenness in the form of tool marks, scratches or burrs, as well as sagging up to 2 mm. A rough finish of this quality is suitable for decorative plaster (with a filler fraction of more than 2 mm), as well as gluing tiles.
Second contraction and alignment
If you need a better quality surface, wait 15-20 minutes after the first trim and perform a second trim. To eliminate unevenness, use a wide spatula.
Removing beacons and sealing grooves
The procedure for removing beacon profiles is carried out after the mortar mass has set and pulling out the metal parts will not cause the mortar to slide. Remove the planks by clearing the area near the end with a chisel. The edge of the lighthouse is clamped with pliers and pulled away from the wall.
After removing the profile, a groove is formed on the wall - a groove. Dust is removed from it, the inner surface of the groove and adjacent areas are primed. Then fill it with mortar, which is leveled flush with the wall with a wide spatula.
Grouting plaster
A special quality of smoothness can be achieved by grouting rotband plaster, performed 15-20 minutes after the second trimming. The plaster coating is moistened generously using a sponge grater (you can use a felt trowel).
Moving the grater in a circular manner, smooth out the marks left by the spatula or rule. Allow moisture to be drawn into the solution (this can be seen by the wall becoming dull), then smooth it with a spatula. This achieves a finishing quality suitable for gluing structural wallpaper, applying texture paint or decorative plastering with finely graded compounds.
If after another 2.5 hours (or within 24 hours) we wet the wall again with a sponge, we will pull out the gypsum milk from the surface layer. It will fill the remaining pores under the influence of the smoothing iron. This creates the basis for painting the wall with matte paints, making the Venetian.
Consumption per 1 m2
The condition of the working surfaces varies, and the average consumption of material is indicated - for a layer of 1 cm. The professionalism of the person performing the repair work also plays a role. Specialist painters can determine the required layer thickness as accurately as possible, but amateurs often think that more is better. Where it was possible to get by with two centimeters of thickness, they impose the maximum, as a result of which the consumption increases greatly.
To avoid unnecessary time and financial costs, you need to correctly calculate the gypsum mixture per square meter.
This is done manually step by step:
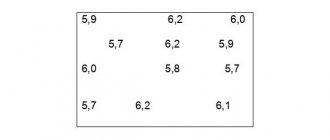
"Hanging" the walls. A perfectly flat surface is the exception rather than the rule, so you need to compare height differences at at least three points. To do this, the length of the base of the wall is divided into three identical segments, a nail is driven in in the middle of each segment 20 cm from the ceiling, and a cord with a weight is tied to the nail. Below, at the point where the load stops, another nail is driven in and the tip of the cord is fixed. The same cord can be pulled along a horizontal line. This method allows you to accurately determine the differences in the curvature of the walls.
- Calculation of the arithmetic mean. This figure will be equal to the required thickness of the plaster layer to make the wall as even as possible. For example, if the length of the wall is 9 meters, three canopies were placed on it, and the deviations turned out to be 1, 2 and 3 centimeters, they need to be added up and divided by the number of canopies. In total, the curvature gives 6 centimeters, and the leveling layer should be 2 cm.
- Calculation of material per 1 square meter. The packaging shows the minimum layer thickness per square meter. From these data it is easy to obtain both the maximum and average indicators. For example, with a layer thickness of 2 cm, you need to multiply the data from the information table by 2. For “Rotband” plaster, consumption per 1 sq. m at 1 cm is equal to 8.5 kg. It turns out that for 2 you will need 17 kg per meter.
- Calculation of material for the entire area. 17 kg (another resulting number) must be multiplied by the area of the wall. For each surface the calculation is carried out separately.
- Calculation of the number of packages of plaster. The total weight of the plaster must be divided by 5, 10, 25 or 30 (kg in 1 package). The larger the volume, the cheaper the price per kg, so it is better to focus on large packaging.
- Stock of plaster. Even manual calculation does not give a 100% accurate result. The number of bags of plaster required to renovate a room is always rounded up. At 10.5 - up to 11, at 12.5 - up to 13. If the number turns out to be even, an additional bag is purchased in a volume of 5-15% of the total mass.
Create a structure (if necessary)
Fine-grained gypsum plaster rotband is suitable as a material for creating relief patterns on the wall. You can create a unique decoration with your own hands, since the gypsum composition is harmless to the skin. You can experiment with gypsum plaster to achieve different effects. Wanting to change the interior design, they use shaping techniques, a description of which can be found in the Decorative plasters section.
To create a pattern after leveling the mass, a relief roller or any other forming tool (hard brush, trowel, brush, crumpled plastic bag, shaped spatula) is usually used. When the mixture has hardened and completely dried, the decorated ceiling is painted.
Comparative analysis
To level a concrete surface, mixtures based on cement or lime are most often used. But they have quite a few disadvantages:
- poor ductility;
- the appearance of cracks;
- too high density;
- low technology.
Relatively recently, gypsum-based mixtures began to appear on the domestic market and quickly gained popularity. They have increased ductility, no cracks and do not shrink.
Process
In price they do not exceed the mixtures we are familiar with. Let's look at one example. A consumption of 30 kg of rotband will be enough to cover 3.5 squares of surface. And a consumption of 50 kg of cement composition will cover 1.5 square meters. Having made some simple calculations, you can see that buying a rotband is even more profitable.
Also, the use of gypsum mortar affects labor productivity. The gypsum mixture hardens much faster than the cement mixture, which significantly saves work time when plastering the walls under the lighthouse with your own hands.
Features of ceiling plaster with rotband
There are some differences between finishing the ceiling and leveling the walls with a do-it-yourself rotband:
- If a layer of up to 50 mm can be applied to the wall with a rotband, then a layer of up to 15 mm can be applied to the ceiling. Therefore, if the height difference on the ceiling is more than 30 mm, it makes no sense to plaster it to level it. You need to use other means, for example, drywall.
- If during leveling the walls the movement of the tool when applying the plaster mass is directed from bottom to top, then when plastering the ceiling it is directed towards itself.
- After plastering and smoothing, the gypsum thickness along the perimeter of the ceiling (without gaps) is cut to the base with a Stukzege saw. The use of such a constructive technique prevents the formation and development of shrinkage cracks, which otherwise can originate near the walls, developing towards the center of the ceiling.
Surface preparation
It is best to plaster at room temperature from 18 to 22 degrees Celsius and a relative humidity of 60%. This requires a dry base, and a concrete surface that is too smooth must have notches, especially if it is horizontal:
- First, the surface is cleaned of old coatings, such as paint, wallpaper, tiles, as shown in the photo;
- After them, all dirt and dust are removed;
- Before installing the guides, it is necessary to treat the surface with a deep penetration primer. Only after the primer has dried can work continue.
Necessary tool
Before work, prepare the necessary tools:
- h-shaped and trapezoidal rule;
- wide spatula;
- corner spatulas;
- trowel;
- level and other devices for installing beacons;
- mixer;
- half;
- ironing board;
- rollers (for priming and applying patterns);
- brushes;
- sponge or felt grater;
- capacity (90/200 l);
- masking tape;
- cord, plumb line;
- clean rags.
A special feature of the tools used to work with gypsum mass is that the metal spatulas and trowels must be stainless. If you use tools made of rusting steel, black marks will remain on the wall.
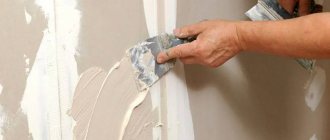
Application
To apply the solution, use a wide spatula or trowel. It should be applied using the throwing method:
- First, the lower section is processed, gradually moving upward;
- First, the area between the guides up to a meter high is filled;
- After this, it needs to be leveled using a rule. The ends of the rule are firmly applied to the base of the beacons and slowly move from bottom to top, making wave-like movements to level the solution;
- The excess is removed with a spatula and sent back to the bucket for further use;
- If there are missing places or recesses, additional solution is poured onto them and everything is repeated all over again;
- Having finished with one area, move on to the next, and so on until the entire surface is plastered.
Since rotband is flexible, the plaster can float under its own weight. From time to time, return to the finished areas and use the rule to remove any excess that appears.
How long does it take for the solution to dry?
The drying time for rotband plaster is indicated in the instructions for use for optimal conditions:
- humidity up to 60%;
- temperature - +20°C;
- layer thickness - 15-20mm.
It is 7 days. In fact, plastered walls may have a thicker or thinner coating, and the temperature conditions of the room may differ. With good ventilation, the drying time may be a couple of days shorter.
The manufacturer recommends priming the surface of the rotband after drying with Tiefengrund primer, the film of which will protect the gypsum material from moisture and increase adhesion to water-dispersed paint or wallpaper.
If the Knauf plaster that you used to renovate your apartment is already familiar, then when building a house there is a high probability of using this material again. We hope that the article “Rotband plaster: instructions for use” will help beginners achieve “German quality” guaranteed by the manufacturer.
Advantages and disadvantages
The building mixture is made by adding gypsum to the dry composition, so it has high plasticity. Let's take a closer look at its characteristics:
- Rotband is an environmentally friendly material . It is obtained by processing natural raw materials from gypsum. This plaster breathes, retains excess moisture, and does not emit toxic fumes.
- The dried mixture does not burn . A high degree of fire safety is achieved by using natural materials.
- The solution dries completely in a few days . Already on the third day, further work can be carried out.
- Rotband goes well with other finishing materials . It is used with insulating boards or vibration-insulating films.
- Gypsum plaster provides a smooth surface when applied correctly and carefully . Often, puttying is not required after it.
Like any building material, Rotband has its drawbacks:
- Gives a high degree of shrinkage when drying. This is especially noticeable when covering up cracks or holes in surfaces. It is necessary to carefully observe the proportion of mixing the solution so that the mixture gives minimal shrinkage.
- High hardening speed is a possible problem when leveling a large surface.
- Price. Rotband is more expensive than similar compositions made of cement or limestone.
In practical use, gypsum plaster adheres quietly to almost any surface. The main condition is a prepared wall with a primer layer applied. The mixture is used:
- for local alignment of differences in gypsum board sheets;
- for leveling surfaces finished with ceramic tiles;
- for surfaces made of OSB, chipboard.
Attention:
Rotband is not used for leveling floors! It can be used to cover cracks and potholes in the floor for subsequent screeding of the self-leveling floor, but cannot be used as a self-leveling floor covering.
How to plaster bathroom walls
The time for plastering work is during preparation for cosmetic repairs or immediately upon completion of construction. This work is not very difficult, but it will not be easy for an inexperienced person to cope with it.
Typically, a cement-sand mortar is used as a plaster mixture; the use of such a material requires knowledge of the exact recipe for preparing the mortar and adherence to the technology for mixing it.
Somewhat more expensive, but much more reliable, will be the use of a ready-made mixture produced by an industrial method - waterproof putty for the bathroom.
As a budget option, we can note the use of prawning, a mixture consisting of cement, lime and sand. Gartsovka can be applied in a thick layer, up to 5 cm, but be sure to use a plaster mesh. A thick layer of the mixture will take about a month to dry completely, but it should be taken into account that the solution acquires sufficient strength only after 25-27 days.
Smoothing
If you plastered the wall to lay ceramic tiles, then your plastering work is finished. But painting and wallpapering also require a smooth surface.
An hour after applying the main plaster layer, you can begin to smooth the plaster. A small amount of the solution is mixed until the thickness of liquid sour cream and applied in a thin layer to the wall with a trowel. This is necessary to eliminate defects and create a perfectly flat surface. If one layer does not bring the desired result, then several more layers can be applied.
The time for complete hardening of the rotband depends on the room temperature and is approximately 7 days.
If you plan to use light-colored wallpaper, it is better to apply a layer of finishing putty. And when using decorative plaster, you may need a reinforced mesh.
Let's sum it up
After puttingty with a rotband, you can safely lay tiles or paint them on the wall. DIY repairs are always more valuable and last longer. And we will do our best to help you.
Can it be used on drywall?
Many people are interested in the possibility of applying Rotband plaster to a plasterboard wall.
GCR is often used for any construction and finishing work. Rotband is used for processing moisture-resistant drywall . The primer is taken with the same characteristics so that the putty layer is well and evenly distributed over the surface. The coating formed with Rotband putty on plasterboard is very durable and withstands minor mechanical stress.
Despite its moisture-absorbing properties, it should not be used in rooms with very high humidity. On drywall under such conditions it can get wet and fall off.
You can putty Rotband on any surface: concrete, wood, metal or plasterboard. It is important to know the amount of mixture required for work and to prepare tools for puttying.
Preparatory work
Some craftsmen note that the gypsum solution can be applied directly to the base without prior preparation. This is not quite the right position. Although the material has a high degree of adhesion and ductility, this will not protect it from dirt, debris or chipped concrete in the wall.
Let us consider in order the preparation of the foundation for Rotband:
Preparation of the solution
To prepare gypsum plaster you will need:
Mix the plaster according to the following algorithm:
We invite you to watch a video on how to mix Rotband plaster:
You can find out how to correctly calculate different types of plaster for different mixtures here, and you can learn how to properly mix different solutions from this article.