Home / Ceiling design / Design solutions / How to make an imitation brick wall out of cardboard?
Bricks in the interior have always looked good. Especially if the design of the entire room matches a similar finish. Typically, for this design, panels with a pattern and texture of stone are selected, or the existing wall masonry is cleaned. However, both require time and money. There is another, faster and very inexpensive way to give the room an interesting look - an imitation brick wall made of cardboard. Simple and fast.
What is needed for this
Of course, it won’t be possible to make the wall look exactly like real masonry - the materials are not the same. However, the panels are also not always similar to real bricks and are nevertheless popular. Therefore, we will make the most similar design, which will require:
- Cardboard is corrugated, thick, used for boxes and durable packaging.
- PVA glue.
- Brush for applying glue.
- The napkins are of high quality, with a clearly visible texture.
- Heavy wallpaper glue or glue gun with sticks.
- Ruler, pencil and sharp knife - create bricks.
- Varnish to decorate the surface with a finishing layer.
Having prepared the necessary things from the list, you can begin to figure out how to create an imitation brick wall from cardboard.
Do you throw away egg trays? We found an interesting use for them in budget renovations.
A subscriber to our VKontakte group, N.A. Kolmogorova, shared the history of the renovation and photos before and after.
Brickwork in the interior will probably never lose its relevance. If you think through the design correctly, it will become an original addition to the room and its bright accent. But to make such home decor, you need to buy either the brick itself, or panels that imitate such masonry. Sometimes it is impossible to purchase materials for one reason or another. But there is a solution: you can make beautiful brickwork from egg trays! How to make it? For you - a step-by-step guide to creating such decor.
Main details
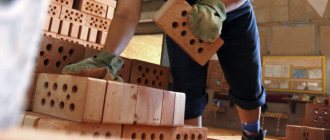
The most important thing in all the work is to make the “right” bricks. They must be the right size. There are many varieties of this material, but most often in masonry you can see the following dimensions: 250 by 120 by 95 millimeters and 228 by 138 by 65. There is also a dimension that is less common: 250 by 120 by 88 millimeters.
In addition to choosing the dimensions, you still have to decide which side the brick will lie in the masonry - this is also done in different ways and you need to choose the option that suits you. Having decided on this, a template is drawn on the cardboard according to which the parts will be cut. When the marking is applied, everything is cut along it and put aside for now. Some of the parts will have to be cut in half to imitate halves of stones.
Step-by-step algorithm of actions
Drawing the wall
The easiest way is along a long rail. Naturally, with exact observance of the distances between the horizontal lines (the bricks have the same dimensions). You can focus on the standard. The thickness of single – 6.5, one and a half – 8.8, double – 13.8 (cm).
Application of imitation coating
There are many techniques, so we will limit ourselves to only the most common ones, based on the fact that the work is done independently.
Using adhesive tape (masking tape)
Before starting work, the wall must be painted in the color that should be at the seams. Typically gray or white (or something in between). The fact is that depending on the components and their ratio in the mixture, the dried solution takes on a different shade. Next, horizontal seams are marked (using tape). After this, it is easy to highlight individual bricks, simulating masonry with shifting products in adjacent rows (pieces of tape are attached vertically).
Peculiarity
: Since the tape will then have to be removed, there should be free ends left, sufficient to grab them with your fingers. After this, the prepared mixture is applied to the wall.
Important
: the consistency of the solution should be such that it does not flow down the wall. And the layer should be applied minimally, no more than 2 - 3 mm.
Option #1
- based on gypsum. But this material hardens quickly. Therefore, it is necessary to introduce a so-called “moderator” into the mixture. Its use leads to the fact that the layer of gypsum mortar does not harden for 20 to 40 minutes. Otherwise, it will simply not be possible to remove the tape to mark the masonry seams.
Option No. 2
– plaster mixture + tile adhesive (1 to 1). In this case, only the smallest fractions of sand are used in the preparation process. This means that you will have to purchase it specially, since the usual one (from a river or from a quarry), even well sifted, will not work.
Flaws
: If the object is large, covering the wall with tape will take a lot of time and material. If the solution hardens too quickly, it can lead to problems in removing the tape from it in order to preserve the appearance of the design.
Stenciled
The method is more complicated, since you will have to prepare the grate. It is made from a sheet of plastic or rubber, knocking out rectangles in it.
In addition, it is advisable to create a template from thin slats, the undoubted advantages of which are:
- the ability to work with solutions that harden quickly, since they have time to “set” and dry;
- a large selection of materials and flexibility in carrying out any set of works. The shape of the structure fully repeats the elements already discussed;
- the ability to create a template directly on the wall and an image of any shape;
- naturalness and authenticity of the appearance of the resulting brickwork.
Texture
The wall still doesn't look like brick at all. This is just cardboard glued to the wall and napkins will be useful to give it the desired texture. PVA glue is applied with a brush on top of the glued cardboard. The napkins need to be thoroughly crumpled in your hands to create many folds. Pressing them tightly onto the cardboard, PVA is coated on top of everything again. Gaps simulating mortar are pressed through with your fingers or the handle of a brush. When the PVA dries, the most creative part remains - coloring.
A few words about egg trays
The trays that are used to transport ordinary chicken eggs are mostly made from paper waste and waste paper sent for recycling. They are quite dense, have a certain shape, and inside the eggs themselves are more or less tightly packed into special cells.
Since such a tray contains only paper, it is absolutely safe, and besides, it can be used by needlewomen and craftsmen to create various objects from papier-mâché. Papier-mâché is a special plastic mass that can be easily given the desired shape, created from paper and glue. You can make anything from it: masks, crafts, figurines, various accessories, and so on. Depending on the type of papier-mâché, you can create objects of varying texture and strength.
An egg tray is a product made of cardboard and paper, ideal for creating papier-mâché
On a note! Most often, papier-mâché is used to make various crafts for school. However, the list of options for using this mass is quite extensive. Papier-mâché is suitable for a variety of projects, from creating jewelry storage boxes to all kinds of stucco molding that decorates the walls of the house.
An egg tray is one of the most affordable materials that is great for creating papier-mâché. But everyone throws them away, except for handicraftswomen. Although in fact it is best to recycle such trays if you do not want to use them in any other way.
On a note! Until the early 70s of the last century, eggs from USSR poultry farms were transported using sawdust and straw. Later, the equipment necessary for the production of egg trays was purchased abroad.
If you like to make things with your own hands, then the egg tray is a real find for you. This is a great option to make something useful in everyday life or just a beautiful thing. In this article we offer you to get acquainted with a master class on creating brickwork from such trays.
Painting and varnish
The process is more creative than complicated—be sure to use multiple shades of paint. For red bricks, brown, red and black are suitable. For white - just white paint, slightly diluted with black to a grayish tint. The solution turns gray or dark gray. The result will depend on your efforts and the talent of the artist. After the paint has dried, you can coat the surface with varnish.
Option 3 – traced brickwork.
To simulate it you will need:
- kitchen sponge;
- Ruler and pencil;
- paint of the desired color (in our case it will be obtained by mixing the available 2 red and 3 dark paints).
That's the whole list.
- Cut the sponge to the required brick size.
- On the wall where the imitation will be created, draw the lines along which you will work.
- Dip the sponge into the paint (or mixture) and press it firmly against the wall. Do this several times until you get the print you want. Next, make a gap (indent) and repeat this step again until the entire wall is covered with these “bricks.” And don’t be afraid if something isn’t perfect – it’s even more natural.
We use decorative plaster
Of course, this material simply perfectly conveys the features of the brick relief, but it will cause serious difficulties even for a trained person.
- requires special molds;
- DIY production takes an incredibly long time - you are unlikely to be able to cast more than 10 tiles per day;
- It is not always possible to achieve the desired consistency of the gypsum solution, which is why the resulting fragments become very fragile and unreliable.
The best way out is to purchase ready-made bricks in the store, pre-cast according to all the rules. They are even cheaper than ceramic tiles.
- apply glue to the back side of the brick with a spatula and press it against the wall;
- check the vertical and horizontal levels;
- for greater naturalness and creating a displacement effect, a new row begins with half of one brick;
- in order to create seams, use small pieces of tiles, which can be easily removed after the glue has set.
This imitation is considered the highest quality and most suitable if the accuracy of conveying the features of the brick relief is your first priority.
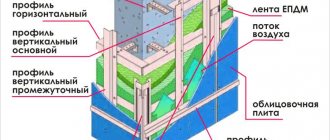
Why plaster?
This question is one of the first that comes to mind. Why not line the wall with brick or use special decorative panels. Imitation plaster has a number of tangible advantages.
- Saves space indoors - plaster does not “eat up” the area of the room, as brick does. Therefore, finishing with brick using this method is effective for small apartments.
- Light weight - plaster does not increase the load on the floors and walls, which in a city apartment may not allow the plan to be realized.
- Quick work - laying decorative plaster will not take as much time as laying real brick.
- Carrying out the work yourself - only a professional mason can carefully lay a brick, and this takes the cost of the work to a completely different level. You can make decorative plaster in the form of bricks yourself.
How to choose a place for a stencil?
There are no universal tips on this matter, but stencil patterns look best on large surfaces. Therefore, if your room has a spacious wall that is not used for furniture or decorative elements, you can start with it. In this case, the stencil
You can also use stencil decoration to decorate switches, sockets, shelves, and bedside tables. As for the latter, the wall above them can be interestingly played up by painting on it an image of those objects that could stand on this furniture.
The picture can be placed above the head of the bed in the bedroom
One of the walls in the nursery is decorated with a stencil pattern.
Unobtrusive white pattern on a black wall
Using a stencil you can create a beautiful, unique ornament
White delicate flowers on a red wall in the bedroom