Any, even the most reliable and high-quality bathtub, over time can become covered with cracks and roughness, turn yellow or rust. It is almost impossible to avoid this - even the mildest detergents and household chemicals lead to thinning and wear of the surface coating. In this case, the bath owner is faced with the question of purchasing and installing a new bowl. However, this is a rather expensive solution, which, moreover, entails the need for repairs to the premises. Therefore, it is better to restore the bathtub - it will not require large expenses, and the work can be done independently.
Do-it-yourself bathtub restoration
There are three main methods that allow you to restore the appearance of old plumbing: applying a new enamel coating, restoration with self-leveling acrylic and using a special liner. It is better to choose a specific method taking into account your own financial capabilities, the materials from which the bowl is made, as well as its condition.
Restoration process by staining
In addition, it should be taken into account that such a solution has a number of disadvantages, since a bowl with a new coating will not have the same performance characteristics as one that was manufactured in an industrial environment.
- The materials that are used to restore plumbing fixtures are less durable and not as strong, so the surface requires more careful and gentle care.
- When enameling a bathtub or restoring it using liquid acrylic, you may encounter the following problem: the original color of the bowl will shine through the new coating (especially if the layer is too thin), changing its shade.
- During use and cleaning, the color of the bathtub may change under the influence of chemicals.
- Sharp or bulky objects will damage the new coating even if they fall from a small height, and dyes (such as hair dyes) can leave permanent stains.
- Those who like to smoke in the bathroom will have to give up their habit, as a cigarette can leave an unsightly burn on the surface.
However, restored plumbing fixtures are repairable, and their properties directly depend on the quality of materials and the accuracy of the work.
Bath after restoration
Photo of a restored bathtub
Restoration. Methods
Restoration can be carried out using different methods, including:
- application of two-component enamel. The two components are the hardener and the enamel itself. The mixture is applied to the surface like regular paint;
- Filling the bathtub with acrylic (glass). After sanding and thorough degreasing, the bathtub is filled with acrylic. After just 2 days, the updated plumbing is completely ready for use;
- installation of a “bath in a bath.” This method involves installing an acrylic liner that is completely identical to the old bathtub. The liner is attached with glue or foam and allows you to use the restored bathroom for a long time.
Enameling compositions - review of brands
The choice of enamels on store shelves is quite wide. Most often, the following compositions are chosen for self-enamelling:
Epoksin 51 or Epoksin 51C
Two-component, particularly thick formulations that can only be applied with a brush. The special consistency of the enamel allows you to get an even, smooth coating without streaks. The thick solution fills well small defects in the base: scratches and cracks.
The composition hardens completely within two days. If applied correctly, the manufacturer provides a guarantee of at least 9 years of operation.
Sets from Random House
Popular compositions produced under the names “Fantasy” and “Svetlana”. They differ only in the configuration. The two-component enamel included in the kits is the same. It can be applied to the surface of the bowl with a brush or roller. It is used only for self-enamelling; specialists do not work with these solutions.
Reflex 50
The composition produced by Tikkurila is intended for professional work. Two-component epoxy enamel differs from its analogues in its liquid consistency, which makes working with this material more difficult. To obtain a high-quality coating, at least four layers of this enamel are successively applied to the surface of the bowl.
In this case, the previous layer must be completely dry. Thus, it takes at least seven days to enamel a bathtub with Reaflex. However, the result is worth it.
Preparing a bathtub for enameling or acrylic application
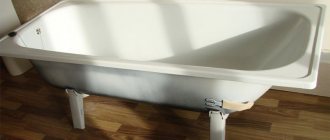
Old bath
Although these methods have their own characteristics, the preparation procedure is completely identical. It is necessary to remove the layer of old enamel and achieve maximum adhesion of the future coating to cast iron/steel.
Find out what types of acrylic corner asymmetrical bathtubs are available, and also check out the types and tips for choosing from our new article.
It is necessary to prepare the following materials and devices:
- cleaning powder;
- solvent;
- fabric-based sandpaper (for example, P24);
- quick-hardening polyester automotive putty;
- polyethylene, newspapers and masking tape;
- vacuum cleaner (or wide soft brush);
- grinder + grinding wheels;
- clean, lint-free cloth;
- construction hair dryer;
- screwdriver
Step 1. Clean the entire surface of the bathtub with a brush and an abrasive agent (powder).
Bathtub cleaning
Step 2. Take sandpaper and clean the bathtub until risks from abrasive appear. There is no need to rinse off the cleaning agent when sanding. Instead of sandpaper, you can use an angle grinder with a special attachment. This will greatly simplify the work and speed up the preparation process.
Bathtub sanding
Grinding
Grinding
Step 3. After sanding, thoroughly rinse off all crumbs and soap film. We etch the bath using oxalic acid. Neutralize the acid with soda.
Step 4. Fill the bathtub with hot water up to the sides. We wait about 10 minutes, open the drain to let the water drain, and then wipe the bathtub dry with a cloth. You can warm up the vessel with a hair dryer. This way, the moisture will quickly evaporate and the bathtub can be further prepared for restoration.
Drying and warming up
Step 5. Inspect the bathtub for major defects and potholes. We apply automotive putty, and after it dries, we sand it with fine sandpaper. Remove dust with a vacuum cleaner/soft brush, then thoroughly degrease the entire surface of the plumbing fixtures with a solvent and wipe with lint-free wipes.
Step 6. Unscrew the shower hose. We wrap the spout and taps in polyethylene so that drops of water do not fall into the bath during operation.
We wrap the spout and taps in polyethylene
Step 7. Armed with a screwdriver, remove the drain grate and siphon under the bathtub. We place a container under the drain hole into which drops of acrylic or enamel will flow.
Strapping diagram. 1 - overflow pipe; 2 - drain pipe; 3 - metal wedge of support; 4 - floor siphon; 5— sewer socket; 6 - metal grounding strip
Diagram of a siphon in the bathroom
Step 8. Cover with masking tape all surfaces that are adjacent to the vessel being restored. We cover the floor, the washing machine next to it, and the sink with polyethylene or old newspapers.
Let's begin the restoration process.
Some tips
To ensure that your bathroom cleaning is effective, you can use the following recommendations:
- But you should not try to clean the bathtub by hand using sandpaper. The enamel on the surface lies quite firmly and you will have to spend a lot of time and effort on cleaning. For this purpose, it is necessary to use a special drill attachment. It is not recommended to use a grinder. Due to high speeds, the enamel can be scraped down to the base.
- After cleaning, you need to wash everything off. The surface of the bathtub is completely treated with a stream of water under pressure.
- If there are chips or shells with traces of rust, the defects are puttied. In this case, you can use special modifiers. Before using them, it is recommended to read the instructions in detail.
After removing the rust, the remaining modifier must also be washed off. To fill defects, you can use body putty, which is easy to purchase on the automotive market. To apply the composition, use a soft rubber spatula. After the putty has thoroughly dried, its surface is sanded. The final step of the preparatory work is degreasing the surface using alcohol-containing compounds.
Applying enamel
You can enamell not only a bathtub, but also a shower tray made of steel and cast iron, a washbasin, and a kitchen sink. Both the entire surface of the plumbing fixtures and individual areas are restored, if necessary.
This method of restoration is short-lived, but quite economical. A painted bathtub will serve you for another couple of years, after which you will again have to think about painting or replacing it.
Note! The enamel has a pungent chemical odor, so all work can only be performed in personal protective equipment for the respiratory system.
Step 1. Open the enamel and hardener. Pour them into a convenient bowl and mix with a mixer until smooth (see the exact proportions on the package).
Mixing paint
Step 2. We begin to apply the enamel with a brush, making first horizontal and then vertical strokes. Carefully paint the entire bath.
Bathtub staining
Advice! To prevent bristles from coming out of your brush, soak it in water for one day!
Step 3. Without waiting for the first layer to dry, apply the second. Gently stretch out the smudges with a brush.
Bathtub staining
Step 4. Paint the bottom of the vessel again.
The bath will be ready for use in about 5 days. Until this point, it is advisable not to turn on the water and prevent dirt from getting on the painted surfaces.
Read the article on which bathtub is best to choose, and also find out the recommendations of experts.
Prices for bath enamel
Bath enamel
Restoration with glass acrylic or self-leveling bath
This two-component mixture is quite easy to apply, has no pungent odor and has increased strength characteristics. The glass spreads on its own, forming a monolithic, smooth film on the surface of the bathtub. At the same time, glass does not dry too quickly, which means that work can be done without haste and fuss.
Self-leveling acrylic
Step 1. Mix the stacryl with a mixer in a convenient bowl.
Step 2. Add glass from a common container into a small glass and pour it onto the top edge of the bath. As soon as the stream reaches the middle of the wall, we begin to move the glass around the perimeter, periodically pouring the mixture into the glass.
Glass pouring
Glass pouring
Step 3. Repeat the process, starting to pour from the middle of the walls. There is no need to save the mixture; the excess will be poured into a container under the hole, and the coating will be even and smooth.
If bubbles form on the surface, they can be smoothed out with a plastic spatula or brush.
The polymerization process takes up to 4 days. Exact instructions for proportions and drying time are indicated on the glass packaging.
Self-leveling acrylic
| Hardening time of Stakryl Ecolor enamel | Air temperature |
| 36 hours | +25 degrees C |
| 42 hours | +20 degrees C |
| 48 hours | +17 degrees C |
When the surface has completely hardened, you can remove the films, newspapers, tape, install a siphon (old or new, at the discretion of the owner) and use the bathroom restored with your own hands.
Find out how to properly care for an acrylic bathtub at home from our new article.
Video - Restoration of a bathtub using liquid acrylic using the “pouring” method
Prices for bulk acrylic
Self-leveling acrylic
Coverage restoration options
To restore the internal surface of bathtubs, three types of restoration are common:
- applying enamel coating using a brush or spray gun;
- treating the bathtub bowl with a polymer compound - acrylic;
- installation of the liner.
Paint - the service life of the enamel coating largely depends on the experience of the craftsman and the thoroughness of the preparation of the base of the bathtub/bowl. As a rule, even with careful handling of the restored coating, its service life does not exceed 1-1.5 years.
Liquid acrylic is used to restore bathtubs of non-standard shape. The technology allows you to update the bowl yourself, without involving a team of craftsmen. True, you need to buy a high-quality polymer from a trusted manufacturer.
Installing a liner is a rather problematic option, since they are cast in a certain shape and it can be very difficult to choose the right size for your bathtub. And quite often it is impossible - if you have a non-standard shaped bowl installed.
The choice of method for restoring it will depend on the shape and size of the bathtub. For example, in a situation with products of non-standard shapes, it is better to opt for an acrylic coating
We won’t give advice on what type of restoration is better - you will figure it out on your own, assessing the condition of your bathtub and your own strengths.
“Bath in bath” or acrylic liner
Acrylic inserts
If you do not want to carry out hygiene procedures for several days using a basin or visiting a bathhouse, then the method of inserting an acrylic insert is ideal for you. The process of self-restoration in this way takes no more than three hours, and you can use the bathroom the next day.
In addition, the liner made of durable sanitary acrylic significantly reduces the thermal conductivity of the bathtub, as a result the water cools very slowly.
For the best result, it is important not only to choose the appropriate size liner, but also to correctly distribute the adhesive composition (foam and sealant).
Bath measurements Bath measurements
Bath measurements
Step 1. Armed with a screwdriver and a grinder, we dismantle the strapping elements.
Dismantling the harness
Step 2. Prepare the bathtub for installation of the liner. We clean the entire surface with sandpaper, a grinder, remove debris with a vacuum cleaner and degrease the surface. Wipe all drops of water dry. This measure is necessary to improve the adhesion of the adhesive foam to the plumbing fixtures.
Step 3. The inserts are transported with a technological edge, which is carefully trimmed with a grinder before installation.
Step 4. After the edge is cut, insert the liner into the bath and make markings for the technological holes. To do this, we draw circles with a marker, sticking our hand under the bathtub and tracing the drain and overflow holes.
Acrylic bath insert
Step 5. According to the markings, we drill technological holes.
Step 6. Apply two-component foam and sealant. We insert a bottle of sealant into the gun and distribute it around the drain and overflow holes. Next, we take the foam and use a syringe to inject a special composition into the balloon, which will prevent it from swelling excessively. From bottom to top, apply foam in strips to the bottom, walls, and sides of the vessel being restored.
Foam application
Step 7. Insert the acrylic liner into the bathtub, gently press it with your hands, leveling it. Remove excess sealant and foam.
Installing the liner
Step 8. We install the siphon (piping).
Step 9. Fill the bath with water so that the foam, when hardened, does not displace the lightweight liner. The next day, you can drain the water and use your updated bathroom.
Fill the bath with water and leave for a day
In your free time, you can install a decorative screen under the restored bathtub, as well as protective edges on the edges in contact with the walls.
Before starting hygiene procedures, do not forget to remove the protective film from the liner.
Video - Installing an acrylic liner. Do-it-yourself bathtub restoration
What problems might you encounter?
There are several shortcomings of old bathtubs that can be eliminated using suitable methods. This includes:
- the enamel has become rough, the problem is eliminated by restoration;
- rust appears on the coating, and removing dirt has become difficult - the problem can be solved by updating the coating;
- water does not drain well from the product, which is due to serious errors during the installation of the structure, so dismantling and repeated correct installation are carried out, but a stain may appear from the water, which can be eliminated by using an acrylic liner;
- peeling paint is removed by creating new enamel or using an insert;
- when using a steel bath, a lot of noise occurs, the water cools quickly and rust constantly forms - this problem applies to all steel products, and it is solved by installing a special acrylic liner, which increases the thermal insulation parameters of the bath, making it quiet and resistant to rust.
How to repair chips or minor restoration of damage to a bathtub
Sometimes small chips, cracks from fallen heavy objects, or scratches appear on the surface. And in this case, there is no need to carry out a complete restoration; it is enough to carry out minor repairs in the proper sequence.
Previously, such defects were eliminated by mixing glue with tooth powder or applying epoxy to the chip and sprinkling it with porcelain dust. But such methods are extremely unreliable and should be abandoned.
Chip on a cast iron bathtub
Chip on a cast iron bathtub
Step one. We are preparing the chip for repair. First, apply a rust converter to the chip, wait, and wash off the composition with water. Then we clean the chip with powder or dishwashing liquid. Rinse with water and wipe dry.
Step two. Using acetone or another solvent, degrease the defective area. Dry and heat the surface with a hairdryer.
Step three. Using automotive putty, we coat the chip. We wait for it to dry and sand it with sandpaper.
Step four. We cover the putty area with two-component acrylic or automotive enamel.
You can also use a ready-made bathtub repair kit for restoration, which includes acrylic paint, hardener, several sheets of sandpaper, epoxy putty, polish and detailed instructions. The approximate cost of such a kit ranges from 900 to 1300 rubles.
Repair kit
Conclusions and useful video on the topic
For reliable adhesion of materials and durability of the coating, it is necessary to follow a clear sequence of preparatory and restoration work:
High-quality repair of a cast-iron bathtub means careful restoration of the most important plumbing fixture in the apartment.
Restoration of a damaged surface is possible as a result of the “jewelry” work of a master. The result of painstaking work and many hours of waiting will be a bath without visible chips, scratches and cracks, which will last for another ten years.
Share with readers your experience of restoring damaged enamel of a cast-iron bathtub and carrying out restoration work. Please leave comments, ask questions about the topic of the article and participate in discussions - the feedback form is located below.