Balcony glazing allows you to turn an open, undeveloped area into a comfortable room. Provided the glazing and insulation are done correctly, the balcony can become an extension of the room, which will significantly expand the living space.
DIY balcony glazing
It is possible to handle balcony glazing yourself. To do this, you need to familiarize yourself with the features of existing varieties of balcony structures, select the appropriate option and complete the main stages of work in accordance with the instructions.
DIY balcony glazing
How to glaze with your own hands
First you need to decide how the balcony frames will be installed:
- Directly onto the parapet, if, of course, the original structure is strong enough.
- To the full height of the loggia with the first step of removing the parapet and tinting the window opening.
- Installing the profile on an additional structure (foam blocks) to increase the reliability of fastening and strengthen the base.
- With removal, in which the balcony is first sheathed from the outside. Then glass frames are installed on the powerful parapet.
Possible difficulties during installation
Glazing work at height is a very important construction work, the implementation of which is associated with both hazardous work factors during the installation process and during operation of the window structure.
Errors associated with glazing are often made by contractors already in the process of preparing construction and installation work , if a thorough examination of the technical condition of external structures, especially for balconies, was not carried out, design calculations for strengthening structures and the selection of economically sound glazing options were not carried out.
Such errors are very difficult to correct and lead to the creation of an emergency situation in the house due to the possible collapse of PVC systems.
In addition, you can make many mistakes during installation work, especially if they are performed by non-professional performers :
The frame is not installed level, the sash is jammed, and the fittings do not work. Since the frame is already fixed, it is impossible to fix the problem without dismantling it.- Weak fastening of the PVC frame in the central part; the sash touches the frame when opening/closing.
- A low-quality PVC block for glazing was purchased without a quality certificate, with poor heat-insulating characteristics, and poorly functioning fittings.
- The work was carried out without agreement with the operating organization in violation of the space-planning design of the house, fire safety rules, SES, environmental and energy efficiency standards. Such glazing must be dismantled at the request of executive authorities.
- The balcony glazing is installed on a weak parapet and balcony slab, which may cause destruction and collapse of the structure, especially with gusts of wind.
- Assembly seams are not sealed.
- The canopy or roof over the balcony is not completed.
- The ebb and window sills are not completed.
Glazing and insulation of a balcony - general concepts
The whole process consists of 5 stages:
- preparatory work;
- sealing cracks with sealant;
- thermal insulation;
- installation of double-glazed windows;
- finishing (lining, drywall).
New PVC double-glazed windows and a thermal bridge are being installed to reduce heat loss. The original appearance of the street facade of the house does not change. If there are thin concrete slabs on the sides of the loggia and a lattice parapet in front, then the walls are first prepared by laying ceramic bricks.
Further:
- double-glazed windows are installed;
- the cracks are hermetically sealed with foam;
- the floor is prepared and leveled with a concrete screed;
- a layer of waterproofing is placed on top;
- finishing of the ceiling, floor and walls is carried out.
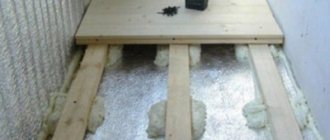
With the insulation method, it is important to insulate the walls inside and out. This way, drops of moisture will not settle on the walls of the room, and the dew point will remain outside it. For thermal insulation of walls:
- polystyrene foam boards are glued;
- a reinforcing mesh is applied.
To insulate the walls from the inside, penofol is first attached. On top are polystyrene foam boards. The joints are sealed with aluminum tape.
The ceiling is insulated in the same way. The waterproofing layer is attached. Then foam boards on plastic dowels and reinforcing mesh.
Attention! As additional insulation after thermal insulation, it is worth considering installing a heat source.
Stage one preparation.
You can't do without it
It is important that the balcony does not collapse under the weight of the structure, the windows do not fly out at the first wind, and the cladding does not come off as quickly as it is being installed
Technical analysis is one of the components of the initial actions. Assessment of design features, the percentage of dilapidation (accidents) of a living space - these parameters will allow us to draw a conclusion about whether the design of the house is designed for the fact that there will be an additional load on the balcony in the form of glazing.
Having made sure that all this will definitely not collapse, we move on to additional strengthening of the parapet. Depending on the future load, reinforcement is carried out using foam concrete blocks or metal.
Which material to choose? The answer depends on your goals and the technical capabilities of your home. Metal will be universal, suitable even for extremely dilapidated balconies.
How to do this is detailed in the diagram. We only note that a strong metal structure “ties” the parapet and is capable of taking on the main load of the glazing system.
If your balcony is strong and wide, then you can use foam blocks. This material also serves as excellent thermal insulation. But such a structure requires strengthening with reinforcement. Otherwise, the desired effect will not happen.
After the preparatory work is completed, you can, without fear, deal directly with what, in fact, everything was started for.
Main types and types of glazing
There are 3 options for installing glass blocks:
- Cold (1 frame). It requires laying powerful insulation between the windows so that the balcony can be used as a refrigerator in winter.
- Warm with insulation of the loggia inside and outside. The frames are equipped with thermal inserts. Although the option of preserving and retaining heat in the room may result in the appearance of mold and condensation on the glass. It is impossible to do without arranging natural ventilation.
- Sliding. Suitable for small loggias, saving space and protecting from dirt and precipitation. The mechanism of action is to slide one flap behind another. Although the option is not suitable for the harsh conditions of the Russian climate. In winter, the roller mechanisms may fail and freeze. Another disadvantage of the design is single glass. It will be cold on the balcony in winter.
- Panoramic - a type in which there are no frames. Guides with grooves are installed along the bottom and top of the balcony. Durable, thick glass with maximum insulation is inserted, from floor to ceiling in a hinged, sliding or tilting manner.
- With takeout. Modified version. Steel profiles are welded to the parapet. The window sill is taken as the basis. The entire plastic (aluminum) structure is mounted on it. This is a good option if the balcony is small and narrow and the parapet is durable.
- With supporting frame. A durable, wear-resistant method with the ability to turn a loggia into a warm living space for 20 years to come. But the outside will have to be radically changed. One person can't do it. Need a specialist assistant.
When might PVC frames need to be replaced?
There are several cases when owners decide to install PVC glazing. These include :
- urgent work to eliminate an emergency situation, which is carried out immediately upon detection;
- planned - for the creation of primary glazing, carried out throughout the year;
- promising - related to modernization, for example, replacing cold glazing with warm glazing with the installation of energy-efficient double-glazed windows, can be performed during a major home renovation.
Emergency replacement of PVC glazing on loggias and balconies is usually caused by mechanical damage to the structure or from hurricane winds, or as a result of improper installation of the system. It is necessary to begin eliminating it immediately, inviting specialists - high-altitude workers - for this work, so that the collapse of the structure does not cause an accident for surrounding people.
How is technology changing?
Due to the introduction of new technologies and materials in construction, in most cases, the installation of glazing on loggias and balconies is associated with modernization and major repairs, both in a separate apartment and in an apartment building.
These directions of modernization are different, for loggias mainly energy-efficient warm glazing is installed , with the goal of creating an auxiliary warm room, and for balconies, due to their small area, greater emphasis is placed on new design forms, for example, installing French or panoramic frameless structures.
significant benefits to the owners for several decades :
- Obtaining additional living space.
- Insulation of the façade part of the wall, which will have a positive effect on saving energy resources.
- High resistance to heat loss in the room.
- Increased noise protection of the apartment.
What is cold glazing of balconies
Simple design using a thin single-layer frame. It will protect the room from wind and dust, although it does not guarantee high thermal insulation. If euroframes or wooden frames with one glass are installed, then the method is optimal when deciding to turn the room into a small office or a greenhouse for flowers in the warm season.
Additional insulation procedures are not carried out. Although you can lay wooden flooring on the floor for comfort.
If wooden frames are used, then in order to avoid the appearance of dampness, mold and condensation, effective ventilation and waterproofing of the floor and parapet must be organized.
Window
0 votes
+
Vote for!
—
Vote against!
A glazed balcony or loggia not only provides additional thermal insulation and protects against extraneous noise from the street. Such a decision makes the owner of square meters the owner of an additional (albeit small) room, which can be equipped to his own taste and according to his needs. Many construction companies offer their services in this regard, as do sellers of PVC and aluminum profile structures. However, often the financial situation forces you to look for more cost-effective options that involve doing most or all of the work yourself. This article will talk about how to glaze a balcony yourself.
Important: glazing of balconies requires official approval from the relevant authorities. If you do everything “according to the law,” then first you will have to take care of additional “permitting” documents.
How best to glaze a balcony
There are quite a lot of methods, we will list all the main ones and give a little idea about them, which will allow you to decide on the direction of work in the future.
Glaze the balcony photo
- “Cold” glazing, regardless of the method of opening the frames, suggests that the balcony can be used as an additional “livable” room only in the warm season. This is the most inexpensive option, since aluminum profile structures, which are most often used for these purposes, are quite affordable. Among the positive qualities of this type of glazing is its low weight, so if there are doubts about the reliability of the support, then aluminum will be the right choice. The material is very resistant to external influences, it is not afraid of humidity and low temperatures, although it can still become deformed from sudden changes. Sometimes wooden frames with one glass are used for the “cold” method.
- There is also an option with a “warm” aluminum profile . It uses double frames and double glazed windows. And in addition, special plastic placed inside the profile keeps heat inside and does not let cold air in from the street. But this design is almost not in demand due to its high cost.
- Using wooden frames is considered a budget option, but labor-intensive in terms of caring for them: you will have to update the paint once a year if appearance matters. To reduce the cost, some use used wood. With proper care it will last quite a long time. If your income allows, then you can, as they say, install wooden “Euro-windows” once and for life. Their production technology makes them durable, and they look very impressive.
- The panoramic view of the glazing suggests that special glass, additionally processed to increase its strength characteristics, serves as the basis for assembling the balcony fencing from floor to ceiling. From the point of view of creating a spectacular space, this method takes a leading position. Due to the thickness of the material, the apartment becomes protected from heat loss and the noise insulation performance increases. The partition can be made of tinted glass and looks especially stunning when assembled without frames.
- The frameless method of glazing a balcony requires certain skills and literacy during installation. But the complexity is justified by the result when the “output” is a light, as if weightless, structure made from one glass. The lack of frames is compensated by special metal guide profiles. It is in them that the glass sections are fastened and moved along them. Special tempered glass is used for such tasks.
- PVC profile frames are a popular and practical way of glazing. The ability to install a double-glazed window with three air chambers significantly insulates the room, especially in combination with a wider profile. Installation is simple and quick, and the service life is quite long, and all this splendor will not require complex maintenance. For those who do not want to install plastic windows because the sashes “eat up” a lot of space when opened, you can opt for the option with sliding sashes.
- If you want to glaze the balcony “with the extension” of the structure , then you should be very confident in the strength of the parapet, because the load on it in this case will increase in two directions at once.
Important: it is better to carry out work on the exterior finishing of the balcony with siding or other materials before glazing. This sequence will make the cladding work easier.
How to glaze a balcony with plastic windows
- This process is not very difficult, especially since the manufacturer itself carries out measurements, so there should be no mistakes in this area. So, the finished PVC structures have been delivered, the decision has been made to abandon installation, what next?
- The existing old sashes are being dismantled and at the same time the balcony must be freed of all objects and things that may interfere. The space on the balcony can’t be called large anyway, so ideally it’s worth taking everything out of it. How else is the “deep cleaning” stage useful? All the nuances that require improvement and elimination during insulation, waterproofing, and so on become immediately visible.
- A wooden beam is secured along the perimeter of the balcony using mounting dowels. When measuring, the presence of beams is taken into account. That is, the height of the finished structure will be equal to the height from the side of the barrier to the top slab minus the parameters of the crossbar. It is worth checking with a representative of the supplier company what thickness of beam he includes in the calculations.
- First, the PVC frame itself is installed without sashes. First of all, the main and largest front part is mounted. And then the side one. In order to save money, many refuse glass on the side in favor of sandwich panels. This, of course, is a matter of taste.
- On the street side, a flashing is attached under the frame. If a balcony with a roof is glazed, then the canopy must also be secured. It is placed under the structure and secured with self-tapping screws, and the cracks are filled with sealant. The visor will protect against moisture ingress and leakage into the profile and into the room. Therefore, issues of tight fit should be given more attention.
- When the frame is level and secured, you can begin installing the sashes in place. After installation, you should check them for tightness. An important indicator is the smooth operation when opening and closing. If everything is done correctly, the frames will open easily and close without effort, fitting tightly into the opening.
It is important to think carefully about the options for opening the doors. This structure will have to be washed, and it is better to plan it so that from the tear-off section you can easily reach the adjacent “blind” one. It’s unlikely that anyone would want to risk their life cleaning things up.
- From the outside, it is convenient to hide the joints with the help of additional decorative elements. They can be purchased independently, or “included in the kit” when ordering from a company that supplies PVC frames. All gaps from the inside are sealed using polyurethane foam. When it dries, it is trimmed and the protective film is removed from the frame and sashes. Next, work continues on the final decoration of the room.
Glaze the balcony video
Glaze the balcony with an aluminum profile
Another advantage of a lightweight aluminum structure is the sliding opening system. It saves space, however, it also causes problems with the folds freezing in winter. If the choice is still made in its favor, then we learn how to properly glaze the balcony.
- We dismantle the previous glazing.
- If the parapet is made in the form of metal handrails, then an “apron” made of galvanized steel must be installed on top of them. If the barrier is concrete, this is not required. The profile will fit right on it.
- The visor is mounted.
- A window sill is being installed.
- To secure the frame, anchor plates are installed in the opening. Using anchor bolts, the frame structure is installed on them.
- The ebb is attached to the frame.
- Sashes are installed in the openings.
- All seams are sealed using polyurethane foam and covered with flashings (optional)
- The final step is to adjust the fittings. The doors should move apart smoothly without making any noise. This indicates correct installation.
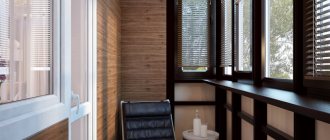
Glaze the balcony with wood
It’s good if the home handyman has carpentry skills. Then the option with glazing with wooden frames becomes cheaper. After all, he can assemble sashes using wooden beams, glazing beads and ordinary glass 4 mm thick, providing them with the simplest fittings from the nearest store. However, even in the absence of such talent, you can order an inexpensive finished product from a workshop. After which you can begin installation.
It is important to consider that a large structure can “sail”. Therefore, despite the visual appeal of large and wide openings, this unpleasant effect is worth remembering.
- Preparation has already been written above, so we skip this stage.
- There are no special tricks in installing such a structure; moreover, the process itself differs little from, say, installing a PVC profile. Using metal fastening plates and screws, we install a wooden frame without frames.
- The ebb, canopy and window sill are installed similarly to the glazing methods described earlier.
- The seams are foamed and subsequently hidden under the finishing.
- The sashes are fixed in place, the fittings are adjusted.
For a long time, this was the only way to glaze a balcony in a Khrushchev building. Of course, such glazing will never become the object of envy of neighbors. But if done carefully and securely fastened, it can protect against dust, falling leaves and change the microclimate on the balcony by a couple of degrees.
How to glaze a balcony with your own hands using a frameless method
- A very impressive type of glazing, but it also requires some effort and courage. The first thing many homeowners fear when they are offered this option is safety. If we are talking about installing “full-height” glass, then it may be worthwhile to provide some kind of removable structure, reaching a meter in height, and attached to the walls or floor at a time when, for example, children are playing on the balcony. It is quite simple to weld from metal pipes of small diameter.
- The second not entirely desirable effect of a magnificent view of the surrounding area is an equally wonderful view of the privacy in the apartment. Especially in the evening with the lights on. Those who do not want to provide neighbors and random passers-by with the opportunity to watch the reality show “live” can choose the following “rescue” options.
- Consider a system of curtains or blinds. The second option will be expensive, given the non-standard dimensions of the opening, and you will have to suffer with a fabric solution.
- At the planning stage, you can choose the type of glass with one-sided transparency. They look good, they are very good on sunny days, but in the fall and in cloudy winter weather such glazing brings melancholy due to the low light transmission. Alternatively, the presence of such glasses can be combined with regular ones.
- If we are talking about frameless glazing of a balcony only in the part where most people are accustomed to seeing the window opening, then the difficulties described above do not arise.
Important: glazing into the floor requires dismantling the parapet. Before carrying out work, you must make sure that the demolition is legal and will not cause negative consequences for the entire house.
- For all its attractiveness, the panoramic method requires additional costs for insulation, and you shouldn’t choose it if the balcony offers a “wonderful view” of the factory complex or the dull neighboring multi-story buildings.
- An aluminum panoramic profile will be cheaper, but its ability to retain heat, let’s say, tends to zero and you should think carefully before installing it.
There are many options, but each of them can be implemented on your own. Therefore, balcony glazing can be considered a type of work on which you can save money.
What is aluminum glazing
Method using aluminum frames, 1, 2 glasses and thermal inserts. The frames are installed on a parapet or a panoramic structure is constructed from them.
If desired, you can make a “French balcony” by installing glass blocks exclusively in front of the parapet.
Aluminum frames:
- do not burn;
- do not corrode;
- have good heat resistance;
- will last up to 70 years;
- do not need painting.
The design with aluminum glazing is lightweight, with good sound insulation properties.
Stage two: design selection.
Of course, the process itself is not so complicated, considering that almost every man, to one degree or another, has a little knowledge in the field of construction.
But when glazing without the help of specialists, you must be prepared to do not only the “dirty” work with your own hands, but also other related work. One of which is the choice of design.
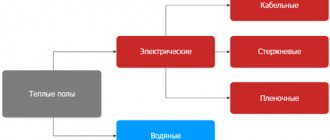
It makes no sense to say that there are standard and non-standard double-glazed windows. This is already clear to everyone. But the expected result from the design matters. Traditionally, there is a division into warm and cold glazing. What is the difference?
- Cold food is made using cheap material, and warm food is made using expensive material.
- Cold glazing does not retain heat inside the room; the temperature always corresponds to that outside. Warm means insulation, which will allow you to maintain room temperature at any time of the year. Read more in the articles - do-it-yourself interior decoration and balcony insulation and waterproofing.
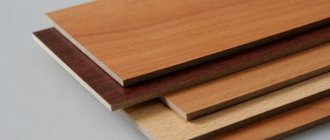
Having dealt with the functional load, we will solve the issues with the material. Wood, aluminum, PVC. Today these are all possible options for finishing a balcony:
- Wooden Euro-windows have a long service life, so you don’t have to worry that they will rot or dry out under the influence of external factors.
- Aluminum frames are cheap, lightweight and are most often used for cold glazing.
- If we take PVC, then they have a wide range of additional functions - noise insulation, thermal insulation, imitation of a certain style in architecture, etc. Of course, they are heavier than aluminum and are used for warm glazing.
How are things going with the lighting in the room? In addition to frames, you should also pay attention to glass. Do you have a sunny side, but want to make a games room on your balcony? To prevent the baby's delicate skin from being exposed to ultraviolet rays, sunglasses are used, which are covered with a film using a special technology
How energy saving glass works
This glass absorbs almost 99.9% of radiation. Or maybe the balcony is a future greenhouse? For this purpose, tinted glass is used, which prevents sunlight from penetrating through the glass and creating a “magnifying glass” effect.
Colored glass and stained glass are ideas for specific styles of both interior and exterior. Well, and finally, energy-saving windows. A thin layer of metal is applied to the surface of the glass at the factory, which retains heat indoors.
Glass, structure, reinforcement - all preparatory issues have been covered, the decision has been made. All that remains is to understand how it can be glazed. To do this, we move on to the next stage.
Video - what is energy-saving glass and what are its capabilities:
What is warm glazing
Frames with double, triple glazed windows or with thermal inserts (Euro version) are installed. Thermal packages consist of two vacuum chambers. The main thing is that during installation, a dew point does not form between the glass panes after moving outside the perimeter of the balcony.
Double-glazed window
The main goal is to achieve the correct balance of temperature effects on the windows, i.e. think about insulation.
Installation of aluminum and plastic frames. Instructions
The PVC frame is more massive than aluminum, so the installation process will take longer. Both frames are installed on wooden beams.
A hole is drilled in the concrete structure into which the anchor is screwed. Then lay the board horizontally, checking the evenness with a building level. The bars on which the board rests can be moved until the board assumes a strictly horizontal position. Then it is fixed with self-tapping screws. The next stage is the installation of galvanized ebbs, one of which is placed on the board, and the second - directly below it, in the upper part of the balcony.
The tides are fixed with dowels. When glazing long balconies, it may be necessary to install a sill in several parts. To securely connect them, metal screws are used.
The most difficult part of the work is installing the frame and adjusting its position. First, the frame is fixed with wedges, checking the evenness of the position with a level. Then the sashes are hung. They can have single- or double-glazed windows. The work uses a hammer and a level.
Now you can install the spacers. The windows are completely closed, using a mounting tool, the frame is raised slightly and wedges are placed under it. When the evenness of the structure is adjusted, they begin to drill holes for long screws, thanks to which the lower and side profiles of the window will be fixed.
Silicone sealant is used to seal the holes. The cracks and gaps between the frame and the wall are sealed with polyurethane foam. Cement is used to finish slopes.
Advantages and disadvantages of wood glazing
Wooden window blocks:
- reliable;
- environmentally friendly;
- visually attractive;
- suitable for self-installation;
- suppress noise from the street well;
- have increased thermal insulation properties.
The downside is water penetration or icing of window systems. Especially with a sliding design. Easy to produce.
If you assemble all the doors correctly, the temperature inside the loggia should rise by several degrees. Although the problem often arises when installing glazing beads from the reverse side, if the floor is higher than the first. Experts recommend first inserting the glass into the frames, then installing it on the base. If the structure is three-dimensional, then it is better and safer to carry out all the work from the inside
Mistakes you can make when installing windows
There are a number of points that you should pay attention to when installing the structure so that it has a long service life:
- you cannot install the window with the glazing beads facing outward, as this reduces the structure’s burglary resistance, since the glazing bead can easily be pulled out and the glass unit removed;
- you need to be careful about leveling the structures when installing the window, otherwise opening and closing the sashes will be difficult;
- It is imperative to protect the mounting foam from direct sunlight to avoid its destruction;
- It would be wrong to choose to fix the frame structure only with mounting foam: it is absolutely necessary to attach it to the wall, otherwise it may simply fall out.
By following all the installation rules, you can successfully install the window structure yourself, and if you seek the services of professionals, you will be able to monitor their work at any stage.
Advantages of glazing and insulation of balconies with plastic windows
Plastic windows are long-lived, because they will last over 40 years. The frames are equipped with a drainage hole. This means they will not freeze even at low sub-zero temperatures.
Plastic windows:
- provide a comfortable temperature on the balcony at any time of the year due to increased thermal insulation;
- have a high level of sound insulation, maintaining silence and comfort in the room;
- protect from drafts and precipitation;
- easy to clean thanks to high-quality fittings and easy opening (closing) of the doors;
- stylish, therefore they will harmoniously complement the interior of the room and improve the appearance of the building’s facade;
- budget-friendly and reliable if installed correctly;
- can handle any load.
Attention! Plastic windows with parallel sliding sashes are more suitable for cold glazing because they have low thermal insulation properties.
Pros and cons of aluminum balcony windows
Installing aluminum windows on balconies is becoming increasingly popular today. And for those who are just thinking about this, we will present the pros and cons of such glazing. Let's start with what advantages aluminum windows on the balcony have.
- Availability. Often people give their preference to aluminum windows precisely because of their low cost. On average, the price for them is 1.5-2 times cheaper than for similar glazing with PVC windows.
Glazing of balconies with aluminum profiles
Aluminum sliding windows for balcony
Balcony with aluminum profile windows
Photos of aluminum balcony windows
French balcony made of aluminum profile
Option for glazing a balcony with aluminum windows with a perimeter larger than that of the parapet
Aluminum window with sliding sash. Most often, similar structures are used for glazing balconies.
Section of “warm” and “cold” aluminum window profiles. The first differs from the second by the presence of two glasses with an air gap and a heat-insulating gasket between the outer and inner sides
Also, when thinking about purchasing aluminum windows for a balcony, you should be aware of their disadvantages. The main disadvantage of such structures is the insufficient degree of thermal insulation. A balcony with aluminum windows, as a rule, will be “cold” - in winter the temperature in it will exceed that outside by no more than 5-6°C.
Sliding cold aluminum structure Framex S22
Another disadvantage is that aluminum frames and sashes are installed only on perfectly flat and pre-prepared surfaces. Therefore, before the installation process begins, the parapet will either have to be leveled using a cement mixture, or a wooden board will be placed under the structure and all glazing elements will be installed on it.
Glazing with extension (extension)
The best option when deciding to set up a winter garden on the balcony. The permissible extension is up to 35 cm. Unlike standard glazing, you will need:
- strengthen the parapet (especially in old houses), because this type of glazing will exert the greatest load;
- equip a strong and large canopy.
Double-glazed windows are installed on a metal structure, which is mounted additionally. The glazing is placed along the window sill, due to which the balcony area will increase.
The design with the offset is complex. First, the base of the parapet is prepared, metal corners are installed in the form of a kind of shelf or metal profiles. Wooden blocks are first attached to the floor and parapet.
Outside the parapet, to give the frame the greatest rigidity, triangle-type brackets or corners are attached. Then they are fastened to the structure of the protruding part, onto a load-bearing wall along the height of the entire loggia. With aluminum glazing, the frames are attached to the top.
Attention! The width of the area increases by 200 - 300 mm, the upper part of the window sill outside the balcony - by 250 mm. For expansion, a metal structure is used, attached to the wall of the balcony and extended beyond the frame. Then the frames are installed.
General rules
Many users do not distinguish between these two concepts - loggia and balcony, and therefore may choose the wrong Euro-windows for glazing. There are many differences between them, but their design differences are important for the glazing process.
A balcony is a remote structure installed on a reinforced concrete slab, fixed in the load-bearing wall of the building and closed along the perimeter with a fence. A loggia is an internal platform built into the facade of a building, closed on 3 sides by walls, and its external open part coincides along the external cut with the external facade wall.
The general requirements for glazing such structures are:
full functionality of the system;- appearance corresponding to the design solution of the building facade;
- the profile must be rigid with galvanized steel reinforcement 1.5 mm thick.
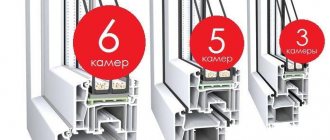
- for warm glazing, a three-chamber package with a glass thickness above 4 mm must be installed;
- functional high-quality fittings;
- high heat, moisture and noise protection;
- glazing type: cold, not higher than the 8th floor; warm method with multi-chamber packages and insulation of all adjacent surfaces and semi-warm/multifunctional, using a medium-density profile;
- with a service life of 50 years or more.
Due to the fact that the balcony is located on an external reinforced concrete slab, in order to withstand the additional load from the window structure, the parapet and the balcony reinforced concrete slab are strengthened. Sometimes, to increase the balcony area, glazing is carried out outside.
The useful area of the balcony is increased along the entire length of the parapet. In this version, double-glazed windows are mounted on a specially designed frame on the parapet. At the same time, the customer should be aware that such work must be agreed upon with the organization operating the house.
Since loggias, as a rule, are larger in size than balconies, all standard modifications of window systems, both tilt-and-turn and hinged, are applicable to them. For balconies and loggias above the 5th floor, experts recommend sliding window construction, since they are less affected by wind loads when opening. It should be borne in mind that in most cases they are performed using the cold glazing method.
For balconies with metal railings, panoramic glazing is a good option, which does not carry a large weight load, has a modern look and creates additional conditions for lighting the apartment.
When installing a balcony block, it is necessary to consider whether the reinforced concrete slab is able to withstand the increased weight from the frame structure.
Glazing with roof
An excellent solution if the balcony does not have a roof. Tree leaves, snow, and raindrops constantly fall. If aluminum frames are installed, then it is reasonable to install a dependent roof, attaching it to the wall of the house and a block of frames.
The design is lightweight and reliable. Although it is only suitable for a narrow balcony.
If you decide to build an independent roof, then a wooden or metal frame is made without connection to the glazing. You can insert the glass later if you wish.
Glazing a loggia and roof is a dangerous task. It’s better not to do it yourself and trust the experts. Also, in order to avoid the structure being torn down by the wind, it is important to make the most accurate calculations for the frame and brackets.
Sequence of work for installing an aluminum frame
Let's take a closer look at the installation of aluminum frames on the balcony. First you need to prepare the necessary tools for installation.
Tools
To work on cold glazing you will need the following tools and materials:
- hacksaw for metal;
- roulette;
- drill;
- self-tapping screws;
- screws;
- screwdriver;
- brush seal (schlegel);
- weather-resistant silicone sealant;
- polyurethane foam;
- hex wrench.
Aluminum sliding frame device
The balcony is glazed with an aluminum profile in the following order:
- dismantle the old frame (if any);
- clean the parapet and slabs from debris and fragments of cladding;
- assemble a frame from fragments;
- fix the assembled structure to the parapet using galvanized self-tapping bolts and mounting loops;
- install guides for the sashes, for which measure the length of the horizontal sides of the balcony opening, transfer the dimensions to the guides and cut them out
- polish the cut area with a file;
- Drill holes in the opening for self-tapping screws in increments of 0.3 m. Install guides using screws. The gap between the outer edge of the frame and the guide should be no more than 5 cm, so that the frame does not freeze in the winter;
- install a brush seal along the contour of the valves;
- insert the sash into the upper guide, and then with the rollers into the lower one;
- place a steel canopy covered with a decorative and protective polymer coating under the mounting loops;
- connect the canopy to the balcony slab using self-tapping screws;
- draw a cast on the polymerized steel strip. Cut it out with roofing scissors;
- install the ebb outside the frame;
- seal the joints of the ebb and flow hood with weather-resistant silicone sealant;
- fill the corners between the frame profile, balcony slabs, walls and parapet with polyurethane foam;
- install glazing on blind sashes. To do this, install clamping strips for a tight joint between the frame and the glass.
Installing a sliding aluminum frame on a balcony is the most acceptable and economical option for glazing a balcony. Detailed instructions will help you install it yourself without much hassle.
https://youtube.com/watch?v=CCxjajGSOJY
Technical features of frameless glazing
Frameless glazing is a sliding system made of transparent, stained or impact-resistant glass. Partitions and frames are not provided. The glass is mounted on metal profile rails. A rubber seal is laid between the doors and the aluminum profile.
The system is lightweight, durable with a glass thickness of 8-10 mm. Although it is not warm. After installation, there will definitely be cracks and gaps due to the impossibility of fitting the glass close to each other.
Professionals consider frameless glazing to be universal. The absence of frames allows the room to be heated by the sun and muffle noise from the street. Although the temperature on the balcony is unlikely to rise by more than 2 degrees, unlike outside. This option is suitable for gardeners who want to grow plants.
For frameless glazing, tempered thick, durable, impact-resistant glass with round ground edges is used.
The advantages of this glass:
- withstand high loads;
- inability to get hurt.
This option is suitable for dark rooms when you want to add sunlight. But it involves the complete demolition of the parapet. This means that we are talking about reconstruction and you will have to contact the relevant services to obtain permission.
Installation of frameless window structures
The frameless method of glazing balconies has a spectacular appearance, but creating a home panorama will require a lot of effort. It is also important to consider that when installing a full-length glass panel, neighbors and passers-by on the street will become witnesses of your private life in the apartment.
What else will lovers of viewing the surrounding area have to do:
- take care of the safety of the space when people are there;
- ensure reliable insulation of the room, which will increase the cost item;
- choose a glass shading option - curtains, blinds, tinted glass.
Advice. When choosing frameless glazing, which you will do yourself, you will have to dismantle the balcony parapet. For this type of work, it is necessary to obtain a permit, as well as a conclusion that dismantling the structure of the house will not result in negative consequences for its residents.
Coordination of balcony/loggia glazing
If glazing (especially with removal) is not pre-approved by contacting the BTI (Urban Planning Department), then the work carried out may become illegal.
First, the specialist must:
- come and inspect the balcony slab;
- draw up a protocol;
- issue a conclusion and permit indicating the characteristics of the house.
The next stage after glazing is reworking the plan for a house or apartment with the introduction of changed characteristics.
Reference! The work being carried out involves making changes to the design, so glazing the loggia is equivalent to redevelopment. Permission is required. If you do not first coordinate the work with a specialist, you may receive a fine and will not be able to sell the apartment. Glazing will be considered unauthorized. Moreover, it leads to the weighting of the structure as a whole. This means it potentially increases the likelihood of a complete or partial collapse.
What you need to be prepared for before starting glazing
Balcony glazing requires a professional approach. In such work, it should be remembered that the balcony slab is designed for a certain load. Therefore, she may not be able to withstand the weight gain. To prevent a fatal collapse of the entire structure, it is better to seek advice from specialists. They will be able to give clear recommendations on materials that can be used for glazing in a particular case.
When glazing a loggia, such detailed calculations of the load-bearing capacity of the balcony slab are not required, since the load of the side of the loggia is transferred to the main wall of the house. Glazing can be produced using almost any materials and methods.
It is better to do the balcony glazing yourself with your own hands together with an assistant. In such work you will have to constantly lean over the parapet, so it wouldn’t hurt to have someone who can provide backup. For safety, it is advisable to prepare safety equipment in advance.
What and how to glaze a balcony correctly
The ideal glazing option for year-round use of a room is a metal-plastic structure with high thermal insulation qualities. Although it is better to entrust the installation to specialists.
Plastic double-glazed windows are good because they do not require additional insulation of the balcony. The level of thermal protection will depend on the thickness of the double-glazed windows and the width (gap) between them.
The current option is an aluminum profile - a lightweight material that does not put a load on weak floors in old houses, allowing you to visually expand the space due to a frame with an extension. The profile, unlike plastic or wood, will allow a lot of light into the room and will allow the balcony to be used as a completely normal living space.
To give the room a panoramic view, you can prefer frameless glazing. Instead of frames there are narrow, metal profiles similar to guides.
Wooden window structures are easier to install yourself.
Wooden window design
Let's look at it in step-by-step instructions:
- Measure window openings.
- Mount a wooden box, secure it at the level of the top beam and balcony railings.
- Attach the side bars to the right and left walls using metal brackets.
- Install sheathing for interior finishing.
- Cover the ceiling, wall surfaces and floor with clapboard.
- Install frames. Attach brackets or support posts made of wooden beams treated with an antiseptic (sealant) to the walls.
- Remove the glass from the frames.
- Make front and then side glazing without distortions.
- Place the frames on anchors and screws for fixation.
- Seal the seams with foam.
- Align the double-glazed windows, then the sashes, so that the glazing beads fit snugly against the frames.
- Treat the cracks with insulating material, polyurethane foam (tow).
- Install casings (after thermal insulation).
- Treat wooden areas with a protective compound in several layers.
Sealing Recommendations
After completing the glazing of the balcony, take the necessary measures to protect the structure from the penetration of atmospheric moisture. To do this, fill the existing cracks with foam and sealant.
Sealing
Sealing
Connections between glazing and walls
High-quality sealing will further improve the thermal insulation characteristics of structures.
Good luck!
Prices for mounting foams and cleaning gun cleaners
Polyurethane foams and cleaners for construction guns
Preparatory work
Reconstruction actions begin with preparing the premises:
- the parapet is checked for cracks and cracks;
- the gaps are measured, the required pieces of galvanized sheet are cut off;
- sealing is carried out with fastening to self-tapping screws after installation under the tree from the outside;
- the old parapet is demolished, a new one is erected in case of a disapproving decision by the specialist;
- laid out 1 brick wide, one by one, on sand-cement mortar;
- all work is monitored by level to obtain a completely horizontal structure, problem-free glazing and no distortions;
- a frame is made if necessary, onto which the frame will be attached with self-tapping screws and dowels around the perimeter of the opening;
- The sash is removed from the frame and the lock is removed from the upper hinge of the sash.
Stage five: step-by-step instructions for glazing.
Of course, the balcony must be cleared of everything that was previously there: chairs, flowers, linoleum, tiles, old trash, etc. The issue of strengthening was previously touched upon, so we will omit the description of this procedure.
Installation of wooden windows.
Correct installation according to GOST
Installation of the frame. The beams that serve as the base are pre-treated with sealant (but only the mounting surface). Next, a wooden structure is constructed around the perimeter using mounting dowels.
Window installation. The frames must be glazed, as the glass may simply break. Installation is carried out in the following sequence: front structure - side elements.
Afterwards, it is necessary to seal the seams using sealant and polyurethane foam. When everything has hardened (at least a day), you can glaze. But first, all grooves must be treated with silicone sealant. The beads used to secure the glass must press it tightly against the frame.
Video - how to glaze a balcony with wooden windows:
Installation of aluminum frame.
- We eliminate everything unnecessary, namely: we remove all opening elements, so as not to complicate our life, we remove the glazing, as in the previous case.
- Mounting plates are attached to the frame (using metal screws), with a pitch of 700 mm or more.
- Installation of the frame in the opening, followed by alignment (horizontal, vertical, plane).
- Fastening mounting plates to surfaces using dowels.
- We hang the sashes and return the glass.
- All holes and gaps are eliminated using polyurethane foam.
Video - how to install an aluminum frame with your own hands:
Installation of PVC windows.
The installation diagram is similar to the previous one, with some exceptions.
- To remove the window, you just need to remove the plastic beads.
- Installation is carried out using mounting plates that are attached to the frame with self-tapping screws.
- All gaps are also eliminated with polyurethane foam.
The final stage is to bring the balcony into an appropriate aesthetic state: installation of siding.
External installation requires certain efforts, such as the construction of fastening belts. There are two of them - upper and lower.
Such structures are built around the perimeter, which are attached to the walls using corners or liquid nails. The blocks are connected to each other by metal corners. The lower belt should go along the base of the balcony.
Attaching the siding itself begins from the sides. The screws should not be overtightened; they are located exactly in the middle of the panel's technological hole. Installing trims that hide all the screws completes the glazing process. It is simply put on the strip of siding until it clicks.
Thus, by carefully examining the technical characteristics of your premises and strictly following the instructions, it is possible to glaze without resorting to the help of specialized companies and saving your own money.
How to install metal-plastic frames with your own hands
Step by step steps:
- Prepare slats (10-15 pieces) to align the parapet line and optimally align the window horizontally.
- Remove the double-glazed windows from the frames, placing them on thin foam rubber.
- Remove the sashes from the window hinges.
- Mount the stand profile by rotating the frame 180 degrees.
- Insert the profile into the groove and secure it to the underside of the frame using a wooden hammer.
- Mount the frame fasteners, retreating from each edge of the frame by 15-16 cm.
- Secure the plates to the top panel using self-tapping screws.
- Install the windows, fixing the frames to the parapet. Attention! This stage is dangerous, so it is better to do it with an assistant.
- Fix the top level of the frame, then all other sides. Place on self-tapping screws, maintaining a distance of 6-7 cm.
- Align the connected frames using a plumb line and level.
- Seal gaps and cracks on the outside with sealant.
- Install the window sill, then the slopes and ebbs.
- Treat windows and perimeter joints with silicone.
- Insert double-glazed windows and secure.
- Hang the sashes.
Installation technology for sills, window sills and slopes
For this stage you will need:
- self-tapping screws or self-tapping screws;
- polyurethane foam;
- regular or stationery knife;
- silicone sealant.
The main task of ebb tides is to prevent water from entering the room during rainy weather.
Using self-tapping screws (screws), the aluminum ebb is attached to the outer lower part of the frame (stand profile). After that, using polyurethane foam, all formed cracks are removed. After hardening, the residues are cut off, and silicone sealant is applied along the seam line.
Installation of an aluminum window sill is carried out using the following tools:
- silicone sealant;
- plasters or putties;
- spatula.
The technology for installing an aluminum window sill is similar to installing its plastic counterpart. It is mounted under the frame, in a special groove. But it can also be pressed against the stand profile or against the frame itself. Such nuances must be corrected at the measurement stage.
The installation of the window sill itself is carried out on foam, and a strip of silicone is applied to the place of contact with the frame. Again, the connecting side seams are “hidden” using plaster or putty. This also allows you to level out all surface differences. After installing the window sill, its seam must be sealed with silicone sealant.
Finishing of slopes is carried out using the following materials and tools:
- sandwich panels;
- sealant or additional profile;
- plasterboard sheets;
- self-tapping screws;
- putty/plaster;
- putty knife.
Slopes are the last and final element of the integrity of the window structure. Work on them is carried out last. Experts most often use and recommend sandwich panels for aluminum windows. They allow you to give a more aesthetic appearance to the window. To attach the slopes to the window, a sealant is used, and in some cases an additional profile is used. This nuance depends on how this question was posed during the measurements.
Approximate cost of glazing
The cost depends entirely on:
- type of construction and double-glazed windows;
- condition of the balcony;
- number of floors of the house;
- type of profile used.
The price for the cold aluminum version is lower. Wooden and plastic warm glazing will cost more.
When arranging a turnkey loggia, the price includes the following types of work:
- calling a specialist;
- dismantling, removal of old glazing;
- preparing the base for installation;
- erection of a parapet or roof (if missing)
- strengthening of load-bearing elements;
- removal of the roof and balcony;
- production, delivery of window systems;
- installation of window blocks with attachment of the frame, sealing of adjacent installation sites, molding of the canopy and window sill;
- siding finishing;
- Carrying out interior finishing work (insulation, installation of slopes and electrical wiring).
Necessary tools for glazing
A set of tools and consumables should provide the entire technological installation process from measuring the structure, dismantling the old PVC frame structure, installing a new one, adjusting the operation of fittings and pressing the sashes.
Basic set of tools for glazing balconies and loggias:
- Measuring kit: tape measure, level, angle and plumb lines.
- Metal and rubber hammer.
- Mallet.
- Assembly knife.
- Hacksaw and wood saw.
- Scrap.
- Electric drill and screwdriver.
- Victory drills.
- Self-tapping screws, anchors and dowels.
- Wooden beams for a loggia or metal fastenings for a balcony parapet.
- Polyurethane foam.
- Slings.
- Waterproof and heat-protective materials for warm glazing options.
Tips and tricks
- Before glazing a balcony, it is important to choose a suitable profile.
- All installation options are associated with certain difficulties in execution, therefore they are carried out in a certain sequence and are adjusted to the structure of the loggia.
- Measurements are taken and calculations are made after selecting the profile. Then the old glass, frames and fastenings are dismantled, starting from the balcony ceiling to the parapet.
- It is worth making all measurements with maximum accuracy to avoid problems during installation. Sometimes a few millimeters ruin the installation.
- Think about how the doors will open in the future. Won't you have to risk your life to reach the distant blind windows?
- It is advisable to hide the external joints using additional fittings so that the double-glazed finish looks smooth and beautiful in appearance.
- Be sure to align and adjust the openings during installation in relation to the bottom wall to avoid the cladding sticking out and leaving gaps.
- Full glazing is carried out only after the expert issues the final permit.
Siding
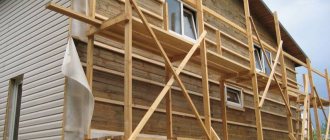
In addition to glazing the balcony, I was interested in the option of external cladding of the balcony. And for this I chose siding. This material is the most optimal, it is durable, consists of PVC and is not afraid of sunlight and precipitation. In addition, it enhances thermal insulation on the balcony. The siding has a wide range of colors, and the manufacturer claims a service life of no less than 50 years.
DIY balcony siding
Advice! For those who decide to carry out all the work on glazing the balcony themselves, you need to know that it is better to complete the outer cladding of the balcony before glazing. This will save time and money. After all, after glazing the balcony, it is not so convenient to carry out external cladding, and calling craftsmen who will do all the work with the help of climbing equipment will cost a lot of money.
It is quite possible to do siding work yourself, but only if you are confident in your abilities and have skills in such work. Otherwise, it is better to entrust all work on covering balconies with siding in apartments to qualified specialists who have professional equipment.
Finishing the balcony with siding
I have described the sheathing instructions below:
- First you need to build fastening belts from wooden beams - upper and lower. In the future, siding will be attached to them
- We attach the beams to the wall using liquid nails. They are connected to each other using iron corners
- Let's start installing the siding - you should start from the sides. We do not overtighten the screws; they should be left in the middle of the hole.
- Upon completion of the siding installation, we hide all the screw heads using platbands
Balcony siding
# PVC profile
It is very popular and is a practical method. If you are interested in this topic, then here, if you wish, you can find out more about how to glaze a balcony https://xn—-7sbgimwvecb.xn--p1ai/zavod/osteklenie-balkonov/. You can install double-glazed windows with several air chambers, which will significantly improve the insulation of the room, especially in combination with a wide profile. It is characterized by simplicity and efficiency of work, while the structure will serve for a long time, there is no need for complex maintenance.
Window opening systems
Plastic, wooden or aluminum windows can be equipped with different sash opening systems. But practice has shown that for cold glazing it is advisable to install aluminum systems with a sliding mechanism, when the sashes slide one after another. If you plan to install plastic sliding windows for a loggia, then usually 1-2 sliding sashes are made, the rest are solid.
For warm glazing with wood or metal-plastic, a tilt-and-turn mechanism with swinging doors is installed; it is somewhat more expensive than a sliding system, but retains heat better.
Both opening systems allow the doors to be tilted vertically for ventilation. Sliding sashes are easy to remove from the runners to wash the glass; you don’t have to remove everything from the window sill to open the window opening, and swing systems are more airtight, which eliminates drafts and heat loss, but sliding curtains on the loggia have to be moved back.
French glazing
Selecting a profile and glass unit for warm glazing
Before glazing the loggia, you need to decide what functional load will fall on the room. If your plans include insulating the loggia or connecting it to the main residence, then you need to carefully select double-glazed windows and profiles for frames.
Metal-plastic profile
Energy saving is the most important function of window systems. The frame occupies 17-20% of the total window area, so a lot depends on the profile design. To properly glaze a loggia, you should focus on the climate in the region:
- if in winter the air temperature does not drop below -20°C, then a 2-chamber profile is sufficient to retain heat;
- at temperatures below this mark, a 3-chamber profile should be installed;
- in the regions of the North there are 5 chambers and higher.
The second important aspect when choosing a profile for glazing a loggia is statics - the rigidity of the window structure. These indicators are influenced by the overall dimensions of the profile and its internal metal reinforcement. The modern market today is represented by profiles with a width of 58-121 mm. The main rigidity of the window system is provided by the reinforcing liner; the greater its thickness, the more stable the structure; to glaze a loggia, a thickness of 1.2 mm or more is required.
Wooden frames
The traditional way to glaze a loggia is with wooden frames. Nothing compares to the warmth of natural wood and the beauty of its texture. Modern wooden European structures do not require additional maintenance - they are reliable and technologically advanced systems, but their cost is quite high compared to plastic windows. Ordinary wooden frames are made of pine, so their price is low, but they will have to be regularly treated with fire-fighting agents and antiseptics, and painted. For expensive interiors, valuable types of wood are used.
How to glaze a complex opening
Wooden frames, when installed correctly, are many times warmer than plastic and aluminum structures, but before glassing the loggia, it is necessary to perform high-quality waterproofing. Natural wood breathes, creating natural ventilation in the room. Modern woodworking technologies make it possible to glaze openings of any shape; wooden frames can be round, trapezoidal, arched or triangular - this expands the possibilities of designing a loggia. You can install the same double-glazed window in them as in a plastic profile.
When covering the loggia with clapboard, it is better to glaze it with wooden frames
Double-glazed window
The glass unit accounts for approximately 80% of heat loss, so an important selection criterion for glazing is the heat transfer resistance coefficient. For warm glazing, it is recommended to choose a 2-chamber profile for 3 glasses of 4 mm thickness, preferably with a low-emission energy-saving silver-based coating applied to the glass, which reduces heat loss by more than 10 times.
The spacer that connects the glass is also important. In inexpensive windows it is made of aluminum, this reduces the coefficient of resistance to cold, which is not a problem if your region has a mild climate. If the temperature differences are large, in order to avoid the formation of cold bridges and heat loss, the installation of a combined aluminum and plastic insert is required. This configuration of the double-glazed window will significantly reduce the cost of heating the loggia.
Warm panoramic glazing of the loggia, photo of the attached room
Wooden and plastic windows have a lot of weight, therefore, they put a lot of stress on the fittings, and as a result, the sashes sag and warp. It is better to glaze the loggia with swing doors up to 1500 mm in height and up to 750 mm in width. Blind sashes can be larger. When calculating windows, do not overuse swinging elements; to glaze a loggia of 6 meters, 4-6 are required, and for a 3-meter loggia, 2-3 swinging sashes are enough for proper ventilation and washing of the windows.
How to beautifully glaze a balcony with wood