assets/from_origin/upload/resize_cache/iblock/6e2/600_450_2/6e2de20d798149e0259ddebc24b01781.jpg From this article you will learn:
- What you need to know before you start finishing your balcony
- How to decorate the exterior of a balcony with siding yourself
- How to do the interior decoration of a balcony with wooden clapboards yourself
- How to make the interior decoration of a balcony with plastic panels, plasterboard, block house, laminate and MDF panels with your own hands
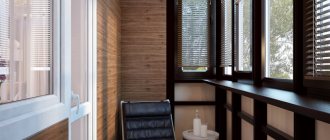
An integral part of a home in a multi-storey building is a balcony, which adds square footage to your apartment. The trend of recent years is to eliminate clutter on the balcony, creating winter gardens, comfortable places to relax or work areas. What are the stages of step-by-step finishing of a balcony? How to turn an old balcony into a place where you can have a good time? Read about this in our article.
Mandatory conditions before starting to finish the balcony
A balcony is a fortified area that extends beyond the plane of the wall of an apartment building. There is a big difference not just between a balcony and a loggia, but also between balconies in different houses. The differences are determined by both the type of construction, type of fence, and shape.
What are the differences between a balcony and a loggia? The first is an external structure attached from the outside to the wall of a high-rise building. On the contrary, the loggia is inscribed in the plane of the building; it is a niche that rests on load-bearing walls.
If you look at the balcony, all three sides will be open. It can be a box balcony or a glazed structure, one way or another its perimeter is located outside the wall of the house. In the case of a loggia, two sides can be open (when it is corner). But most often, three sides of the loggia are closed by the walls of the house.
Today you can find many types of building and finishing materials on sale; the choice will be limited only by your imagination. In Moscow you can choose everything you need for any interior design style. Therefore, finishing any balcony will not be difficult, no matter whether it is closed and insulated or open. Remember that in the latter case it will be possible to stay on it only in the summer.
If the balcony is insulated, you can decorate it however you like. First of all, decide what the balcony area will be used for. Pay attention to the most important step in the step-by-step finishing of the balcony, namely glazing.
What type of balcony glazing – cold or warm – should you choose? Again, decide why you need a balcony. Are you planning to combine the resulting area with the next room? Make a sleeping or working area on the balcony? The answer in this case is obvious: you need warm glazing.
Why do you need cold glazing? Just so that gusts of wind do not blow onto the balcony, dust, rain, or snow do not fall on it. However, this type of glazing will not make it warmer. It makes sense to carry out cold glazing if the balcony is not insulated and things will simply be stored on it, and you will only be on it in the warm season, using this area as a terrace. In this case, you should purchase frames made of metal-plastic, aluminum or wood with single glass.
Metal-plastic frames for warm glazing are installed on the parapet (insulated balcony railing), as well as on the balcony slab itself. In this case, the glazing will be panoramic, and there will be no need to install additional metal fencing. You can also place a stylish wrought iron grille on the balcony slab to make the appearance of the balcony more aesthetically pleasing.
Of course, step-by-step finishing of the balcony yourself will take longer than in the case when the repair is carried out by a professional team. However, this is the only way you can realize all your plans.
It doesn’t matter what finishing materials will be used. First you need to remove old coatings, eliminate cracks, and insulate surfaces. Take the step-by-step finishing of the balcony seriously, because the service life of the new cladding depends on the quality of the work performed.
Lighting on the balcony
Experts recommend thinking through the lighting system on the balcony in advance. Ideally, before starting repairs, the consumer should know what the situation on the balcony will be like and select the lighting in accordance with it.
As a rule, general lighting is used, which is not too bright. In some cases, even a light, dim light will do. But if there are work areas on the balcony, for example, a dining area, for studying, working on a laptop or handicrafts, then spot lighting is used. This way it is possible to provide good light in the desired area, but at the same time not spend a lot of money on electricity.
Do-it-yourself step-by-step instructions for finishing a balcony with siding
What is siding? This is a facing material for external use, presented in the form of a plastic (PVC) profile. Siding is not afraid of severe frosts and is resistant to negative environmental influences. The only difference between panels of different brands is the level of resistance and duration of operation. However, if the lining is produced in different quality versions (not all of them can be used for exterior work), then any type of siding is suitable for exterior decoration; it is resistant to frost and other external weather influences.
In addition, due to the special design, even a beginner can handle the installation of siding. Another plus is that frequent lathing is not needed. If the profile was installed correctly - the recesses are directed downwards - the cladding is dense, the wind does not blow through it and moisture does not accumulate on it.
What is the step-by-step process for finishing a balcony with siding?
Action 1: preparatory work.
First, we dismantle the railings and remove the old finishing of the balcony. Using a grinder, we cut off the panel holders flush with the fencing bars. The joints should be inspected: if there are cracks in the fence, we fix them by welding.
We remove the cement from the lower edge of the balcony grille until solid concrete appears. To do this, we knock it down in sections. First, some kind of container (for example, a baking tray) must be tied to the outside of the fence, which will prevent broken pieces of cement from falling out. Think not only about the safety of your neighbors’ balconies, but also about the fact that a piece of concrete weighing 200–500 grams, falling from a height of 4 floors, can lead to an accident.
Using a wire brush, remove rust from the grille, then apply a rust primer, followed by a coat of paint. A border of concrete paint is not needed. After this, we check the level of the edge of the balcony along the perimeter, external and behind the bars. We achieve a perfectly flat surface by eliminating holes with cement. Have you noticed that the balcony leans to one side? In such a situation, you should stop repairs and consult a professional builder.
Action 2: lower and upper belt.
After making sure that the balcony slab is level, we make the lower belt of the sheathing from timber. The lower belt should be from 80 mm, for this you will need to lay out 2-3 rows of timber. Let's see how many whole strips of siding are required for the height of the fence (from the top edge to the bottom belt). The difference between siding and lining is that it cannot be cut lengthwise to size. If suddenly a few centimeters remain in the height of the cladding, then there is no point in raising it to another row of siding - it is inconvenient. It is better to leave this distance below, attaching the starting bar a little higher. Then the lower section of the wooden beam, not covered with siding, is simply painted.
The upper perimeter of the frame should be made of boards 60–100 mm wide. The outer edge should be flush with the sheathing strips, and the inner edge should be used as a support for the window sill. We attach the top belt of the sheathing to the metal fence so that its top edge is 2 cm higher than the top siding strip. This distance will be needed for the platband. Self-tapping screws and bolts are suitable as fastening elements.
Action 3: starting belt.
At the very bottom, we attach the starting profile to the horizontal strip of the sheathing with self-tapping screws; the successively installed siding strips will then rest on it. To make the work easier and safer, we will first make a safety loop from braid for the drill. We carefully tighten this loop around the wrist.
You can simplify the work (especially if it is performed by one person) by using 3-4 pieces of fishing line, one edge of which is attached to the inside of the upper belt. We tie a thick wire hook to the opposite edge. We attach the starting strip to these hooks, and then pass it over the railing and lower it down. We will do the same with the next siding strips in the future.
Recommended articles on this topic:
- Arrangement of a small apartment
- Stages of renovation in an apartment
- Turnkey cosmetic repairs
Step 4: paint the bottom.
As soon as the sockets for the corners, as well as the starting strip, are secured, we apply two layers of paint to the remaining part of the lower belt (if the tree not covered by the siding is outside). Dry the paint layer thoroughly before applying a new one. We remember that the wood for sheathing should be treated with fungicides and impregnated with drying oil. Of course, over time, the paint underneath will peel off, but leaving the wood untreated is not an option; it will also become dark. And since only a maximum of 10 cm of the tree will be visible, this will not spoil the appearance of the balcony.
Of course, the excess wood below can be covered with half a strip of siding secured with self-tapping screws. Unfortunately, in this case, when the panels are not attached in a standard manner, the siding can be torn off by a strong gust of wind.
Step 5: attach the siding.
We begin to attach the siding. How to do it right? Look, the mounting slots in it are made oblong. Due to this, during thermal deformations, the panels move on the fasteners. There is no need to tighten the siding too much, otherwise the finishing material will swell and come off. How to attach siding using self-tapping screws? We attach the self-tapping screw to the magnetic attachment of the drill, and then screw it into the middle of the slot.
You can perform this operation with one hand (screws are much more convenient than nails), while you can hold the siding with your other hand.
To make it more convenient to work, and most likely you will be attaching the panels by weight or in a squat, first use a metal scribe to make a hole in the wood for the screw. Once it is screwed in, use a screwdriver to unscrew it one-fourth of a turn. Due to this, a backlash of 0.3–0.5 mm is formed. If you use nails, then they should not be finished to 1–1.5 mm. Of course, with such a gap, the siding will creak in windy weather. To provide thermal displacement, it is sufficient to loosen the fastening by 0.5 mm in the transverse direction of the play.
Step 6: External corners.
Before proceeding with the sheathing and cladding, the outer corners should be inserted into the lower slots. Then their upper ends are attached to the upper wooden belt. It is recommended to apply glue to the corner fastenings from below. Subsequently, we will push the sheathing beams under the corner flanges, while the siding will slide into their grooves.
Action 7: lathing work.
The width of the siding panel should be measured from the bottom edge of the lock of the first plank. We will use this step when attaching the sheathing beams to the fence. They must be secured using clamps and self-tapping screws. If you are a beginner, install the sheathing and siding at the same time. To do this, simply snap a strip of siding suspended on a fishing line with hooks into the starting profile. Draw a pencil along the top of the fence, then fasten the sheathing belt. Stick with this technology until you complete the job.
This way you can make the cladding parallel to the sheathing, while precise alignment will take place on site.
We slide the next strip of siding into the grooves of the outer corners, push it down until a characteristic click is heard. Then proceed to fastening the sheathing beams (parallel fastening technology). We repeat the steps until the work is completed. Ready! Now we proceed to attaching the platbands.
Insulation of the loggia
How to make repairs on the loggia so that when you go out you feel comfort and not the cold of the street? Of course, it needs to be properly insulated. All cracks and voids must be sealed, and the structural elements of the loggia must be protected from moisture.
Creating a warm floor
It is very desirable to combine the formation of the floor with its insulation. For this, the following flooring options are used:
1. Wooden floor. To do this, a waterproofing film or foil penofol is spread on the floor. Wooden logs are laid on top of this layer. They are leveled and secured to the slab using dowels. Between the lags, sheets of foam plastic 5 cm thick are inserted, or the same or thinner layer of extruded polystyrene foam. You can also lay a layer of mineral wool. You can lay another layer of penofol on top of the insulation. Tongue boards or OSB boards are attached to the logs.
Floor insulation using mineral wool joists
2. Cement screed. First, the slab is leveled, after which slabs of penoplex or extruded polystyrene foam are laid on it. They are carefully adjusted to size. A cement screed with a thickness of at least 4 cm is made on top of the insulation.
3. “Warm floor” system. It may include one of the following components:
- Heating mats. They are laid in ready-made sections. The advantage of mats is that for their installation it is not necessary to prepare a rough surface. The mats operate electrically, being laid directly into a layer of tile adhesive. Floor tiles are usually laid on top of the mats;
- Electrical cable. A heating cable powered by an electrical outlet is laid in the concrete floor screed. To provide warmth, it is advisable to lay a layer of insulation underneath the screed. It is recommended to use tiles as flooring;
- Infrared film coating. The subfloor is covered with heat-reflecting material, after which an infrared coating is laid on it. The finishing coating can be linoleum, tiles, carpet, etc.
Ceiling insulation
If you decide to make a warm ceiling on the loggia, you should know that all cracks above the windows must be closed to prevent condensation from forming on top of the ceiling panels.
Ceiling insulation is carried out in one of the following ways:
- A wooden frame is placed on the ceiling, with insulation inserted between the slats. On both sides of the insulation there should be a layer of vapor barrier such as penofol, although penofol is often used only on top of the insulation;
- Penoplex is nailed to the ceiling slab with dowels. Next again comes a vapor barrier layer in the form of penofol. Below the insulation layer, on the frame, a suspended ceiling is formed.
Mounting penoplex to the ceiling
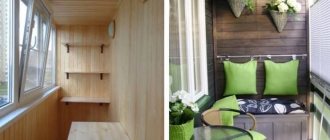
Instructions for DIY interior step-by-step finishing of a balcony with wooden clapboard
Only using wood as a finishing material can you create an environmentally friendly, prestigious and respectable balcony. If you like natural materials, then feel free to choose wood for your balcony renovation.
It doesn’t matter how glazed your balcony is, in any case you will need to insulate the space from moisture and sudden temperature changes. How to achieve this? You can use wooden or plastic lining, depending on your taste. Either way, follow the recommendations below.
If you are looking for a material for finishing a balcony that will suit metal-plastic windows and create an atmosphere of comfort, then lining is exactly what you need.
The long service life of wooden lining is another significant advantage. The fact is that during the production of this finishing material it is impregnated with a special composition that preserves the wood.
Elegance and style are the best descriptions of a clapboard balcony. However, this material has a number of advantages:
- Step-by-step finishing of a balcony with wooden clapboard will go quickly, and the result will please you. The uneven surface of the balcony will be hidden under the lining;
- environmental friendliness of the material used;
- limitless flight of fancy in balcony design;
- increased heat and sound insulation;
- a natural microclimate is created in the balcony space: if the air humidity changes, the lining easily absorbs and evaporates moisture;
- The panels are attached to each other using the tongue and groove technology. This means that installation will be easy and the cost of work will be reduced. Since the joints are invisible, visually the coating appears solid. In addition, such a finish will not allow dirty air, dust, etc. to pass through.
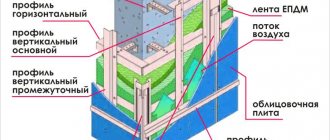
Step-by-step finishing of the balcony with clapboard means that you will need to create a special design in advance. Lathing is required when laying a frame made of wooden bars (metal profiles). This design is located perpendicular to the wooden panels. If the installation will be carried out horizontally, then lay out the frame vertically. Due to this frame, the walls are insulated. To create it, you will need bars 60 by 60 mm, fixed in increments of 0.5 meters. Using insulation, we fill the space between them; mineral wool slabs or mats are suitable.
How is wood paneling installed? To do this, use grooves and ridges (when available) or the joint-to-joint method.
It is better to choose chrome screws with a semicircular head for fastening; nails are also suitable. Of course, the hats will be visible from the front side. To make it look nice, attach the nails at the same distance. Is there a tongue and groove? Then the nails will not be visible.
Wooden cladding should be varnished. If wooden elements are attached externally, then a special oil varnish is used to protect them.
Where to start finishing the loggia
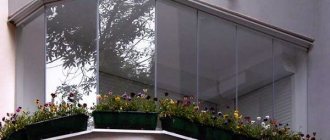
First of all, you need to take care of protecting the loggia from wind, rain, moisture and low temperatures, namely, glazing and waterproofing.
Glazing
To do this you need to do the following:
- Take measurements of the openings in which the windows will be installed.
- With this data, you need to visit a workshop or company producing metal-plastic windows.
On a note! Wooden frames are more environmentally friendly than plastic, but when it comes to performance characteristics, artificial material wins.
- After receiving the ordered products, they must be installed in the openings one by one, using anchors or mounting plates. These fasteners will subsequently be hidden under the trim.
Installation of metal-plastic windowsYou should know! When installing frames, it is important to check the verticality and horizontality of the structures. Even small deviations can lead to the fact that after a few months the doors will not open due to misalignment.
- Then it is necessary to install a window sill no more than 15 cm wide - inside the loggia, and a galvanized steel ebb is installed outside.
- All gaps should be filled with polyurethane foam, then the excess fragments should be cut off and painted to protect from sunlight.
The first stage of finishing the loggia is glazing
Waterproofing
Finishing a loggia with your own hands also means arranging moisture protection for the base:
- To do this, the first step is to remove the old floor covering.
- Clean the concrete slab.
- Fill all cracks and crevices where the floor meets the wall with a sealing compound.
- Next, you need to install a waterproofing material, this can be a coating or roll material.
At this point, the preparatory work for finishing the loggia is ready.
Waterproofing is the second stage of preparing the loggia for finishing work
Do-it-yourself step-by-step instructions for interior finishing of a balcony with plastic panels
Why choose plastic as a finishing material?
- Long service life 25–50 years.
- High-quality material is not afraid of exposure to ultraviolet radiation, is not subject to rotting, and can be washed with aggressive chemicals.
- Ease of use. Even a beginner can install plastic panels. You will save on turning to professionals for help.
- A huge variety of types of plastic panels of various shades. You will definitely choose the material that suits the design of your room.
- Low cost of plastic panels.
- Ease of care. Due to the antistatic properties, dust does not stick to the plastic; cleaning such a surface is easy. In addition, even if the panel is damaged, it will not be difficult to install a new one.
- Let's start installing the sheathing.
Before we start covering, we attach a frame made of wooden blocks (metal profile) to the inner walls of the balcony. It is better to choose the second option - the fact is that the tree will change its shape due to sudden temperature changes and high humidity. This means that the skin will not hold its shape. You need to determine the direction of the finishing slabs before you begin installation.
Have you chosen a horizontal layout? Then we fasten the planks vertically. And vice versa, respectively. The horizontal arrangement will visually expand the balcony. And vertical will make it taller. The best option is to mount the panels vertically on the walls and perpendicular to the room on the ceiling.
We attach the frame strips to the wall in increments of 40 cm. In this case, the bottom strip should be at a height of 3–5 cm from the floor surface. We place the planks at the same distance from the wall, they should be parallel to each other.
- Select the order of plating.
Where to start covering? From the ceiling, of course. We attach the starting profile along the perimeter of the room: using self-tapping screws to the window frame, and using dowels to the wall. We attach the guide profile in the middle of the ceiling on hangers, the pitch of which is 0.5 m. Do you have a small balcony with a width of up to 120 cm? Then one profile will be enough. If the balcony is wider, then we install 2 profiles.
We insert the panel cut to the width of the balcony into the grooves of the starting profile. We fasten it with self-tapping screws and a construction stapler to the guide profile. Let's see if the panel is attached evenly - this is what we will use to align all subsequent finishing. We also insert the second panel into the grooves, connect it with the previous one, and fasten it to the guide profile.
- How to do wall cladding.
We start attaching the plastic panels from the corner. We install the sheathing as described earlier. We fix the corners around the perimeter of each wall. Then we insert the panel with a narrow shelf into the groove of the corner. Let's see if the panel is perpendicular to the floor and ceiling? It should stand upright. Now we attach the panel to the sheathing using a self-tapping screw or stapler. The next sheet of sheathing will snap into the groove of the previous sheet. Please note: the panels must be pressed tightly against each other and against the guide profile.
We cut the last panel to the width, making it 6-8 mm narrower than the remaining gap - this will make it easier to install. We perform this operation using a stationery knife. Do you need to cut sheathing sheets crosswise? A metal knife is suitable for this.
Wall decoration
Wall finishing begins with lathing. Most finishing materials are attached directly to it. You can use metal, wood or plastic. It is also recommended to use high-quality sheathing to tuck insulation under it, rather than making a separate frame each time.
Do-it-yourself step-by-step instructions for finishing a balcony with plasterboard
Step-by-step finishing of the balcony with plasterboard will be quick and easy. Just follow the recommendations below.
Step one. We install the sheathing.
If you are planning to cladding a gypsum board balcony, then remember: the result of all your work depends on the quality of installation of the sheathing. Under the plasterboard, the sheathing can be made of mounting wooden planks. You can also make a metal frame from a profile for gypsum plasterboard, it depends on your preferences.
We mount the lathing on the wall horizontally, at a pitch of 40–60 cm, taking into account the width of the insulation. Perform a double laying of the sheathing where the vertical joint of the plasterboard slabs occurs. The sheathing is secured with dowels or nails. The most important thing is that the planks on the surface must be attached as firmly and evenly as possible relative to the wall and the general level.
Step two. We lay insulation.
After the frame for the plasterboard is built, we fill it with insulation. We use polystyrene foam, mineral wool or other high-quality material.
We lay the insulation between the planks and secure it. We simply drive the foam between the wooden sheathing, this will be quite enough. If you use mineral wool, then to secure it you will need L-shaped hooks or dowels with a wide round mushroom-type cap.
Step three. We provide vapor barrier.
At this stage, it is necessary to carry out simple manipulations with the rolled foil vapor barrier. It will protect the material from moisture. We place the vapor barrier along the sheathing on top of the insulation, attach it to the staples using a mounting stapler. The joints between the parts of the vapor barrier should be taped, this is the only way the coating will be airtight.
Step four . Installation.
It is better to start installing drywall from the side where you can fix the whole sheet or most of it. Thanks to this approach, you can use the material more economically without having to cut the gypsum plasterboard again.
Even a beginner can handle installing gypsum boards on wooden sheathing. Simply fix the bottom edge of the gypsum board onto the beam (sheathing), starting from the wall, level the sheet, and press it against the wall (sheathing). Screw in 3-4 self-tapping screws around the entire perimeter and check using a level.
As soon as the first sheet of material is mounted, focus on it and secure subsequent sheets. If necessary, the sheet can be cut to complete the surface finish.
So, your balcony is covered with plasterboard. What's next?
First of all, the gypsum board surface must be primed, seams and joints sealed, and putty applied. After this, we proceed to grouting and priming again, using steklohost where required.
Cosmetic repairs of balcony loggias
At this stage, the main thing is imagination. Only financial possibilities can limit you. A loggia can become a cozy, secluded place where you can play sports, have a tea party or grow flowers. The selected finishing material completely determines the style of the balcony.
Here are the most popular ways to redecorate a balcony and what it can be used for.
On your loggia you can arrange:
- Greenhouse. For this plan it is necessary to make additional lighting and insulation. Plants that bloom all year round completely offset all your costs.
- Tea room. To do this, you can equip your loggia with a wooden table, a couple of armchairs, and a deep-pile carpet.
- Study. In a small apartment, the loggia will find a way to create personal space. To do this, the room is complemented by a computer desk, chair and additional lighting.
Step-by-step instructions for finishing a balcony with a block house with your own hands
What is the main advantage of such material as a block house? It imitates rounded timber, and its performance characteristics will pleasantly surprise you. Translated from English, Block house means frame-panel buildings, most often used in Finland and Canada. What explains such popularity of this material? Because it looks like a real rounded log. That is why this material has such a name, because it allows you to create an unusual interior and exterior of the room.
The sequence of step-by-step finishing of a balcony with this material:
- We remove clutter from the balcony. You will need to not only throw out old things, but also dismantle the previous decoration, if any.
- Are you planning to make a living room on the balcony? You'll have to do a vapor barrier. We take glassine (polyethylene), cover the sheets, making an overlap of 10–15 cm. Roll out a roll of film, securing the material with aluminum tape under the ceiling on the top of the walls. Was the film torn during installation? We seal the resulting gap with tape. With its help we seal the joints.
- Now we install a vertical wooden frame. For this purpose, we prepare dry bars with a cross-section of 5 by 5 cm. The strength of the structure and long service life are determined by whether it is impregnated with a fire-resistant and antiseptic agent. We place the wood blocks, leaving a distance of 60–70 cm between them. Depending on whether the wall is brick or wood, the frame can be secured using nails, dowels or screws.
- Once the frame is secured, we begin to provide thermal insulation. We lay the heat-insulating material between the parts of the wooden frame on the surface of the wall and firmly fix it. To ensure good thermal insulation, we use tile rather than roll material.
- We proceed to the next stage - finishing the surface with a block house. We attach the slats either vertically or horizontally, as you prefer.
- We place the slats with the tenons facing up to prevent moisture from accumulating in the grooves. Then we attach them to the sheathing using self-tapping screws, clamps, staples or nails. Do you prefer self-tapping screws? Then, upon completion of installation, we hide their heads behind wooden plugs, gluing them to PVA. One beam will require 2 self-tapping screws. We fix one at the groove, the second next to the tongue.
- The final step is to attach the linings to the external and internal corners. You can purchase them at specialized retail outlets, in the department where materials for block house cladding are sold.
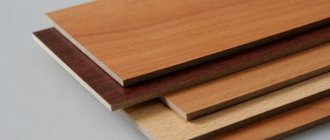
MDF
This material is medium density fiberboard. The simplest option is a regular board, but there are products with a polymer coating. This material is produced in a wide range of colors. It is easy to install, since no surface preparation is required, and the installation technology is very simple. You can also use it to disguise utility lines or insulation.
Install such panels according to the following instructions:
- Before finishing the loggia, you need to calculate the amount of building material and add 10% of the reserve.
- The same lathing is placed on the surface as in the case of clapboard.
- Glue is applied to the back surface of the MDF panel, after which the product is pressed into the corner of the sheathing.
- Moving from the corner, they build up the entire wall.
- The material at the opposite corner may need to be trimmed.
On a note! During installation, it is necessary to additionally fasten the structural elements with a tongue-and-groove system.
MDF panels are often used for decorative finishing of loggias
Step-by-step instructions for finishing a balcony with laminate yourself
Laminate is made from wood with increased resistance to mechanical stress. Laminate consists of many layers, the top of which is a protective decorative coating.
The main advantages of this material are as follows:
- increased wear resistance;
- fire resistance;
- a huge selection of panel appearance;
- ease of use.
Step-by-step finishing of a balcony with laminate consists of two stages:
- We install the sheathing.
The better the installation of the sheathing is done, the more reliable the structure will be. Using the slats, we will make sure that the walls are even. To do this, we run the strip vertically along the surface. If there are depressions, mark them with a pencil. We remove all bulges with a chisel or scrape them off. Apply a layer of plaster.
We place an emphasis on the bottom so that the first row of panels can be laid on it. Using a plumb line we find the horizontal. We are looking for a place for a vertical supporting structure, taking into account the dimensions of the laminate. If the panels are large, the sheathing profile will run along the edges and in the middle of the board. Typically, the profile installation step is 40 cm. Using a drill, we drill holes into which we then insert self-tapping screws.
We begin installing the metal sheathing from the outer parts. We stretch a rope between them and use it as a guide for the intermediate profiles. Wooden slats will be attached to the sheathing. We lay insulation between the parts of the sheathing.
- Let's start installation.
We attach the first panel to two clamps. To do this, insert them into the grooves of the laminate and fasten them using self-tapping screws. You can also nail small nails, leaving a small gap, otherwise the material will begin to peel off and swell during the cold season.
We continue facing, moving clockwise. We rotate each subsequent panel relative to another board, so the locks will close. We apply sealant to the fastening areas to extend the life of the laminate and prevent moisture from entering. We fix the aluminum corners along the edge of the panels, also applying sealant to them.
Laminate is suitable for finishing a balcony only if you follow the technology for laying this material in a given room. You can do the installation yourself, just follow the described sequence. This step-by-step finishing of the balcony with laminate will delight you with a luxurious design that will not lose its attractiveness for many years.
Types of balcony repairs
In principle, balcony repair options can be divided into two main categories - cosmetic, which does not require major reconstructions and administrative approvals, and capital, which often requires obtaining the appropriate permit.
Any owner is free to carry out cosmetic repairs inside the balcony himself, without regard to housing maintenance organizations
- When making cosmetic changes, you can simply paint the walls, lay tiles on the floor and sheathe the fence with waterproof material. This process does not require any complex calculations, since the load on the balcony slab practically does not increase.
- Another option is to expand the balcony area, erect a permanent wall, insulate and glaze, or install panoramic windows. In this case, it is recommended to invite specialists who can determine how much the load on the load-bearing slab can be increased, or whether it will have to be strengthened by creating an additional metal structure.
Step-by-step instructions for finishing a balcony with MDF panels
Balcony finishing with MDF panels is the most common. This material combines good design and high performance. Look at the photographs of balconies, the finishing of which is made of MDF panels: this material suits almost any interior style.
To begin with, we prepare the surface by marking sectors on it for the convenience of calculating the area for cladding. We determine the required volume of MDF panels. The panels have different sizes, so first you need to choose the material that suits you, and only then, based on your area, calculate how many units you need to buy. To complete the interior decoration of the MDF balcony, we add an additional 1-2 strips to the calculated amount of material.
Using putty, we eliminate unevenness on the walls and achieve a perfectly flat surface.
Where does the step-by-step finishing of a balcony with MDF panels begin? First of all, we mount the frame. Its base is made of metal profiles or wooden planks. We fix the structure to the wall using self-tapping screws or nails. We begin cladding the walls from the bottom up, securing the panels from the corner to the end of the row. Leave a distance of 2-3 mm between the sheets. We use sealant to strengthen the seams.
The balcony can also be lined with MDF sheets. In this case, 1-2 whole MDF sheets are enough to completely cover the balcony. However, installing such a layer of material will not be easy due to its heavy weight. It is recommended to buy several small sheets. This material is installed according to the same principle as the previous one. First, the frame is installed.
As soon as you finish attaching the MDF panels, you will immediately see the result of the work. Balcony finishing is complete! Even a beginner can perform such repairs on his own, without turning to professionals for help, and will require ordinary materials.
Preparation of balcony surfaces
Finishing a balcony with your own hands begins with preparatory stages, which involve bringing all surfaces to the desired form:
- Everything unnecessary is removed from the balcony
- the old covering is dismantled, if there is one on the walls of the balcony;
- all gaps, cracks, cracks are sealed with thick cement mortar, large holes are first filled with foam cuttings. Vertical seams are blown with polyurethane foam, the excess of which, after drying, is carefully cut off with a sharp knife. It is also recommended to foam the cracks around the perimeter of the window opening rather than cover it with mortar. As the window is used, the dry mortar will crack and crumble, and over time you will have to get rid of the cracks again.
- surfaces are inspected for areas with mold or crumbling areas, as they must certainly be eliminated;
- all surfaces are treated with special antiseptics;
- After the antiseptic has dried, a primer is applied, for which you can use rollers, brushes or sprayers.
Examples of finishing balconies: photos for inspiration
What to use to finish the floor and ceiling on the loggia?
- Tile. It is not so easy to install and is quite expensive. To tile the ceiling you need to have certain skills.
- Linoleum . The most popular solution for decorating a balcony floor. When the question arises about how much it costs to decorate a balcony, you should think about using inexpensive linoleum. With it, finishing costs are much lower than with laminate or tiles.
- Laminate . Especially popular for finishing heated floors. Easy to install.
The ceiling of the loggia is sheathed with the same materials as the walls.
Light plastic panels are often chosen to decorate the ceiling. They weigh little and are easy to install. You can decorate a loggia or balcony yourself. Knowing the sequence and features of the finishing work, you can cladding the room yourself and significantly save on repairs by refusing the services of a contractor. However, if you are not a professional finisher, the quality of the repair and its timing may not suit you.