How to cover the polyurethane foam?
Polyurethane foam is a building material with excellent thermal insulation properties and good moisture resistance. It is often used when installing window structures; it is used to seal the seams between the frame and the window opening.
Exposure to moisture, ultraviolet radiation and temperature changes can destroy the material within a few years. This is especially true for external seams. Treatment of polyurethane foam with special materials will significantly increase the service life of polyurethane foam:
Acrylate paint.
Facade sealant.
The putty is resistant to sub-zero temperatures.
Liquid plastic.
Window mask.
The simplest and cheapest method to protect polyurethane foam is to cover it with a layer of ordinary mortar made of cement and sand. Before covering, use PSUL tape - it will make the protection even more reliable.
Seams should be sealed on both the outside and inside of the room. This must be done immediately after installing the double-glazed window.
Sandwich paneling
When choosing this option, it must be taken into account that the minimum panel thickness is 20 mm.
Without auxiliary profiles, the slope is sewn up within a few hours. The order of plating is as follows:
- The panels are cut to fit the dimensions of the slope.
- “Liquid nails” are applied to the panel and it is pressed tightly against the surface of the slope.
- The gaps between the frame and the panels are sealed.
- The corners are installed on the outside with glue.
Lining and sandwich panels cannot be repaired. As a rule, they change when damaged. In this case, the choice of shade is of great importance, since it differs in different batches of material.
What to do with cracks under the windowsill?
The cause of blowing under the window sill may be subsidence of the window structure, errors during its installation or degradation of the thermal insulation layer.
The problem of depressurization can be solved by using plaster or a shock portion of polyurethane foam from inside the room or from the street. The “outdoor” option is preferable, but it is not suitable for winter. When sealing the gap under the window sill from inside the room, proceed according to the following algorithm:
- Cut off the wallpaper at the work site.
- Unstitch the seam under the window to its maximum length and width.
- Fill the joint with plaster or foam.
- After the foam has cured, trim off any excess foam and cover it with putty or sealant.
- Cover the repair area with wallpaper.
You can fix the problem in 2-3 hours, even if you have no experience in repair work. But it’s better not to let things get too cold and carefully check the tightness of the structure in the summer. Sealing the seams from the street and inside the apartment is guaranteed to save you from an unpleasant draft under the window sill. After blowing in foam, be sure to cover it with plaster or sealant.
Sometimes a draft appears not under, but above the window sill. This problem can also be fixed from the inside or outside. In the latter case, you need to foam the seam that is under the low tide.
This method is effective, but it does not work at sub-zero temperatures. In this case, you should buy a sealant and carefully coat the joint between the frame and the window sill with it.
Preparing the window opening
Restoration of slopes begins after their surface has been prepared. Preparation is performed in the following sequence:
- Use a chisel to knock down damaged and protruding areas.
In order not to destroy the restored slopes, the window sill is installed before the repair begins. To protect against dirt and broken elements, the window and window sill are protected with paper or polyethylene. It also wouldn’t hurt to protect the window handle and battery under the windowsill.
- Excess foam is cut off to seal the window structure. The dried foam is cut off with a knife. To do this, you need to pierce the protruding excess from the top of the window, and then remove it with a downward movement. The foam glued to the wall is also removed.
The protective film on the window is removed only after all work is completed.
- The surfaces of the slopes are thoroughly cleaned. Large dangling fragments are attached to the mortar.
- To improve adhesion, the surface is primed. Usually, a deep penetration primer is used before plastering; in other options, antiseptics are used.
How to seal the slopes?
Installing a double-glazed window usually leads to a violation of the integrity of the window opening. Therefore, slopes are the final stage of installation of window structures.
Slopes perform not only decorative functions. They protect structures from condensation and foam from degradation. Their restoration should not be delayed, but carried out immediately after the installation of the double-glazed window is completed.
There are three finishing options:
- drywall;
- plaster;
- plastic panels.
Each of these materials has its own advantages and disadvantages.
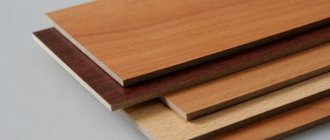
Drywall
This is an inexpensive and practical material that allows you to level even complex surfaces. Its disadvantages include low strength and fear of moisture. The latter property makes it impossible to use drywall for finishing external surfaces. But even when carrying out interior work, it is better to cover this material with a primer or other moisture-resistant materials.
There are several ways to install drywall sheets:
- on a wooden or metal sheathing;
- on the corners;
- using glue.
Today the most popular installation of plasterboard sheets on the corner. It allows you not only to give the opening an attractive appearance, but also additionally insulates the window. Drywall is covered with several layers of plaster, rubbed down and painted in the desired color.
Plaster
The traditional way to seal slopes is to cover them with plaster. It is cheap and simple, but at the same time quite labor-intensive and time-consuming.
For working with internal surfaces, both cement and gypsum mixtures are well suited; for external surfaces, it is necessary to use facade compositions or ordinary sand-cement plaster.
First you need to carefully prepare the surface: remove old plaster, dust, and excess foam. To increase adhesion, it is better to apply notches to the walls and coat them with a primer. The corners of the opening are reinforced with a perforated corner. It is advisable to cover the glass unit with film - this will protect it from contamination.
When sealing external slopes, it is advisable to use reinforcing mesh.
After leveling the plaster, it is primed and painted.
Plastic slopes
Slopes made of PVC panels are durable, practical and hygienic. It is quite possible to install them literally in a day - you do not need to wait for the layers of plaster to dry.
However, the appearance of these panels is unique - many believe that such material is only suitable for public spaces. Plastic looks fine in the kitchen, but for the bedroom or living room it is better to choose something else.
PVC panels are attached to the profile, covering the joints with special decorative corners. Mineral wool is placed in the empty space for insulation.
Plastic panels are rarely used for outdoor work, because this material tolerates sunlight and low temperatures very poorly.
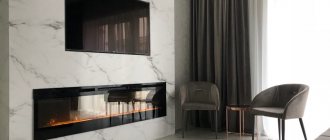
Decorative rock
Decorative stone made from gypsum and cement is used to finish slopes. Outwardly, it is no different from natural, but at the same time it is much lighter and cheaper than the latter.
Decorative stone is strong and can withstand high humidity and temperature changes. It can also be used to decorate external surfaces. The advantage of the material is its “rich” appearance and a wide variety of colors.
Finishing slopes with decorative stone is simple:
- The stone is placed on glue, which is applied using a comb or spatula.
- When working with a flat surface, you can do without preliminary preparation. If there are defects, then it is better to plaster the slopes.
- If there are seams between the stones, then you need to use crosses, as when laying tiles.
- When installing elements of arbitrary shape, they must be laid out on a horizontal surface in advance. To trim the stone, use a hacksaw or grinder.
To increase service life, the material can be coated with a protective compound.
Looking for the cause of cold windows
To ensure that the insulation work is not in vain, it is necessary to correctly determine the weak point of the window that allows cold air to pass through. The reason may lie in different parts of the structure:
- Slopes (deteriorated or missing insulation);
- Window sill (cracks or bridges of cold may form in its lower part, which, at first glance, are invisible);
- Glass (blowing occurs at the junction of the glass and the frame; the putty that covers the joint deteriorates over several seasons and requires regular updating);
- Frame and sashes (shrinkage of wood, subsidence of sashes, movement of soil under the house - all these circumstances lead to the formation of gaps between the frame and the window frame).
Defects in a wooden window frame lead to heat loss in winter. If a visual inspection fails to identify the cause, you can use some tricks. For example, wet your hand with water and bring it to different parts of the window. An even more sensitive method is a lit candle or lighter. The flame reacts to any air vibrations, which will indicate places of heat loss.
A very old window requires an integrated approach. To achieve good thermal insulation, you need to eliminate all possible cold bridges
. Structures in good condition need to be insulated around the perimeter of the frame and opening sashes using any available method.
External slopes: what are they for?
The finishing of external slopes should not be postponed, as they protect the thermal insulation layer from degradation, and structural elements from environmental influences.
Proper preparation of the outer part of the opening significantly increases the sound and heat insulation properties of the double-glazed window. In addition, it will make your home much more attractive from the outside.
Most often, plaster or various facade mixtures are used for such work. It is recommended to lay them in several layers, and the previous one must dry normally before applying a new layer.
After the last layer has dried, it needs to be painted - this will provide additional protection from moisture and temperature.
Determining critical places
It is very important to find out exactly how cold air gets inside the room. To do this, you need to take a lighter and run it around the entire perimeter of the plastic window.
Pay special attention to the places where the frame meets the wall. The window sill and slopes are also worth checking
If you don't have a lighter, use an open palm.
Cold air can penetrate through the following structural elements:
- clamping elements that tend to loosen over time;
- a detached glazing bead that holds the glass unit in place;
- worn out seal;
- polyurethane foam, if it was applied in violation of technology;
- windowsill;
- slopes.
A double-glazed window rarely causes a violation of thermal insulation (the exception is its depressurization), but it can also be additionally insulated. “Extra” heat in winter will not hurt.
It is easy to identify leaky window elements - just run your palm along and across the entire structure, and you will feel that there is a decent amount of wind in some places. Some people recommend using a lighter for this purpose. If you light a flame and pass it around the perimeter of the window, maintaining a safe distance, it will tilt in those places where there is even a small draft. Be extremely careful with this method!
As a rule, work on insulating a plastic window can be done with your own hands. The exception is when it is necessary to insulate the slopes from the outside, and the apartment is located above the second floor. You need to be prepared that comprehensive insulation may be needed if several zones of warm air leaks are found, but first things first.
Installation process
We have a window in a new building where only a window sill is installed.
On top there is a metal corner 100 mm thick. It is to this that the upper slope will need to be screwed.
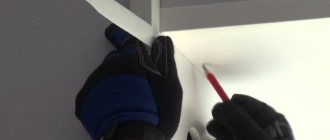
We cut the starting profile to the width of the window and screw it along the edge of the frame, having first removed the protective film (from the frame). We twist the screws every 15 cm.
In the photo it looks as if the profile was not screwed evenly, in fact everything is smooth, it’s just that the material was slightly deformed during delivery. Cut off the side profiles. We take the length from the top profile to the window sill with a minimum gap and screw it (also along the edge of the frame).
Next you need to prepare the upper slope and install it.
Ways to fill the opening
There are several common solutions for how to remove a window in a wooden house:
- The most radical, but also the most reliable and aesthetic way is to disassemble part of the log house and replace the logs or beams. If we are talking about an attic or dormer window, this is not such an expensive solution, and it will allow you to forget about all the problems with blowing through the walls. But it should be borne in mind that old and new lumber will settle differently, so it is better to purchase dried wood and do not forget about laying insulation. When shrinkage is complete, re-caulking of the resulting cracks will be required.
- Installation of fragments of logs or beams of similar size and diameter into the hole. This is a rather labor-intensive method: the opening logs are cut at an angle of 45 degrees, the same angle is made at the ends of the insert pieces. There is also a minus: the new elements filling the hole will be very different in color. In this case, you will have to paint the entire wall to disguise the blocked part, or use another cladding option. You can build a false window: cover the closed space of the wall with decorative shutters. New parts must also be treated with antiseptic and fire retardants. It is recommended to coat the joints with a special sealant.
- If the house is equipped with brick cladding, the hole can simply be blocked with thick boards. They must fit tightly into the opening; insulation is laid between them so that there are not even small gaps left. On the inside, the walls can be covered with plasterboard or covered with clapboard; on the outside, the former window will be invisible because of the brick.
- Frame filling using various wood materials. This is the simplest and most common answer to the question of how to seal a window in a wooden house. Let's take a closer look at this repair method.
Frame method
How to install a window in a wooden building with minimal labor costs without cladding? There is a simple and effective method that will allow you to forget about the cold, and at the same time the structure will remain beautiful and neat. Sequencing:
- The old window block is being dismantled. The doors are carefully removed and the frame is removed. There is no need to throw away the plastic system: it will be useful for a summer house, greenhouse or gazebo.
- The resulting hole is cleared of accumulated debris and dust. After this, a frame made of thin timber or wooden slats is installed in it. It can be attached to the wall logs with nails or self-tapping screws.
A frame is stuffed onto the frame from the outside, and material corresponding to the walls is attached to it. If the house is made of logs, they usually use a block house, if it is made of timber, a horizontal lining of the required size is used. As a result, the opening will not be noticeable from the street, and the surface will appear smooth. To avoid any difference in color tone, the wall should be painted. The internal space of the frame is filled with insulation: you can use a thick layer of mineral wool, penoplex, extruded polystyrene foam or other materials. The insulation must fit tightly to the frame and sheathing, then the wall will not freeze. On the inside, similar work is performed: the sheathing is installed, and decorative material is nailed to it. Usually this is a clapboard or block house. Next, the entire wall is covered with varnish or paint so that it acquires a uniform appearance.
If external or internal cladding is intended, you can do without sheathing. OSB boards made from sawdust and shavings are nailed to the frame-frame, and the internal space is similarly filled with insulation. After this, the building is finished with the selected material: OSB boards retain heat well, the insulation will not allow the wall to freeze.
To better protect the structure from external influences, it is recommended to place a waterproofing film on both sides of the frame under the decorative material. It will protect the insulation at high humidity and will not allow it to collapse.
In some cases, a window opening in a log house is covered with brick or aerated concrete blocks. This method is possible if the object is supposed to be faced with brick or other material, with cladding on the inside. Typically, infill bricks are used only in very old buildings where shrinkage has long since completed.
Plaster
Sealing external seams after installing plastic windows using the plastering method also requires compliance with certain rules. First of all, this relates to the choice of material suitable for these purposes. The most convenient to use is elastic acrylic plaster. The only thing I want to warn you about is: before purchasing, pay attention to the manufacturer’s recommended thickness of the seam to be applied. There are compositions intended strictly for decorative work and they are laid in a thin layer (5-10 mm).
If it is necessary to seal a seam whose depth is 3 centimeters or more, I recommend using proven cement-based plaster. It can be used for sealing deep seams.
Source usetips.ru
Tools
Plastering slopes requires a certain set of materials and tools.
You will need:
- mixer to prepare the composition;
- spatulas (spatulas) of at least two sizes - 9 cm, 35 cm or more;
- roller;
- grater;
- rule;
- brush;
- level (plumb line, level);
- square;
- masking tape;
- hammer;
- caulk;
- chisel;
- stationery or construction retractable knife.
Additional ways to insulate plastic windows
- Washing windows. Paradoxically, cleaning the glass unit helps save heat. After all, dirty glass loses its ability to transmit sunlight, but continues to transmit rays in the infrared spectrum.
- Thick curtains. Which speaks of seasonal mode. Before you prepare your plastic windows for winter, make sure there is such a mark on them. Which also trap heat indoors.
- Insulating windows with improvised means. This method somewhat spoils the appearance of the window, but in critical cases it can be a very worthy alternative to replacing the window unit. The following materials are used as insulation: foam rubber, soaked paper, window tape, strips of white fabric, etc.
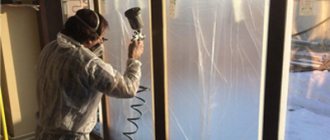
- Insulation of windows with heat-saving film. The energy-saving film is glued to the entire surface of the window (on the sashes). The main thing is to do the gluing correctly, without air bubbles or folds. The film reduces heat loss through glass by 75%.
- Electric window heating. In this case, a heating cable is placed around the window, which heats the heating coil, or an oil radiator is installed on the window.
- Electric heating of double-glazed windows. The most technologically advanced way is to install plastic windows
with heated glass. The technology is applied at the window production stage. Plastic windows have become if you need to adjust the shift of the plaster and how to do it correctly. Winter is approaching, and for many the question is becoming increasingly pressing: how to insulate plastic windows? It involves installing a special conductive film (transparent film with conductive threads) on the inside of the glass, which heats the glass from the inside. - A complex approach. The most appropriate for insulating windows in an apartment or private house, since it allows you to eliminate all possible causes of heat leakage through metal-plastic or PVC windows.