Making an inexpensive door to the attic with your own hands is entirely within the capabilities of a home craftsman.
Regardless of whether your attic is cold or insulated, the passage to this room should be closed. Accordingly, a door to the attic is needed. Next we will look at the varieties of such structures, plus I will tell you in detail how to make a door to the attic with your own hands.
Door for gable
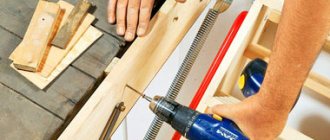
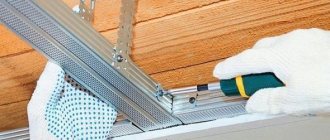
In order to hide large items in the attic, we will make the opening wide and high; in our case, its dimensions will be 90 by 120 cm. We will build the frame itself from bars measuring 5 by 5 cm, securing them with self-tapping screws to the mauerlat and rafters using mounting angles.
First, we'll cover the pediment with clapboard. To ensure that there are no gaps between the future door and the jamb, we will nail wooden planks 2 cm wide to the bars around the perimeter of the opening.
We plan to hang the door on arrow hinges, in an antique style. But they will not stick to the lining, since its thickness is only 1 cm. In order to securely fasten the hinges to the pediment, we will screw 2 five-centimeter bars on the back side of it where we plan to install them.
Let's cut the lining to the width of the frame and nail it to the bars using short nails.
In the place where the loops are planned to be installed, we will install two boards from the inside so that the arrow loops are firmly held on the canvas. When installing the door on the gable, these boards should be in line with the bars that we screwed earlier.
Before painting, we will install the door in the opening to make sure that nothing will interfere with it when opening and closing. Let's paint the pediment and the canvas with the same paint, the color of oak.
We will install the door on the pediment, screwing the hinges to the bars with large self-tapping screws.
Finally, we will cut out a small latch from the board, paint it and screw it to the pediment. The door for the gable is installed, you can begin further construction of the barn.
If you liked the article, share it on social networks.
Source
DIY sliding doors
Sometimes the dimensions of a room dictate their conditions for preserving living space, and in this case, swing doors are replaced by sliding doors, which save space in the room due to their design.
Such doors are optimally suited for small rooms, but recently, they are increasingly being used by designers when decorating large rooms, since such doors allow them to emphasize the majesty of the room and its size.
How to install such doors and what the finished result looks like can be seen in a selection of photos with sliding doors presented in various designs and designs.
The advantage of these doors is the relative ease of installation, since their operating principle is based on a roller system moving along guides, top and bottom rails. Therefore, by correctly installing the guide rails, you will get interior doors that will faithfully serve you for a long time.
Step-by-step instructions for installing interior doors of a similar design can be seen in the presented selection of photos, which show all the nuances of installing such a system.
Types of designs
I have not found a clear distinction between doors and hatches to the attic either in domestic or foreign standards. Even GOST R 53307-2009, which describes fire doors to the attic, only talks about the level of fire resistance.
Therefore, we will consider the hatch-door to the attic as a single concept.
As for the dimensions, according to the same fire safety standards according to SP 4.13130.2013:
Attic doors are conventionally divided according to the type and material of the door leaf.
The choice of materials is also small - the market offers wooden, metal-plastic and metal hatches.
Wood and plastic are usually installed in private homes, metal is aimed at high-rise buildings and administrative buildings.
Tips for creating comfort
To make access to the attic more comfortable, you can listen and implement several tips from experienced craftsmen:
- For easy access to the attic, you can build supports around the hatch.
- For quick and easy opening, you can make a special loop on the lid. And if you make an elongated handle, you can open the exit to the attic without an additional stand.
Using special do-it-yourself attic hatch drawings, you can get the job done without spoiling the overall interior of the room.
Do-it-yourself questions
We will not consider how to make a simple external door to a cold attic. For those who are interested, below is a sketch of such a hatch.
We will walk you through step-by-step instructions for creating a wooden door and the option of inserting a finished plastic or metal hatch.
How to make an insulated attic door
The dimensions of the hatch directly depend on what kind of staircase to the attic will be installed:
When calculating the length, you need to start from the angle of inclination of the stairs. The principle is simple, the vertical distance from the edge of the opening to the steps should be at least 180 cm. So that an adult does not bend over or cling to the opening with his head when climbing.
Any opening must first be cultivated:
To ensure the doors have a tight fit, we need a frame with a quarter (a groove for the door leaf).
There are 2 options for arranging such a box:
Now the insulated door leaf is assembled:
The easiest way is to screw such a hatch onto regular door hinges, but hidden retractable awnings will be much better, safer and more convenient.
Factory canopies of this type are expensive, so many people make them with their own hands. In terms of price, this design is at least 3 times cheaper.
For those who are interested, below are sketches of such canopies, and the video in this article shows how such canopies work.
How to fit a finished attic door into an opening
We are talking about a plastic or metal hatch:
We will consider the installation itself using the example of plastic doors to the attic.
This technology is suitable not only for plastic; it can be used to embed metal structures and ready-made hatches with retractable stairs.
| GAP | When taking dimensions for the hatch, keep in mind that there should be a gap of about 10 mm between the frame and the opening. |
| FRAME | When your hatch is ready, fix the frame in the opening using wedges and remove the door from it. |
| FASTENING | Drill holes through the frame into the ceiling for anchors. If the ceiling is wooden, then holes are drilled only in the frame, because it will be screwed with self-tapping screws. |
| DOOR | Fix the frame with anchors or self-tapping screws, then remove the wedges and put the doors in place. |
| FOAM | The gap between the door frame and the opening is filled with polyurethane foam. |
| Slopes | Next, all you have to do is cut off the foam when it hardens and arrange slopes around the perimeter. |
Correctly chosen location of the hole
When installing an insulated hatch in the attic, it is very important to determine its correct location . Here you will have to face different nuances:
1. The location of the hole is chosen so that the lid can open freely inward or outward (depending on the design and idea).
2. The hinges can be fastened on the wide or narrow side.
3. A hatch located in the corner under the rafter system will interfere with free entry into the attic. When making an opening, you must not get on the floor beams so as not to damage the integrity of the roof structure.
4. The location of the manhole largely depends on the type of ladder used. If stationary ladders or an iron (wooden) staircase are proposed, then this design should fit well into the overall interior of the room and not block the passage.
simple drawing of hatch insulation (Fig. 3)
wooden (Fig. 4)
5. If you have concrete floor slabs, then it is best to drill an opening at the junction of two slabs, as in Figure 2.
6. If it is possible to install a retractable ladder, you must not block the place where it extends.
7. In the version with a folding ladder, you will have to work hard on its design and method of attachment to the hatch.
After installing the hinges on the hatch, it can be insulated. I will use extruded polystyrene foam 50 mm thick as insulation.
The construction of the garage is nearing completion; it is adjacent to the house; to access the attic of the garage, it was necessary to make an insulated hatch. Since I will use it extremely rarely, there is no point in buying it, so I will do it myself, and the ladder to the hatch will simply be attached, and if it does not interfere, it will be permanently based on the wall in front of the hatch.
And so we have an opening in the ceiling, a little larger than the hatch itself, in the photo there is an opening, the ceiling is not yet insulated. The photo shows the frayed wind protection of the wall of the house, as it stood for a year without protection.
The hatch to the attic will be located between two ceiling joists, the distance between them is 99 cm. The width of the hatch was made 90 cm, for a total opening of 99 by 90 cm.
Installed opening boards 1 and 2
After installing the opening of the hatch itself in the attic, I made support bars on which the hatch cover will rest, since on one side I have a shelf made of boards (in the photo there is a screwdriver on it) from the partition, I installed only 3 support bars.
I cut out the hatch cover itself from OSB 3, used simple door hinges, and secured everything with self-tapping screws. In order to recess the hinges, I placed a 10 mm thick strip under them; OSB is 9 mm thick.
After installing the hinges on the hatch, it can be insulated. I will use extruded polystyrene foam 50 mm thick as insulation.
I will glue it onto polyurethane foam, for the best adhesion I will treat the OSB surface from dust and other unnecessary things.
I cut out pieces of polystyrene foam of the required sizes, and only after that I applied mounting foam to the hatch, then applying polystyrene foam, you need to press it down and slide it a little along the hatch to expel the air from the foam, so that it becomes like glue and loses volume.
After that, I put a weight so that the polystyrene foam sticks properly
All that remains is to add the strips. That's all for now.
This homemade hatch performed well over the winter, I didn’t bother to finish anything, everything is fine, we are preparing for the next winter, there is still a lot to do.
The installation diagram looks like this:
How to make a door to the attic from the street
During the construction of the pediment, we placed an opening assembled from bars, 70 cm wide and 90 cm high. We found this size to be the most comfortable. Now you need to make a door for him with your own hands.
First, let's build the frame. To do this, take the old bars that are left over from the picket fence, cut them, sand them and connect them together with self-tapping screws.
Now let's move on to insulation. Let's cut a piece of stizol around the perimeter of the frame and stick it inside, securing it with a stapler. The insulation will reliably protect the attic from cold air entering through the cracks.
All that remains is to secure the door in the gable opening. To do this, we stick it into the box, align it, and screw the hinges to the pediment with self-tapping screws. Let's check how it opens and closes.
There will definitely be gaps between the box and the canvas, otherwise it simply won’t open. To prevent the wind from blowing into them, we will nail small wooden planks to the jamb. Firstly, they will close the cracks, and secondly, the canvas, resting against them, will close more tightly.
Finally, we will paint our product with white paint,
INSTALLATION DIAGRAM OF A DOOR IN THE ATTIC IN THE GROUNDS
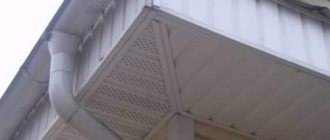
3 To make ebbs, you can search the construction markets for aluminum profiles suitable for this purpose. They can be easily given the required shape, reminiscent of the letter Z, by bending along the stiffening ribs. To cut the profile, use ordinary metal scissors. However,
The more common galvanized iron is also suitable for low tides.
4 The lower ebb (H) is inserted between the wind protection (glassine) and the trim (A) and secured with screws from the outside.
At the same time, the same screws are additionally attached to the frame (A) and the sheathing boards of the blanket. If the ebb is made of galvanized iron, then you must first drill holes in it for the screws.
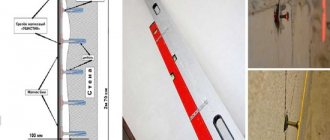
t The “door” opening is marked in width (X) and height (Y) using a level, and the opening is positioned symmetrically on the pediment. In two diagonally
drill holes 03-10 mm in the located corners of the marked rectangle
under the saw blade of a jigsaw.
2 Having fastened both frames (A) of the door and the bottom block (O) of the “door” frame to the gable skin from the inside (all screws are screwed in from the outside), cut it out with a jigsaw
Seven stages of steel door assembly
You can make metal doors with your own hands only from a corner or only from a profiled pipe, but the mixed version turns out to be more reliable and practical. It is better to weld the outer frame (frame) from a 50x50 mm corner, and the frame for the door leaf from a 40x20 mm profiled pipe.
Stage No. 1. We cook the loot
First of all, we cut off the corners according to the diagram and fix them on the work table or sawhorses with clamps. Here it is important that the lower plane is flat and the corners meet at 90º. We check the rectangle of the box by its diagonals, if they are the same, then the corners will be right.
You shouldn’t scald the corners right away, they can lead, first we grab them at several points and measure the diagonals again until everything is boiled, you can still adjust minor inaccuracies.
When scalding corners, first apply all the vertical seams, and then move on to the horizontal ones, so the metal will overheat less. We will cut out the excess part of the corner later.
Now we turn the frame over and check the plane with a long level or any even standard. There should be no distortions or bends.
We boil the external joints and immediately sand these seams with a grinder.
As shown in the photo above, we still have a piece of the corner left uncut from the inside; it needs to be removed, as it will interfere with installation. To do this, turn the frame over again and cut out the excess parts with a grinder. The loot is ready, now you can move on to the frame for the iron door.
Stage No. 2. Frame for the door leaf
When cutting profiled pipes for the frame of a door leaf, first measure out all the long parts, and then cut out the short ones from the rest. Otherwise, you may not guess, and then large vertical posts will have to be welded from pieces.
It is better to make the slot for the lock right away. To do this, measure 1 m from the bottom of the post and make 2 vertical cuts according to the dimensions of the lock, and cut this strip diagonally in the middle. To make the pieces easier to break out, we make small cuts on them; the arrows in the photo point to these cuts.
Next, we break out the strips, turn the pipe over and cut out a similar hole on the reverse side, after which you can drill the side holes for the screws, cut threads into them and try on the lock.
To ensure that the frame of the door leaf fits neatly into place, we fix the profiled pipes on the inside of the door with clamps. Don’t forget: there should be a gap of 5 mm between the profiled pipe and the corner; to do this, insert spacers. You can use the same corner trims as spacers.
It is important here how to install profiled pipes; any such pipe has a welded seam, so this seam should “look” inside the canvas.
When constructing a frame for a door leaf, it is no longer necessary to check the diagonals, since we are “attached” to the outer frame. The corners are welded by analogy with the loot, that is, we grab it at several points, and then weld the joints from the center to the edges.
Here, while the frame is in the sump, we weld the transverse stiffeners; they are made from a profiled pipe.
Now we remove the clamps, remove the outer frame and weld the ends of the joints in the corners, after which we sand all the seams. Be careful, the metal is thin and burns easily.
Always control where your top, bottom, hinges and lock are. At this stage it is very easy to get confused and then it will be difficult to correct the situation without losses.
Stage No. 3. Attaching the sheet
First we need to cut the sheet to size. From the frame of the door leaf to the edge of the sheet we leave 20 mm (5 mm for the gap, plus 15 mm for the overlap of the slit). To cut the sheet exactly according to the markings, you can use a profiled pipe; simply secure it with clamps and cut along the edge with a grinder.
We place the door frame on the cut sheet, check that the overlap is clearly observed everywhere, and spot weld the profiled pipes to the sheet (steps of about 100 - 150 mm). To prevent the frame from moving during welding, it can be secured with clamps.
You grab the frame not along the perimeter, but diagonally. That is: we welded one point, then moved to the opposite one, and so on until everything was scalded. Otherwise, the design may fail.
Any work must begin with a project. Determine the height of your future staircase, taking into account the height of the ceiling and a slope of 60-70 degrees. It is also worth accurately measuring the attic passage and drawing a corresponding diagram. The drawing must contain the following information: length of the staircase, angle of inclination, height of the ceiling of the room, dimensions of the passage and attic hatch, width of the flight, number and dimensions of sections, number, distance and dimensions of steps.
Door for gable
While planning the gable roof of the barn, it was decided that the attic space would be used to store various things that would not have room in the barn itself.
It is planned to enter the attic through the gable door. Since its dimensions are arbitrary, depending on the design of the pediment, you will have to make the canvas yourself. In order to hide large items in the attic, we will make the opening wide and high; in our case, its dimensions will be 90 by 120 cm.
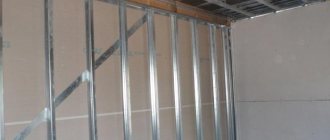
We will build the frame itself from bars measuring 5 by 5 cm, securing them with self-tapping screws to the mauerlat and rafters using mounting angles. First, we will cover the pediment with clapboard. To ensure that there are no gaps between the future door and the jamb, we will nail wooden planks 2 cm wide to the bars around the perimeter of the opening.
Join the group and you will be able to view images in full size
Source
Sunroof opening system
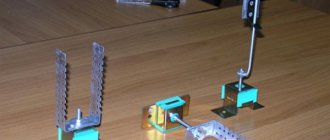
Opening the hatch to the attic is still a problem. I solved it with the help of two such blocks, carabiners and a rope, which already appeared a little in the photographs above.
The idea is to stand below and pull the rope to open the ceiling hatch into the attic. The blocks are attached to the rafter system in convenient places. A hole is drilled in the ceiling through which the cord passes.
A woman can open the hatch with a little effort. You can see this in the video below))
After the hatch was sheathed from below and insulated, it began to weigh a little more, but this did not particularly affect the opening. The hatch is fixed quite simply. The ring that needs to be pulled is put on the hooks.
It doesn’t look much like a ring))) I wanted to steal my daughter’s tubing, but was refused in a harsh manner. So for now it’s like this, but in the future I’ll find something normal.
Thus, we got a warm hatch into the attic, made with our own hands.
comments powered by HyperComments
MesterulManole
0 0
An example of how great a homemade attic hatch can look, assembled from available materials
Do you want to make an attic hatch with your own hands? I will tell you how to properly arrange the entrance to the attic and carefully close it with a hinged lid. In addition, you will learn what types of attic hatches can be purchased ready-made and what their mechanism of action is. As a result, you will be able to assemble a simple hatch with your own hands from scratch or choose a ready-made product for its subsequent installation.
Door to the attic: which one to choose
The attic can be entered from two sides - from the house and from the street. In both cases, it will be necessary to make a door structure that acts as a conductor to the room under the roof. In this article from dveridoma.net we’ll talk about the door to the attic and how to make it. Let's see what types of it exist and how to choose the appropriate option.
Door to the attic from the street photo
Installation of an attic hatch in the ceiling
If you are determined to actively use the attic space, most likely you will have to make a hatch into the attic. In villages in the past, this task was handled very simply - it was enough to use an extension ladder, but for a modern person such a dubious method can hardly be called suitable. Definitely, you will need a convenient access hole from inside the house, and not from outside, as was previously practiced. There are ready-made solutions on sale, but you still have to install them yourself, and the dimensions of the structure may not work. This article will talk about how to make the roof of a house habitable.
Door to the attic from the street: installing an external entrance
If the entrance to the attic is from the street, then you will have to arrange not only a passage to the upper floors (i.e. build a staircase), but also install a door. Since it is located on the outside of the building, it will be exposed to all natural factors: precipitation, strong winds, and temperature changes. Therefore, it is necessary to select a material that can withstand all these loads. What doors to the attic from the street do manufacturers offer?
Wooden door to the attic photo
Metal door to the attic photo
Plastic door to the attic photo
If you choose from three options, then the most reliable are metal, the most budgetary are plastic. And for those who like to craft, you can offer the option of making attic doors from wood yourself.
Peculiarities
In old house designs, the entrance to the attic was usually located outside the house, and the door could only be reached using a stationary ladder or stepladder. But in modern realities, this method is not very convenient, it requires significant investments in the construction of a reliable and safe staircase suitable for use in outdoor conditions, and in addition, it can turn things stored in the attic into easy prey for thieves and vandals.
The best option would be to organize comfortable access to the attic from inside the building itself. Modern solutions offer the installation of a hatch with a special ladder for quick and aesthetic access to the attic of a country house. But the issue of installing a hatch must be approached with careful preparation and certain knowledge.
Errors in installing the hatch can lead to drafts and excessive cooling of adjacent rooms, or even breakdown of the incorrectly installed structure.
Hatch to the attic: how to design an entrance inside the house
Since the internal entrance to the attic is part of the living space, other requirements are put forward for it:
Door to the attic photo
First, let's decide on the location of the hatch. In which room is it most advisable to make a doorway to the top? Of course, if this is not an attic, but an ordinary attic, which is visited extremely rarely, then the best entry point will be a little-used or walk-through room. Most often, an entrance hall or corridor is chosen for these purposes.
We decided on the place. Now let's move on to the dimensions. As a rule, the hatch has a square shape and dimensions that are optimal for a person of average build to squeeze through the opening and not get stuck in it. Minimum 600 mm. If you plan to carry large objects and furniture into the attic, then, accordingly, the dimensions of the hatch must be increased, for example, take a square side of 800 or 900 mm.
How to choose the size of the attic door
Since a non-residential attic is an unheated room, in the process of arranging the entrance it is necessary to minimize heat loss. The outside of the hatch cover is insulated with foam plastic or mineral wool (this is a natural insulation that is safe for the health of household members and reliably protects the interior from the penetration of cold).
Where should the hatch cover open? Based on the issue of ease of use, it is better that it opens outward. Imagine how you climb the stairs, reach the hatch and then, to open it, you have to bend down (otherwise there is a possibility of colliding with the lid). It is much more convenient to fold the hatch out and easily enter the opening.
Hatch door to the attic photo
The next issue that will have to be resolved concerns fire safety. When making a hatch door to the attic, it is important to protect the structure from fire and the spread of fire. To do this, you can use basalt wool - it will serve both as insulation and as an obstacle to the spread of fire.
What materials is the attic hatch made of? Most often, wood is used to make an attic door inside a house. But if fire safety comes first, then it is better to use metal.
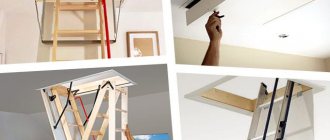
As for the configuration of the hatch, along with the classic forms you can find a very functional design, which we will look at in more detail. We will talk about compact folding attic ladders built into the hatch. When folded, this design is a block of multi-section stairs (usually 4 or 8 sections), fixed to the outside of the door and hidden in the attic. When the door is opened, the staircase expands and goes down. This way we get rid of the bulky element of the attic entrance (stairs), which often spoils the interior. Despite the original design, manufacturers do not forget about other important qualities, such as reliability and durability, as well as thermal insulation and fire safety. The design has reliable locks that secure the hatch cover and ladder elements in the required position. The hatch is equipped with insulation and a seal along the contour.
Folding ladder with hatch to the attic photo
As you can see, the entrance to the attic can be equipped not only with an unsightly and unremarkable door, but also with a functional design that saves space and meets all the requirements of the modern user. A folding door to the attic will allow you to comfortably and safely climb into the room under the roof.
Source
Attic stairs: overview of options
The main elements of the staircase are the bowstring and the stringer (side parts); tread (steps) and riser (for stationary stairs).
I. Capital steps
If there is enough space in your house, then we recommend building a stationary staircase to access the attic or attic. This option is reliable, practical and durable. Capital steps can be made on the basis of a metal frame or high-quality wood.
Monolithic stairs can be marching, with one or more bends, or spiral (spiral). Marching options have steps in the form of rectangular plates (boards), which evenly move upward at the same distance. A spiral staircase is folded around a central base, has steps narrowed towards the inner edge and is arranged in a spiral. The latter option is more compact and can be built even in small spaces, without sacrificing space.
The “advantages” of the capital option include durability, reliability and ease of use.
II. Portable ladders
Portable steps are the closest analogue of the “good old” stepladders. Such a ladder will only be reliable if you make a folding version with a platform. However, it is difficult to call such a design convenient. You will have to make extra efforts to get into the attic hole, and the issue of storing such a ladder will cause a lot of trouble.
III. Folding attic ladders with hatch
A very convenient and easy-to-implement type of attic ladder is folding steps connected to a hatch. Thanks to its convenient design, this type of steps has become the most popular among professional craftsmen.
Today there are many types of folding stairs, among which you can choose the most suitable option (telescopic, scissor, folding, etc.).
The folding mechanism is suitable for any attic space with a hatch onto which the staircase structure can be attached.
In general, most stairs schematically look like this:
Before we begin designing an attic staircase, let's consider some standard design characteristics:
The choice of material for a flight of stairs should be determined by the frequency of operation of the structure. Wood wears out faster than metal. So, if you go up to the attic every day, it is better to design the steps from metal. In other cases, wood, as a material that is light, environmentally friendly and easy to install, is very popular.
So, let's get started and create a modern attic staircase with a hatch with your own hands according to the drawings that our specialists have prepared for you.
Such doors are optimally suited for small rooms, but recently, they are increasingly being used by designers when decorating large rooms, since such doors allow them to emphasize the majesty of the room and its size.
Choosing a location for the attic entrance
The place for the manhole should not be located outside the living room. Ideal options for such a room would be a corridor or a storage room .
The entrance to the attic should be designed as practical and convenient as possible, without posing a danger to human life. Thus, there are many options for stairs that provide a comfortable climb to the upper floors of the room. Sometimes the staircase to the attic space is made permanently, in which case you need to make sure that it does not create inconvenience , but more often a manhole with an extension or retractable ladder is used. Folding staircase constructors, which unfold only when the entrance is opened, have gained particular popularity.
Before making a manhole, you need to decide on the design ; it must match the design of the room where it will be located. The lid should open well and freely. Please note that the entrance may require insulation.
When installing a manhole, it is unacceptable to remove part of the supporting structure; this leads to a decrease in the strength of the entire ceiling.
2 Factory designs - are they easy to install?
To organize an opening in the ceiling, the easiest way is to use commercial hatches. They are sold in many hardware stores. When purchasing a hatch, you can immediately look for a convenient sliding ladder for climbing to it. Before this, of course, you need to take preliminary measurements of the height of the room. Finished stairs differ:
Sliding stair structures are also easy to fold and unfold. Many home craftsmen make hatches themselves, using the materials at their disposal. But they prefer to buy a factory staircase. Installation of the factory kit (ladder plus hatch) in the presence of a pre-made opening in the ceiling is done really quickly. This job will require two people.
The installation diagram looks like this:
Now let's wait a while until the foam has completely hardened, after which we begin to lay out the ladder to the required height. Nuance. Before laying out the ladder, loosen the fastening bolts located on its sides. Then we adjust the sliding structure. We need to ensure that it turns out perfectly smooth. We achieve this by twisting the bolts. We use the attic entrance at any time!
You can purchase a folding attic ladder mounted on the hatch cover. Very convenient if the attic space is regularly used.
Adjusting the hatch to size
In this case, you will not have to assemble the frame and cover, since all this is already pre-assembled by the manufacturer. The folding attic ladder with a lid is equipped with mechanisms for smooth opening and closing. After making the opening, you will need to install the stairs according to the instructions.
The lid with the built-in ladder will open downwards, so it is important to install it flush with the ceiling finish.
Hatch design requirements
Before you make an attic hatch with your own hands, it is important to remember a few key rules:
You also need to remember that access to the hatch should be fairly free.
It is necessary to take into account the safety of the work itself and the final result. To ensure safety and reliability, it is best to draw up a design drawing before starting work. It is also necessary to provide for strengthening the opening. For this, boards are used, and if the ceiling is concrete, then metal corners are used. If the design involves a retractable staircase , then there must be free space under it.
Buy or make?
Those who plan to buy a finished product can use the instructions for its installation, which will also be given in this article, and those who want to make a convenient attic hatch with their own hands will be interested in the full information about the process, which we offer for reading. So, here are a few important nuances that will be useful in your work:
If you make the hatch along with the ladder yourself, do not be lazy to carefully study all the stages of the process, then you will not encounter difficulties in the work, and it will not seem complicated to you.
Types of products and their designs
Structurally, hatches can be of several types. This is due to the location and design features.
Types of attic hatches:
In addition, hatches are also distinguished according to other parameters:
Such structures are also distinguished by their diameter.
He considers the standard size to be 120 by 60 cm. However, the sizes are completely different, it all depends on the specific conditions and capabilities of the owners. The design of the room itself also plays an important role. For example, many people make the entrance to the attic a real highlight of the house.
In this case, the entrance to the top is designed as creatively as possible, and the size of the passage can vary depending on the wishes of the residents. Today, factory-made hatches have become widespread. There are a great variety of their designs. Just go to any construction hypermarket and you can find dozens of options there. The most popular designs are those with retractable stairs. There are variations here for every taste - metal, wood, plastic, combined. The length of these ladders is usually adjustable, however, most often varies from two meters to two and a half. The staircase design can be chosen from ready-made options , and it is also possible to make it to order.
Schemes of folding stairs
Such designs do not require more space for arrangement; they can be organically integrated into the interior or hidden in the attic. The suggested options will help you arrange your home ergonomically.
Drawing No. 1
This type is a device of two folding sections.
This option is suitable for attic openings located near the wall.
When developing a drawing, take into account the following points:
- To calculate the length of the stairs, the height is taken not to the hatch, but 50 mm below the ceiling level.
This staircase is not particularly aesthetically pleasing, but when assembled it takes up virtually no space.
Drawing No. 2
This option, like the first, is attached to the wall, but through one bowstring. The requirements for it are slightly different:
This staircase is a little more complicated than the previous version. But the following type of device has gained great popularity.
Insulated attic space
The access to the attic space is almost always made at the construction stage, but there are exceptions.
In this case, you will need to cut out the passage yourself. The easiest way to do this is on a wooden ceiling, but it can often be a concrete ceiling. When cutting a hole into the attic, it is important not to damage the supporting structures. In concrete slabs, it is best to make a hole at their junction. To work on concrete, you will need a hammer drill and a grinder with discs for metal and stone. The work must be carried out carefully and slowly . The most correct way would be to mark lines on the concrete and make cuts along them, and then use a hammer drill to extract the concrete composition. After the hole has been made for the manhole, it is carefully processed around the perimeter for further work.
An example of making a hatch can be seen in the example of a wooden product (wood is a good heat insulator and very easy to process); let’s look at the step-by-step process:
This is the general scheme of work. It is important to remember that it will definitely differ depending on the layout of the house, the wishes of the residents and financial capabilities.
A popular solution for an attic hatch would be to install a finishing mechanism. Ready-made mechanisms are sold in many hardware stores. Using this mechanism will greatly simplify the use of the hatch. So, it can be opened and closed with one hand, without much effort. Installing the door closer is quite easy to do with your own hands.
An insulated attic hatch can also be ordered from manufacturers, who can also offer quick installation.
Preparing the hatch slot
The hole in the ceiling is cut according to the markings, and the location of the floor beams must be taken into account. The distance between them, depending on the project, can be from 35 to 60 cm: it is important to ensure that the hatch touches as few beams as possible.
If you still had to partially cut them out, then transverse jumpers are installed between adjacent beams. This will prevent a decrease in strength.
The hatch is cut through with a grinder or other tool; it should be slightly larger than the planned dimensions of the hatch so that there is space left for installing the frame. The work is carried out in several stages:
Important! Making a box from timber is essentially the most reliable and convenient for installation. The timber has low residual moisture, clear geometry, and working with it does not require complex carpentry tools and skills.
Safety precautions
It is quite possible to make and install an attic hatch with your own hands. This work may take a couple of days, depending on the experience of the builder and the availability of the necessary tools and materials.
Safety precautions when creating an attic crawl space with your own hands are extremely important. It is necessary to ensure that there is no electrical wiring running through the work site. When working with a grinder and hammer drill, you must use safety glasses. The work will be carried out at a certain height, so a reliable ladder or stable stepladder is required. By following these simple rules, you can quickly and safely add new space to your home.
The attic hatch, although not used often, is a noticeable part of the interior. Therefore, with some effort, you can not only expand the square footage of your home, but also add some zest to it.
Source
Ceiling opening
An attic hatch installed in a corridor or room will be more reliable than the street version. In this case, they use a ready-made opening that was provided for by the project or cut or punch it in a convenient place. This is easier to do in a wooden house than in a house with concrete floor slabs. However, with a lot of work, you can make an opening in the concrete (Fig. 1.2).
opening for a hatch at the junction of two plates (Fig. 1)
opening for the hatch (Fig. 2)
How to insulate a ceiling in a wooden house or bathhouse yourself.
If you decide to create an attic hatch with your own hands, it is important to follow the technology and carry out construction step by step. In any case, there is always the opportunity to turn to professionals and consult with the InnovaStroy company.
Procedure for installing a hatch with your own hands
With a place for the upcoming hatch formed. We begin production of the entire structure:
- To make a frame, in most cases, boards with a thickness of 25-30 mm are taken. Then a rectangular frame is made from them, ensuring that all corners are even. The dimensions of the frame for the attic opening, in most cases, are the usual ones - 60x120 cm, although you may have other dimensions suitable for your option.
- Next, they begin to cut out the opening in the ceiling. The opening dimensions are larger by 50-60 mm. This is exactly the total allowance for the thickness of the boards used. This allowance is needed to cover the opening with a frame without reducing its planned dimensions.
- If the ceiling is made of wood, then the cut material that comes out after making the opening can be used to finish the wooden hatch to the attic from the inside of the room.
- Hinges on the hatch cover can be attached to both the wide and long sides. It depends on the specific case and the owner’s concept.
- To give reliability to the manhole cover, additionally install a spacer diagonally. It can be secured using corners and screws.
- You also need to worry about insulating the heat from the entrance to the attic from the house. The insulation material that was used to cover the attic space is perfect for this. Very often, mineral wool or expanded polystyrene (foam plastic) is used, having previously placed a vapor barrier on the bottom of the hatch cover.
- Then, if necessary, install handles, latch and closers.
- A seal is fastened around the perimeter of the frame to firmly fit the lid and prevent air from entering from the attic.
- From the ceiling side, you can cover the frame with platband to give a seductive façade look.
- The final point is the selection of stairs. This can be a homemade or purchased system. For better convenience, the staircase is foldable.
Installing a purchased hatch in the attic
An attic hatch can also be purchased at a store that sells building materials and tools. It differs in the presence of the supplied insulation in the lid and the presence of a folding ladder, which freely changes and “goes” up along with the closing of the hatch. You won’t have to overpay a lot for this compact and practical attic hatch device, but it’s worth it.
Let us highlight the advantages of using such a system:
- 2 people are enough for installation. For example, it could be you and your assistant;
- the height of the stairs can be very easily adjusted to the height of your room;
- the lock is located from the inside of the manhole cover, and therefore no structural components are noticeable from the outside;
- the profile of the steps is designed so that there is no possibility of slipping on them;
- compactness and design.
How to make a hatch to the attic with your own hands Do-it-yourself attic hatch - basic recommendations, installation How to make a hatch to the attic: a door in the ceiling with your own hands, an insulated entrance to the attic, an insulated cover Hatch for the attic with a ladder Attic hatch: how to make a hatch to the attic with your own hands Do-it-yourself attic hatch - Roofing and roofing
Since a purchased product is a system with established dimensions, before going to the supermarket you will need to measure:
- Dimensions of the room in which the staircase will be located when unfolded.
- An opening for a manhole to the attic, in case you have already completed it.
- Ceiling height.
Any manufacturer has detailed assembly instructions so that you do not have any difficulties when installing it yourself.
Installation is carried out in ordinary and simple steps. Here is the procedure for installing a system from one of the manufacturers:
- The entire system with the necessary tools is lifted into the attic.
- Before attaching the frame, two non-permanent mounting boards are fastened on top of it. This is done so that the system does not fall down, because the frame has not yet been fixed to the ceiling opening.
Some manufacturers put pins on the four edges of the frame (instead of planks).
Then they put iron strips on them to hold the system. Nuts are screwed onto the studs. Similarly, by adjusting the height of the nut, you can achieve a flush alignment of the hatch and ceiling structure.
- Next, the frame is fixed to the opening with self-tapping screws. Sometimes it happens that there is a small gap between the frame and the opening. In this option, to fill the void, backing boards are used, which are placed in the places where the screws are screwed in. The frame is fixed around the perimeter.
- The cracks are filled with insulation, for example, mineral wool.
- Then remove the mounting boards or metal strips (depending on your option).
- Loosen the bolts on the side components to release and freely lay out the ladder.
- The “legs” of the ladder are cut with a wood saw at the desired angle to achieve a strong connection of the “feet” to the floor.
- Tips are attached to the legs of the stairs to protect the floor from scratches.
For greater clarity, we recommend watching the video, which demonstrates in detail how to install a hatch in the attic with your own hands.