The attic is a great place to store various old things, clothes and other accessories.
Although, to use it, you need a special arrangement of the hatch, which will help you get onto it without much difficulty. We will write in more detail below about the different types of attic hatches and their features. [contents]
Advantages of an attic ladder with a hatch
Such designs have become very popular in many private homes. This is due to many advantages:
- Despite its apparent fragility, an attic ladder can withstand up to 200 kilograms of weight.
- The steps have reliefs and notches that increase the convenience and safety of operation.
- The design is very durable and reliable.
- Its price is directly dependent on the materials and complexity of the product. However, it is not very big.
- Wide selection of design solutions. You can choose an attic staircase for any interior.
- Practicality and simplicity.
Install a folding staircase structure in your home and you will see for yourself all its advantages. Such stairs look great both in old buildings and in modern houses. But without any doubt, an attic ladder with a hatch is solid, beautiful and incredibly practical.
Features of designs for arranging an attic
Staircase structures are different, you can’t do without them. To make a hatch, metal or wood can be used, then the opening will be almost invisible in the ceiling surface.
The choice of stairs deserves special attention. They can be stationary (non-portable), folding and mobile.
Stationary models cannot be folded or moved to another location. They are best used in cases where there is a lot of space in the house and the staircase structure will not bother anyone. The portable (mobile) option is quite troublesome, because the structure will have to be constantly moved and moved. Folding attic stairs are considered the most attractive and practical.
The dimensions of the attic hatch are not very difficult to calculate, since they depend on the angle of inclination and the width of the staircase itself. The width varies from 70 centimeters to a meter. The tilt should be no more than 65 degrees, but for regular use, an angle of 45 degrees is considered the most convenient. The stairs should consist of ten to fifteen steps. Their thickness should be about 2 centimeters. Such an attic ladder can easily support a weight of more than one hundred and fifty kilograms.
Self-assembly steps
For the attic version, a ladder on bowstrings is considered the most suitable. The instructions are simple, plus you need little tools and material.
- To make a wooden structure, we will need a planed board 200–250 mm wide and 30–40 mm thick.
- The length of the board depends on the size of the structure, because 2 solid bowstrings will be made from it.
- Theoretically, steps can be made from boards 25 mm thick, but it is more convenient to purchase one board for both the string and the steps.
Methods of fastening steps
There are 3 ways to fix steps:
- Small wooden blocks are screwed from the inside to the board and treads are placed on them.
- The treads from the inside are fixed to the board with metal corners.
- Grooves for treads are cut in the bowstrings, and steps are inserted into them.
From an aesthetic point of view, the option with grooves looks better than competitors
Installing the bowstring
The first two strings are marked and trimmed at the desired angle. After trimming and fitting, you need to immediately mark the fixation points of the structure on the floor of the first floor and on the attic hatch box.
- Marking the steps. If you are not sure that you can accurately calculate the angle of inclination, then install (without fixing) the string in its place and, applying a level to it, mark the horizon for the first step.
- Sample. Now you have the angle of the steps relative to the string. To mark the remaining degrees, you can use a small marker or make a homemade template from cardboard.
It is more convenient to cut the grooves for the steps with a hand-held circular saw, but in the absence of one, you can use a regular hacksaw for wood
A circular saw is convenient because it can be set to a fixed cutting depth
Grooves. Next, take a wide chisel and carefully select grooves to cover the entire depth of the cut. A blind groove, as in the photo below, is also made using a chisel. First, you select everything you can, and then place the chisel vertically and trim the side.
The blind groove is selected with a wide chisel
Place both strings on pre-marked points and secure them with metal corners. Screw the string with self-tapping screws, and drive the anchor into the floor.
For stronger support on the floor, you can cut and fasten a wooden corner from the same board underneath the bowstring
Installation of steps
It is advisable to measure and cut the steps after installing the bowstring. The grooves are small and if you make a slight mistake, the boards will not fit tightly or will burst the bowstring.
It is quicker to make boards for the steps according to a template so that they are all the same, but for an amateur it is better to cut and adjust each element separately. Without experience, it is impossible to select a groove with a chisel with millimeter precision.
It's faster to do all the steps in one package
Before installing the boards, the grooves must be lubricated with any wood glue; alternatively, you can use PVA.
The grooves must be coated with glue
When inserting elements into grooves, you can use a wooden mallet; hammering boards with your bare hands is problematic.
Immediately after inserting the element into the groove, it is necessary to remove excess glue
To prevent the massive structure from drying out over time and the strings moving apart, we install a tightening metal pin under one of the central steps.
A pin is needed to secure the side elements
Railing
There are many options for installing railings, but we chose the easiest one for an amateur. If the hatch is in a corner, then the railing can be mounted on only one side.
- From the point where the bowstring is fixed on the floor, to the ceiling, install a stand made of wooden beams, the minimum section of the beam is from 50x50 mm.
- Then, parallel to the bowstring, 1 or 2 boards are attached to the beam and to the trim box of the attic hatch.
- The boards can be screwed with self-tapping screws or holes can be drilled and secured with bolts and wide washers.
The last stages of staircase assembly will be sanding and varnishing.
How to make an attic hatch with your own hands
Staircase manufacturing, installation and testing are the main stages of work. But without design and calculation of the future structure, construction will be complicated, and the quality may not meet expectations.
The beginning of work is the creation of a hatch leading to the top. A DIY attic ladder is a great approach if you have sufficient knowledge and skills. The correct choice of hatch location, its precise creation and staircase equipment serve as the basis for the entire project.
You have 2 options: use a ready-made hatch or make it yourself. The size of the hole should be comfortable for climbing, so as not to touch the ceiling and slings with your head. The location should not be crossed by beams or load-bearing elements. The hatch must be additionally insulated, because the integrity of the structure is compromised and this can lead to heat loss.
If you decide to make an attic staircase with your own hands, then you should understand that this is not just a classic path to the upper floor. The attic staircase has its own characteristics and requires a special approach.
Manufacturing a hatch for an attic staircase includes the following work:
- Development of drawings
- Accounting and detailed analysis of the thickness of all structural elements and hatch dimensions.
- Selection of necessary materials and tools.
- Forming an opening where there will be a folding ladder or other option for climbing into the attic.
- Assembling the hatch frame and securely fixing all elements.
- Making a cover from leftover floor coverings.
- Decoration and complex of insulation works.
As a result, you get an equipped hatch that can be easily closed for a while.
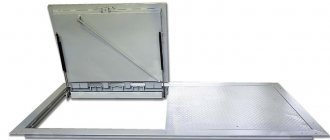
The hatch in the closed position practically does not stand out against the background of the ceiling
Advantages ↑
- This system is compact. In the closed position, the lid, merging with the ceiling, is almost invisible.
- The elegance of the design is “deceptive”, because it can support a weight of up to a quarter of a ton.
- Installation does not require much effort and can be done by a home handyman.
- The system is easy to use and highly functional. The ladder can be easily removed after use.
- Durable materials used in the manufacture of the structure ensure its reliability and durability.
- The varied design allows it to harmoniously fit into both classic and modern interiors.
Where and how to install
It may seem that choosing a place to place and cut out the hatch is not very difficult. However, most people forget that there are floor beams in the ceiling. During the installation of the hatch, they must not be touched; this also applies to roof rafters. In this case, professional builders recommend following some rules:
- When folding, the staircase structure should not touch the walls and ceiling of the attic. To prevent this problem, you need to first measure the distance from the stairs vertically and horizontally.
- The hatch to the attic should also fold/unfold smoothly.
- The direction and location of the hatch depends on the direction of the attic rafters.
- The hole in the ceiling must match the dimensions of the hatch, otherwise gaps and cracks will appear.
Folding structures
The range of manufacturers of folding stairs is quite wide; the price of the product depends on the material of manufacture and functionality.
The folding version for the attic is a structure of 3-4 sections that fold into each other and are converted into a compact unit located under the ceiling.
Thus, it can be easily unfolded if necessary, is stable, and climbing up will not be a problem. If the size of the room is small even for placing the bed and staircase structure together, then the folding version is definitely suitable in this case.
Drawing of a sliding attic ladder
Transformers are driven by a special rod. It is activated when the hatch cover is opened, there are models with a remote control.
Preparing the hatch slot
The hole in the ceiling is cut according to the markings, taking into account the location of the floor beams
The distance between them, depending on the project, can be from 35 to 60 cm: it is important to ensure that the hatch touches as few beams as possible
If you still had to partially cut them out, then transverse jumpers are installed between adjacent beams. This will prevent a decrease in strength.
The hatch is cut through with a grinder or other tool; it should be slightly larger than the planned dimensions of the hatch so that there is space left for installing the frame. The work is carried out in several stages:
Carefully cut through the top layer down to the insulation. If the attic has already been insulated, the layer of thermal and waterproofing should be carefully cut through and not pulled out.
It will be more convenient and reliable to finish cutting the hole from below. A frame is assembled from the boards that will frame the hatch. The thickness of the board is 33 cm, the width of the frame depends on the wishes of the owner. The frame is installed from the top and bottom sides, it must be fixed to the hatch frame. The hatch cover is attached to the frame. It is better to purchase an already assembled structure in a store, since it is guaranteed to withstand the weight of the ladder and will be able to hold a person climbing; if this is not possible, the hatch is assembled from two layers of thick plywood and timber, with insulation laid between the plywood sheets.
Work progress
The first priority is to install the hatch; it is carried out according to the diagram below. We will consider the progress of work using the example of a more complex option, when the presence of a hatch was not initially planned, and the attic floors were not prepared in advance.
The first step is drawings and calculations
First you need to decide on the dimensions of the hatch and ladder, as well as the method of fastening it, since all these parameters are interrelated
When constructing a folding staircase structure, it is important to take into account its unfolded size, compare it with the height from floor to ceiling and record all calculations and measurements in the form of drawings. An example is shown in the diagram below
Please note that in the drawing the floor thickness is indicated as 31.5 cm, but it can be less, the minimum limit depends on the thickness of the hatch, in this version it is 14 cm. Hatch diagram for an attic with a built-in ladder
All dimensions are clearly verified and are interconnected
Scheme of an attic hatch with a built-in ladder. All dimensions are clearly verified and are interconnected.
Second step - choosing a location
This is a very crucial moment of work, since it will be impossible to change the location of the hatch later.
When choosing a place for an attic hatch, take into account:
hatch dimensions. Typically they are 80 cm long and 60 cm wide; attic geometry. Namely, the distance of free space from the proposed hatch to the roof and walls; condition of the floors at the site of the planned installation
It is important to avoid contact with roof beams and rafters; if during construction a system with transverse and longitudinal rafters was used, then it is advisable to try to position the hatch so that it rests on them on three sides. And the best option would be a hatch hole surrounded by rafters on four sides
Considering the most common distance between the rafters is 60 cm and the standard dimensions of the attic hatch 60 x 80 cm, its direction, the direction of the floor rafters is determined.
The third step is making a hole for the hatch
Since the hatch design is a ready-made assembly, consisting of an upper and lower seal and face strips around the entire perimeter, it is important to keep the dimensions of the hole for the hatch as close as possible to the assembly parameters. It will be more convenient to carry out work by sitting on the floor of the attic, checking your actions against previously made marks
Procedure:
- Mark the contours of the hole on the floor surface. They should be slightly larger than the dimensions of the hatch itself, taking into account the placement of the casing;
- then, using a grinder, we remove the top layer of the ceiling, opening access to the insulation and waterproofing;
- carefully cut the insulation around the perimeter of the future hatch, being careful not to pull it out;
- we do the same operation with the insulation for the roof (if any);
- if there is another waterproofing layer below, we also carefully cut and remove the roof insulation;
- we make holes to control the location of the hatch opening on the ceiling;
- we finish cutting out the hatch (it’s more convenient to do this work from below, from the ceiling).
The fourth step is finishing the hatch hole
At this stage of work, the hatch is strengthened and its frame is installed. We unscrew the front rims and try them on to the resulting hole; further actions depend on the results of the fitting and on how many sides the hatch is surrounded by rafters.
If the hole size turns out to be inappropriate and the rafters are located on three sides:
- determine the required cut size for one of the beams so that the rim fits;
- select the size of the seal so that the hatch structure sits tightly in the hole;
- To securely fasten the frame on one side (empty), we install an additional reinforcing beam.
If there are rafters on only two sides:
- cuts are made on these sides or seals are installed;
- Transverse beams are installed on the unstrengthened sides to help securely fix the hatch frame.
All of the above work should be performed very carefully, taking into account that the structure must be reliable and capable of supporting the weight of a person climbing it.
Fifth step - securing the hatch
After the hatch hole is adjusted to the required dimensions, further installation of the structure is not difficult and is performed as follows:
- we assemble the hatch rim from the attic side and insert it into the hole;
- then the rim is secured (methods of fastening depend on the design of the hatch itself);
- after which we install and fasten the second (lower) part of the rim;
- We attach a lid covering the hatch to the finished frame;
- if the cover and the ladder are a single structure, then they are fastened together, after which we check the entire mechanism for operability.
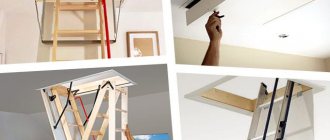
Stair options
Attic stairs can have several types. The ability to choose allows you to optimally equip any room depending on your personal wishes and needs.
— folding ladder on hinges
A fairly common format for making stairs. The project consists of 3 sections that are connected into a single structure. This format is suitable for equipping stairs in any room. Hinges for an opening hatch can be purchased ready-made and installed in the shortest possible time.
Folding ladder on hinges
- simple wooden staircase
This option is more attractive and is a definite upgrade of the previous design. To make it, it is enough to cut a standard ladder into 3 sections. The smallest one should be the size of the hatch, the second one should be larger, and the third one should completely cover the remaining distance to the floor. Make grooves on and install steps into them. Be sure to finish all corners and surfaces accurately.
Wooden staircase on
- two-piece folding ladder
An attic staircase option that is suitable for low room heights or a type of simplified design.
Folding ladder
- sliding attic ladder - retractable flights to the attic
A ladder with large retractable sections that can be pulled out and simultaneously cover the distance to the hatch. Requires precise fitting of elements and sufficient space.
Sliding staircase
- do-it-yourself staircase to the attic from the street
An attic staircase can have an unlimited number of design options - below you can admire the completed projects.
Stairs from the street
What type of stairs to choose for the attic
The attic space can be used in completely different ways - to set up a workshop, a warehouse, or just another room for relaxation. It all depends on the configuration of the home and your imagination. But in any case, you will have to think about organizing access to this place; here it is necessary to use a ladder to enter the attic.
Arranging a hatch also requires careful analysis, because not every room is suitable for this. Most often it is located in those places that are less often used - in the hallway, corridor or passage room. The main condition is a sufficient amount of space and the possibility of constant access.
Previously, there were not only internal, but also external stairs to the attic, located outside the outer part of the home. This is convenient from the point of view of saving space, but absolutely inconvenient if the attic space needs to be visited regularly. In frost, cold or heavy rain, few people want to leave a warm home and climb up slippery or icy stairs.
Staircase outside the houseSource olestnicah.ru
Of course, if you wish, you can do without any lifting devices at all and use several chairs stacked on top of each other. But this method can hardly be called convenient and safe. To be able to safely climb into the attic at any time of the year, it is necessary to use modern stairs with reliable fasteners. There are many different options, each of which has its own advantages. If space allows, it is better to use stationary solutions - they are more durable and stable, break less often and do not require replacement for a long time, and are also able to withstand more severe loads. If there is very little space in the room, you will have to resort to complicated structures - folding ladders, which are hidden inside the ceiling when the hatch is closed. Such models are not only comfortable, but also very beautiful; a correctly selected option can become an interior decoration and its main accent.
Wooden ladderSource stroidominvest.ru
Today on the market you can find stairs of various shapes, colors and sizes. Traditional materials for products are wood and metal. Wooden options are suitable for infrequent use, as they are designed for light load. Metal devices can already withstand significant weight, but their cost will also correspond to the quality. If your budget does not allow you to purchase a reliable staircase made of suitable material, it is better not to tempt fate and make the product yourself. In this case, it will have all the necessary characteristics that the master will put into it.
Metal sliding staircaseSource maximuscentr.com.ua
Materials for production
The materials from which the stairs are made with your own hands are subject to strength and weight requirements. Due to rapid wear, the design for frequent use is not made of wood. Metal is the best option for such a product; it will ensure safe and durable operation.
A combination of materials will allow you to reduce the overall weight of the ladder attached to the hatch. Steps are made from lighter wood. Hardwood blocks about 2 cm thick are used. Metal or plastic fittings are installed to connect the products, the latter reduces friction of the parts. In the folded position, the structure is attached to the hatch, which prevents spontaneous falling out.
Insulated attic space
The access to the attic space is almost always made at the construction stage, but there are exceptions. In this case, you will need to cut out the passage yourself. The easiest way to do this is on a wooden ceiling, but often it can also be a concrete ceiling.
When cutting a hole into the attic, it is important not to damage the supporting structures. It is best to make a hole in concrete slabs at their junction
To work on concrete, you will need a hammer drill and a grinder with discs for metal and stone.
The work must be carried out carefully and slowly. The most correct way would be to mark lines on the concrete and make cuts along them, and then use a hammer drill to extract the concrete composition. After the hole has been made for the manhole, it is carefully processed around the perimeter for further work.
An example of making a hatch can be seen in the example of a wooden product (wood is a good heat insulator and very easy to process); let’s look at the step-by-step process:
- Load-bearing parts of the manhole frame, boards or metal corners are installed.
- The manhole opening platbands are being installed. Options for attaching platbands may be different and depend on specific conditions. The easiest way is to attach platbands to wooden structures. To do this, it is best to take self-tapping screws. It is better to avoid using nails, as they can split the wood and, in addition, fastening with nails loses strength over time. If the platbands need to be attached to concrete, then dowels are best suited here. Platbands can be made from boards or fiberboard. After installing the platbands, you must carefully check all the elements. The structure must be reliable, since it performs a load-bearing function.
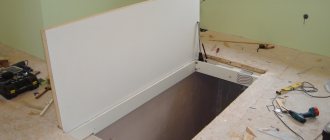
- To make the hatch frame, boards with a thickness of 25-30 mm are suitable. The hatch frame should be 40-50 mm smaller than the opening. Such allowances are necessary for covering the opening in the ceiling with a frame on which the lid will later rest. Next, you need to sew up the hatch on one side.
- Thermal insulating material is placed in the frame. The best option would be mineral wool. The insulation is attached to the frame. Wooden planks are used for this. Next, the frame is carefully sutured. This creates an insulated sandwich.
- The finished hatch is attached to the opening using hinges.
- A rubber seal is installed on the perimeter of the hatch, which will prevent drafts and serve as insulation.
- The side of the manhole cover facing the room is decorated to match the design of the room in which it is located.
This is the general scheme of work
It is important to remember that it will definitely differ depending on the layout of the house, the wishes of the residents and financial capabilities
A popular solution for an attic hatch would be to install a finishing mechanism. Ready-made mechanisms are sold in many hardware stores. Using this mechanism will greatly simplify the use of the hatch. So, it can be opened and closed with one hand, without much effort. Installing the door closer is quite easy to do with your own hands.
An insulated attic hatch can also be ordered from manufacturers, who can also offer quick installation.
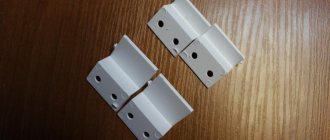
Installing hinges for a basement hatch
If your house or garage has a basement, the entrance to it must be blocked for safety reasons and also to prevent cold air from entering the room. The easiest way is to close the entrance with a hinged hatch.
It can be constructed from clapboard or steel sheets and, if necessary, insulated. You can also attach hinges for a floor hatch in the basement with your own hands. There are several types of loops, from which you need to choose the most suitable design. To do this, you need to consider how to make hinges for a basement hatch.
Hinge options
Depending on the frequency of use of the hatch and the amount of money that the owner is willing to spend on this design, you can choose from the following options:
- Overhead loops. This is the simplest mechanism. One part of it is attached to the door, and the other to the floor or wall from the inside. If desired, the shape of the hatch and hinges can be made unusual by adding forged or antique-decorated elements, thanks to which the structure will become an interior decoration.
- Secret loops. In this case, hidden hatch hinges are installed in the floor. If the door is made of the same material as the floor, the entrance to the basement will be completely invisible. You can even cover it with a carpet to prevent drafts from entering through the cracks. Then only the owners of the house will know about the existence of the door to the basement.
- Electric hinges. They are equipped with an electric motor that allows you to open access to the basement without effort. This option is well suited for heavy hatches made of steel or other materials that are difficult to lift manually. Such structures are either pulled out using a retractable hatch mechanism or folded back.
- Hinges with gas closers. Another way to make lifting the lid easier. In this case, it will be enough to apply a little force for the hatch to open on its own.
- Pantograph loops. When using such mechanisms, the door first moves upward and then moves to the side. In this case, it is convenient to use two doors so that they can be moved apart.
Points to consider
When installing hinges for the cellar lid, it is advisable to pay attention to the following points:
- Quality of connections. The hinges will bear the entire weight of the hatch cover structure, so they must be of high quality and strong enough. You can find cheap options on sale that can only withstand the weight of a small chipboard door. They are not suitable for heavy oak or steel hatches. The handle for lifting the door must also be able to withstand its weight with a reserve.
- Hatch dimensions. If the lid is large enough, two hinges may not be enough.
- Lack of wedge. The mechanism must be adjusted in such a way that the cellar door does not jam during regular use. To do this, it is necessary to maintain a small gap between the moving parts.
- Door strength. When actively using doors made of chipboard or wood, a large load is created on the edges. They can be strengthened with a metal corner.
- Possibility of service. Periodically, the mechanism requires lubrication. If shock absorbers are installed, they may need to be repaired or replaced. Therefore, when installing basement doors, it is necessary to maintain free access for their maintenance from above or from the underground.
Installing hinges
To install the hatch hinges, you need to complete the following steps:
- Determine the side where the basement lid will open and select the appropriate mechanism.
- Mark the installation locations with a pencil or chalk.
- Prepare the surface. If the lid is wooden, you can skip this step, since it should be immediately screwed on with self-tapping screws. If the hatch is a metal structure, holes for fastening must be made in advance.
- Install the door by placing a strip under its end, the thickness of which will be equal to the required gap between the door and the floor.
- The mechanism must be opened 90°, applied to the intended places and secured with self-tapping screws or self-tapping screws.
- The structure of the basement hatch in the floor needs to be adjusted. This requires slowly opening and closing the door several times, finding the positions where it begins to jam. After this, adjust the fastenings so as to remove the wedge. If this cannot be achieved by tightening the fasteners, the hinges will have to be removed and reinstalled.
It is recommended to lubricate the loops once every six months with lithol or sewing machine oil. If the door is in active use, more frequent cleaning may be necessary as lubricant tends to be produced. To perform such maintenance, most mechanisms have special technical holes.
Types of hatches
The design of the hatch itself is quite simple. According to the plane in which it is installed, the following varieties are distinguished:
- located on the ceiling - horizontal;
- vertical, called manholes;
- attic or corner. This type is installed on a sloping roof, combined with roof windows.
Corner hatches that also serve as windows are a topic for another discussion. It is better to purchase them from companies specializing in the design of such hatches.
Since our article deals specifically with the arrangement of attic hatches, let’s take a closer look at the existing solutions to this problem.
The so-called “inspection” hatch. Such structures are designed to test the space above them.
Preparatory stage of work
Before starting work, you need to decide on the materials and tools used and possibly purchase what is missing. To install a hatch in an attic with stairs yourself, you will need the following tools and materials:
- hatch box and staircase structure (if you decide to buy them);
- wooden blocks, boards, hinges and hinges (if the structure is not purchased, but will be done entirely independently);
- a set of screws and screwdrivers;
- tape measure and protractor;
- polyurethane foam;
- anchor bolts;
- grinder and hacksaw for wood.
When building a staircase and making other wooden elements with your own hands, you will also need paint to give the entire structure a complete look that fits into the interior and extend the life of the wooden elements. The material for such structures is most often pine.
It is also advisable to draw up a work plan and estimate for the necessary materials. This will help streamline all your actions and avoid unnecessary waste of time and money. The estimate is drawn up after all calculations and drawings are completed; more details on how to carry them out are in the next paragraph.
Form
A round cover or any other shape, but with rounded edges, is good for external hatches, but not for internal ones. The most common shape for a basement hatch is square. The square provides the hatch with structural rigidity. It is easy to adjust the finishing material for the floor to match it. The location of the loops can be arbitrary.
Rectangular hatches are more practical. They allow you to place the cover along the wall, providing convenient access to the stairs to the basement. In this case, it is advisable to place the hinges on the long side of the lid. Then, when using the basement, you can safely walk up/down the stairs without fear of injuring your head. In addition, it is most convenient to lift or lower any cargo with such a hatch. The open space above your head gives you more freedom of action.
Having decided on the shape, you can begin to choose a place to enter the basement.
DIY manhole cover
Types of hatches for attic floors
DIY insulated attic hatch
You can make the stairs and attic equipment for the room yourself. In this article we will look at how to make an attic ladder with your own hands. At the end of the material we will show video instructions for installing and insulating an attic hatch in a private house. But first, it’s worth noting that any hatch to the attic in a house must meet several parameters:
— functionality, structural strength; — simple installation of stairs and hatch; — convenience during further use; — modern and attractive design; — high-quality thermal insulation of the hatch.
A cold attic can be used in the summer as a warehouse for winter things. If you decide to make a living room for the summer, insulate the attic hatch for the winter. In this case, the installation location of the hatch should be chosen so that the cover can be opened freely. Another important point is how the staircase will be located below, so that it does not interfere with the passage of residents near it and fits into the interior of the house.
Hatch design requirements
Before you make an attic hatch with your own hands, it is important to remember a few key rules:
- The design must be strong and reliable.
- Installation should be convenient.
- The design must be safe.
- The design must provide for the possibility of insulation.
- Before starting work, you need to decide on the type of hatch and its design.
You also need to remember that access to the hatch should be fairly free. It is necessary to take into account the safety of the work itself and the final result. To ensure safety and reliability, it is best to draw up a design drawing before starting work. It is also necessary to provide for strengthening the opening. For this, boards are used, and if the ceiling is concrete, then metal corners are used. If the design involves a retractable staircase, then there must be free space under it.
The main stages of creating a hatch
Having prepared all the required tools and materials, as well as printed out the design of the future entrance to the attic, you can proceed to the actual work.
1. Creating a frame. First of all, you should cut a hole for the hatch, if it was not provided during the construction of the house. The opening should not be too large. It is optimal if the size of the hole exceeds the size of the hatch frame by 5-10 cm. In the future, the gap will be compensated for by insulation. The frame and door can also be purchased ready-made, in the shape required in each specific case. When assembling yourself, you must use boards 20-30 mm thick
It is important to maintain the evenness of the corners so that there are no distortions; it is worth using a construction square
Advice! Before making a cut, it is recommended to measure all dimensions again. The standard parameters of the hatch are 60x120 cm. If necessary, the dimensions can be increased or decreased to suit your own needs.
It will also be necessary to adjust the dimensions if a retractable or folding staircase structure is planned, that is, the parameter of the cover should be such that the folding segment of the staircase system can easily be placed on it. Having finished with the frame, you can install it in place, carefully securing it in the opening.
2. Installing the door. The next step is to create the hatch door. The cover is made of wood boards or plywood. It is desirable that the product is durable, but not massive, this will make it easy to open and close
It is especially important to take care of the reliability of the door when a sliding or folding ladder is attached to it. If boards are used for the lid, then to secure them more firmly it is worth installing a crossbar on the reverse side
It is recommended to use door hinges to mount the door to the frame. As for the option of opening the door, the decision depends on the preferences of the owners, as well as on the design features of the attic staircase. In addition, do not forget about installing the locking mechanism.
3. Insulation of the hatch. The final stage of creating a manhole is the insulation of the structure.
It is especially important to perform this work in the presence of a cold attic. The sequence of work is the same as in the case of insulating the attic floor
That is, first a vapor barrier material is laid on the door, and then a layer of thermal insulation is placed on it. Further, the insulated system can be covered with decorative finishing, for example, clapboard. It is imperative to seal all the cracks in the frame with polyurethane foam, as well as install a sealing contour, after which you can cover it with decorative cladding.
How to adjust hinges
After the door is seated, it is opened slightly and released. Let's assume that it remains in place, then we move it to a position of 90 degrees to the opening and release it again. If the door is motionless at any point of opening, then it hangs correctly and its vertical is not displaced anywhere.
Next, check the operation of the loops. By slowly opening the door leaf, make sure that the awnings do not make any other movements other than the rotating ones provided for by the design. In the event that the hinges begin to bend or the door moves randomly in any direction when released, it is necessary to adjust the position of the hinges.
You can adjust the awnings so that the door does not open arbitrarily by placing a backing under one part of the hinge. To do this, the lower hinge is released at the point of attachment to the box and pieces of cardboard are inserted into the gap, achieving a position where the door stops moving spontaneously. After this, they plan out a wooden backing to replace the cardboard and firmly fix it under the canopy.
Align the loops so that they do not bend in the following way. At the top one, the topmost screw is loosened slightly, the second one is completely unscrewed. Then they slowly open and close the door, observing how the canopy begins to shift from the second landing hole. The average position of the loop for the entire cycle of movements is noted and it is firmly fixed through the new mounting holes.
Hinges for hidden hatches do not need adjustment. This is a plus of the product. This ease of use is due to the fact that the secret hatch does not bear any special load on tearing off.
Procedure for installing a hatch yourself
We have decided on the location for the future hatch. Let's start making the entire structure
:
- To create a frame, boards with a thickness of 25-30 mm are usually taken. Next, a rectangular frame is made from them, while maintaining the evenness of all corners. The dimensions of the frame for the attic access are usually made standard - 60x120 cm, although you may have other dimensions suitable for your option.
- Next, proceed to cutting out the opening in the ceiling. The opening dimensions are increased by 50-60 mm. This is just the total allowance for the thickness of the boards used. This allowance is necessary to cover the opening with a frame without reducing its planned dimensions.
- If the ceiling is wooden, then the cut-out material that is obtained after making the opening can be used to line the wooden hatch to the attic from the inside of the room.
- Hinges on the hatch cover can be attached to both the wide and long sides. It all depends on the specific case and the owner’s ideas.
- To give strength to the manhole cover, additionally install a spacer diagonally. It can be attached using corners and screws.
- It is also necessary to take care of the thermal insulation of the entrance to the attic from the house. The insulation that was used to cover the attic space is quite suitable for this. Most often, mineral wool or expanded polystyrene (foam plastic) is used, after placing a vapor barrier on the bottom of the hatch cover.
- Next, if necessary, install handles, latch and closers.
- A seal is attached along the entire perimeter of the frame to ensure a tight fit of the lid and prevent air from entering from the attic.
- On the ceiling side, you can cover the frame with platband to give it an attractive appearance.
- The final stage is the choice of stairs. This can be a homemade or purchased design. For greater convenience, the staircase is made foldable.
Installing a commercial hatch in the attic
An attic hatch can also be purchased at a hardware store. It is distinguished by the presence of installed insulation in the lid and the presence of a folding ladder, which can be freely transformed and “goes” upward when the hatch is closed. You will have to pay a little extra for such a compact and functional attic hatch, but it’s worth it.
- Two people are enough for installation. For example, it could be you and your assistant;
- the height of the stairs can be easily adjusted to the height of your room;
- the lock is located on the inside of the manhole cover, so no structural elements are visible from the outside;
- the profile of the steps is made in such a way that it is impossible to slip on them;
- compactness and design.
Because a purchased product is a design with given dimensions, before going to the store you will have to measure
:
- The dimensions of the room in which the ladder will be located when unfolded.
- An opening for a manhole to the attic, if you have already made one.
- Ceiling height.
Installation takes place in simple and uncomplicated steps. We present the procedure for installing a structure from one of the manufacturers
:
- The entire structure with the necessary tools is lifted into the attic.
- Before attaching the frame, two temporary mounting boards are attached to the top of it. This is done to ensure that the structure does not fall down, because the frame has not yet been fixed to the ceiling opening.
Some manufacturers install studs on the four edges of the frame (instead of boards).
Next, metal strips are put on them to hold the structure. Nuts are screwed onto the studs. Thus, by adjusting the height of the nut, you can achieve a flush alignment of the hatch and ceiling structure.
- Next, the frame is fixed to the opening with self-tapping screws. It often happens that there is a small gap between the opening and the frame. In this case, to fill the void, backing boards are used, which are placed in the places where the screws are screwed in. The frame is fixed around the entire perimeter.
- The gaps are filled with insulation, for example, mineral wool.
- After this, the mounting boards or metal strips are removed (it all depends on your option).
- The bolts on the side elements are loosened to release and freely lay out the ladder.
- The “legs” of the ladder are cut with a hacksaw at the required angle to achieve a tight fit of the “feet” to the floor.
- Tips are attached to the legs of the stairs to protect the floor from scratches.
For greater clarity, we recommend that you watch the video, which shows in detail how to install a hatch in the attic with your own hands.
Sizing and preparation for installation
The production of stationary marches begins with design - taking measurements and creating a drawing in three projections (front, side, top), linked to the floor plan. For an accurate calculation, you need to measure the length and width of the attic opening, the height from the floor of the first floor to the floor of the second floor, and the thickness of the ceiling. Based on this, a drawing is constructed, focusing on the optimal dimensions of general construction standards and GOSTs:
- span width - 0.6-1.0 m;
- tread depth - from 17 cm;
- step thickness - at least 2 cm;
- tilt angle - maximum 75°.
The calculation can be done using the online calculator, which is available on our website. After creating the project, they purchase the necessary materials and prepare the tools. An alternative is to buy ready-made staircase elements from the manufacturer for further installation.
To purchase a folding model, just measure:
- Distance between the floor and the attic opening. Manufacturers produce ladders with lengths from 280 to 350 cm. The height can be adjusted during installation (the bottom is filed or cut with a hacksaw), so we recommend choosing structures that are longer than the required size. If the length is not enough, additional segments can be supplied.
- The size of the opening in the ceiling. Look at the product label. For example, “Fakro” on the label indicates the width/length of the attic opening (50-70/80-140 cm) into which the staircase will fit; other companies - the dimensions of the box (in this case the opening should be 2-3 cm larger).
- The thickness of the floor slab where the box will be mounted. If the walls of the box do not completely cover the stove, you will have to install an additional board or finish the open part with other available materials.
If there are rooms at the attic level, it is better to close the entrance with a door; in non-residential premises, install a hatch. To prevent heat loss, the lid must be insulated.
Important details:
- the optimal width of the attic opening is 60-100 cm;
- The recommended lifting angle is a maximum of 75°;
- thickness of steps - 2 cm;
- The maximum length of the attic ladder is 3 m.
When determining the size of the opening, we recommend taking into account the dimensions of the users and the possibility of moving bulky objects into the attic. When walking up the steps, a person should not hit his head on the ceiling.
Metal stairs and models with insulation are best installed in unheated rooms.
If you plan to make the folding structure removable (independent of the ceiling), before installation you need to complete all ceiling work, prepare the opening, for example, reinforce it with a CD profile, or cover it with plasterboard.
Installation of staircase structure in the attic opening
Installation of an attic ladder begins with lifting the box into the attic; it will be installed and secured by a worker located on top. To secure it in the opening, we use two pre-prepared boards, which we attach to the underside of the opening (to the ceiling) so that we can place the box on them.
Having placed the structure in the opening, to maintain right angles, we use spacers in the gap that we provided and left 1-3 cm between the ends of the opening and the outer walls of the box. It is also necessary to level the installed box, focusing on the plane of the ceiling; for this we use mounting wedges.
Having aligned the box with the folded ladder in it, we fasten the ends of the box to the opening with screws on both sides, from above from the attic and from the side of the ceiling of the room (where two boards were attached). For reliable fixation, it is necessary to attach 2 screws to one end.
After we have fixed the box, we remove the two boards attached to the bottom and lay out the attic ladder, but it is still not possible to use it at this stage. Having laid out the structure, the worker secures the sides of the box with screws from above. There are two screws for each side panel. Having secured the box, we begin to fill the distance between the box and the opening with foam.
To tilt the ladder all the way, you need to loosen the bolts in the side elements of the structure. When it is tilted as far as possible, it is necessary to re-tighten them.
When unfolded, the ladder must be straight; to adjust the length, the excess part of the ladder is sawed off, so it is necessary to take the ladder with a reserve in height. We determine the cutting line using a template from the manufacturer's instructions.
When determining the location of the cut, you may encounter a situation where you end up on a step or the cut will not be smooth; this problem can be solved using the height adjuster located on the side corners. We loosen the fixing screws, and it becomes possible to move it slightly up or down.
To adjust the optimal angle of inclination, select the desired position of the hole in the fastenings of the side supports. The final stage of installing an attic ladder with your own hands is the installation of handrails and fencing.
A detailed overview of the installation of a staircase structure by a master.
Thanks to our instructions and step-by-step work, it will not be particularly difficult for you to install an attic ladder yourself, without calling a specialist, which will save your family budget.
Fire hatches
There is also such a variety as fire hatches, the main function of which is to prevent the spread of fire in the event of a fire in the house. Depending on the quality and individual characteristics, a period of time is determined during which such hatches do not allow the flame to spread from the attic to the lower rooms or, conversely, from the residential floors to the roof of the building.
Drawing with dimensions of a fire hatch
The traditional material for such products is high-strength steel, under which there is a special filling made of equipment that can repel fire.
There are also fire hatches that are made of wood material. This is not surprising - such products are treated with special varnishes and antiseptics that have fire-retardant characteristics.
The process of installing a fire hatch will differ from installing a traditional device, since several important points will have to be taken into account:
- The hatch must be installed with the hinges up so that its lid opens strictly into the attic, and not vice versa.
Correct installation of a fire hatch
- The box for such a hatch must be reinforced, have an angular base and be fastened with special hinges. They usually come standard when purchasing a sunroof.
- Taking into account the specifics and purpose of the hatch, during the installation period it is necessary to monitor all gaps - there should be few of them, and if they occur, all gaps must be filled with fireproof material.
How to install a commercial hatch
If you buy a ready-made attic hatch and have a folding ladder, then this is very convenient, since the system:
- compact
- steps made to fit the profile practically do not slip
- the height of the stairs can be adjusted
- You can install it yourself, you only need one assistant.
The purchased structure has specified dimensions, and to make sure that its dimensions match the dimensions of your manhole, you need before purchasing:
- allows you to take measurements of the opening for the crawl space into the attic
- measure the room so that the ladder fits in unfolded
- measure the height of the ceiling.
Purpose of the hatch and its performance characteristics
The roof of any home should be periodically serviced and carefully inspected. This can be done using a convenient hatch to access the roof surface, which is often accessed by a folding or stationary ladder. Any house with any area should have such a hatch; for large buildings this is enshrined in SNiP 21-01-97, but for buildings with an area of less than 100 square meters. meters, and single-story ones, the presence of such hatches is not necessary, but is recommended.
Such a hatch can not only be operational, it is often also fireproof, and sometimes serves as a window to illuminate the attic space. The number of such roof exits is unlimited (but within reasonable limits).
Types of hatches and windows for attic roofs.
So why do you need a hatch on the roof surface? The fact is that it is on the roof that there are elements such as chimney pipes, various lanterns, and ventilation system outlets that require maintenance and periodic repairs. Supervision is also required for roof coverings that may be damaged. It is not always possible to carry out such work from inside the house; convenient and safe access to the roof is often required.
Another important purpose of roof hatches is fire safety - such hatches can serve not only as a safe exit from the house, but also as smoke removal. And for attics, such structures have long turned into comfortable and attractive windows. The number of such windows can be very different, this is dictated only by the external aesthetics of the house.
Estimated cost
There is a huge selection of attic products available these days. Many manufacturers produce a variety of designs that will perfectly complement the interior of the room. In addition, they have a convenient design that will last for a long time.
So, the minimum cost of these products starts from 100 rubles and can reach up to 200 thousand, and some manufacturers offer 300-400 thousand. The most suitable and optimal option can be purchased for 7000-8000 rubles.
Stairs with a hatch for attics are a necessary tool that is designed to access the attic in every private house or cottage. They can be installed in any room; they are mainly installed in attics and other secondary rooms.
In addition, you can choose a staircase that will harmoniously fit into the design of the room. Yes, and you can install them yourself. The main thing is that the entire installation is carried out step by step and according to the instructions.
If difficulties arise, you can use the help of specialists for these purposes.
Types of attic stairs
There are many different design options. The choice of mechanism depends on how often you plan to use it. What's in your attic? Storage space or full room? A recreation area or a children's room? All this will affect the choice of design. The most common option for arranging an attic is still a storage room. Then the ladder must meet these requirements: fold quickly and easily, and be small in size.
And if you often go up to the attic and there is a rest room there, then a stationary option is best suited. But this option is only possible if the space of the room allows. If there are children in the house, then the stairs should be very durable with high, closed railings. And the retractable structure must be reliably insulated. If there is very little space, then a screw one will do, but climbing it is quite difficult. Especially older people. Children should also not use this option. Stationary ones are those that do not fold. There are several design options: attached, marching, screw. An extension ladder is the simplest and at the same time the most inconvenient option. The structure is installed almost straight, which makes movement difficult. And you won’t be able to climb it with your hands full; someone will have to hand everything from below. Marching ones are more convenient and safe. There are various options. But even with all its compactness, it will take up enough space. The screw type is the most compact. In principle, it can fit in any space. The steps of the structure can rest on a bowstring, which simultaneously acts as a fence, or on walls and a central column. Movable models save a lot of space. Such models are retracted into the hatch or recline. In any case, the ladder will have to be taken out, which will quickly become boring if the room is used frequently. There are several options: folding, scissor, folding, retractable, telescopic and sliding type of mechanism. If the ladder is folding, then the hatch will open upward. If it is built-in, the hatch opens downwards. There are stairs without a hatch at all. The opening mechanism works automatically or manually. The first one will cost more.
The folding version is very widespread. The staircase consists of several separate segments, fastened together and, when unfolded, turns into a single straight line. Takes up minimal space and stows under the hatch. There are variants of models with and without railings. The traditional number of segments is 3. If there are fewer of them, then the design takes up a lot of space. And if there are more of them, then it is not durable. The stairs are made of wood, and the fasteners are made of metal.
The scissor type is not yet as popular as the folding type due to the relative novelty of the mechanism. This ladder works on the principle of ordinary scissors.
The folding mechanism is usually used next to a wall, which serves as a support. The ladder moves down or to the side. There is a design option on wheels. You can climb such a ladder only with two free hands. Retractable mechanisms simply slide out, which is their main drawback. They take up a lot of space when removed, simply filling the room.
The telescopic type is the most economical. The staircase elements simply fold into each other and are stowed under the hatch. But when unfolded, the structure is quite flimsy. Sliding structures simply slide one part towards another. Automatic stairs are equipped with an electric drive, so they can be removed either manually or using the remote control. They look very comfortable, but they are quite expensive. The quality of the drive plays an important role. If you buy a low-quality one, the mechanism will constantly jam. So if you have already decided to purchase this option, there is no point in saving. If you use the attic very rarely, then the stairs can generally be made from the outside. But there is no risk that children will get in there when they are at home. This option is most often made of metal, as it will withstand weather conditions.
Manufacturers, models and prices
There is a sufficient selection of models on the market. Among well-established manufacturers, European brands stand out:
- VELTA (Denmark).
- ROTO (Germany).
- FAKRO (Poland).
- Nozycowe (Russia).
Approximate prices in rubles for popular models can be seen in the table.
| model, manufacturer | characteristics | price, rub |
| Optistep OLN FAKRO | 5800 | |
| LWS PLUS FAKRO | 10200 | |
| Nozycowe folding | 12900 | |
| "Comfort" VELTA | 15500 | |
| Roto Cadet 3 ISO-RC ROTO | dimensions beech, pine, maximum load on steps 150 kg, on the entire structure 350 kg, height up to 290 cm | 24500 |
| Roto Cadet 2 ISO-RC ROTO |
When choosing a specific model, you should proceed from the following parameters:
- dimensions of the product (based on the height of the house and the size of the hatch that has been made or is yet to be made);
- maximum load on the steps and on the structure as a whole - if frequent economic use is expected, it is better to take it “with a reserve”;
- How insulated the hatch is can be assessed by the thickness of the insulating material;
- presence/absence of folding railings - if there are elderly people or children in the house, it is better to choose designs with bulkheads.
conclusions
The instructions for installing a hatch with a ladder into the attic are divided into three large components. The first practically does not depend on the selected hatch model and consists of creating a hole in the ceiling (or floor, whoever is looking from where).
The second, and third, installation of the hatch and installation of the ladder, on the contrary, largely depend on the model. Therefore, be careful and familiarize yourself with the installation algorithm and its complexity before purchasing the hatch.
The photo shows the completed design of an option thought out to the smallest detail; its price may seem disproportionate, but the quality is worth it
The video in this article will help you more clearly understand all the nuances of purchasing and installing hatches in the attic.