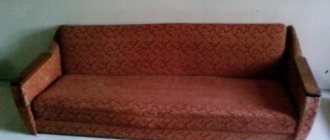
Old pieces of furniture spoil the interior, but instead of being thrown away, they are given new life. To do this, you need to know how to properly restore a cabinet or wardrobe, what radical methods of restoration or painting there are. Reconstruction of furniture helps to unleash creativity, come up with unique ornaments and methods of decoration. But first, they will learn the features of restoration methods.
What you need to decorate a closet - the most affordable and interesting decoration methods
Restoring a cabinet is a truly long and painstaking process. You can carry out all the work yourself; many people have old furniture that adds coziness to the house. Refurbished furniture can last for many more years, and it looks even better.
Restoring furniture with your own hands is a fascinating process that you may even enjoy. You can even find everything you need in your toolbox. You can transform your closet in a variety of available ways, for example, by applying a variety of patterns, using stickers, and so on.
Fabric decor
You can also update an old closet using fabric. This will give the outline softness and volume and allow the furniture to harmoniously combine with the interior. The convenience of this technique is that you can change the selected color at any time without having to re-prepare the surface.
The facade design fabric should be combined with the textiles already in the room.
To update your closet you will need:
- Textile;
- Layer (sintepon or foam);
- Stapler for furniture.
The contrasting patterns on the fabric front of the cabinet are very elegant and also give the interior a “Japanese” atmosphere.
First, the lining is attached over the entire surface of the body using staples (another option is to use liquid nails). The material is stretched over it and symmetrically secured.
How to prepare an old cabinet for decoration
Before you begin restoration, you must carefully inspect the furniture in order to determine the tone of the furniture as accurately as possible. Restoring a cabinet is quite a labor-intensive task. Doing work at home has a lot of positive aspects. First of all, this piece of furniture is quite difficult to transport. Doing the process yourself will allow you to make changes at any stage of the work. Carrying out the work yourself will have a positive impact on the budget.
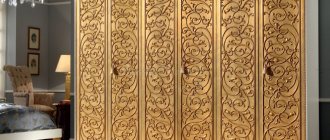
You can make patterns with plaster
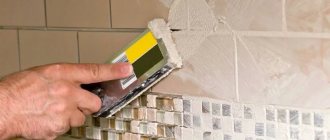
You can apply a three-dimensional ornament. To do this, you need a design stencil, a spatula and special decorative plaster. After repairing minor defects, do the following.
- Secure the stencil to the surface to be decorated with tape.
- Apply plaster to the stencil.
- Remove the stencil and stick it on the next section.
Plasters are excellent for creating decorative coatings. - Dry the plaster thoroughly.
- Cover with acrylic paint in several layers.
- Apply a final coat of varnish.
Decorative plaster today is an excellent alternative for interior decoration.
ON A NOTE! It is better to make a stencil from plastic or PVC. Cardboard quickly wears out, gets wet and loses its shape.
Decorative plaster will appeal to those who appreciate the sophistication of interior solutions.
"Dress" for an old wardrobe
Yes, you can cover the body and doors with cotton fabric with a suitable pattern! You will also need PVA glue, acrylic paints and varnish.
One of the original and affordable ways to decorate a cabinet is to cover it with bright fabric.
After priming, do the following.
- Carefully coat the outer surface of the cabinet with glue.
- Gently apply and roll the pre-made fabric blanks. Avoid bubbles and creases.
- Apply a second layer of glue.
- Dry thoroughly.
- Paint the drawing.
- Make inlay from available items - beads, buttons, multi-colored pieces of glass of the correct shape. You can make edgings from braid along the edges of the door. Glue it all together using Moment glue.
- Coat several times with acrylic varnish.
It is better to cover large elements such as wardrobe doors with fabric.
Painting polished furniture
Painting furniture can really make a big difference in the appearance of a piece of furniture. However, before you begin the dyeing process, you should know some nuances.
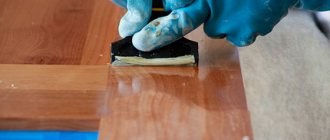
Before you begin the staining process, you need to prepare the cabinet. Initially, all things are taken out of it and the fittings are removed. The surface is cleaned of dirt and degreased. The next step is to remove the old layer of varnish using a special scraper. The surface is then primed and sanded, after which the painting process can begin.
Materials and tools
The first thing you need to start with is choosing a coating, that is, paint. The quality and appearance of the work performed depends on the correctness of this choice. In order to repaint polished furniture, the paint must meet the following parameters:
- Water resistance of the coating
- Resistance to mechanical damage.
Depending on the desired result, you can choose glossy, matte or translucent paint. If the cabinet is quite old, then it is best to give preference to thick paint and apply it with a roller. If you want to repaint the cabinet white, then it is recommended to choose translucent paint.
Painting process
Painting a varnished surface is not difficult. The process does not take much time or financial investment. Painting should begin from the internal shelves and recesses. Various shelves and drawers should be painted separately. If a person is painting furniture for the first time in his life, it is recommended to do it with a roller in order to distribute the paint more evenly.
Once all the internal parts have been painted, you can move on to the outside. Apply the paint slowly and carefully to avoid drips. After the first coat of paint has dried, you can apply the next one. When the cabinet is completely dry, you can assemble the structure.
For your information. In order for the paint layer to lay down evenly and thinly, it is recommended to use a spray bottle, but it can only be used outdoors.
Painting a wooden cabinet made of chipboard
Paint selection
- For processing wood and chipboard, you can use alkyd or acrylic ,
- spray or regular wood paint,
- for deeper coloring - varnishes, but most often preference is given to acrylic paints .
They are non-toxic, dry at room temperature, which in our case and when painting home furniture is very convenient, they are presented in a wide range in stores, they can be colored , i.e. dilute with white paint to achieve the desired color. In addition, there is a choice of acrylic paints with a mother-of-pearl effect or, for example, metallic.
- Varnishes are used mainly to give furniture an antique , but well-groomed, noble and rich look. In this case, the surface is painted several times after each layer has completely dried.
- Varnishes are also necessary to fix the color and protect the surface from scratches and minor damage.
- You will need varnish even if you decide to paint the chest of drawers in an antique or Provence style.
Selecting Brushes and Rollers
After choosing paint, special attention should be paid to brushes and rollers. Why shouldn't you save on painting supplies if you decide to update your chest of drawers yourself?
- With the correct technology for processing the old surface and good painting, the cabinet will retain its appearance for several years .
- If you use bad brushes, you will not protect freshly painted furniture from sticking hairs or lint, which is almost impossible to fix unnoticed.
If you have a task to paint a large smooth surface, then a roller and aerosols will .
- a roller to take the right amount of paint and remove smudges, but if aerosols are used correctly, the surface will ultimately be smoother.
- To paint medium and small cabinet parts, protrusions, bas-reliefs, 2 brushes will be enough - wide and narrow.
ATTENTION: During work, do not leave the brushes dry, it is better to put them in a jar of water, otherwise they will quickly become unusable
Technologies and painting methods
Don't forget about other important painting tools and materials, such as sandpaper or sander, primer, putty, solvent and varnish. All this is necessary to comply with the correct dyeing technology.
Equipment:
- Sandpaper of different grits is needed to pre-grind the old paint layer and sand the surface.
- A primer will be needed to seal small cracks on the surface of wood or chipboard.
- Putty (you can use car putty) and a putty knife will come in handy if there are deep scratches or chips.
- Solvent or white spirit is needed to degrease the surface before painting for better impregnation.
- The varnish performs a protective function and gives the furniture shine.
In general, preparing a cabinet for painting consists of 5 short but very important steps .
- First, carefully remove the old paint and use medium-grain sanding paper (or a machine) to level the working surface.
- All dust must be wiped off, but without using wet rags, sponges , etc. Otherwise, the old paint will only be absorbed better, and the new paint will not adhere well.
- After processing with the finest grains, degrease with white spirit (acetone) and apply a primer layer for better adhesion to the paint.
- If there are large chips, then first fill them with putty and rub them until smooth. Afterwards we apply one or two layers of primer.
When you know all the stages of preparation, it’s time to move on to the main stage and figure out how to paint a wooden chest of drawers and chipboard.
Aging furniture
This method of furniture design has been especially popular over the past few years. In this case, to complete the interior idea, you may need to age the cabinet. You can do this yourself, armed with water-based paints, varnish, sandpaper, brushes and acrylic paints. Aging gives furniture a sophisticated look. With a little practice, you can create an intricate pattern on the cabinet.
Mirror decoration
An elegant solution is to install mirrors on the fronts of an old cabinet.
Mirrors will add volume to the room and brighten the space, making it more attractive.
For such a transformation you will need mirrors and fixtures. Having carefully measured the facade, you can order canvases from a specialized workshop.
A mirror on the closet door will immediately transform the room and update the interior.
It is worth considering that the use of liquid nails implies a horizontal position of the surface. Therefore, you will have to either disassemble the cabinet body or use conventional hinged fasteners.
There is no need to cover the entire surface or apply thick stripes too close to the edge.
Old furniture that has served for a long time does not necessarily need to be replaced. With some imagination and a little effort, you can give it a new look with your own hands and increase its service life by several years.
We hope that our ideas and advice will be useful to you.
Photo printing and photo wallpaper
You can completely transform your closet using photographs or wallpaper. In the case of photographs, they must be prepared in advance by printing them in a printing house. Using photo wallpaper is a budget option. For gluing, starch-based glue is used to make it easier to replace the picture in the future.
Wallpaper can also be glued to furniture
It is better to use vinyl wallpaper and special glue. Having previously carried out an inspection and restoration, we do the following.
- During restoration, leave unpainted areas on which you will paste wallpaper.
Treat them with acetone or gasoline. Apply primer. - Make accurate drawings of the areas on the wallpaper and cut them out.
- Carefully coat the cut piece of wallpaper with glue and carefully apply it to the surface.
- Smooth with a special roller or dry, clean cloth.
Avoid peeling and blistering.
ON A NOTE! If there are no convex or decorative elements on the outer surface of the old cabinet, then you can completely cover it with wallpaper.
Decoupage
Another interesting option for transforming furniture. For implementation, you should prepare napkins and acrylic paints. You will also need PVA glue, as well as several convenient brushes. The method looks quite beautiful and you can change the style at any appropriate time.
Classical
This method involves gluing a specific picture or coating the surface with varnish. However, before starting the actual process, the cabinet requires preparation. The preparation stages are no different from preparation for coloring.
Reverse decoupage
This method is perfect for transforming transparent furniture. In this case, reverse decoupage is suitable for glass doors. The drawing is applied on the reverse side.
Decopatch
To implement this method, you need to spend a lot of time. However, the result of such manipulations is truly wonderful. Using various elements, entire compositions are assembled.
Restoration methods
Restoring a wardrobe is not a difficult task; not only an experienced craftsman, but also a beginner can handle the job. The main thing is to choose a simple technique, be patient and follow the recommendations. Ideas for inspiration can be found on thematic resources. A master class studied in advance will help you perform all the steps correctly.
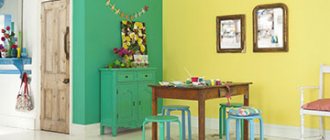
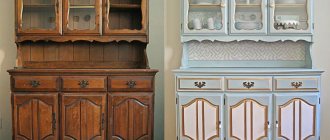
Coloring
Painting is the most popular DIY way to restore an old wardrobe. It is available to everyone, you don’t need to show imagination or perform complex actions - you just need to choose a new color scheme. And in order for the coating to last a long time, it is worth following the correct painting sequence:
- First, all surfaces are prepared. To do this, the cabinet is disassembled, the parts are puttied, polished and primed. If it is impossible to remove some elements or you want to preserve their color, you need to seal them with tape.
- The selected paint, preferably acrylic, is poured into a container and begins to paint. You can work with a roller. Movements must be made crosswise so that the paint lies evenly. If you are using a brush, it is recommended to sweep it from top to bottom. The easiest and most reliable way is to use a spray gun.
- It is necessary to apply the paint in several layers, each time waiting for the coating to dry completely. Then you can paint over all the blanks and get a uniformly bright color. This is especially important for surfaces that absorb the composition. It is recommended to start painting with the internal parts: shelves, mezzanines. Having finished processing them, you can move on to the facade, moving from top to bottom.
- The last step should be painting. It not only gives the surface shine, but also protects it from abrasion. If you don't want the furniture to shine, you can use matte varnish.
If several colors of paint are involved, they must be applied sequentially, waiting for the previous tone to dry. You can also use stencils or masking tape to draw patterns.
Prepare surfaces, filler and raw parts
Apply paint in several layers
Cover the cabinet with furniture paint, which will add shine to the surface and protect it from abrasion.
Decoupage
You can restore a chipboard cabinet with your own hands using decoupage. This method is popular when decorating many interior items. The selection of napkins with different designs in every art supply store is always impressive. Usually drawers, small external parts, and mezzanines are decorated in this way. After choosing the texture and location of the lining, you need to follow the step-by-step instructions:
- Prepare the surface by sanding and priming. Then apply paint on it, which will serve as a background. It is better to use light shades.
- Glue napkins for decoupage. You can use a trick to position them correctly and maintain the pattern. You will need to place the napkins face down on a regular clear file, spray them with water from a spray bottle, and smooth the surface with your fingers, pushing out any bubbles. After this, the workpiece is applied to the cabinet in the right place and the file is carefully removed.
- Cover the top of the paper with special glue using a soft synthetic brush.
- When the glue has dried, seal the surface with two coats of clear varnish.
Restoring a piece of furniture using the decoupage method is suitable for decorating a room in a vintage, country or Provençal style.
Prepare the surface of the furniture by sanding down any uneven surfaces and applying a coat of primer.
Apply paint to the wooden surface, preferably a light shade
Glue napkins for decoupage and cover the top of the paper with special glue
When the glue has dried, secure the structure with two layers of clear varnish.
Craquelure
Restoring an old-fashioned wardrobe can make it feel more than modern. In some interior styles, antique designer furniture will look more appropriate. For artificial aging, a method known as craquelure is suitable. This is the use of special paint, which after drying becomes covered with cracks, creating the effect of an old coating. The visibility of antiquity is achieved thanks to the special composition of the product.
How to compactly fold things in a closet, useful tips
The sequence of actions is practically no different from the staining method:
- Remove the old coating, seal all cracks and prime the surface of the furniture with a primer.
- Apply dark paint with a brush, it is necessary for the formation of cracks.
- After drying, apply craquelure. It is recommended to do this in several layers, so the cracks will be more pronounced.
- When the craquelure is dry, coat it with a light or clear varnish. This will consolidate the effect, the characteristic mesh will become visible, creating the appearance of an old coating.
Craquelure cannot be applied to the entire surface of the cabinet; “cracks” can only be created along the edges of the cabinet, on one side or around the design.
If you're regretting throwing out an old cabinet that's still strong, you can simply refurbish it. Restored furniture will refresh the interior, adding new notes and originality.
Remove old coating and fill all cracks
Apply the dark paint needed to create cracks
After the paint has dried, apply craquelure
Finally, seal the coating with clear or transparent varnish.
Photo wallpaper or photo printing
Another original way to remodel your wardrobe is with wallpaper or photo printing. The image selected in the photo shop will be enlarged and printed at the desired size. Or you can buy the wallpaper you like. Then it's a minor matter. The technology for gluing a photo print on a closet is no different from ordinary wallpapering. For greater reliability, you can paint the surface.
A sliding wardrobe or just an old wardrobe is greatly updated with photographs or photo wallpaper.
Stained glass film
Using stained glass film for furniture restoration has many advantages: it is durable, attractive, has a wide variety of colors, is easy to care for and protects the method from mechanical damage. This way it is easy to repair furniture, spending a minimum of time and money. You will need film and sharp scissors.
It’s very easy to remove the film, and this decorative technique looks very impressive, because the imitation is as close as possible to real stained glass.
To avoid difficulties, you need to use the following algorithm of actions:
- measure the dimensions of the furniture;
- cut the film into pieces of the required size;
- before gluing, free the edge of the material by 10-15 cm from the protective coating;
- stick the edge with the adhesive side to the body and carefully smooth out the remaining film.
This will add presentability to old furniture. In addition to its decorative function, the film protects the glass from impacts and scratches.
Remember! It is important to have a clean, smooth and spotless surface. All imperfections will become visible under the film.
Restoring an old lacquered cabinet using fabric
An original method of decorating old cabinets with fabric. To do this you will need:
- textile;
- furniture stapler;
- foam rubber or synthetic winterizer.
An unusual idea to update cabinet-type furniture with fabric.
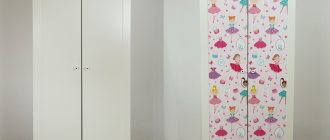
The fabric is fixed with a stapler from the reverse side of the surface. Make sure you add a thin layer of padding underneath the fabric. Preference should be given to dense fabrics that do not deform when stretched. An excellent solution for a nursery would be a pattern made from pieces of fabric using the patchwork technique.
The fabric is stretched over the surface of the body and fixed with staples or liquid nails.
Replacement of accessories
Old, shabby and untidy accessories reveal the true age of the furniture and make it look unattractive. Well-chosen fittings will highlight all the advantages of the new design.
Discreet and laconic details fit modern minimalism. Provençal style requires antique carved handles. Classics love curves and carvings. Replacing accessories is easy. To do this, you only need a screwdriver. Don't forget the old loose hinges, these should also be replaced.
Every designer knows that 40% of the success of any interior is details and accessories.
Decor using glass
Many people wonder how to turn an old wardrobe into a modern one. The most elegant way would be to decorate the closet with mirrors. To do this, you need to carefully measure the dimensions and order mirrors from a specialized workshop. The mirror surface is attached with liquid nails to a horizontal surface. To do this, you need to remove the cabinet doors.
Decorating old furniture with mirrors is very popular.
This solution will ideally hide all the imperfections of the furniture, and also visually expand the space.
Now, knowing what you can do with your own hands from an old wardrobe, you can give it a new life, you can surprise everyone with unique design solutions. At the same time, it requires the least investment of money and time.
Give free rein to your imagination and everything will definitely work out.
Sources
- https://mebel-sovet.ru/shkafy/vse-varianty/574-kak-otrestavrirovat-stariy
- https://GidPoKraske.ru/okrashivanie/derevo-i-mebel/kak-obnovit-staryj-shkaf.html
- https://m-strana.ru/design/dekor-shkafa/
- https://svoimi-rukami2.ru/ukrasaem-staryj-skaf/
- https://handskill.ru/439426a-kak-iz-starogo-shkafa-sdelat-shkaf-kupe-proekt-poshagovaya-instruktsiya-opisanie-s-foto-i-rekomendatsii
- https://kallibry.ru/kak-pokrasit-i-obnovit-staryj-shkaf/
- https://severdv.ru/mebel/shkafy-i-shkafy-kupe/chem-i-kak-obnovit-staryj-shkaf-sposoby/
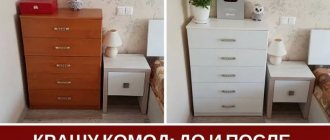
- https://made-box.ru/samostoyatelno/kak-obnovit-staryj-shkaf-svoimi-rukami-foto-do-i-posle.html
- https://berkem.ru/shkafy/kak-obnovit-staryj-shkaf/
- https://nikastroy.ru/kak-obnovit-staryj-skaf-39-foto-kak-otrestavrirovat-skaf-i-ukrasit-ego-svoimi-rukami-restavracia-i-dekor/
- https://nedvigdom.ru/kak-otrestavrirovat-staryy-shkaf/
- https://setafi.com/mebel/shkaf/kak-obnovit-staryj-shkaf/