Criteria for choosing grout for tiles
Grout for tile joints is a special material designed for filling tile joints at the final stage after laying ceramic tiles. The material performs several functions: it serves as a decorative element, protects the base from moisture, protects joints from contamination, and also prevents the occurrence of mold and mildew. When choosing a grout mixture, professionals are guided by the following criteria:
- uniformity;
- elasticity;
- type;
- color;
- price;
- manufacturer.
A high-quality composition must be uniform and elastic so that no lumps form in the space between the tiles at the time of its application. By type of grout there are cement, cement-sand, epoxy, silicone, and also polymer. More information about the types of grout mixtures is described in the next section.
The color of the material is selected based on the preferences of the home owner. For example, for light tiles it is better to choose white, sand, or beige grout. If the tiles are dark, you can play on contrasts and also choose a light material. Colored tiles require monochromatic combinations: if the tile is purple, then the grout can be pink or a tone lighter than the color of the tile itself.
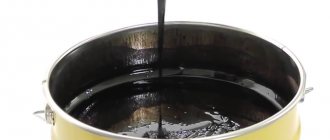
Fugue is used for tiles and mosaics Source lo.insterne.com
Popular brands among manufacturers include Ceresit, Litokol, Mapei, Sopro. These manufacturers have a wide range and good pricing policy. On average, the cost of grouting starts from 300 rubles for cement mixtures to 3000 rubles for polymer compositions.
How to seal the seams between bathroom tiles?
Today there are many brands known on the world market that produce mixtures for sealing joints between tiles or porcelain tiles, and each guarantees high quality, durability and impeccable appearance.
You should buy those materials that are known, at least in your region. You can always read reviews. The following brands are popular: Ceresit, Mapei, Litokol, Schtern. All these brands are known, so it is difficult to judge from the description. You should rather rely on the guide and choose the right type from the suggested guide.
Will you buy ready-made grout or make it yourself?
Ready I'll do it myself
Types of grout mixtures
There are several types of grout for joints:
- Cement . This composition is based on cement; additives and color pigments are also used. To use this composition, it is mixed with water to the consistency of thick sour cream. Dry grouting is much more economical, since tilers use the required amount of cement at a time. Sand is added to the composition for wide joints, which, due to its dispersion, fills the joints. The material is easy to use, low cost, durable, but not resistant to mold.
- Epoxy . Such mixtures consist of two components - a hardener and an epoxy resin. The finished mixture looks like a dense elastic mass. This grout is not very popular, but it is resistant to moisture, hardens quickly, is durable and can remain attractive for ten years.
- Polymer . This includes silicone and silicate compounds. Special polymer additives are added to such grouts; the putty is easily washed off and creates a dirt-repellent surface.
Examples of epoxy grout mixture Source ohiogas.info
Cement grout is considered the most popular; epoxy mixtures are less commonly used. Tilers often choose dry compounds, as they have lower consumption and are economical.
Features of tiles must be taken into account
The selection of grout should take into account not only the operating conditions and color of the tile, but also the material from which it is made and its texture.
Glass tiles or mosaics are best revealed when framed by an epoxy fugue. Shiny resin looks organically with glass, as if it becomes its continuation. In addition, as already mentioned, this grout can be used as mosaic glue.
Mosaic with epoxy joints.
If the tile is glossy or patterned, the best grout for it is one that will not damage the surface. Compositions with coarse fractions are not suitable here. Fugues based on finely ground cement, compounds containing latex, and polyurethane mastics are suitable.
Porous or rough ceramics - cement grout. Liquid mastics will be absorbed into the material, the consumption will exceed expectations. Removing residue will also be a challenge. It is better to choose a shade that matches the tone, then the appearance will not suffer from the penetration of pigment into the pores.
What the modern market offers: popular brands and formulations
The market for grout mixtures offers options from foreign and domestic manufacturers. The most popular brands with brief characteristics:
- Ceresit - this kind of fugue has long been a success among tilers, because the company produces easy-to-use cement grouts. Just add water and achieve the desired consistency - the material is ready for use. Latex and epoxy compounds are sold separately. Bulk mixtures are sold in packages of 2 and 5 kg, suitable for joints up to 10 mm. The finished compositions are packaged in buckets of 2 and 5 kg.
- Mapei . An Italian company offering cement and epoxy mixtures. Suitable for 2-5 mm seams, available in 2 and 5 kg packs.
- Litokol . A company from Italy also produces cement and epoxy grouts for joints. Cement compositions require preliminary dilution with water; they are suitable for grouting joints of 1-6 mm. The epoxy base allows the composition to be used for joints of 1-15 mm.
- Kerakoll . The company produces dry and liquid mixtures that are immediately ready for use. Epoxy grouts are suitable for tiles in the bathroom and where there is high humidity. The mineral composition is suitable for seams up to 8 mm in size.
- KIILTO . Manufacturer from Finland, cement mixtures are suitable for narrow joints; they tolerate moisture and air well. Such compositions are packaged in packs of 1.3, 10 and 20 kg.
Manufacturers of grout mixtures Source remontidei.ru
Each manufacturer offers tilers different types of mixtures. Cement-based compounds are more suitable for narrow joints, while ready-made epoxy or latex compounds can be used on larger tile joints.
See also: Contacts of companies that specialize in insulation and finishing of houses.
Recommendations for selection
The information above is enough to choose the right material for jointing gaps in tile cladding.
- For dry areas of the wall (kitchen splashback, bathroom, glazed balcony), a regular powdered cement mixture is sufficient.
- Rooms with damp conditions, where tiles are constantly in contact with water or steam, are recommended to be jointed with polyurethane or latex compounds. Epoxy will also work.
- Expansion joints and troubled surfaces are sealed with latex, polyurethane or furan fugue.
- For heated floors, it is advisable to use a polyurethane or latex mixture - a cement fugue is too hard and may crack.
- Depending on the width of the seam, the following are purchased:
- for gaps up to 3 mm wide - plastic compositions without mineral fillers (sand);
- gaps of 4-6 mm - any mixtures filled with sand of the finest fraction;
- wide paths from 10 to 20 mm will require a cement fugue with the addition of plasticizers and coarse quartz sand.
- Tile with a glossy surface is afraid of compositions with sand. Here you need a latex or polyurethane mixture. You can also use finely ground cement without mineral filler.
- Mosaic and glass tiles are best jointed with epoxy.
- For tiles with a textured surface, it is advisable to buy cement-sand grout. Ready-made mixtures lead to excessive consumption of material - a lot of it remains on the surface of the cladding.
Everything is clear here. The biggest problems arise when you need to decide how to choose a tile grout based on color.
What grout color to choose
The simplest solution in this situation is to recommend that consumers buy fugu according to their taste. But there are several design rules that will help you navigate among multi-color mixtures.
- A light (gray or beige) shade unifies the pattern on the tiles, simultaneously visually increasing the size of the room.
- It is better to grout floor tiles with darker mixtures - dirt is less visible.
- Dark-colored joints highlight the color and texture of the tile well.
- Walls with plain tiles look good with a fugue 1-2 colors lighter or darker than the tiles.
- Patchwork tiles are best grouted with transparent compounds.
- Multicolor panels will receive even greater expressiveness from the “chameleon” mixture.
- The contrasting shade of the seam will highlight the color scheme of the cladding.
A special program located here will help you choose the color of grout to match the tiles.
Features of performing work in stages
Each master knows in his own way how to grout seams on tiles, since different tilers have their own work habits. Despite this, there is a certain algorithm for performing the procedure, which is followed by every specialist. First, a solution is prepared, then the surface is prepared, and the mixture is applied. At the final stage, cleaning work is carried out.
Preparation of the solution
The proportions of cement mixture and water are selected based on the required amount of grout per application. In order for the composition to acquire the desired consistency, water is poured into a container with cement prepared in advance. Then, using a small spatula or spatula, gently mix the resulting mixture until it reaches the consistency of sour cream. The finished composition should be elastic and easily applied into the space between the tiles. Tilers strictly adhere to the proportions indicated on the pack of grout.
This is how the fugue solution is mixed Source leonardo-stone.ru
If you pour more water, there is a risk of getting a mixture that is unsuitable for work. Such a composition will not have strength characteristics, and the grouting of the tiles will be done in violation of the technology. After the solution is prepared, it is left for 10-15 minutes to achieve the desired consistency, after which the tiler uses it for its intended purpose.
Preparation of the seam surface
Before grouting seams on tiles on a wall or floor, craftsmen must carry out preparatory work. For better adhesion, the entire surface of the space between the tiles is cleaned of excess debris, dirt, as well as tile adhesive residues. A paper knife or sharp spatula works well for this. It is carefully placed in the seam and the internal space is cleaned with up and down movements. Tilers do this with caution, as the metal tip can scratch the tile.
Stripping is a mandatory step before grouting. Source plitkahelp.com
Using a grout bag
If you are working on a surface that is particularly difficult to clean after grouting, such as antique brick veneer, use a grout bag to fill the grout. This bag looks and acts just like a piping bag for decorating cakes. A metal tip approximately the same width as the grout joint is attached to the end of the bag. The bag is filled with grout, and then it is squeezed out with force through the tip into the seam.
When working with a grout bag, place the tip of the bag at the top of the joint and slide it forward along the edge of the joint as you fill it. For best results, grout the entire length of the grout rather than around individual tiles. Usually, all horizontal seams (along the x-axis) are filled first, and then the vertical ones (along the y-axis).
You should squeeze out a little more grout than seems necessary. After it has set slightly, tamp the grout into the joint using a jointer or a piece of smooth metal tube, the diameter of which is larger than the width of the joints being filled. Then let the grout pressed into the joint set for half an hour, after which remove the excess with a stiff brush.
Video description
The process is described in more detail in the video:
Tilers make sure that the grout mixture does not protrude beyond the plane of the tile, otherwise it will be difficult to wipe it off later. Ideally, the grout should be slightly pressed into the space between the tiles. Then the master runs a spatula along the seam, removing excess. The tiles embroidered with grout should stand for 24 hours, then you can begin cleaning work.
Finish stage
Some tilers immediately wipe the tiles, others wait until the grout is completely dry. To do this, take a damp cloth and carefully wipe each tile, without touching the space with seams. A white coating may form on the surface of the tile after applying the grout mixture - this must be removed. To do this, use a damp sponge or cloth. Difficulties arise when the tile has a porous surface and the grout mixture eats into the tile relief itself - then it becomes difficult to wipe off the grout.
The last stage of grouting
At the end of the grouting, the facing material is cleaned. It can be made wet or dry. Wet is carried out half an hour after filling the recesses.
- To do this, wipe the work surface with a damp sponge.
- This method is advantageous because it allows you to identify irregularities and other shortcomings and correct them in a timely manner.
- Polishing with a rag and treating the space with antifungal material are the final stages of cleaning the facing material using a wet method.
Dry cleaning is a simple but labor-intensive process. Cleaning is carried out using a grater with a rubber nozzle.
If the area is large, the craftsmen use a toothbrush. At this stage, it is important that large hardened particles do not get into the fresh seam.
How to grout joints on the floor
Porcelain stoneware is used as floor tiles for the home - it is easy to lay, has large dimensions, and is also durable and reliable. Every master knows how to grout seams on floor tiles, since the principle of filling voids is identical to the standard work scheme. The difference is that floor tiles are subject to higher wear resistance requirements.
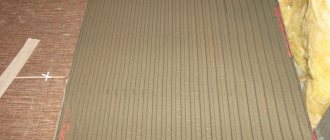
The tiler rubs the mixture over the entire surface Source otvali.ru
Two-component epoxy-cement joints
To process tile joints in industrial premises, hospitals, swimming pools, laboratories, grout is used, which contains epoxy resins along with cement and mineral fillers.
The use of a two-component epoxy-cement joint results in joints that are particularly resistant to a number of different chemicals.
A good example of this type of tile grout is the mixtures of Fuga Epoxi 710 and Ceresit CE44.
Features of grouting joints on the wall
Fuging the seams gives the tiles a finished appearance. Before grouting the tiles on the floor, craftsmen must treat the walls. The technology for grouting wall tiles is no different from the standard procedure for filling tile joints, but there are several nuances. First, the master must decide on the width of the tile joint. If the tiles have an irregular shape, then tilers choose a width of no more than 10-12 mm. At the same time, you should not make the distance between the tiles too narrow - then difficulties arise when applying the fugue.
A miniature rubber spatula is used for work. Source stroylab.su
After laying the tiles, craftsmen prepare its surface for grouting. To begin with, the space between the tiles is cleaned. This is done with a sharp spatula or screwdriver. In this case, the tile adhesive must dry, so preparation takes place the next day after laying the tiles. When the adhesive is removed, craftsmen use a construction vacuum cleaner to remove any residue in the space between the tiles. The less dust there is between the tiles, the better the grout will adhere.
Cleaned seams are wiped with a damp cloth or sponge - this increases the adhesion of the grout and prevents the material from absorbing all the moisture. Then the master mixes the solution or uses a ready-made fugue using a small rubber spatula. The grout is prepared in a small container; after using a portion, the container must be thoroughly rinsed to remove fugue residue. Grout is applied using standard technology.
When the material has dried, the tilers begin to clean the tiles from the white residue left by the fugue. To do this, use a moistened sponge in plain water and remove the remaining grout from the surface of the tile.
The nuances of working with floor tiles
The tile joints on the floor are filled in exactly the same way as on the walls, but there are several nuances that make the work easier. For example, there is a method that allows you to quickly treat a floor with smooth tiles. Instead of a regular sponge, take a hand-held construction float with a rubber pad and fill the seams at arm's length with wide, sweeping movements. The solution will spread evenly and fill the voids tightly if you make it more liquid.
The grater can also be effectively used for the next step - removing grout residues by attaching a porous foam sponge instead of a rubber pad.
This method is not suitable if the texture of the tile is embossed, has protrusions or scars. The grout will fill the depressions in the ceramic, which is an additional labor-intensive cleaning job.
After treating the ceramic cladding, do not forget to fill the seams around sockets, pipes, plumbing fixtures and heated towel rail mounts with mortar.
How to update grout for tiles at seams
Over time, the grout on the seams requires updating, as cracks and plaque may form on its surface. Dirt, grease, dust appear at the joints, and the tile seam may darken and begin to crumble.
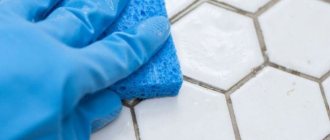
Chemicals are used for renewal Source ignter.club
Often, fungus or mold appears in the space between the tiles - this is due to a violation of the grout application technology or the use of low-quality grout. To update the seams between tiles, craftsmen use the following means:
- gels for cleaning seams;
- household chemicals in powder form;
- sprays for updating and cleaning seams.
Chemicals are applied to the surface of the seams, left for a certain amount of time, then the composition is washed off with water. For better penetration, use a soft brush - the gel or spray is gently rubbed into the space between the tiles to refresh the condition of the grout.
Epoxy joint fillers
Fugues made on the basis of epoxy resin with the addition of a hardener are considered the most resistant to any influences - chemical or mechanical.
Epoxy joint filler can maintain its color and quality for half a century of use. At the same time, the finishing material is an environmentally safe product.
The rather high cost is one of the disadvantages of this type of grout. To work with this type of grout, the skill and experience inherent in professionals is required, since the mixture is very viscous.
To grout tile joints in floor cladding, choose Italian grout Kerapoxy Mapei or the German equivalent Ceresit CE48, and for walls, other representatives of the collections of these brands - Ceresit CE47 and Mapei Kerapoxy Design - are more suitable.
Mapei's water-repellent grout color palette is represented by 36 shades, from which you can choose a grout mixture from light gray to bright blue
The process of removing grout from tile joints
If you want to update the fugue between the tile seams, sometimes you resort to radical measures. When the grout on the joints is in poor condition, it must be completely removed to refill the joints. While it is easy to remove just used grout during the grouting process, it is difficult to do so when it hardens. The following methods are used to remove grout from joints:
- chemical reagents - made on the basis of acids, applied to the seams carefully so as not to touch the tiles;
- mechanical method - tilers can use a construction knife, screwdrivers, or a small chisel.
A sharp knife perfectly removes frozen mixture Source acost.ru
If the grout has been in the joints for a long time, then tilers use an electric drill with a thin drill, a jigsaw or a screwdriver.
Start of wet cleaning
All you need is a bucket of clean water and a sponge (it is better to use a sponge with rounded edges, this will prevent grooves from forming in the grout joints).
First, use a sponge to quickly remove most of the excess grout. Begin cleaning the grout from the surface of the tiles using a gentle, circular wiping motion to remove sand and cement particles.
Be careful not to create grooves in the grout joints. Rinse the sponge as soon as the pores of the sponge are filled with particles of cement and sand, and then wring it out well. If not too much time has passed before you start cleaning, you can remove excess grout from the surface of the tiles in two or three passes.
Clean only a small area at a time (1-2 square meters in size), wetting the sponge frequently to wash away any grout particles that have penetrated the pores of the tiles. When you rinse the sponge, always try to rinse as well as possible and squeeze as hard as possible to ensure that any grout particles that were in the pores of the tile are washed away. Be sure to shake off excess water from your hands.
If the cladding is no larger than 9 square meters. meters, there is no need to change the rinsing water in the bucket. You can judge by the purity of the water how well the tiles have been washed (of course, some commercial projects require constant water changes).
At the second stage, you need to inspect the grout joints to see if they are all neat. Level and smooth the seams using a jointer, a wooden stick with a sharpened end, or the end of a toothbrush. Then smooth the edges of the seams with a sponge. Move the sponge parallel to the seam, carefully removing any ridges and filling any gaps with a small amount of grout using your fingertip (wear tight rubber gloves to do this).
The actual joint size depends on the type of tile used and the industrial or artisanal finish of the top edge of the tile. If the edges of the tile are sharp and straight, the grout in the joints should be flat, flush with the top edge of the tile. If the top edge of the tile is rounded, the tiler must decide how high the joint should be.
Whatever height is chosen, ideally the seam should be smooth on top, not convex, although most of the seams then become slightly concave, which is quite acceptable. It is very important to give all seams the same shape and depth.
At the end, a final thorough cleaning of the surface of the tiles from grout residues is done. As soon as the seams in the cladding are leveled, the surface of the tiles should be thoroughly cleaned again. First, rinse and wring out the sponge well. Then make a straight, vertical pass about a meter long with one side of the sponge, moving it slowly towards you - slower than seems necessary - and without stopping (if you move the sponge quickly or intermittently, you will leave grout streaks on the surface of the tiles).
After the first pass, turn the sponge over to the clean side and make a similar pass parallel to the first, then stop and rinse the sponge. For one pass, use the freshly washed side of the sponge. Continue this process until the entire area of the cladding is completely cleaned, trying to act carefully so that again the sponge does not pull the grout out of the joints.
If this happens, it may mean that there is too much grout in the seams and the seams need to be trimmed, or there is too much water in the sponge. After such cleaning, all grout residues must be removed from the surface of the tiles, and the joints must be allowed to dry for 15 minutes.
During this pause, the moisture remaining on the tiles after cleaning evaporates and the cement particles that were in the water are deposited on the surface of the tiles. If the tiles are covered with a shiny glaze, and the corners are smooth and straight, then grout deposits can be easily removed by immediately wiping the surface with gauze or a soft, clean cloth. If the tiles have a matte surface or rounded corners, you may need another, additional pass with fresh water and a sponge.
If the grout residue is still difficult to clean, you may not have cleaned the surface well enough the first time. If there is glue left on the surface of the tile, the latex or acrylic additives contained in it may be the reason why the grout has set more than usual.
However, whatever the reason, the longer the plaque remains on the tiles, the more difficult it is to remove. If you were unable to remove the residue using a damp abrasive float, you can try using a special solution to remove plaque, or, as a last resort, resort to acid cleaners.
If you decide to use special cleaners or acids, keep in mind that the grout needs to fully set before you use them. However, don't wait for the grout to fully set until the final cleaning step is completed - removing any traces of grout from the expansion joints.
Briefly about the main thing
Tile grout is used as a decorative and protective coating for tile joints. It prevents moisture accumulation and the appearance of mold and mildew. When choosing grout, pay attention to its elasticity, color and type: compositions can be cement, epoxy, polymer, latex. The stages of applying grout involve preparing the seams, preparing the mortar and filling the space between the tiles. Over time, the grout requires updating.
Ratings 0
What to pay attention to
In order to make the right choice in the store and not make a mistake, you need to adhere to the basic rules when purchasing:
- Store samples are usually slightly lighter than the actual grout color;
- It is better to take tiles with you so as not to make a mistake in choosing;
- If you choose a light shade for the tiles, you will get a merging effect. And if it’s dark, then a geometric pattern;
- If you cannot purchase a suitable color, then take a universal white shade;
- Make it a rule to combine 3 colors - there should be no more than 3 in the room.
- At the same time, they often choose a shade specifically for the interior or furniture, and not for the tile itself.
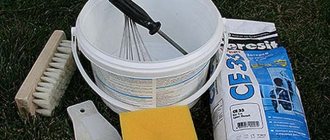
Tools and materials
The grout itself should be prepared. If the grouting material is dry, to prepare it you will need a construction mixer or a drill with an attachment, containers, water and dye.
- To apply the solution into the seams, a rubber spatula is needed, and a grout float is needed to form the seams.
- To prepare the seam you will need a paint brush and a utility knife. A few thick sponges will also come in handy. Work should be performed with gloves.
Selecting grout color
When choosing any grout, you need to rely on appearance. This is especially true for color. Cement grout consists of pigments that color the mixture in any color. But this does not always help you choose a color that would perfectly match the tiles. In such a situation, it is better to use coloring agents. To get a unique color, you need to mix white grout with color. The epoxy mixture can be transparent, which is highly appreciated when laying glass mosaics. If you seal the seams between the tiles with a fugue in bronze, chrome, gold, silver, you will get a bright effect. If you are thinking about how to choose the right fugue for tiles, it is better to choose what you like. If you are still in doubt, then choose the white mixture, as this option is considered a win-win. But it is only suitable for walls, since the seams on the floor will become dirty after just a few days. To make floor cladding, use a fugue of gray or dark color that would harmoniously match the color of the tile.
Method number 2. Painting seams
Painting the joints between the tiles is a more reliable way to update the surfaces in the bathroom (they will remain clean and fresh for about six months). The seams can be treated with ordinary lime, water-based paint, or you can choose a special composition in the store that is intended for these purposes.
Painting seams is not considered the most durable option; the effect of the result lasts for a maximum of six months
How to choose paint for seams?
To update the grout, you can choose a color similar to the shade of the old grout, or experiment with the palette. Light paint hides imperfections in the tiles and harmonizes with any shade of tile, while dark paint gives the room an original look. Some of the most well-known manufacturers that produce coloring compounds for seams include Edding 8200, Pufas Frische Fuge, Fuga Fresca.
- Edding A coloring composition designed to “refresh” the appearance of joints between tiles. For convenient use, it comes in the form of a marker; it can be black, white or gray.
Industrial marker Edding 8200, 2-4 mm, round tip, white (for tile joints)
Attention: when choosing a marker for painting seams, you should pay attention to the thickness of the line - if it is wider than the seams themselves, it will be inconvenient to work with the marker.
- Pufas Frische Fuge Komplettset. Inexpensive paint, which has one significant drawback - low durability. Usually has a white tint, but the addition of a tinting compound is allowed.
Pufas Frische Fuge Komplettset
- Fuga Fresca. A composition based on acrylic polymers that adheres well and fills the seams evenly. A wide range of colors allows you to choose any shade to suit your taste.
Mapei Fuga Fresca
Application of the product
It should be noted that when applying paint to a surface, the color may differ significantly from that declared by the manufacturer - especially if the shade of the new composition is much lighter than the shade of the old grout.
When choosing a paint composition, you should carefully read the instructions on the packaging - most products are not used for epoxy joints, as well as those filled with silicone or polyurethane sealants.
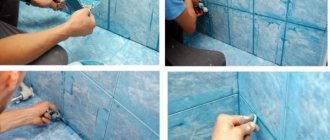
Step-by-step instructions for applying paint to seams
In order for the paint to lie evenly on the surface, and the result of the work to please the eye for a long time, you need to follow a few simple rules.
Step 1. Clean the surface between the tiles well (you can use the methods described above). If the dirt is strongly ingrained, you should use a mechanical cleaning method, and if there is mold and mildew, additionally treat them with an antiseptic.
Step 2. Wait for it to dry completely (paint cannot be applied to a wet surface, as the result will be unsatisfactory).
Step 3. The paint is applied with a thin brush, as carefully as possible, and special attention should be paid to vertical seams where the composition can flow down.
Applying paint
Any paint that gets on the tiles must be wiped off immediately, without waiting for it to dry, with a soft cloth, since it will be impossible to remove it later.
Wipe off excess paint with a rag
Step 4. Wait 24 hours until the composition is completely dry, then evaluate the result and, if necessary, apply another or more layers of paint.
After painting the seams, it is advisable to protect them with a special sealant compound, which will extend the service life of the composition.