After laying the tiles, you want to quickly evaluate the result of the work. But first you need to bring it to its logical conclusion. You also need to grout the seams on the tiles correctly. The process won't take much time if you approach it wisely. And the result will certainly please you: perfect seams will highlight the beauty of the walls (floor), and will not leave a chance for fungus.
Types of grout for tiles
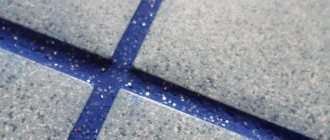
To obtain a finished, aesthetic coating, you should carefully seal the seams between the tiles. To do this, use a special grout that prevents moisture and dust from getting under the facing coatings, prevents the development of fungus and strengthens the masonry.
Today the following types of grout mixtures are considered the most popular:
- Cement - affordable compositions that are not difficult to use. After filling the joints, the master has a lot of time to remove excess grout and correct errors in the work. The acrylic additives included in the cement-based mixture provide a variety of shades of the material. Used for finishing seams in rooms for various purposes. Complete drying and readiness of seams for full loads after a minimum period of time. Sometimes the timing may vary depending on the additional components included in the grout mixture. After it has dried, it is recommended to treat the seams with a water-repellent solution to increase their strength and prevent the development of mold.
- Epoxy - are characterized by increased strength and resistance to negative influences, but working with them requires professionalism. The seams set very quickly, and the material itself hardens in half an hour. Therefore, it will be effective to distribute the grout over 2 - 3 square meters. m at a time. Next, the surface should be cleaned until the material is completely dry. After 2 hours, the epoxy grout will have hardened and will be difficult to clean. There are also standard requirements for the size of the seam - from 0.5 - 1.2 cm in width and no more than 1 cm in depth.
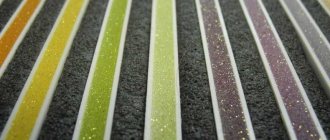
- Silicone grouts are elastic and moisture-resistant grouts that promote good filling of joints. They are a novelty on the finishing materials market. Silicone fugues are used in rooms with high humidity, and outdoors to seal joints. The material is resistant to fungal formations and the negative effects of ultraviolet radiation.
- Furan - dense mixtures of dark shades. They are widely used for finishing in industrial premises, but are practically not used for finishing residential premises.
Advice! “To change the color of tile adhesive, grout mixtures are used. They contain a pigment that allows you to improve the external qualities of the cladding: highlight the tiles or emphasize the integrity of the coating.”
Grout drying time
The process of setting grout joints is influenced by compliance with technological processes, the composition of the material, and the level of humidity in the room being repaired.
Drying time directly depends on the thickness of the applied layer. If the adhesive is applied poorly under the tiles, unevenness is formed in the seams, which are eliminated by filling the joints between the tiles with an increased amount of grout. This leads to an increase in the drying process of the grout mixture.
If a cement-based material was used, the seams will take twice as long to dry as usual.
In order for the seams with the applied mixture to set quickly, it is important to carry out the installation correctly and change the environmental conditions.
There are a number of reasons why the time for complete drying of the grout mixture may increase:
- Material composition - different types of grout mixtures dry at different speeds. This is due to the different composition and characteristics of the components;
- Improper mixing - the use of low-quality material, adjustment of proportions, lack or excess of water, the presence of lumps leads to the loss of adhesive qualities of the grout mixture. As a result, the tile joints will take a long time to dry or even remain damp;
- Increased level of humidity in sanitary facilities - temperature changes and hot steam affect the grouted joints between tiles and the drying time. In such conditions, the drying process increases and it is recommended to begin using the surface 7 - 10 days after finishing work.
To ensure that the layer of material in the tile joints is not thickened, it is recommended to use professional tools for flawless application of materials:
- Rubber spatula - ideal for applying mastics and solutions to surfaces;
- Grater - used when decorating joints on mosaic tiles;
- Syringe gun - used for deep filling of seams. The tool allows you to apply neat joints using silicone mixtures.
Important! “If the tiles are being laid for a long time, it is advisable to seal the joint, and the grout mixture in this case will be a mandatory step during the work.”
If you don't have time to wait
Acceleration of polymerization occurs due to an increase in the temperature of the base. Heat guns are used to heat the air and the floor. Professionals advise maintaining a favorable temperature (+24-26 C), but not achieving the maximum. Drying the adhesive under the tiles too quickly leads to defects and individual tiles peeling off. You can place a fan heater in the doorway at minimum speed.
The accelerated process is contraindicated for the “warm floor” system. Due to a violation of the technology, the screed is destroyed, which provokes cracking of the ceramic coating. It is better to arrange natural ventilation in the room by opening the door and window. Directed sunlight should not hit the drying tiles.
How to speed up drying Source plitkahelp.com
The process can be accelerated even at the stage of tile installation. Glue powder is diluted in hot liquid. The prepared solution in a bucket is dipped into a tank of boiling water. The composition is carefully mixed, then the ceramics are laid. During heating, it is important not to let the mixture harden. The mass thickens very quickly, so start working immediately.
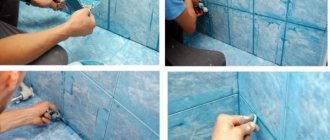
Applying grout
Before using the grout mixture, let it sit for an hour.
- Seams must be clean and dry before applying the mixture.
- Failure of the craftsmen to comply with this condition may result in the grout not setting.
- Excess silicone material is removed within 10 minutes after caulking the seam.
If cement-based grout is used, the procedure can be completed within 30 minutes. For work use a foam sponge.
Final work
When the grout has completely dried, it’s time to remove the remaining white deposits and finally put the tiled surface in order.
The intensity and amount of plaque on the tiles depends on how thoroughly the foam sponge was washed and how often the water in the bucket was changed. But even if the tiles need a good cleaning, it is not difficult to do.
The best and most effective way is to use clean running water from a hose – it’s quick, clean and there’s no need to scrub anything. But it is not always practical to use this method. Therefore, the “dry” cleaning method is more often used. To do this, use a thick, preferably felt, rag, which is used to rub the surface, removing the remaining mixture. The problem can only arise with cleaning the surfaces of grooved, textured or matte tiles. And here special cleaners will help, which can usually be found in the same stores where grout is purchased.
Drying process
After the seams are filled with grout mixture, they need to dry.
- This will take 5 to 7 days.
- In the first day the putty sets. On the second day, the seams can be moistened with water to prevent cracking.
- On the third day, the putty dries completely, and on days 5-7 you can load the surface, that is, drill holes and wash the walls with cleaning agents and plenty of water.
High-quality work in compliance with all technological operations will protect the seams between the tiles from moisture and destruction.
Renewing old bathroom grout or replacing mastic
To renew the old grout layer, you need to prepare a mixture, take a spatula, a molding tube and a soft cloth to clean the surface of excess composition. When the mass is prepared, it is applied to the desired areas in small portions. The voids are filled carefully. The mixture can be compacted a little. The excess is removed immediately before the mass hardens. Finally, a tube is used to make the seams smooth.
The voids are filled carefully.
When to start cleaning
At the final stage of finishing, cleaning should be done and any excess material should be washed off. It is recommended to do this only after the applied grout has completely dried.
Wet cleaning is done on the third day, and general cleaning a week later. You can see whether to wet the joints or not by looking at the remaining frozen mass on the lid of the jar. If it has brightened by several shades, you can start cleaning.
Drying of the grout occurs in several stages. It is difficult to see from external signs whether the composition has hardened well. The most correct thing to do is to focus on the average time frame for each type of grout.