What factors affect drying speed?
In fact, the drying speed is influenced by many factors: from the components of the plaster to the thickness of the layer.
But in order to delve into the topic of drying plaster in more detail, it is worth examining each of these parameters:
- type of plaster coating;
- features of the primer base;
- air humidity at the time of drying;
- general room temperature.
It is these factors that can be called the main ones influencing the drying speed of the plaster coating.
Reference! Additionally, you can study the manufacturer's notes on the packaging. It is there that the approximate drying times under certain conditions should be written.
Effect of layer thickness on drying speed
This is a completely logical point that directly affects the drying speed of the plaster. For example, if you take a thin layer of plaster, thanks to certain conditions it will dry quickly and efficiently. If the layer is thick, then, of course, it will dry much longer.
If we analyze the drying time using the example of a standard cement-sand composition, then under favorable conditions, after application, it will dry within two weeks. If you maintain the same favorable conditions, but the plaster layer is many times thicker, then it will take more than two weeks to dry.
Reference! Particular attention should be paid to the preparatory work that is carried out before leveling the walls.
Influence of plaster layer thickness on drying time
When calculating drying time, we primarily focus on the thickness of the applied layer and its quality. If the solution contains a certain amount of moisture and is applied up to 3 cm thick, then the drying time will increase significantly.
For example, when working with concrete surfaces, if the layer of plaster is halved, the setting speed is reduced by 30%. If wooden walls are plastered under the same conditions, the time difference will be 40%
It is also important to properly prepare surfaces for repair work.
A dry base reduces the setting time of the solution by several hours, and in some situations, weeks.
Putty can only be applied to dry walls, so when plastering yourself, do not force things, even if it seems that the surface is dry. It’s better to wait another day or two so as not to spend money on rework later.
Time for complete drying of the plaster, depending on its type
Another important point is the type of plaster. The classification of varieties is determined by the main substances in the composition.
Depending on these substances, certain properties of the composition will depend, including the drying rate.
Plaster
This composition will dry within 5 days if favorable conditions are provided.
Important! The entire time the plaster is drying, the builder must ensure that the same temperature is maintained.
Due to the special qualities of the gypsum composition, all imperfections should be eliminated immediately. This plaster sets quickly and if any defects are observed, they cannot be corrected within a day; the composition will set 40 minutes after application.
Cement
This composition takes a very long time to dry. The average duration under favorable conditions is 14 days.
But if the layer is too thick, then the drying time may increase to 30 days. In this case, humidity should not exceed 70%.
Limestone
The lime composition will completely harden in one week. But drying time also depends on the provision of favorable conditions, as well as on the thickness of the layer. If you apply this mixture in a thin layer, complete drying will occur within a day.
Advice! If you add lime to the cement mortar, this will significantly reduce the drying time.
Acrylic
One of the fastest drying plaster bases. The first layer, if thin enough, will dry in one hour.
If the humidity level is very high, the waiting time will increase to three hours.
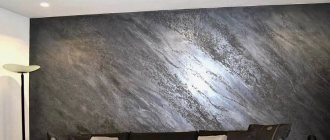
Decorative
It should be applied in a thin layer to already smooth walls. Drying time also depends on the main components of the composition, but most plasters will dry in 3-5 days.
Important! It is necessary to strictly monitor the thickness of the layer, only this will ensure proper drying of the decorative composition.
Optimal conditions for quick drying
During the use of plaster compositions, it was found that a layer 1 cm thick dries out within a day. Even ideal temperature and humidity practically do not change this indicator; a maximum of 2 cm layer can dry out in a day.
In addition, the drying time is affected by the type of plaster, the quality and material of the walls. For example, the most popular and affordable composition: cement, water and sand, dries and gains its strength characteristics within 28 days under ideal conditions. It turns out that if a significant layer of lime-cement composition has been applied, then further finishing can be done after 1 month.
However, a week after plastering with a cement composition, it is already possible to perform basic putty.
When using a gypsum mixture, facing work can begin after 4 days - during this time the plaster layer will completely dry.
When calculating drying time, it is important to consider the thickness of the layer. Experts do not advise applying more than 5 cm at a time - this will not only significantly increase the drying time, but will also not allow you to obtain a durable and high-quality surface.
Optimal drying conditions:
- air humidity up to 70%;
- temperature regime is not higher than +20 degrees.
Based on this, it is worth noting that it is not advisable to start finishing during a hot period, since this will entail rapid weathering of water, which can cause the plaster to crack and begin to move away from the walls.
When the temperature ranges from +5 to +10 degrees, the cement composition can dry for a very long time.
In order to improve the adhesion of the plaster to the walls, and the coating lasts a long time, the following conditions must be observed:
- eliminate drafts;
- refuse to accelerate the process by additional heating;
- protect surfaces from sun exposure;
- do not try to remove moisture from the room by ventilation - opening windows and doors until completely dry is strictly prohibited.
Drying time depends on the following conditions:
- type of plaster;
- wall material;
- thickness of the applied layer;
- weather.
How long does it take for plaster to dry, depending on the base?
The surface on which the composition is applied also plays a big role.
Monolithic surface
It is not able to absorb moisture, therefore, the drying time of the plaster increases many times.
A thin layer of plaster composition at the optimal temperature will dry from 2 to 6 days.
Tree
Excellent air and heat permeability. A thin layer of plaster will dry within 14 hours if conditions are favorable.
Important! A layer of more than 2 centimeters will take 2 times longer to dry.
Brick
Excellent moisture transfer. The brick must be primed first, and this will increase the drying time.
For example, a layer of 2 centimeters under favorable conditions will harden in 10 days. If the walls are very crooked, then several layers are applied. But each layer is applied only after the previous one has dried.
Drywall
The material is very thin for applying plaster, so it will require additional strengthening.
Reinforcement of the surface is required, and a layer of 1 centimeter will dry within 1-2 days.
Expanded clay
Plaster on expanded clay blocks dries very quickly. They are able to withstand coating thicknesses from 1.5 to 5 centimeters. This layer will dry within a week.
But due to the special surface, the coating may crack. To prevent this, you need to systematically spray the surface with water.
Aerated concrete
The special surface of aerated concrete allows the plaster to dry quickly. Under favorable conditions and a relatively small layer of plaster, the walls will dry within 24 hours.
How to plaster external walls - technology for finishing work
When preparing to plaster the facade, carefully study the technology requirements. It provides for the following stages of work:
- Choice of finishing material.
- Preparation of the external surface of the walls.
- Installation of guide elements.
- Applying the plaster mixture.
- Clean finishing.
Each stage has its own characteristics. Let's look at them in more detail.
Choosing material for plastering external walls
- performance properties;
- shelf life of the plaster composition;
- manufacturer rating;
- reviews from professional builders;
- adhesion of the finishing mixture.
Also analyze the adhesive properties of the material and the need for additional preparation for application.
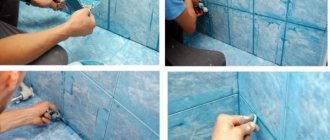
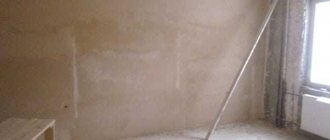
Preparing walls for applying finishing mortar
You should take responsibility for preparing the surface of façade walls. Their condition affects the quality of plastering activities.
Prepare the surface of the walls according to the following algorithm:
- Remove old plaster with a chisel and hammer or use a hammer drill.
- Clean the surface from finishing residues, sweep away dust, and remove grease and oil stains.
- Cut the brick joints by widening and deepening the joint areas.
- Remove the bumps, seal existing cracks and level out elevation differences with putty.
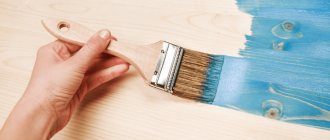
- Apply a deep penetration primer to the wall surface and wait until it dries.
- Attach a plaster mesh with square cells with a side of 20-25 mm to the outer surface.
Fixation of special beacons
Beacons are made of metal profiles and are securely fixed to the walls at certain intervals. Guides allow you to smooth out the plaster mixture using a rule, ensuring a flat finish.
To install beacons, you must perform a number of operations:
- Check the verticality of the walls by level or plumb.
- Cut the beacons to the height of the walls.
- Step back 20-30 cm from the edge and draw a vertical line.
- Apply a thick solution to the marking at intervals of 0.5-0.6 m.
- Place the guide along the markings and press into the solution.
- Adjust the verticality of the beacons according to the level.
- Remove any solution that has floated onto the surface of the guides.
- Fill the cavities under the beacon after the solution has set.
When determining the distance between guides, consider the length of the rule. The optimal interval between beacons is 1.5-1.8 m.
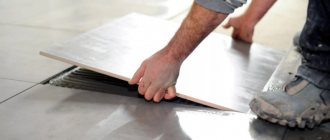
Applying external plaster to the facade of a house - finishing rules
Plastering technology involves sequential application of the material:
- First, a liquefied solution is poured. You should add polyvinyl acetate glue to it and add water until it reaches a creamy consistency.
- After drying, the main layer of plaster is applied. It is necessary to evenly distribute the finishing composition over the surface, ensuring a layer thickness of no more than 50 mm.
- Grouting completes the finishing activities. A wooden or foam trowel is used to smooth out uneven surfaces and seal cracks. Grouting should be done in a circular motion.
Start finishing after 5 days, when the plaster is completely dry.
How to properly plaster external surfaces - protecting problem areas
- thoroughness of sealing defects on the surface;
- uniform filling of cavities with plaster mortar;
- flatness of the finishing composition after grouting.
Grouting must be done correctly. First, make spiral-shaped leveling movements and, starting with a small diameter, gradually move to a larger circle.
Exterior wall finishing - finishing operations
At the final stage of work, finishing is carried out. Possible options:
- creating decorative spray;
- painting the surface in the required color;
- formation of a rough surface.
What are the features of drying?
Drying features are indicated depending on the environment where the plaster is drying.
Room
If the walls are plastered indoors, this will happen quite quickly, regardless of weather conditions.
For favorable conditions, it is enough to ensure optimal temperature and humidity. Most manufacturers write drying times for their compositions specifically for indoor environments.
Important! Do not forget that the cement-sand composition shrinks after application.
Street
Plastering work is best done in the summer. Under the influence of warm temperatures and normal air humidity, the plaster composition will dry much faster.
If the temperature is less than 15 degrees, this will increase the drying speed.
How to find out if the plaster is dry?
Experts recommend paying attention to the shade of the surface and its uniformity. As the plaster dries, it changes color from dark to light. However, on walls with severe unevenness, damp spots are visible near the floor. If the plaster does not dry for a long time, this may indicate that the necessary conditions were not met, or that the layer was applied too thick (more than 30 mm).
Experienced builders use a special device to measure surface moisture. When the indicator on it reaches the limits of 8 or 9%, they move on to the next stage of finishing.
This method will also be useful - you should run your hand along the wall, and if the moisture is still present, then there will be no traces of plaster left on the palm, and the moisture itself will be well felt. The dry surface leaves barely noticeable marks on the hands.
You can drill a small hole in some inconspicuous area of the wall. Wet plaster will partially stick to the drill, while dry plaster will crumble.
Ways to dry walls
We will provide several popular methods for drying plastered walls.
Ventilation
The ventilation path is the simplest and practically ineffective. Why?
- the option is relevant only in the warm season;
- humidity should not exceed 70%;
- you need a stable supply of air masses.
That is why the method is not effective.
Application of heat guns
Not a bad option, but it won't always work. Why?
- you cannot point the gun at the wall, otherwise the plaster will overheat and crack;
- ventilation is still needed to maintain the optimal temperature;
- constant adherence to temperature conditions;
- You can use the gun for no more than 6-8 days.
The method is budget-friendly, not bad, but not the best.
Application of dehumidifier
This method can be used always and everywhere. In this case, you do not need to constantly monitor humidity and temperature, and the device will ensure quick drying of the plastered surface.
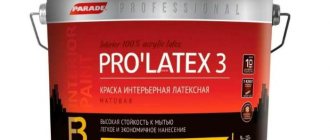
What putty should I use to putty cement plaster?
“Saten”, “Fugen” and many others putties are suitable for filling walls using DSP. In this apartment, Fugen putty based on gypsum and fillers was used.
Interesting materials:
Nordman 4 how many spikes are there in a wheel? Nordman 4 winter tires how many studs? New MTPL policies from what date? New rules for allowing pedestrians to pass? How to calculate the volume of a suitcase in liters? What's the penalty for overtaking? Limit 60 KM, how long can you drive? What will happen to the drying oil in the tank? Where does the oil in spark plug wells come from? Where does the water in the muffler come from?
How to dry walls in winter
In winter, this procedure is quite problematic. What to do in such a situation?
Compliance with conditions
When applying plaster to walls in winter, certain conditions must be observed:
- monitor the humidity of the walls;
- ensure favorable room temperature;
- carry out preparatory work correctly;
Once these conditions are met, you can proceed to the next step.
Relationship between plaster and frost
If you have to plaster the walls in severe frost, then there is an unusual life hack. You can add a chemical to the composition and not worry about the temperature in the room and freezing of the walls.
Chlorine
If you add chlorine, then plastering work can be done even at -25 degrees. True, such water needs to be heated to 35 degrees and only then add lime to the water.
Application of potash
This method is only suitable for reinforced walls. The composition is used primarily for cement mortars.
Important! Potash does not cause metal corrosion and can be applied directly to the mesh.
Ammonia bases
If you use ammonia, you can carry out plastering work even at -30 degrees.
Important! To prevent ammonia from dissolving, the temperature of the liquid should not exceed 5 degrees.
Common drying methods
Repair experts have developed ways to reduce the drying time of treated surfaces without negative consequences.
How long the plaster should dry before applying putty is already clear - this is individual in each case. But what to do if you can’t wait for the surface to dry? To avoid delays, effective methods have been developed that do not have a detrimental effect on the surface. In particular, professional builders use the following methods:
- Natural process. We are talking about through ventilation of the room. However, if it is too hot outside during the summer seasons, the surface dries out. In rainy or cold weather, a draft occurs, which does much more harm than good.
- Use of heat guns. These devices will be useful when the room temperature is below +10 °C. With their help, the desired mode (+20 °C) is maintained for 24 hours. At the same time, it is impossible to direct the heat flow to the walls, otherwise it will cause cracks, and the quality of adhesion of the mixture to the base will begin to decrease.
- Heater or fan heater. The drying process is gentle and fast. The efficiency of using such devices is comparable to the operation of a heat gun. In this case, temperature control is carried out by ventilation.
- Dehumidifiers help. This is the best method due to the fact that the device does not dry the air, but absorbs moisture, accumulating it in special containers. Correctly setting up the equipment taking into account the area of the room reduces the drying time of surfaces by 50%. A centimeter coating in low humidity conditions will dry in 12 hours.
It is recommended to use additional devices after 24 hours after applying the plaster. This time is enough for the mixture to set and adhere to the base.
It is best to carry out repair work in the summer months, as well as ensure air circulation in the room, and, if possible, allow the solution to dry quietly in natural conditions.
Is it possible to speed up the drying process?
Many experts say that accelerating the drying time of plaster artificially is extremely undesirable, because this can lead to the formation of cracks. But there are several recommendations that will allow the plaster to dry faster, without negative consequences for it:
- plastering of walls is best done in the warm season , when above-zero temperatures prevail;
- You can install an electric heater inside the room, but you should not turn it on “full”;
- It is necessary to ensure good ventilation in the room. But here it is important to avoid drafts. In addition, if the weather is rainy outside, then you shouldn’t open the windows at all;
- we have already said that gypsum plaster dries faster , so if you want quick results, you should use formulations containing this material.
Complete drying of a plastered wall can be determined by eye. If it has a uniform grayish color, without moisture spots, then this will be a signal that you can proceed to further work.
If you want the plaster to stick to the wall normally, then you must follow the following recommendations:
- in the room must be completely eliminated
- the plaster should dry naturally, without the use of additional equipment. The only exception is heaters, but these should be used very carefully;
- it is necessary to protect the treated surface from exposure to sunlight;
- at the end of the work, when the plaster is almost dry, you should open the window so that the remaining moisture disappears faster.
In principle, there should not be any special problems with plastering walls; it is only important to follow a few simple recommendations. Perhaps the most important rule for interior finishing with plaster is that you need to wait until the surface is completely dry, after which you can start gluing it with wallpaper, tiles or other materials.
Types of base
How long does it take for plaster to dry on walls
Masters do not have a clear opinion about the drying period for plaster on different surfaces. Following generally accepted recommendations and observations, a 1 mm layer of solution hardens in one day. If the requirements for processing and applying the mixture are met, this period can be significantly reduced. Thus, a plastered wooden surface at an air temperature of up to 25 C and moderate humidity will dry in about 12 hours. The mortar layer for this example is 20 mm. How long does it take for plaster to dry on plasterboard walls? The dry and smooth surface of this material is an ideal base for plastering. The mixture, 2 mm thick, hardens after 8 hours.
The base is made of aerated concrete - a capricious material. With different humidity levels in the room, the drying time of the plaster lasts from 5 to 35 days.
| The basis | Layer of plaster (cm) | Complete hardening time |
| Tree | 0,9-2,00 | up to 4 days |
| Concrete | 0,5-1,00 | 2-6 days |
| Brick | 1,5-2,5 | up to 12 days |
| Expanded polystyrene | up to 4 | 1-3 days |
| Foam block | 1-1,5 | from 3 to 20 days |
| Gas block | 1,5-5 | up to 35 days |