No matter how trivial it may sound, wood was, is and, for sure, will remain one of the most popular construction and finishing materials. Despite the abundance of high-quality composites and various imitations, natural wood has no equal. But this material requires mandatory protection from external factors. Without treatment with specialized means, both in the interior and on the facade, the tree will quickly lose its presentable appearance, in addition, its operational and technical characteristics will deteriorate. Whereas wood paint or similar protective and decorative coatings will both preserve the original data and extend the service life of the material. In this part of the FORUMHOUSE Academy course we will consider:
What should you protect wood from?
Paints and varnishes for wood
Range of paints and varnishes private label FORUMHOUSE
Features of protective and decorative products based on acrylic dispersion
How to choose the best wood treatment product: cheat sheet
How to treat a wooden surface before painting
So, why pre-treat the surface, we figured it out. Now let’s decide what compositions to use for processing.
Protective impregnations for wood
Antiseptics. These are impregnations that protect wood from the growth of fungi and mold and stop wood rotting.
Insecticides. Provide tree protection from attacks by pests and rodents
Fire retardants. Protecting wood from fire. Of course, no impregnation will save you 100% from a fire. But fire retardants reduce the flammability of wood, that is, the material resists fire longer. The flame does not spread as quickly. There is additional time to localize the fire. Water-repellent impregnations. One of the dangerous enemies of wood is moisture. Exposure to moisture destroys wood. The material is deformed, mold and fungi appear
It is important to protect the tree as much as possible from moisture and humidity changes.
Combined and one-component impregnations
Protective impregnations for wood on the market can be combined or single-component. Single-component ones are aimed at protecting against a specific negative impact. Combined ones provide comprehensive protection.
Primer for wood
Priming the wood before painting provides additional protection. In addition, it prepares the surface for applying paint. The primer can penetrate 3-5 mm into the wood
The primer should be chosen on the same base as the paint.
Primer, like paint, can be:
- Acrylic - water based. It is not toxic. Very well suited for indoor work. The applied layer is dense and durable, dries quickly
- Epoxy primer contains resin. It should be used only for exterior work, since this primer is toxic. But it perfectly protects the wood from moisture. It also dries quickly.
- Shellac primer is used in exceptional cases. It is mainly used when applied to unseasoned wood. This primer replaces water in tree cells with methyl alcohol. This helps the wood dry out.
- Alkyd primer consists of safe components. Therefore, you can safely use it indoors. Excellent for rooms with high humidity. Such as a bathhouse, sauna, swimming pool and others. Since it provides excellent protection from moisture, it prevents the growth of mold and mildew. It does take a long time to dry, though. Indoors, for 18-20 hours.
Often, instead of industrial compounds, so-called folk remedies are used, for example:
- Hot bitumen (for exterior use only)
- Treatment with copper sulfate (protects against fungus and pests)
- Soaking with vinegar or soda (prevents rotting and can fight mold)
- Resin impregnation (the most ancient method of wood processing)
Why do you need to treat wood before painting?
Here's something worth paying attention to. The quality of painting depends on how well the surface is prepared. As well as the durability of the paint layer and the level of protection of the wood.
Pre-treatment of wood provides the following advantages:
Additional protection
Processing wood before painting involves, among other things, the use of various compounds. Compositions that are designed to protect wood from negative environmental factors.
Increased coating service life
Thanks to pre-treatment, the paint adheres better to the surface. And it lasts much longer than on an unprepared surface.
Surface leveling and protective film
Pre-treatment levels the surface. Covers crayons defects and cracks. This also additionally protects the tree from the growth of mold and the development of rot. It is in microscopic cracks that they multiply. Protective film allows you to avoid such unpleasant “surprises” as cracking and warping of wood.
Facilitation of the painting process and paint consumption
The paint adheres better and easier to the prepared surface. And the surface layer, after preliminary preparation, does not allow the liquid to be strongly absorbed. Including paint. Paint consumption on the prepared surface is reduced by an average of thirty percent.
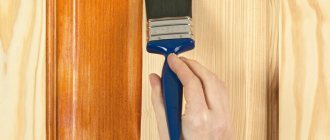
How to use stain correctly
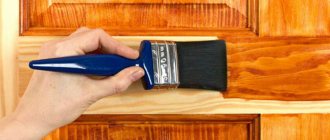
Painting a door with stain
To ensure that the wood does not absorb excess moisture and the paint applies evenly, the prepared canvas needs to be slightly moistened. All horizontal surfaces are treated with stain along the grain and then across it. The finishing layer is also applied in the longitudinal direction.
The jambs and parts that have not been dismantled begin to be covered from below so that the drops do not touch the still untouched areas. This sequence of actions is followed if the finishing layer is an opaque material. When the surface treated with stain absorbs moisture, the wood fibers straighten, which is why you will need to sand the canvas with zero sandpaper and repeat the procedure.
It is also worth noting that after staining (when the dye dries) the wood becomes lighter. Therefore, you need to coat it as many times as necessary to achieve the desired color. If you want to speed up the process, you can use an alcohol-based stain. The surface treated with this composition will not require re-grinding. But, water-soluble materials are considered safer, will not smell bad and are more popular.
Products for treating wood before painting
Have you decided to build from wood? An excellent choice, because this natural, beautiful material is very strong, durable and will create a healthy microclimate in the house. But in order for the paint to last for a long time, and the wood not to begin to rot, dry out, or bark beetles to infest it, the surface for painting must be prepared. Let's look at how to treat wood before painting.
How to normally paint a door
Painting a wooden door
We told you how to paint a wooden entrance door or an interior door, now it’s time to talk about how to do simple painting to avoid smudges and other problems. If you need to update the outside canvas or paint only the doors, there is no point in buying a spray bottle.
To do this, it will be enough to buy a narrow brush (for hard-to-reach places) and a roller that will suit any canvas (natural wood, fiberboard, MDF, Canadian, etc.). The only drawback of brushes is that they often lose hair, so before work you need to fluff it up so that everything unnecessary and poorly fixed falls out, so as not to spoil the finish.
For panel doors, it is better to use a roller so that the paint applies evenly. Work begins from the end, moving to the right. You will have to paint the canvas in 3 passes, so each subsequent layer should be applied in opposite movements. If painting is done on any other surface, do not allow an excess of paint to prevent smudges from forming.
What are the advantages of hand sanding?
If you don’t have special tools to sand the wood, you can do this by hand. To work, it is enough to have only a piece of sandpaper and a special block, which you can make with your own hands. The advantages include the following points:
- Low cash costs.
- You can sand any surface and hard-to-reach places.
- Grinding can also be carried out in the absence of an energy source.
However, there are several significant disadvantages, including low performance.
Painting an interior door
Before painting, the wooden interior door must be removed from its hinges and placed vertically. Next, we adhere to the following plan:
- We release the canvas from the fittings. If there is a lock, it must be filled with cotton wool or sealed with tape.
- Soak the brush for an hour. This is done to ensure that the fibers do not fall out and remain on the painted surface.
- For wide surfaces, prepare a roller.
- Pour paint into the tray and start painting.
If you have a paneled structure installed, then painting begins with the recesses. For such areas, a narrow brush is suitable. You need to use very little paint to avoid accumulations in the corners.
Below we will tell you how to paint a door to look like wood.
It is convenient to paint the accordion model with a spray gun or a spray can. If you only need to paint one side, we recommend sealing the cracks with paper tape.
Important advice! The adhesive tape is removed immediately after painting! Otherwise, the tape will come off along with the paint.
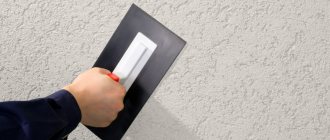
Stages of wood processing before painting
Processing wood before painting consists of the following steps:
- The first step is to clean the wood from dirt and dust. Remove the old coating, if there was one, and so on. After cleaning, uneven surfaces must be removed and sanded. So that the surface is as smooth and even as possible.
Priming before painting
We choose a primer depending on the type of surface to be painted. For the kitchen cabinet we used a pigmented shellac-based primer, which reliably seals resinous pine knots. Using a synthetic or natural bristle brush, first apply one coat of primer to all surfaces and edges of the product, and then a couple more coats at 5-10 minute intervals to areas with exposed end grain.
A board with nails supports a primed kitchen cabinet door, allowing you to finish both sides and all four edges in one go. Sharp nail tips provide firm, even support while leaving almost invisible marks.
To save time when painting the door, we placed a board with sharp tips of nails protruding from it, on which the door rests with the already treated side while priming the second side and edges. After 24 hours, when the primer is completely dry, sand large flat surfaces with 220-grit abrasive using an orbital sander or sanding block. Sand small areas by hand using an abrasive pad or profile sanding pads.
To reveal all the imperfections of the primed surface, use backlighting. Unlike surfaces primed for clear coat, nothing untoward will happen if you remove the primer layer to bare wood. Simply apply the primer again, let it dry and sand smooth. Then thoroughly clean the surface from dust.
By directing the light from the lamp parallel to the primed surface, you can see shadows that indicate coating defects. Sand these areas and reapply primer.
Fill all the recesses that need to be hidden with acrylic putty and smooth the surface by sanding. Apply another coat of primer and sand with 220 grit abrasive. Sanding a putty surface creates a lot of dust, so vacuum the piece before wiping it with a damp cloth (for latex paint) or a tack pad (for oil-based paint).
Rough areas and knots show through the primer, so they can be easily identified and smoothed out using latex putty | In profile areas, we use the simplest and most accessible tool for applying putty - our own finger. | You can restore the clarity of profile parts using a small block with sandpaper on two edges |
About grinding pads and making them yourself
The simplest tool can be called sanding pads. They can be used to work with a wide variety of workpieces. Among the features of common pads, the following points can be highlighted:
- Most versions consist of three main parts: the shoe and the locking mechanism and the handle. The body is used as a base; the fixing element does not allow the sandpaper to move during operation.
- Branded pads are made in a variety of shapes and types. In most cases, plastic is used in the manufacture of the case, which is characterized by low weight, but also low strength.
Homemade sanding block
If desired, you can make such a tool yourself. For this, an ordinary wooden block is used, to which the skin is attached using nails or screws. The handle can be attached to a block to simplify the grinding and polishing process.
When making a homemade structure, it is worth considering what size the workpiece will be processed. If the size is too large, the working area should be larger, but problems may arise with selecting the most suitable skin.
Acrylic
What paint to paint a wooden house if it needs to be done quickly, the cost of the work is not of primary importance, and great attention should be paid to the quality of the painting? In this case, acrylic compositions are best suited for facade work and exterior decoration of buildings. Wooden buildings go quite well with acrylic coatings; moreover, acrylic as a dye base is used for finishing not only the outside of the house, but is also well suited for interior decorative and finishing work
Wooden buildings go quite well with acrylic coatings; moreover, acrylic as a dye base is used for finishing not only the outside of the house, but is also well suited for interior decorative and finishing work.
The service life of acrylic paint on the facade of a house is 8 years.
Acrylic compositions, being quite universal in purpose, are suitable for painting any surfaces, and not just wood. In this case, wooden houses with existing metal or brick structures would be best painted with acrylic substances.
The external beauty of finished surfaces is one of the most important advantages of acrylic. What makes it different from oil is that it allows air to circulate through it so the walls can breathe, which makes it advantageous over other types of paint. It is also worth considering that acrylic dyes, as a rule, last up to 8 years, after which they can be renewed if necessary.
Why impregnate wood?
The material is popular in construction due to the following advantages:
- environmental friendliness;
- hygroscopicity;
- heat capacity;
- sound insulation;
- aesthetics (even without additional finishing);
- ease of processing and installation;
- affordable price.
However, a wooden structure that is constantly located on the street is destroyed over time under the influence of:
- ultraviolet rays;
- high humidity;
- fungus, mold;
- insects, bark beetles;
- precipitation;
- dust, dirt;
- sudden changes in temperature;
- damage;
- fire.
To prevent spoilage, an impregnation was developed.
It is needed to extend the service life of the material by forming a protective layer on the surface or penetrating deep into the structure.
The drugs are produced in a narrowly targeted manner, when some resist moisture, others – fungus (antiseptics), others – fire (fire retardants), there are decorative ones and more. Complex action impregnations are also available. They are more expensive, but more effective.
It is recommended to work with the product at a temperature of +10 degrees. It will absorb evenly and dry quickly.
In addition, impregnation can be an excellent base for painting. The paint applies well, giving the wood the desired color.
How to choose a dye
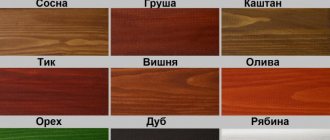
Wood paints can have any base. It is selected taking into account the base on which the enamel will be applied. The main thing when creating decorative finishes is to choose colors. To create an imitation of wood structure, you need 2 tones:
- light (beige, light yellow, sand);
- dark (dark brown, burgundy or even black).
The choice of color combination will depend on what type of wood you plan to imitate when decorating the product, but the dyes must be taken from the same brand. But it is always worth remembering that the dark paint that will be applied as a second layer should be more liquid.
Briefly about the main thing
Sanding wood is performed to solve various problems: cleaning, smoothing the surface, removing dirt or biological formations, preparing the base for paints and varnishes.
There are two ways to process wood: mechanized or manual.
For mechanized sanding or polishing of wood, an electric tool with replaceable attachments or sandpaper is used.
Manual processing of wood is done using an emery cloth or sponge with an abrasive.
You need to select grinding materials taking into account the desired degree of smoothness or condition of the workpiece at a particular moment: for roughing, roughing, finishing or polishing.
Ratings 0
How to paint interior wooden doors, how to choose paint
The question of what is the best way to paint wooden doors will certainly arise before any person who, in one way or another, decides on the process of restoring old doors or simply recultivating new ones. It will have to be solved in any case, and it is better to do it correctly, since the life and quality of use of wooden doors directly depends on the choice of paint and varnish products. It probably won’t be a secret to anyone if I say that the doors can be coated with varnish or colored paint - that’s what we’ll pay the lion’s share of attention to.
Lucky. They come in glossy, matte and even colored - regardless of this, they have one property - the structure of the wood is visible underneath them. We can say that every smallest defect in the wood will be visible under the varnish - it is for this reason that it is better to refuse to use them if the door has undergone a global restoration using putty and give preference to paint. In general, if we talk about the choice of this decorative coating, then we can distinguish two main options for this material - oil-based varnish and the so-called alcohol varnish. There are also solvent-based nitrovarnishes, but it is better to avoid using them for the reason that they negatively affect the condition of the wood. Polyurethane varnish is considered the most ideal option - its strength and resistance to mechanical damage can be called unsurpassed. Paints. Today, the choice of this material is huge, which allows you to give doors almost any look, even the most unusual. Paints can be glossy, matte or highlight the structure of wood - the question of what paint to paint a wooden door can be solved using almost all options
But, again, you need to pay attention to the base on which this paint is made - oil and alcohol are suitable. But you can also use nitro paint
How to paint interior wooden doors
There is also a third, more expensive material for coating wood - wax-containing oils, which give the wood a silky surface. Wax oils, like varnishes, can be colored or transparent. In addition, they can be successfully combined, giving the doors an interesting look.
What is the best way to sand wood?
A wide variety of tools can be used to process wood. In many workshops and garages you can find almost everything you need to carry out such work. There are several tools that answer the question of how to sand wood:
- Drill.
- Bulgarian.
- Belt sander.
- Surface grinder.
Sanding wood with a grinder
The grinder has become quite widespread. It is a universal tool; grinding requires a special flap-type attachment. Other features of the process include the following:
- To make the nozzle you will need pieces of sandpaper. They must be secured to a rigid base.
- There are wheels on sale with different hardness levels, each suitable for a specific case. An example is the use of a No. 40 wheel to remove paintwork. To give smoothness, use a wheel with grain No. 120.
Grinding wheels
Another common question is how to sand wood when using a drill. Such a tool can be equipped with a special attachment, which has a pin for the cartridge in the central part. Among the features of using such a tool, we note the following points:
- All circles have a small diameter, the largest is 125 mm.
- Different grain sizes also allow for various types of work: from roughing to finishing.
There are several types of drill wheels. Most have a hard base, some have a rubber base. An adhesive substance, as well as various Velcro, can be used to adhere the sandpaper to the base. By increasing the flexibility of the disk, the processing quality can be improved.
You can also find a surface grinder on sale. This mechanism is characterized by the fact that the fixed sandpaper quickly performs a reciprocating movement. Many abrasive attachments are designed so that the sandpaper can be quickly replaced if necessary. Compared to a drill, the tool is characterized by high productivity, but it is difficult for them to process a large surface area.
Processing wood with a belt sander
The belt sander is characterized by the highest productivity. It can be used to process a wide variety of wood. The main disadvantage is the high cost, since professional equipment in this category costs 7,000 rubles or more. A special attachment can be used as a working belt, which can have a different grain size.
How to choose the right primer
| Compound | Recommended Application | Note | Drying time |
| Acrylic primer (water based) | Suitable for any clean wood, except pine and other knotty and resinous species. Used before painting with water-based acrylic paints. | Advantages: low odor, dries quickly and is easy to sand without clogging the abrasive. Due to the water content, it raises lint on wood more than other primers. May have weak adhesion to impregnated or previously painted surfaces. To apply, use a brush with synthetic bristles. | Drying time - no more than 1 hour; the paint can be applied after 4 hours. |
| Alkyd primer (oil based) | Suitable for fresh and slightly weathered wood. Penetrates deeper than latex primer into the surface. Applied locally to isolate resinous pine knots. | Used before painting with oil compositions. Check label directions to see if the primer is suitable for blocking contaminants that bleed through the paint. Apply with a natural bristle brush. | Drying time "touch" - 45 minutes; staining after 8 hours (or more at low temperatures and high humidity). |
| Shellac primer (with added pigment) | Blocks resinous substances that can penetrate latex and oil primers. When renewing coatings, shellac promotes good adhesion of the new paint to the old coating and weathered wood. | Alcohol-based shellac dries in minutes and may have less of an odor than some oil-based primers. Shellac can be used before painting with both oil and water-based paints. Apply with natural bristle or universal brushes. | Dries in 15 minutes; the next layer is applied after 45 minutes. |
Degreasing the wood surface
For this, turpentine or acetone is used. Wet a rag with the solution. If there is too much resin on the tree, then these places are filled with solvent. This procedure should be repeated 4 times.
In order to remove the old coating, universal removers are used. First, they are applied to the paint and covered with polyethylene for half an hour. Then, using a spatula, remove the softened coating.
Selecting the material that will be used for painting
Wood has always been very popular in the production of furniture and interior decoration. Is it possible to paint ceramics with acrylic paints? But since it is a natural material, when painting surfaces, all the flaws and flaws can come out.
Therefore, proper preparation of products is important here. We'll talk about this right after we choose the paint we need.
To paint wood you can use the following materials:
- Varnish and enamel are almost transparent materials used to protect surfaces. But even after such staining, wooden products acquire an attractive shade
- Paint - can completely change the color of the object being painted, but at the same time leave the original wood texture
Table of divisions by composition:
Important! Modern paints are distinguished by their naturalness. More precisely, they are less toxic than varnishes and enamels
That is why use a respirator when painting with such materials.
Impregnations can not only shade wooden elements, but also protect them from the influence of fire. They have antibacterial properties and are quite often used for woodworking.
Technology of covering wood with protective materials
First of all, the wood must be dry!
Painting wood from https://www.listvennica.su with your own hands is not a difficult task, however, there are some nuances here. Before painting, make sure the wood base is dry and clean. If it is difficult to determine whether the base is dry or not, then take a plastic film approximately 40x40 in size. and glue it to the wood with tape so that there are no gaps. Leave everything like this for a day.
If the next day there is perspiration on the inside of the film or the base of the wood is damp to the touch, then the surface cannot be painted. It must first be dried thoroughly.
In addition, there should be no oil stains or dust on the surface of the wood. If painting takes place in winter, you need to make sure that there is no frozen water in the wood structure. Otherwise, the layer of paint or varnish will swell or peel over time.
Painting technology
So, after you are sure that the wood is ready for painting, you can get to work. To do this, open the jar and mix the paint thoroughly. Then we take a brush or roller (the choice depends on the number of areas and volumes of work) and start painting. Rollers and brushes should be purchased with the expectation that they will withstand solvent. The height of the pile at the roller should be average.
The painting technology is as follows: dip the roller in the paint, let it drip, and apply the material to the base. At one time there should be enough paint on the roller for 1.5-2 meters. It is better to apply the paint crosswise. First along and then across. If you have large areas to paint, you can use a piston compressor for painting, which works on the principle of airless spraying.
After applying one layer of material, take a break for 4-8 hours. The time depends on the temperature and humidity of the room. After the time has elapsed, check the condition of the dried layer. If the paint no longer sticks to your hands, you can apply the next layer.
Wood painting technology includes the following important points:
- Until the material is cured and has not gone through the polymerization period, it is fire hazardous.
- If painting wood takes place indoors, it is recommended to use class A respirators. Special protective suits are used to protect clothing.
- All subsequent layers are applied in a similar way.
- If it is not possible to apply paint or varnish in one day, then the rollers and brushes are soaked directly in the same material with which you worked. Just seal everything tightly.
- If it is necessary to fill cracks or chips in wood, this can be done with improvised putty. To do this, mix a small amount of enamel with wood dust and fill all the defects on the wood with it. It is better to putty after the first layer of primer. When everything is dry, the next layers of paint are applied.
- If these are floors, then after applying the last layer of paint, within a day you can walk on the wood, and after three days you can put a full chemical or mechanical load on the wood.
What are the benefits of painting wood with varnish or paint?
- Excellent adhesion
- Chemical resistance
- Temperature resistance
- Resistance to vibration-mechanical deformation
- Abrasion resistance
- Reliable wood protection plus metal protection
- Beautiful appearance
The painted wooden surface is absolutely harmless. You can use it everywhere. In production, in hospitals and even in children's institutions. The painting process is so simple that even a teenager can do it with his own hands.
Video: What and how to paint wood
{youtube}dYRbe51pAak{/youtube}
Also read with this material:
- How to paint wood
- How to paint parquet
- Types of parquet
Notes from the masters
All tools and materials used must be of high quality and not expired. It is better to choose paint and primer from the same company for high-quality painting.
Don't buy the most expensive primer. It all depends on the room. For example, if the room is dry and free of mold and mildew, there is no point in overpaying for hydrophobic properties and resistance to microorganisms.
After priming, painting the wood surface is easy. However, do not forget that the wood must be well prepared. Particular attention is paid to the ends. They absorb water the most, so you have to apply several layers.
This is why primer on wood walls is so important. There is no need to save at this important stage so that the result pleases you and the finish lasts a long time. All that remains is to choose the appropriate composition, perform a series of preparatory work and apply paint. The work requires an extra day and part of the budget, but the result is worth it.
Wood varnishing and etching
Varnishes provide long-lasting coverage, just like oil paints. The varnished surface can be matte, satin or shiny. Pigmented varnishes change the color of the wood. Etching produces a more dramatic tone than varnishing. To coat with varnish, wood is prepared in the same way as for coating with oil paint, i.e., level the surface with sandpaper and fill cracks and grooves, then sweep away the dust and wipe the surface with a lint-free cloth soaked in white spirit. You will need a lint-free cloth, fine sandpaper and a brush to apply the varnish.
- Rubbing in varnish. Pour some varnish into a wide container and lightly dip a rag into it. Rub the varnish into the surface along the grain of the wood.
- Processing the first layer with sandpaper. Once the first coat of varnish has dried (about 12 hours, depending on temperature and type of finish), lightly rub the surface with fine sandpaper.
- Removing dust. After sanding, sweep off any dust particles with a brush or old paint brush, then wipe with a lint-free cloth soaked in white spirit.
- Applying the final coat of varnish. Following the manufacturer's instructions, apply each coat of varnish with a clean brush. After each layer has dried, lightly wipe the surface.
Using stain or how to create an antique effect
Often, instead of paint or varnish, stain is chosen for painting doors. This material allows you to accurately recreate the structure of real wood, which will make even cheap doors more presentable. And to create the effect of antiquity, additionally stock up on antique wax. Before performing work, the canvas should be wiped with a slightly damp cloth - in this case, the wood will not absorb much moisture, and the stain will lie as smoothly as possible.
Coating the door with stain
Apply stain in a thin layer of no more than 0.5 mm. After treatment, wait a couple of seconds and wash off the stain with a damp sponge. After the canvas has completely dried, apply another layer of the composition, wait for it to dry and cover the canvas with alkaline primer. Apply antique wax on top and, using a metal brush, rub it into the fabric along the fibers. After such treatment, the doors will retain their aged appearance for a long time.
Remember that when painting wooden canvases it is better to use velor rollers, the structure of which is ideal for working with varnishes and paints. But it is strictly not recommended to use rollers designed to work with water-based paints. This can lead to unevenness of the painted canvas.
Publer Ksenia L
Should I turn to professionals?
Despite the apparent simplicity of the technology, in order to saturate wood with oil to create a high-quality and long-lasting coating, it is necessary not only to be fluent in the technology of applying oil, but also to know the features of the protective compounds used.
Since our company is the official supplier of the most famous brands of protective oils, all specialists directly involved in the work regularly attend advanced training courses, which guarantees full compliance of the coatings created with all working regulations.
accepts orders for repair or finishing treatment of wooden log houses and outbuildings, including oil painting and final sanding of coatings. You can clarify the details of cooperation and order a visit from a specialist to draw up an accurate work plan by contacting us by e-mail or by phone numbers published in the “Contacts” section.
Calculate the cost of painting and insulating your home right now
Select types of work:
Select materials:
Properties of wood
Wood is an extremely heterogeneous material, susceptible to the damaging effects of moisture.
The heartwood, unlike sapwood, is naturally resistant to biological degradation.
| Rice. 1. Sectional view of a tree trunk |
Wood of a radial cut changes its dimensions 2 times less with changes in humidity compared to tangential ones, is not subject to warping due to its uniformity, is most resistant to biological damage, but is less decorative.
| Rice. 2. Cutting a tree trunk |
What causes the main defects when painting wood?Finishing defects can appear on softwood due to the presence of resins, gums, and on hardwood due to the presence of pores, waxes, tannins, and oils. The pile on wood during painting may rise when paints and varnishes are applied to the surface of the wood due to the swelling of the piles and the action of capillary forces. But porosity is one of the main properties of wood. To close pores in large-vascular rocks, special thick paints and pore fillers may be necessary. |
In what cases is oil impregnation recommended?
At the moment, it is difficult to identify situations where oil treatment is the only solution. Any oiled surfaces could almost always be painted over.
However, in some cases, oil protection will be more effective and will allow you to achieve results that would not be possible with similar treatment with traditional paints and varnishes.
The lower crowns of the log house
The lower crowns of a log house are the Achilles heel of a wooden house, and their protection should be treated with maximum attention. Due to the vapor permeability of the coating, oil treatment in this case is the most preferable of all possible options.
The oil protective layer creates an optimal microclimate inside the logs, with minimal risk of developing fungal diseases.
Internal wall surfaces
Of all the existing types of painting of wooden buildings, impregnation with pure oils is the most environmentally friendly.
Considering that such processing also enhances the decorative effect, the use of oils for the interior decoration of wooden cottages has become a de facto standard in the modern architecture of houses made of timber and logs.
Surfaces with complex terrain
When designing the design of a house and outbuildings, it is necessary to consider not only the initial appearance of their coating, but also how this coating will be updated.
Obviously, boards decorated with carvings or profiled for technological reasons are extremely difficult to repaint if traditional paints and varnishes were originally used.
In this connection, oil impregnations are definitely more convenient for processing carved platbands, decking boards, steps and garden furniture.