SNiP Residential buildings on distance standards
The rules contained in the regulatory document are mandatory for the construction of any type of building - industrial, public, medical, educational and residential. However, there is an unspoken opinion that owners of premises in residential buildings and private buildings can deviate from the dictated standards if they themselves carry out their maintenance and operation.
Basically, such a retreat is made by the owners of premises with bathrooms, combined or frankly small. If the toilet is spacious enough, it is better to adhere to the established rules in order to use special rooms with convenience and safety:
- to the front (front) wall or wall with a door, if we are talking about a small toilet, the minimum distance is 53 cm. This is enough to not feel tightness in the knee joint;
- the maximum required distance from the frontal plane located in front of the seated person is 76 cm;
- the maximum distance from the front does not particularly need to be regulated, and if possible, the functional zone for a person can be more than a meter;
- from the middle axis of the toilet to the side wall, the established minimum is 40 cm. In some sources it is defined as 38 cm;
- the optimal distance from the central axis of the toilet is 45 cm. This is enough for comfortable operation of the plumbing fixture. But no one forbids installing at a greater distance, if the parameters of the allocated room allow it;
- in a separate toilet, the distance between the toilet and the wall on the left in standard buildings is usually equal to the distance to the wall on the right side;
- The location of the toilet in the toilet room is usually the center of the room, because the sewer pipe is supplied here. This also determines the position of the remaining toilets on the riser on the floors above and below;
- The second option for placing plumbing equipment is closer to the back wall. This does not make it possible to equip some kind of shelves or rack, but it is typical for the minimum dimensions of the toilet in apartments of standard construction, where the bathroom is separate;
- The toilet stall in Soviet-era houses was built according to size, when the central placement provided the necessary distances to the side wall and front surface with the entrance door located in it.
When arranging a shared bathroom, there are certain conditions that must be observed. These are standards for the distance of the toilet from other interior items that should be adhered to, even minimally.
But this is not a suitable option if the dimensions of one of the family members do not correspond to the average figures for which the building codes and standards are calculated.
Installation. Subtleties of choice, installation secrets and typical mistakes made during installation
What is installation?
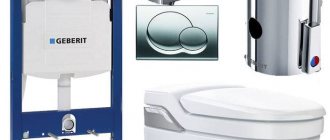
The installation is a durable metal frame-type structure, which serves as the basis for attaching suspended plumbing fixtures. The main feature of the installation is its high aesthetic component. Covered with plasterboard and tiled, this system allows you to hide unsightly sewer pipes and the water supply system. All that remains visible is the toilet floating above the floor and the stylish flush button. Characteristically, despite the apparent airiness of the entire structure, both Cersanit models are designed for loads of up to 400 kg.
In addition to aesthetics, the undeniable advantages of installations include:
- long service life. The design is designed for trouble-free operation for many years, which is confirmed by a warranty period of 10 years for Aqua 40 and 25 years for Aqua 50.
More details about the installation in the video.
Selection options and equipment
Other publications from Cersanit
No matter how rich a specialist’s experience is, and no matter how confident he is, sometimes he needs to consult with someone. Communication on the Internet has long become familiar to us. Various network users - whether a professional or a knowledgeable amateur - can post life hacks (simple useful tips on various topics) online that can be usefully applied to your home.
What are the advantages of using forum resources?
Our forum contains all the latest construction news, because our specialists always keep their finger on the pulse of construction events. Here you will find useful information for the operation of the premises, equipment and so on. Many people find it useful to do more for the home with their own hands, because it is healthy, economically beneficial, and provides some moral comfort. And a logical question arises: “How to do it yourself?” You can get answers by browsing our website. It is after visiting this forum that you will fully experience all the advantages. On this online resource you will find information for arranging a summer house with your own hands. But many of those recommendations can be taken into account when arranging an apartment. To carry out household projects of various sizes, you need equipment. For general consultation of site visitors, an overview of tools is created, where the information is presented simply and accessible.
Source
Recommendations you need
Let us allow ourselves to give the reader some advice on the installation and selection of the plumbing fixture that interests us.
Choice
Like floor-mounted, wall-hung toilets can be made from various materials. Let's try to evaluate them.
Polished stainless steel is virtually dirt-free due to its smooth surface. If deposits still remain on it, they can be easily removed using any household chemical.
Why does stainless steel occupy a much smaller market share than competing solutions?
- Pair of breech type metal plumbing fixtures. It has become familiar as anti-vandal equipment for public restrooms and evokes corresponding associations among many potential clients.
- In addition, the price of stainless steel toilets is much higher than that of ceramic analogues, and starts from approximately 20,000 rubles.
Glass is not much inferior to stainless steel in practicality; but viewing through the translucent walls what remains on the walls of the bowl below the water level is a rather dubious pleasure.
The main disadvantage of polymer concrete is its limited resistance to aggressive cleaning scratches and cleaning agents. Removing lime deposits and urinary stone from it without disturbing the appearance of the surface is not an easy task.
The main value of sanitaryware is its low cost. It is precisely on this basis that it is the undoubted favorite of the plumbing market. The downside is that its large-porous surface actively collects dirt and quite often lacks cleaning.
Finally, the material that is optimal in terms of functionality and cost combination is porcelain. The walls of the toilet will remain white as snow for a long time; If the need for cleaning does arise, you can safely use acidic and alkaline preparations.
Installation
Are there any subtleties to installing a wall-hung toilet yourself?
The installation stages themselves are comprehensively outlined in the accompanying documentation:
- The placement of the installation frame is marked by level or plumb.
- It is anchored to the wall and/or floor.
- Water is supplied to the tank, and a sewer pipe is supplied to the location of the toilet flare.
- The hole in the tank for the drain button is closed with a special membrane or simple polyethylene, after which the communications and installation are hidden behind a false wall. In most cases, it is laid out from moisture-resistant plasterboard over a galvanized profile and laid out with tiles.
- Once the tiles have firmly set, the toilet is hung on the studs of the installation, and a flush button is installed in the tank. A damper gasket is needed between the wall and the toilet to distribute the load on the tile and prevent chips from occurring.
By the way: in the absence of a gasket, silicone sealant can play its role.
There are a couple of nuances here:
- It is better to place the tiles away from the drain button, so that the seams are located symmetrically relative to the center of the button. Asymmetry does not look very careful.
- The smaller the sewerage drain to the riser, the less likely it is to become clogged. Do not forget about the slope: for pipes with a diameter of 90 and 110 mm used for hidden installation, it is equal to 2 cm per linear meter.
- It is better to collect the sewerage using sealant. The instructions are due to the fact that rubber seals can lose elasticity over time and allow leaks.
- Forget about flexible eyeliners. Water is supplied to the tank by a solid pipe. The service life of a braided rubber hose rarely exceeds 5 years.
- Despite the fact that the tank fittings in most cases allow you to shut off the water through the service hatch behind the drain button, it is better to provide the supply to the tank with a valve and leave a hatch in the false wall to access it.
What is a toilet installation?
If the owner wants to install popular wall-hung toilets or bidets, he will also need to install a special structure - an installation. It performs the following functions:
Using wall-hung toilets will free up space and also prevent dampness under the plumbing. Another advantage is that there is no need to dismantle the product if you want to change the floor tiles.
When choosing a location for plumbing fixtures, it is advisable to take into account that the back wall will move forward by 20-25 cm.
The tank is usually made of polymer material. After installation work is completed, it will be impossible to access it, because the built-in system is completely covered with external finishing, for example, ceramic tiles. When installation is completed, the owner will only have access to the ability to regulate using the drain button.
Therefore, it is important to initially purchase high-quality plumbing fixtures, because... If a malfunction occurs, you will need to repeat the procedure: remove the tiles, dismantle the bull, then install the system again. This will cost the apartment owner much more than if you initially buy high-quality plumbing fixtures.
Installation of wall hung toilets
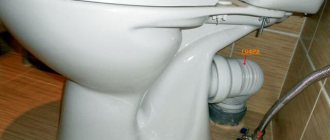
How to install a wall-mounted toilet so that the system works properly and does not cause any complaints? The first step you need to take when starting to install a wall-hung toilet with your own hands. There will be installation of a steel frame, called installation. Using dowels, the installation is attached to the wall and floor surface. A 110 mm sewer pipe and water supply must be connected to the place where the toilet will be located. The installation of toilet bowls must be carried out in compliance with horizontal and vertical levels. The installation process itself is quite simple: the design includes special rods and studs that allow you to attach the frame to the wall.
The height of the bowl is adjusted taking into account the height of the residents who will most often use the toilet, so the selection of this indicator should be done in a practical way. As a rule, the installation height of the toilet from the floor is about 40 cm. Further installation of the wall-mounted toilet involves connecting the water supply to the flush cistern. It is advisable to use reliable pipes that can last much longer than flexible hoses. When installing the liner, it is necessary to close the valve located in the tank.
The next step is to connect the toilet outlet to the sewer, for which you will need a corrugation (read: “How to install a corrugation on a toilet correctly”). To check the functionality of the system, the bowl must be placed on the installation and drained. There is no need to securely fasten the bowl, since its final installation is done last. The installed frame is covered with pre-purchased plasterboard, which is attached directly to the frame and to the wall.
To make the correct cuts on drywall, you should use the instructions for the attachment: it usually contains a diagram that greatly facilitates the process of creating technological holes. When the frame is installed and covered with plasterboard, you can begin cladding, for which ceramic tiles are used. When choosing a tile, you need to take into account its aesthetic qualities and the planned interior of the bathroom. The installation of the wall-hung toilet is complete and it can now perform its functions.
How to properly install a wall-hung toilet
Installing plumbing fixtures yourself is not that difficult if you follow the instructions exactly. Let's analyze the process using the example of a frame model. We have divided the process into stages and offer a detailed description of them.
Necessary equipment and tools
Work begins with checking the configuration. Sometimes it happens that it is not complete. If this becomes clear during installation, you will have to immediately go to the store. Therefore, it is better to check everything and buy in advance. Here is a list of components.
What is included
You will need silicone sealant to seal the joints. To seal the threaded connections from the inside, they are wrapped with FUM tape.
Required Tools
Once everything is prepared, you can move on to the next stage.
Marking
Before installing the installation for the toilet with your own hands, check once again whether the requirements of building regulations are met. After this, they begin marking.
Frame installation
Holes for dowels are made on vertical and horizontal surfaces according to the markings. Adjustable bolts and nuts from the kit are screwed into them. The frame is set using a building level. The height is adjusted with screw feet, the depth with wall screws. All connections must be secured. Otherwise, under the influence of vibration, they will weaken or become unusable. This will lead to the frame and tank falling and damage to the entire structure.
Install the studs that come with the kit. When securing the bowl, you can use store-bought pins, but their strength should be taken with reserve. The console puts a large load on the base. The kit may include extended studs that extend through the frame and are secured to the wall.
Communications liner
Water comes to the tank from the HVO pipes. If the toilet has a bidet function, hot water is also connected. If the hoses are not included in the kit, standard fittings are used for the connections, as for conventional plumbing. Flexible hoses are not reliable. It is better to use metal-plastic products. The connection is made from above or from the side.
Communications are carried out in hidden channels or boxes. It is prohibited to hammer reinforced concrete slabs. According to current regulations, work that worsens the load-bearing capacity of walls and floors is prohibited, so the restriction may also apply to brick and monolithic structures. The laying may be carried out in a layer of plaster or in another coating that does not affect the strength of the building.
To connect to the sewer riser, you need to prepare a plastic or cast iron pipe with a diameter of 10 cm. Its far end is coated with sealant, connected to the entrance to the riser and secured with a clamp tightened with a screw. The other part is fastened to the frame with a clamp. This part is L-shaped. The plumbing fixture is connected to its horizontal top.
If you are far from the riser, the drain will have to be raised so that the water inside does not stagnate. The slope should be 2-3 cm per 1 running meter. The sleeve is hidden in a removable box or channel in the ceiling. In the latter case, they make a screed, leaving free space in the corner. With a significant slope, it will turn out to be too massive and high.
In typical apartments, this technique cannot always be used. It is better to calculate all the nuances before starting work. When installing a toilet installation, the installation dimensions must be known in advance. This will save time and prevent mistakes. When all the power elements are installed and the pipes are connected, the system is checked again and covered with a false panel.
Installation of a gypsum plasterboard partition
It is cut out from a sheet of plasterboard along the width of the niche, after which holes are made in it for the pins, a drain that supplies water to the bowl, and a drain. When installing a shower toilet, you will need to drill holes for the faucet that supplies cold and hot water. If the buttons are located at the front, a niche for them is made at a height of more than 1 m from the level of the finished floor covering.
They use plasterboard with a green color - it easily withstands moisture. They cover a frame made of aluminum profile. Its guides are attached to the floor, walls and ceiling with dowels, then connected with stiffening ribs. Their number depends on the mass of the wall covering and the thickness of the profile. The joints of the sheets should not hang. They are screwed to metal parts and covered with putty.
If the edges are not secured, the putty will quickly peel off due to vibration. After the cladding is completed, it is lined. They move on to the next stage only after the tile adhesive, plaster or other finishing material has completely set. This takes from one to several days.
Mounting a wall-hung toilet
The toilet is mounted on a pre-prepared false wall. We present the technology for carrying out the work.
Installation of the flush key
The installation is completed by installing a flush key, one or two. This depends on the model of the hanging equipment. There are pneumatic and mechanical varieties. In any case, there are no problems with installation, since all the nodes and connections necessary for their operation are already displayed on the panel.
To install a mechanical key, pins are used, and the pneumatic key is secured using small tubes. The parts are placed on the panel and connected to the removed nodes. Then, if necessary, adjust their position. Sometimes they do without them.
Checking the quality of work
At this stage, the strength of the connections and their immobility are checked. Then water is poured into the tank and drained. It is necessary to pay attention to the force of pressure. If it is insufficient, the system will have to be adjusted. There should be no leaks. They appear when the seals are unevenly positioned at the joints. They need to be corrected by turning off the water supply and disassembling the system.
If the drainage is poor, the cause should be sought in the insufficient slope of the outlet pipe connected to the sewer riser. Perhaps the point is that the trajectory is too complex. The more angles, the more obstacles to the flow. To correct the error, you need to raise the drain a few centimeters or smooth out the corners with adapters. Instead of one 90-degree adapter, use two 45-degree adapters.
Dmitry, you are probably not an amateur at all and measure the slope of the pipe with a spreader? ))
Alexander, Dmitry at least bothered to give an argument, but you just - don’t read, you’re not a plumber, where are the arguments, what’s the reason? or is tow not tow? ))))
Source
Advantages and disadvantages
The advantages of toilet models with horizontal (parallel to the floor) outlet include the following features and factors:
- fits even where previously there was a toilet with an oblique type outlet (that is, there is versatility);
- it is possible to connect not only to a horizontal sewer pipe, but also directly to a vertical riser using adapters;
- mounted close to the wall without taking up extra space;
- low cost;
- wide model range.
There are also many disadvantages:
- attachment of the installation site to one of the walls of the room - the one where the sewer pipeline passes;
- relative complexity of installation, especially in terms of connecting the outlet to the sewer;
- careful sealing of the connection points between the outlet and the sewer main, the need to monitor for leaks during the first time after installation;
- Possibility of clogging of the outlet channel.
Standards and installation
If you decide to install a wall-hung toilet yourself, then you need to know the correct sequence of actions and follow them. It’s easier with floor-standing toilets, since their height already corresponds to the standard. When installing, you need to take into account only one nuance: the installation of the toilet occurs after or before laying the floor.
With the second option, it is necessary to take into account the difference that will appear after laying the floor; to do this, you need to calculate the size of the installed floor and, if necessary, use a stand to increase the height.
You should follow the sequence of actions when installing a floor-standing toilet.
- Choosing the correct location of the structure.
- Assembling the drain tank, studying the manufacturer's instructions, and attaching the water supply pipe to it.
- Preparing the location chosen for installation. To do this, you will need to clean the sewerage compartment and insert an adapter (pipe) there. You should lubricate it and the seal with plumbing grease, which will protect against unpleasant odors. You need to cover the water and wipe the flooring dry.
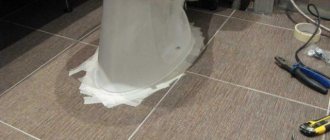
- It is necessary to attach it to the sewer and make markings for fastenings. The corrugation must be treated with sealant before attaching it to the drain. The toilet should be located in the middle between walls or other objects. You need to place the toilet in the place where it is to be installed and make a marking at the base (draw along the contour for ease of applying sealant).
Height of installation of the toilet from the floor
According to statistics, a person spends almost 2 years of his life on the toilet. In order for him to feel comfortable during this period, hundreds of models of these devices were invented. These can be structures consisting of a cistern and bowl, drainage systems, or hanging models.
Toilets - types and sizes
– console type. Hanging models are becoming more and more popular every year. This is due, first of all, to their miniature size. Outwardly, such a device seems much smaller, because the drain barrel is installed in the wall, and only the thicket is visible to the eye. If we are talking about a block installation, then during installation it is walled up in the main wall; as for a frame installation, it is built under a plasterboard panel. A wall-hung toilet with installation is practically no different in size from a floor-mounted one.
Standard dimensions of the hanging device:
– width – 30-40 cm
– the height of the wall-hung toilet is 50-60 cm (this means the height of the bowl itself).
There are models with increased length - up to 700 mm. If the structure is made of porcelain, its weight can reach 25 kg, if made of earthenware - up to 27 kg.
– compact toilets. Today this is the most popular variety, consisting of a bowl and a flush barrel, as well as the necessary fittings. The bowl is located on a special leg that rests on the floor. The barrel can be mounted separately (on the wall or to an installation system) or placed on a solid-cast shelf with a bowl. Such models are extremely easy to install, but are more demanding to maintain, since you have to wash not only the bowl, but also the leg, barrel and communication system.
– width – up to 38 cm,
– length – up to 67.5 cm,
– the height of the compact toilet from the floor together with the tank is up to 80 cm,
– seat height – up to 40 cm.
The weight of the device depends on the material from which it is made. The porcelain model will weigh up to 28 kg, the earthenware model - up to 31 kg.
– corner toilets. Designed for rooms of non-standard shape, where it is impossible to install a conventional model. The dimensions of such devices are as follows:
– width – up to 36 cm,
– length – up to 76 cm,
– height including barrels – up to 81.5 cm,
– seat height – 40 cm.
- children's model. Used in houses with several bathrooms. Dimensions of the hanging type device are 33 x 54 x 30 cm, floor-standing options are 31.5 x 51 x 69 cm. Dimensions include the tank.
Installation of a wall-hung toilet
It makes sense to install a floor-standing model only where there is no possibility of hidden wall-mounted installation of pipelines. In all other cases, you can install a suspended model.
To install a hanging device, you will need an outlet for the riser and connection components, studs, Teflon tape, a flexible hose with an angle valve (needed to connect the flush tank and the water supply pipe).
Installation stages
The presence of an installation system greatly simplifies the installation process, since all that is required is to hang it on the studs and tighten the nuts on them. But before you begin installation, you need to determine the installation height of the toilet from the floor. Hanging models should be mounted so that their top is located at a distance of 40 cm from the floor covering, and at the bottom - 5 cm from the floor surface. You can check the installation height of suspended equipment by adjusting the installation system. For children, you can install the equipment lower, for tall people - a little higher.
So, the equipment is hung on 2 studs, which are wrapped in an installation frame. Next, use the nuts to turn the studs until they stop. After the distance from the cut of the pipe in the wall to the surface of the tile is determined, the waste and water supply pipes are cut.
We connect the toilet to the pipes, then the final tightening of the nuts on the studs is carried out. The hooks are inserted from below and from the side with the bent part into the holes in the lower and upper parts of the lid. The lid is turned over, a hook is inserted into the holes, and nuts are screwed from below.
We are installing a drain button. Considering the fact that today there are a huge number of models of flush buttons, during installation you should follow the instructions and charters. Before proceeding with the installation of the button, open the water supply tap and insert the cables located inside the drain tank into the hole on the button. We check the functionality of the design and snap the button.
Preparatory work
During the preparatory work, materials and tools are purchased, markings are made for the installation, and a niche is cut out in the main wall for the block installation. The last operation is not always performed. Often the tank is installed on the surface of the wall. But in this case it is better to buy a frame structure.
Required materials and tools
Do-it-yourself toilet installation is impossible without purchasing an installation kit, auxiliary materials, and also purchasing a set of tools. The last position is not difficult. Therefore, some or all of the tools can be found at home, with friends or neighbors. As a last resort, rent from specialized companies.
The installation kit should include:
- frame structure;
- plastic tank;
- inlet valve;
- fitting;
- fastening elements for the frame and toilet;
- drain control panel with a button (experts call the entire panel a button or key);
- flush elbow;
- drain pipe;
- pipe plugs - installed during installation to prevent debris from getting inside;
- noise-insulating (shock-absorbing) gasket under the toilet;
- wall hung toilet bowl;
- toilet seat;
- toilet lid.
In addition, you will need auxiliary materials:
- pipe for connecting the tank to the water supply;
- silicone-based sealant for insulating the connections between flush pipes, the toilet bowl and the sewer riser;
- flax fiber or fum tape for insulating threads on fittings.
Tools you will need:
- hammer drill with pobedite or diamond drills for concrete or brick;
- hammer;
- set of wrenches;
- adjustable (gas) wrench;
- level;
- plumb line;
- screwdriver or screwdrivers;
- construction knife;
- roulette;
- construction corner;
- marker or simple pencil (for builders);
- grinder with cutting wheel or hacksaw for metal.
Marking the wall for installation
It is theoretically possible to install the installation correctly without preliminary marking, but in practice it is very difficult.
Therefore, you need to arm yourself with a tape measure, a pencil, a plumb line and a long, even strip, or better yet, mark on the wall the dimensions for installing the installation for the toilet: a vertical line that will serve as the axis for the structure of the wall-hung toilet and the mounting point for the frame. There are several installation options here, and therefore several options for determining the center line:
- In a separate bathroom only a toilet is installed. In this case, a vertical line is drawn strictly in the center of the wall near which the installation will stand.
- It is planned to install a bidet next to the toilet. Then two axes, one for the toilet frame, the second for the bidet, should divide the wall into three equal parts. This is the best option, but not the only one. With a long wall, the proportions may be disrupted while maintaining a minimum distance of 50 cm between the toilet and bidet bowls.
- In a combined bathroom, the vertical is drawn in the center of the selected location. But at the same time, one rule must be followed: the installation frame must be at least 13.5 mm from the adjacent wall. Then the center line will be located from the side wall at a distance of ½ the installation width +13.5 mm.
After applying the vertical line, the location of the drain panel is determined. It should be at a height of 1 m from the finishing of the floor: tiles, laminate, parquet or linoleum. Therefore, you need to take into account what the legs of the structure are installed on: on the base of the floor or on the screed. In the first case, you should take into account the thickness of the screed, tile adhesive and tiles if the floor is ceramic, in the second - only glue and tiles.
Further operations are carried out in the following sequence:
- the top of the structure is located;
- a horizontal line is drawn through the top point of the frame, after which marks are made on it for the installation width of the installation;
- through the marked points, strictly vertical lines are lowered down the wall, after which they continue along the floor perpendicular to the wall and parallel to each other at a distance of up to 25 cm from the wall surface;
- The lines on the floor determine where the legs will be installed. The calculation is carried out as follows: 1.5 cm is added to the depth of the structure for the gap between the tank and the wall and 3.5 cm if the sewer pipe is laid along the wall. The given figures apply to smooth walls. If the plane of the wall is blocked or there is a curvature, corrections are made;
- the points on the floor are connected;
- the perpendicularity of the drawn line in relation to the adjacent wall is checked. If there is no 90o, the foot placement points are adjusted. In this case, the legs of the frame will have different distances to the wall. Here you need to maintain the actual depth of the structure at the leg closest to the wall by adding 1.5 cm.
Advantages and disadvantages
In general, the installation has the following advantages:
- beautiful appearance, accordingly, this is reflected in the overall design of the room;
- convenient to clean the room;
- takes up little space;
- good sound insulation;
- Warranty period – from 10 years.
The Geberit brand has many obvious advantages. The main ones are: ease of maintenance of the equipment, as well as the use of structures made of high-quality and reliable materials.
Here are a number of advantages of the installation from the manufacturer Geberit, namely:
- the structure is made of steel;
- toilets are tested - they are loaded with a load of up to 500 kg;
- the tank is made of HDPE, it is a one-piece, seamless tank;
- the unit is 100 percent sealed;
- the flush elbow is welded three times;
- functional units have comfortable access;
- spare parts will be supplied under warranty for 25 years;
- The device is easy to install.
It is worth noting such negative aspects in using the installation as:
- high price;
- complex installation;
- it is difficult to immediately understand that there is a leak, since all hoses are covered with false panels;
- legal component - utility services do not allow closing the riser, so you have to get the approval of these services so that there are no problems in the future.
Installation of the release button
For some reason, professional plumbers believe that installing a panel with drain control buttons is beyond the power of a non-professional. However, there is nothing complicated here. Let's look at the process in detail.
- We remove the plug, cutting it flush with the tile with a knife.
- We remove the plug. It is always colored, and different models have different colors.
- Open the tap.
- We place the rocker arm on the drain assembly.
- Among the installation elements we find a gasket and a metal frame for the technological window.
- We fasten the spacer rods and install a gasket on them.
Spacer rods are installed.
- Find the position of the frame on the inspection window.
- Using a screwdriver, attach the frame to the spacer rods. It is important here not to twist, so as not to break the thread of the plastic.
- We find the pushers (white plastic rods with threads) and screw them in. The depth of screwing is controlled by the drain button. To do this, you need to constantly try it on. After screwing in, we fix them with special latches.
- We mount the panel with buttons. To do this, first press down the lower stop and install the panel. After that, we pull it onto the frame and snap it at the top.
On the floor or above the floor
In advertising brochures talking about the advantages of wall-hung toilets, the following main points are given:
- Hanging plumbing does not interfere with cleaning, leaving the entire floor area accessible.
- It makes a compact toilet spacious, allowing you to save space due to the tank.
- It allows you to completely hide communications, thereby improving the appearance of the bathroom.
Let's try to find out how much truth there is in marketers' statements.
Free floor
The statement is true without any qualifications. Installation - the frame to which the toilet is attached is hidden behind a false wall, leaving the entire floor area accessible.
This indicates that in your bathroom there will no longer be black and damp places under the tank, that the base of the toilet bowl will not really interfere with cleaning, and to change the tiles you will not need to dismantle it. In addition: the vacated floor will give more scope to your imagination when choosing a flooring pattern.
Compactness
Console plumbing will indeed make the room more spacious, but only visually. The dimensions of a wall-hung toilet with a concealed cistern and installation are at least no smaller than the floor structure: due to the thickness of the false wall, they are likely to be larger.
Visual space will be associated with the highlights of a person’s perception of the size of the room. They are unconsciously assessed by the area of two planes - the floor and the ceiling. Because the floor in our case is not cluttered, the toilet, regardless of the actual reduction in floor area, will begin to seem less cramped.
Hidden communications
Yes, they really will be completely hidden. In addition to the toilet bowl, only the flush button will remain visible. Yes, it will be beautiful, but defiantly impractical.
You see, dear reader, the creator of this article, over a decade of working as a plumber, became convinced that every structure certainly lacks repair, be it a water supply system, a sewer system, a drain tank or a valve. Making communications difficult to access is guaranteed to create difficulties for yourself in the future. Even if it happens in 10 or 20 years.
In addition: in a compact municipal apartment, the back wall of the toilet, which in most cases is hidden by a false wall along with the installation, is decorated with sewerage and water supply risers. In addition, if you are not too lazy to first replace them with durable polymer or metal-polymer pipes, who can guarantee that they will not be damaged during a pressure surge? Or, as an option, there will be no need to replace a section of the riser in the ceiling (which more than happens)?
Conclusions? Anyone can make them for themselves. Let's put it this way: the author never once had the thought of choosing something other than the classic floor design.
Features of wall-hung toilets
The system consists of a bowl and a flat drain tank. Its volume is no less than that of a regular one. It has a small thickness, but occupies a significant area. The main elements in most cases do not come into contact with the floor and are supported on metal stands. This is the main difference from the floor-standing analogue, which rests on the floor.
The vertical part is hidden behind a false wall. As a rule, this is an aluminum frame covered with sheets of plasterboard. It easily holds the weight of tiles and massive shelves. The release button is installed on the partition. Connection to the sewerage system is carried out using standard pipes. The height of the bowl ensures normal drainage in a typical apartment and country house.
Types of embedded systems
How to choose a stove for a summer house
The most convenient stoves for cottages made of cast iron are considered to be convector options. However, choosing one oven from the entire huge range of convection ovens is not as easy as the others.
- Water-heated furnace - the best furnaces and schemes with a water circuit. Tips for choosing and do-it-yourself installation features (95 photos)
- Exhaust furnace - installation, selection and necessary equipment for exhaust furnaces (85 photos and videos)
- Ceramic kiln - review of the best models and tips for using them at home (130 photos)
To make the right choice, you need to determine several different parameters.
In addition, you need to pay attention to the size and purpose of the stove
Another selection rule is to determine the additional functions that the stove should have. For example, the presence of an oven or hob. Thus, choosing a cast iron stove for your home or cottage is not at all difficult.
Divided by type, shape, color: black, bronze, chrome
The flush button is purchased separately from the main structure. This allows you to choose a reliable that is suitable in cost and design. The manufacturer market offers a wide range of panels. They differ in the type of flush, shape, color and material from which they are made.
Photo 1. Single round key from Geberit, easy to use, cheaper than double key.
Advantages of single buttons: easy to use, inexpensive, and easy to clean. Disadvantage - you cannot reduce water consumption.
The two-button option helps reduce water consumption. One key allows you to drain the entire volume, the second - only part of it. Disadvantage - the price is higher than for single ones, confusion arises when choosing a button during draining.
Reference! As a rule, manufacturers make the water drain button larger, while the “economy” button is smaller .
There is also a “start/stop” mechanism; it is made with both one and two buttons. This device allows you to stop the flow of water by pressing again at any time . This functionality helps to use water as economically as possible.
The shape of the button is:
The form does not carry any special functionality; the aesthetic component is more important here. The choice of the shape of the button depends on personal preferences , on the general concept of the toilet room and on the chosen style in the design of the bathroom.
Advantages : huge range, laconic, easy to care for. The disadvantage is the banality of the forms.
By color. Manufacturers provide a whole palette of paints, the main colors are:
These colors are most often used in interiors.
The advantages of black color are that they do not stain, fingerprints are not visible on them, and they add extravagance. Disadvantage : stains from detergents remain and limescale deposits are visible.
Bronze buttons are practical to use and easy to clean. Disadvantages - the coating loses its original appearance, the assortment is poor.
The advantages of chrome panels are their versatility , they can be combined with other plumbing elements, and they do not leave fingerprints on them. Disadvantage: the coating fades.
How to choose?
There is no strictly defined standard for the dimensions of installation frames. In each specific case, the choice is made taking into account the dimensions and design features of the toilet room. If you have enough free space, you can think about installing larger structures, including even a bidet.
If there is a solid wall in the room, it is worth considering block models of installation frames. It is often necessary to equip a non-standard room in limited space. In such cases, experts recommend studying the dimensions of corner structures.
It turns out that choosing a box for subsequent installation of plumbing must take into account not only personal preferences. In this case, we are also talking about the installation and connection features of all products. So, for example, the installation dimensions for a built-in toilet are selected taking into account the distance from the bowl to the wall or pieces of furniture. This value must be at least 60 cm, otherwise using the toilet will be uncomfortable, since your feet will rest against the mentioned obstacles.
Standard systems are suitable for equipping larger rooms. In such cases, the bowl is installed 18-20 cm from the box. And it is recommended to maintain the distance mentioned above on all sides of the plumbing fixture.
Before purchasing and starting installation, you should carefully study the plan of the toilet or bathroom. This will allow you to choose the most convenient and most suitable place for the plumbing and its dimensions
It is worth paying special attention to the following points
- With standard installation of the frame near the walls of the toilet room, you can choose both block and frame models. Their sizes are selected taking into account the dimensions of the plumbing and the room.
- If you need to install a plumbing system in a small room, in the attic or under a window, then you should consider small-sized models. Their height should not exceed 85 cm.
- For installation of plumbing fixtures on both sides of the duct, installations with appropriate fasteners (double-sided) and dimensions are provided.
- When equipping premises in which it is necessary to install several wall-hung toilets at once, special installations are chosen. We are talking about linear structures with a height of 115 cm.
The vast majority of frames are rectangular in shape. At the same time, they should be selected taking into account the commensurability of the parameters of the product itself and the niche. In cases where the box is larger, the voids are usually filled with materials that have soundproofing properties.
The standard dimensions of built-in toilet models are as follows:
- height – from 35 to 45 cm;
- depth – from 50 to 60 cm;
- width – from 30 to 40 cm.
Although the parameters given are standard, they may vary.
It should be remembered that now manufacturing companies offer more than a wide range of models. We can talk about special children's toilets, as well as products with enlarged bowls. In addition, plumbing fixtures are produced for people with disabilities and heavy weight. Naturally, all these factors will determine the choice of installation structures and their dimensions.
In addition to all of the above, you should take into account the size of the cistern. In the vast majority of cases, the thickness of hanging plastic devices is 9.5 cm and their width is 0.5 m
The height of such tanks, as a rule, is slightly higher than the similar parameters of conventional models. This size varies from 55 to 60 cm.
When choosing a frame for installing built-in plumbing, you need to remember the design features of various types of systems. Thus, frame options have a depth of 15-30 cm (more often we are talking about the minimum parameter). The height of such models can be from 85 to 140 cm, and their maximum width is 60 cm.
The following dimensions must also be taken into account:
- the center of the sewer pipe is located 22 cm from the level of the floor covering;
- The distance between mounting holes is 18 to 23 cm.
The minimum dimensions of block installations are, as a rule, identical to the similar parameters of frame structures. Their depth can be from 10 to 15 cm, and their height can be up to 1 meter. It is also necessary to consider the possibility of separate installation of the built-in cistern and toilet bowl. The latter in such cases is not attached to a niche, but directly to the wall.
For more information about the installation for the toilet, see the video below.
Features of installation of installations from different manufacturers
Do you remember that the list of factors influencing height included individual parameters from manufacturers? The fact is that many of them, wanting to stand out in the installation market, use original technical solutions. Let's look at them using the example of several companies:
- Grohe. It has one row of holes in height for studs. In addition, the company offers the consumer a choice: he can place the flush button frontally or on top (for example, if the installation is located under a window sill). The legs are vertically adjustable by 20 centimeters.
- Geberit. Toilet tanks from this company are also equipped with a universal button, which can be located in the front or at the top. The “feet” are adjustable not only vertically, but also horizontally, in the range from 0 to 20 centimeters.
- Cersanit. Compared to the previous ones, they are more economical, the run-up of the legs takes up to 17 centimeters, however, the difference is insignificant.
- Tece. Frame structures, studs are adjustable in height, from 0 to 18 centimeters.
- Viega. Installations from this manufacturer are distinguished by two to four rows of holes for pins.
Geberit decided to focus on variety and a wide range. Thus, she has produced a huge number of installations, their overall height depending on the type of tank that will be attached to them. What’s interesting: when choosing one tank, you will be offered a choice of three installations that differ in height. So, for the Omega model it will be 82, 98 and 112 centimeters, for Sigma - 112.
The same company produces a universal model Geberit Duofix UP320 with a height of 112 cm. If the width of the hanging bowl is from 18 to 23 cm, then absolutely any will suit this installation, so you can choose which one you want and fit it into your interior design.
As you can see, there are a lot of possibilities to adjust the height of a wall-hung toilet to your height. This will not be prevented by either standards (which are more in the nature of recommendations than strict rules), nor by the mistakes of builders who install sewers haphazardly. You can install a podium, you can connect the toilet through a tee, or you can take advantage of the ability to adjust the height provided by many frame installations.
Selecting a location
The standard installation of a wall-hung toilet with installation is done near a niche with communications. If the tank does not fit into it, the pipes inside must be moved to the sides.
The mounted tank and installation are often covered with a false wall.
The marking is done in advance. A line is drawn on the wall that coincides with the central axis of the device, and the distance from the frame to the wall is measured (standard - 13.5 mm). The location of the toilet cistern is marked. The installation is aligned to the building level, after which marks are made for installation holes at the mounting points.
Plumbing connection
Tiling the walls and floors starts the last two stages of plumbing work: installing the toilet bowl and installing the flush button. Installing a wall-hung toilet bowl is much easier than a monoblock or compact one. All work is performed in the following sequence:
- Among the elements of the toilet, we can find pipes and cuffs for them, nuts with washers for studs;
In the photo, the cuffs are not removed from the pipes after checking the functionality of the system.
- Cuffs are attached to the pipe sockets;
- plastic fittings are placed on the faience pipes of the toilet;
- with a marker or pencil, mark the location of the plane of the back wall of the toilet on the pipes (for convenience, you can attach a long ruler or strip to the sides of the bowl);
- the fittings are removed from the toilet and placed on the frame. The plane of the false wall (with tiles) is marked;
- The pipes are removed and the length between the drawn lines is determined. In our case, X is for the drain fitting and Y is for the flush fitting. The pipes from the edge with the smaller diameter need to be shortened to the length X and Y. In this case, IMPORTANT, you need to cut 3 mm less - the fitting will lengthen due to the shock-absorbing gasket;
- the pipes are cut with a grinder, as in the case of connecting the installation elbow to the riser;
- the cut fittings are chamfered;
- burrs are removed with a file;
- all connections are lubricated with silicone sealant;
- a shock-absorbing pad is installed;
- protective PVC tubes are put on the studs;
- fittings are inserted into the installation pipes;
- faience toilet pipes and fitting cuffs are lubricated with silicone;
- the toilet bowl is put on studs and moved towards the false wall, after which it is clamped with nuts through polymer gaskets;
- a lid with a seat is installed.
After complete polymerization of the sealant (12 hours), the toilet can be used.
Frame
The installation scheme for a wall-hung toilet provides for a separate and hidden placement of the tank and fixation of the bowl on a steel frame (installation), which, in turn, is attached to the floor and main wall. The installation is installed after the water pipes have been laid and brought out. High-quality installation of a wall-hung toilet primarily depends on the correct installation of the frame.
The installation is leveled.
- The height of the wall-hung toilet from the floor may be greater if family members are tall. The remaining parameters are selected according to the instructions.
- The frame is attached to the floor and wall with anchor bolts so that the structure is stationary. If necessary, additional fastening is made, which the instructions may not provide for.
- After assembling the structure, the tank with communications is sealed with plasterboard or decorative panels. The material should be moisture resistant.
- The bowl is attached to special pins at the last stage of installation.
What influences the choice of height
The height of the installation from the floor is determined by several factors.
- Sitting comfort – if your hips are too low compared to your knees or too high, sitting in that position is uncomfortable. Even after a short visit to the toilet, there is a feeling of discomfort in the knees, since part of the person in this position has to support the weight on the legs.
- Convenience of standing up – standing up from the “knees above hips” position is uncomfortable, and also difficult for an elderly person. It is advisable that the seat level allows you to keep your thighs exactly parallel to the floor, as is recommended for sitting in a chair.
- Ease of emptying – it is believed that the intestines are emptied faster and more completely in a position where the hips are slightly below the knees. However, this consideration only applies to a healthy person.
The dimensions of the toilet itself do not affect the installation height in any way. And the latter has no effect on the quality of flushing and service life.
Recommendations you need
Let us allow ourselves to give the reader some advice on the installation and selection of the plumbing fixture that interests us.
Choice
Like floor-mounted, wall-hung toilets can be made from various materials. Let's try to evaluate them.
Polished stainless steel is virtually dirt-free due to its smooth surface. If deposits still remain on it, they can be easily removed using any household chemical.
Why does stainless steel occupy a much smaller market share than competing solutions?
Two circumstances:
- Pair of breech type metal plumbing fixtures. It has become familiar as anti-vandal equipment for public restrooms and evokes corresponding associations among many potential clients.
- In addition, the price of stainless steel toilets is much higher than that of ceramic analogues, and starts from approximately 20,000 rubles.
Glass is not much inferior to stainless steel in practicality; but viewing through the translucent walls what remains on the walls of the bowl below the water level is a rather dubious pleasure.
The main disadvantage of polymer concrete is its limited resistance to aggressive cleaning scratches and cleaning agents. Removing lime deposits and urinary stone from it without disturbing the appearance of the surface is not an easy task.
The main value of sanitaryware is its low cost. It is precisely on this basis that it is the undoubted favorite of the plumbing market. The downside is that its large-porous surface actively collects dirt and quite often lacks cleaning.
Finally, the material that is optimal in terms of functionality and cost combination is porcelain. The walls of the toilet will remain white as snow for a long time; If the need for cleaning does arise, you can safely use acidic and alkaline preparations.
Installation
Are there any subtleties to installing a wall-hung toilet yourself?
The installation stages themselves are comprehensively outlined in the accompanying documentation:
- The placement of the installation frame is marked by level or plumb.
- It is anchored to the wall and/or floor.
- Water is supplied to the tank, and a sewer pipe is supplied to the location of the toilet flare.
- The hole in the tank for the drain button is closed with a special membrane or simple polyethylene, after which the communications and installation are hidden behind a false wall. In most cases, it is laid out from moisture-resistant plasterboard over a galvanized profile and laid out with tiles.
- Once the tiles have firmly set, the toilet is hung on the studs of the installation, and a flush button is installed in the tank. A damper gasket is needed between the wall and the toilet to distribute the load on the tile and prevent chips from occurring.
There are a couple of nuances here:
- It is better to place the tiles away from the drain button, so that the seams are located symmetrically relative to the center of the button. Asymmetry does not look very careful.
- The smaller the sewerage outlet to the riser, the less likely it is to become clogged. Do not forget about the slope: for pipes with a diameter of 90 and 110 mm used for hidden installation, it is equal to 2 cm per linear meter.
- It is better to collect the sewerage using sealant. The instructions are due to the fact that rubber seals can lose elasticity over time and allow leaks.
- Forget about flexible eyeliners. Water is supplied to the tank by a solid pipe. The service life of a braided rubber hose rarely exceeds 5 years.
- Despite the fact that the tank fittings in most cases allow you to shut off the water through the service hatch behind the drain button, it is better to provide the supply to the tank with a valve and leave a hatch in the false wall to access it.
Niche for installation
For a block structure, a niche is knocked out in the wall, and a groove is placed under the pipes (it is also allowed to write a groove). If this is not done, the point of purchasing this type of installation is lost - you will have to install a false wall or a protective box. In such a situation, it is easier to buy a frame system or install a monoblock toilet, with the same effect in design and spatial solution, but much cheaper.
Help for beginners in the construction business: a groove is a shallow groove in the wall for various communications: cables, wiring, pipes, etc.
Below we will provide detailed instructions for constructing a niche and laying a groove, but now let’s talk about the fact that such work is PROHIBITED in load-bearing walls .
A niche can be knocked out only after obtaining permission from the management company and developing a project for additional reinforcement of the wall. The cost of the project not only eats up all the savings from purchasing a block structure, but also significantly goes into the owner’s pocket.
If a niche can still be legalized, then with a fine for pipes everything is much worse. By Decree of the Government of the Russian Federation No. 508 (clauses 10.3 and 10.11), it is categorically prohibited to make grooves in concrete walls, and to lay horizontal grooves in brick walls. The same requirement applies to aerated concrete. The explanation is simple: the walls lose their load-bearing capacity.
By and large, a wall with a niche and a fine can stand until the building is demolished. There is another unpleasant point here: if unauthorized influence on load-bearing walls is detected, the owners face a fine, which can be survivable, and a requirement to legalize the alteration. But here a bad trend has been observed lately - engineering design bureaus set the price for retroactively changing a project in the region of 500.0-800.0 thousand rubles. Refusal to legalize the completed alterations may result in forced eviction through the courts. Such a resolution of the conflict in Russia has already been recorded. And more than once.
For those who will still install the installation in a niche, here is the sequence of work:
- a center line for the tank is drawn on the wall, and then the location of the panel with buttons is marked;
- taking the panel point as a reference, draw a rectangle 100 cm high and 60 cm wide;
- On top of the rectangle, a place is marked for the supporting beam of the niche arch (it will always be there in the project);
- using a grinder with a special circle, a slot is made along the drawn lines to a depth of 15-20 cm;
- Mark the location of the water supply with a pencil;
- Using a grinder or a grinder, lines are cut for a channel for laying a metal-plastic (polypropylene) pipe connecting the installation tank to the water supply system. The size of the fine depends on the outer diameter of the pipe used;
- using a hammer drill with a spatula, a niche is knocked out in the wall - a depth of 15-20 cm and a fine;
- A beam made of metal channel is installed on the cement mortar.
Having completed all the above work, you can begin installing the installation.
Exceptions to the rules
There are exceptions to the norms that determine the optimal location of the toilet. Their presence is determined by the technical characteristics of the room.
The reason for this may be: insufficient free space, the location of communications or the personal desire of the owner.
Violation of technical regulations for the location of a toilet is not a violation of the provisions of any law if this sanitary point is located in a non-state institution or outside a special purpose facility: hospital, kindergarten, school, military unit and the like. The owner of the premises is free to determine the location of the bathroom.
What sizes are toilets?
Standard toilet sizes are designed for people of average height and build. Not everyone is like that. And a toilet with a shelf, which is described in GOST, is far from the best choice in terms of aromas. Also, most of the products in stores today are imported. And they have their own standards. For example, the European standard toilet size is 680*360*400 mm (this is the length, width at the widest part and the last number is the height). The Americans went even further - their usual “depth” is 768 mm, width 380 mm, the height of the rim above the floor is still the same - 36-38 cm. As you can see, the standards are different, and not everything is made according to the standards. People have different needs and the market is trying to satisfy them.
There are very interesting models
Dimensions of floor models
As you understand, floor-standing toilet models are different and their sizes are also different. We will give a range, but we do not guarantee that there are no narrower or wider ones. Most likely, if you set a goal, you can find both.
Different styles, different sizes
Compact
The Compact type toilet (with a tank attached to the back) has the following dimensions:
- length - 610-645 mm;
- width from 345 mm to 420 mm;
- height from 370 mm to 395 mm.
Note that the narrowest bowls are more like a rectangle. They are not as round as we are used to. They are quite convenient to use. There may just be problems when buying a cover. This form is rare.
Dimensions of Compact floor-standing toilets
Without tank
A toilet without a shelf with a wall-mounted or separate tank has the following dimensions:
- length 435-460 mm (20 cm less than Compact models!);
- width 360-400 mm;
- rim height from floor level 350-390 m.
The dimensions of floor-standing toilets with separate tanks are more compact.
As you can see, they are more compact, despite the name given to the previous option. But such models are less popular, since the tank must be secured, and this is an additional headache. Previously, this type was considered a “relic”; now it is stylish and interesting. There are very interesting models (though they have interesting prices).
On the floor or above the floor
In advertising brochures talking about the advantages of wall-hung toilets, the following main points are given:
- Hanging plumbing does not interfere with cleaning, leaving the entire floor area accessible.
- It makes a compact toilet spacious, allowing you to save space due to the tank.
- It allows you to completely hide communications, thereby improving the appearance of the bathroom.
Let's try to find out how much truth there is in marketers' statements.
Free floor
The statement is true without any qualifications. Installation - the frame to which the toilet is attached is hidden behind a false wall, leaving the entire floor area accessible.
This indicates that in your bathroom there will no longer be black and damp places under the tank, that the base of the toilet bowl will not really interfere with cleaning, and to change the tiles you will not need to dismantle it. In addition: the vacated floor will give more scope to your imagination when choosing a flooring pattern.
Compactness
Console plumbing will indeed make the room more spacious, but only visually. The dimensions of a wall-hung toilet with a concealed cistern and installation are at least no smaller than the floor structure: due to the thickness of the false wall, they are likely to be larger.
See: the back wall of the toilet room will move forward by about 20 centimeters, thereby depriving you of the opportunity to use the space behind the toilet for shelves or a small cabinet.
Visual space will be associated with the highlights of a person’s perception of the size of the room. They are unconsciously assessed by the area of two planes - the floor and the ceiling. Because the floor in our case is not cluttered, the toilet, regardless of the actual reduction in floor area, will begin to seem less cramped.
By the way: mezzanines also visually make the room smaller. If you want to use part of the space in a small bathroom to store rarely used items, it is better to build a flat cabinet that spans the entire wall and equip it with mirrored doors.
Hidden communications
Yes, they really will be completely hidden. In addition to the toilet bowl, only the flush button will remain visible. Yes, it will be beautiful, but defiantly impractical.
You see, dear reader, the creator of this article, over a decade of working as a plumber, became convinced that every structure certainly lacks repair, be it a water supply system, a sewer system, a drain tank or a valve. Making communications difficult to access is guaranteed to create difficulties for yourself in the future. Even if it happens in 10 or 20 years.
In addition: in a compact municipal apartment, the back wall of the toilet, which in most cases is hidden by a false wall along with the installation, is decorated with sewerage and water supply risers. In addition, if you are not too lazy to first replace them with durable polymer or metal-polymer pipes, who can guarantee that they will not be damaged during a pressure surge? Or, as an option, there will be no need to replace a section of the riser in the ceiling (which more than happens)?
Conclusions? Anyone can make them for themselves. Let's put it this way: the author never once had the thought of choosing something other than the classic floor design.
Installation covering
After completing the installation, the transition from plumbing work to general construction work takes place. All elements of the system, as well as engineering communications, are hidden behind a false wall, protective screen or in a box. The priority option is a gypsum plasterboard partition from floor to ceiling. To install it, a guide metal profile is attached to the walls and screed.
Stiffening ribs from the CD (ceiling) profile are screwed to it with metal self-tapping screws. In this way, a sheathing is formed for fastening the sheet material. Holes are drilled in the drywall for toilet pipes and studs, and a window is cut out for a panel with buttons, after which the installation is sheathed with plasterboard.
To help self-taught people, we recommend that you look at the work “How to sheathe an installation in a toilet,” which describes in detail how to install the sheathing and correctly attach the gypsum board to it.