Military sailors have a very precise expression, which is constantly confirmed in everyday life: the speed of the squadron is determined by the speed of the slowest ship. No matter how hard installation manufacturers try to extend the life of their plumbing fixtures, they constantly run into the problem of rapid wear of individual parts and assemblies. Therefore, breakdowns occur quite often even with such world-famous brands as Geberit, VitrA, Viega, Grohe, etc. And here the owners are faced with a dilemma: call a plumber or repair the toilet installation with their own hands.
How to disassemble a toilet installation
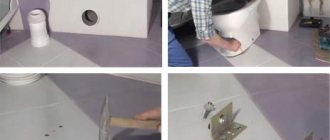
There is no need to dismantle the wall for repairs or maintenance. To get to the toilet installation parts, disassembly is carried out in the following sequence:
- By pressing the bottom of the button, move it up and remove it from the fastenings.
- To remove the frame, unscrew the bolts from the sides, and after removing the clamps, take out the plastic pushers.
- Disassemble the brackets to which the button is attached.
- The partition is removed after pressing the latches.
- They turn off the water.
- After dismantling the filling valve, remove the rocker arms.
- When you press a pair of petals at the top, the drain valve is released from the clamps.
- Due to its large size, it will not be possible to get it through the inspection window. Therefore, the drain assembly is disassembled on site. Unscrew the upper part, followed by bending the second rod.
After dismantling, the parts are washed with running water and the condition is assessed. Faulty and worn components are replaced. After completing the repair, assembly is carried out in the reverse order.
What else is important to know?
- That there are two ways to fasten embedded equipment:
- the frame is attached, followed by the drain tank and pipes;
- The entire system is installed separately, followed by installation in place.
- What you need to know, regardless of the option chosen:
- connecting the pipes to the toilet is carried out after installing the installation and the false panel with cut holes for pipes and fasteners;
- To prevent the frame from moving when installing and connecting the toilet, it must be checked with a level.
- What in terms of usability:
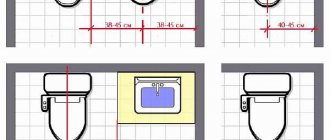
- the height of the button from the base should not exceed 1000 mm;
- the height of the wall-hung toilet from the floor should be within 410 - 430 mm;
Built-in plumbing fixtures assembled in accordance with the manufacturer’s requirements will serve well for many years without additional adjustments or repairs, and its aesthetic parameters will harmoniously complement the interior of any bathroom.
How to repair an installation for a wall-hung toilet
Most often, breakdowns occur in the tank due to poor water quality. Metal parts quickly rust, and plastic parts become covered with deposits of dissolved substances. Repairing the installation yourself can eliminate most problems.
Water slowly fills the tank
The problem occurs if you do not flush the installation's inlet valve. It is removed and the passage is cleared with steel wire. The lid and gasket are washed with running water. The cause of the malfunction can also be a clogged cleaning filter (if there is one). After disassembling, the mesh cells are cleaned from solid particles with a toothbrush under running water.
The tank will not fill completely if the float position is not adjusted correctly. The situation is corrected by bending the lever, ensuring that the water stops when the entire volume of the tank is filled. Sometimes a lack of water occurs due to the valve being misaligned relative to the float. Then it is simply leveled.
It is also necessary to check the condition of the lever, since a breakdown in the connection between the valve and the float is accompanied by premature shutoff of the water.
Exhaust valve clogged
In this case, water will constantly flow from the tank into the toilet. The cause may be debris, hair, or pieces of paper that got inside during installation or repair. They prevent the rubber gasket of the exhaust valve from tightly blocking the drain hole.
It is possible that the gasket does not fit tightly due to loss of integrity or loss of elasticity. Then they change it. If, when repairing a wall-hung toilet, it turns out that the outlet valve is deformed, you will have to replace the entire assembly.
Drain button doesn't work
In installation systems, buttons are made mechanical or pneumatic . If the drain operates only after several presses, then the siphon membrane is worn out. In mechanical systems, the button stops working if the rod connecting it to the exhaust valve breaks.
Pneumatics fail when the button itself fails or the air hose does not fit tightly. The best solution would be to completely replace the drain assembly. If you plan to independently restore the operation of the flush button, then the parts for repair must be from the same manufacturer. Spare parts from other brands may not be suitable.
Water leaks regularly
Constant leakage of water from the cistern into the toilet bowl occurs when the overflow tube is located below the top water level. To resolve the issue, it is raised higher. If the design does not provide for changing the height of the tube, then adjust the position of the float so that less water is collected.
The tank overfills if the inlet valve gasket is faulty. However, in some models they are made one-piece. Then you will have to replace the entire valve. Incomplete overlap also occurs due to a failure of the float seal. If water flows into the toilet after flushing, when the tank is still empty, the gasket on the drain is damaged.
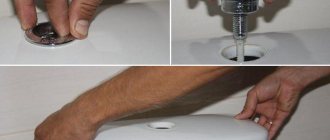
Cover repair
Lids may vary in strength, material, and price. The reasons for their breakdowns can also be different: factory defects, improper operation, excessive loads.
A plywood cover is one of the cheapest, but not very common options. If it breaks - a crack appears - everything can be fixed with ordinary second glue. You can try to rehabilitate plastic ones using regular acetone or liquid nails. To do this, they need to be applied to the joined edges of the crack and fixed for a few seconds. However, this repair is short-lived, the crack will still make itself felt, so it’s easier to replace it.
The situation is more complicated if the microlift does not work.
Repair of cover with microlift
The operating principle of this mechanism is similar to the operation of conventional door closers. The microlift prevents the toilet lid from falling quickly, thereby protecting the ceramics from chips and cracks.
The most common reason for the breakdown of this mechanism is the abrupt closing of the lid. Many people, out of habit, lower it manually, which cannot be done, since the spring is designed only for smooth lowering.
Some breakdowns cannot be eliminated on your own, since the microlift is often a non-separable structure or it can be very difficult to select the necessary parts. In this case, you need to call a specialist or make a replacement. Such breakdowns include:
- faulty spring condition;
- faulty rod.
However, there are breakdowns that you can try to fix yourself:
- Disconnecting the base of the structure from the toilet, which entails its rotation. The cause of the malfunction is loosening or breakage of the mounting bolts. In this case, you need to disconnect the device and replace the faulty bolts.
- The tightening bolts have become loose. To fix this problem, you will need a regular hexagon. When you remove the caps on the mounting legs, hexagonal holes open; you need to tighten them using a special screwdriver.
- The reason for the malfunction of a model with a microlift may be the accumulation of lubricant in a certain area of the cylinder. To eliminate the malfunction, you just need to carefully distribute the lubricant throughout the entire mechanism.
How to change the installation
Manufacturers produce block and frame installations. The first are mounted in niches, the second are mounted on walls or installed near thin partitions. In both types, the flush tanks, inside of which the fittings for draining and collecting water, are made of plastic.
Replacing the installation is necessary if:
- A crack has formed on the tank. This happens due to errors made during installation. Even with a slight misalignment, the plastic begins to gradually crack. Repair with sealant is useless; you will have to change the container.
- During installation, the tank received an accidental blow. A crack will appear in this place over time.
- During operation, the parts have worn out so much that repairs have to be done too often.
Before replacing, it is useful to study the instructions with the attached installation diagram. Installation is carried out in the following order:
- If the frame remains the same, check its position. If necessary, adjust using brackets and screws.
- The tank is installed in such a way that the distance from the button to the floor is one meter.
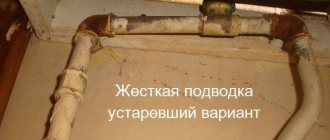
- The container is connected to the water supply using plastic pipes. Flexible hoses are not recommended because they have a short service life.
- The drain hole of the tank is connected to the toilet.
- To check the tightness of the connections, open the water supply.
- The installation is covered with moisture-resistant plasterboard, the sheets of which are attached to the frame with self-tapping screws.
- The finishing is done in accordance with the design of the room.
Rubber gaskets will last longer after repair if they are lubricated with liquid silicone before installation. To prevent low-quality water from leading to a breakdown of the mechanism within a year, a filter is placed at the entrance to the tank.
Life without a toilet can hardly be called comfortable. Therefore, in order not to waste time during repairs searching for failed components, you need to acquire a spare set of spare parts in advance.
Watch the video on the topic:
Source
Faucet selection
Of all the plumbing fixtures, choosing a faucet is the most delicate, since several nuances need to be taken into account. First of all, you need to choose a model that will match the distance between the fasteners. Next, you should take into account the depth of the sink and the distance from the wall to the end of the tulip. If these factors are not taken into account, the faucet may pour water onto the floor instead of the sink. And of course, you should choose a model that can fill not only the bathroom, but also easily reach the washbasin, since in most cases, there is only one outlet for the faucet in the bathroom.
Heated towel rail "out of reach"
It is usually placed on the wall near the shower stall. But it will be impossible to reach it if the fastening loops are located on the side of the wall, and not the handles.
Slippery floor
Smooth porcelain tiles or other glossy finishes are not suitable for the bathroom. If water gets on them, it is easy to slip. For safety reasons, it is better to give preference to lappatted tiles. You can read more about tiles here.
Fragile bathtub
Acrylic bathtubs are often quite fragile, especially their sides. For such models it is better to make a frame, especially if their owners are people in the body and they have a heavy load to bear.
Mistakes when installing plumbing fixtures
If the plan for renovation work in the bathroom involves moving plumbing fixtures, it should be taken into account that the angle of inclination of the sewer pipe should be 3-5% of the distance over which the bathtub or washbasin is moved. That is, when any plumbing fixture is removed from the sewer riser by 1 meter, it will need to be raised by 3-5 cm.
Bath installation
If a technical hatch is not provided in the built-in bathtub box, then in case of problems it will be quite difficult to repair it. And also when installing the bathtub, make sure that the bowl is tilted towards the drain for better water outflow.
If the space of the room allows, then it is best for owners of a hot tub to install it in the center of the bathroom, as opposed to the common stereotype that it should be in the corner. In addition, if necessary, this will greatly facilitate access when troubleshooting the causes of problems. Also read the article - Which bathtub is better to choose: cast iron, acrylic or steel?
Tall sink
The standard installation height of the sink is 85 cm, designed for people with a height of 1.65-1.80 cm. But if family members are taller or, conversely, shorter, then it is best to install the sink at the appropriate height
To do this, you should pay attention to hanging models. The height of such sinks is adjustable using an installation system during installation
Warm floor
It is necessary to design heated floors so that the heating elements are located at a distance of at least 10-20 cm from objects. Furniture made of natural wood, if located in close proximity to a heat source, may crack from constant heating. This also applies to items made from chipboard.
Lighting
In addition to the main overhead light, you need to take care of the lighting of individual areas: near the mirror and near the shower stall. Mirrors with specially built-in top or bottom lighting are very convenient here. It is recommended to use special lamps with a closed socket to avoid moisture ingress.
Wiring
A bathroom cannot be complete without sockets. But installing them in close proximity to plumbing fixtures is not recommended; the permissible minimum that should be between them is 60 cm.
Storage systems
In an effort to leave as much free space as possible, do not forget about where you store washing and cleaning supplies. Wall cabinets will help solve this issue and save space.
We spend a lot of time in the bathroom. That is why everything should be carefully thought out and planned in order to avoid common mistakes during the repair process.
Do-it-yourself dismantling of a wall-hung toilet: Review - device + Video
The wall-hung toilet, like its predecessor compact, has the unpleasant feature of breaking.
In this article, we will present you with a diagram for disassembling a wall-hung toilet and convince you that you will not have to break down walls and spend money on expensive repairs. An important advantage is that you can do it yourself. We give you several methods that every beginner can handle. But before that, we will determine what common problems arise when using a wall-hung toilet, and what are the reasons for this.
Correct the risk of cracking of the ceramic lining
Before assembling and finishing the frame of a flush-mounted toilet, remember to make a strong connection to the wall and floor of the room. Also make sure that the body can withstand significant stress, which eliminates the risk of cracking the glaze around the ceramic bowl. When work is carried out using low-quality materials or in a careless manner, the effect will be that the tiles crack under the pressure of the bowl by only a few tens of kilograms.
Therefore, the body of the hidden enclosure must be sufficiently rigid, with a minimum thickness of 20 mm. To do this correctly, it is necessary to install a double layer of plasterboard, each 12.5 mm thick, or use a single structural board, which is 20 mm thick as standard, as well as a zone of increased load resistance where the toilet is installed.
The advantage of placing a frame in plasterboard or building board is that you can create any shape of wall. It provides a more pleasing look to the bathroom by covering all unsightly fittings under the tile and making it easier to keep tidy by minimizing visible fittings.
Attention
Please pay attention not only to the support frame, but also to the fittings of the cistern flush device.
The relevance of wall-hung installations is due to their compactness compared to conventional toilet designs.
The water drainage mechanism is built into the wall, which makes cleaning the toilet easier. However, some inconveniences may arise during repairs, for example: repairs are carried out through a window in which there is a water release button.
- In order to remove the button from the mount, you need to press its bottom.
- To remove the frames, you need to remove the mount and remove the plastic pushers
- Next, you need to disassemble the brackets on which the button is attached.
- After tightening the clamps, it will be possible to remove the partition.
- Next you need to block access to water.
- After disassembling the valve for filling water, pull out the rocker arms.
- After pressing the two petals at the top, the drain valve gets rid of the clamps.
Due to its considerable size, you will not be able to remove it through the inspection window. Therefore, the drain assembly is disassembled.
After disassembly, all parts are washed and their appearance is assessed. Faulty parts are replaced with new ones. After the repair is completed, the toilet is assembled in the opposite sequence.
Often breakdowns occur due to poor quality water. Thus, metal parts rust faster than usual, and plastic parts lose their original appearance and function due to the sediment that forms.
However, you can fix most of the breakdowns yourself. Most often, breakdowns occur in the tank due to poor water quality.
Measure the wall surface well
For a hidden wall installation, you must reserve a suitable surface of about 40-50 cm wide, 15-20 cm long and 120 cm high. In addition, you must have space for hanging a bowl about 40 cm wide and 55 cm long, as well as free a space that guarantees comfortable use of the toilet (a space of about 20 cm on both sides and 80 cm wide and 60 cm long in front).
If you do not adhere to these dimensions, it may be that the later built-in concealed installation along with the ceramic cladding will not fulfill its functional role. What else should you pay attention to before assembly? Of course, to be able to separate the sanitary zone, that is, to separate from the partition the place where the toilet will be located, from the section for the bathtub and washbasin. Such a partition will provide members of the house with greater comfort when using the bathroom.
Water takes a long time to fill the tank
If you do not flush the inlet valve, you may experience the problem of slow water intake. It is removed by cleaning it with metal wire. The lid and gasket are washed. The cause of the breakdown may be a clogged cleaning filter. The mesh cells are cleaned with a toothbrush to remove large particles.
The tank will not be filled completely if the float is not positioned correctly. On the contrary, if the valve is skewed, there is a risk of water overflow. In this case, the situation can be corrected by leveling.
Replacing the installation is necessary if:
- The tank is cracked. This can happen due to defects during installation. Even with a small error, the plastic gradually cracks. Sealant will not help; the container must be replaced.
- During installation, an unexpected impact occurred on the tank. After some time, a crack will appear at the site of the impact.
- During the use of the toilet, repairs have to be made too often due to wear and tear of parts.
It is necessary to pay attention to the instructions supplied by the manufacturer.
Installation is carried out in the following order:
- Check the position of the frame and, if necessary, change it using screws and brackets.
- The tank is installed in such a way that the distance from the button to the floor is one meter.
- Next, the tank is connected to the water supply pipes. It is not advisable to use rubber hoses because they have a short service life.
- The drain is connected to the toilet.
In order to check the strength of the connections, you need to turn on the water.
The installation is covered with moisture-resistant cardboard and attached to the frame with self-tapping screws. The final finishing is done in proportion to the interior of the room.
Important recommendation!
Rubber gaskets will increase their service life if they are pre-coated with silicone glue.
To prevent water sediment from prematurely spoiling the trigger mechanism, a filter mesh is placed on it.
Connecting a plumbing fixture
At the final stage of installing a toilet with installation, the most important operations are its reliable connections to the water supply and sewer networks.
The tank can be fed from the side or from above; however, in any location, it is not recommended to use flexible hoses to connect the tank to the water supply because of their short service life. Moreover, if they fail, replacing the connections will require dismantling the false wall (if there is no hatch for access to communications). For these reasons, it is advisable to use pipes made of polymer materials or stainless bellows connectors.
To connect the tank to the water supply, it is advisable to use pipes made of polymer materials.
Next you need to prepare the pipe fasteners. The 90º toilet outlet outlet is inserted into the sewer pipe and rigidly attached to the installation frame using a plastic fastener clamp.
1. The outlet for connecting the toilet outlet is inserted into the sewer. 2. Next, the outlet is attached to the installation frame using a plastic clamp with a latch.
The studs are screwed into the frame and locked to connect the wall-mounted toilet bowl. Some models provide for fastening studs to the installation frame and, additionally, to the main wall.
Studs for fastening a wall-hung toilet.
Interim control is carried out. The internal structure is covered with a false panel. Panels are often made from plasterboard sheets, then decorated with tiles or plaster.
Gypsum board is the most convenient material for installing false walls.
Drywall is convenient because it is easy to make holes in it to connect the installation with the toilet bowl itself, as well as flush buttons.
To connect the toilet to the communications, the connecting pipes are shortened to the required size.
To connect the toilet with communication systems (to the sewerage cistern), special pipes are used. The length of the pipes comes with a reserve. Subsequently, the pipes are shortened to the required size, taking into account the thickness of the decorative panel.
To protect against damage to the coating of the wall and toilet, a shock-absorbing gasket is installed between them. And protective PVC tubes are put on the studs.
The toilet is tightly attached to the supporting structure. To prevent damage to the surface of the toilet when tightening the nuts, the kit includes washers made of durable plastic.
Next, install the tank flush button. When installing it, you should carefully read the instructions - the design of buttons from different manufacturers can differ quite significantly.
You can get acquainted with the principle of operation of the flush tank button by watching the video:
After connecting the toilet bowl with the cistern and the sewer outlet, the entire structure is tested for strength, correct assembly of individual elements, reliability of fastenings and tightness.
How to repair an installation button
Hanging installations are currently more popular than conventional toilets. They do not clutter up the toilet room, unlike traditional toilets and look quite stylish.
There are several difficulties in repairing wall-hung toilets, but we will tell you several working ways to avoid them.
How to remove a button from a Geberit installation
Disassemble the installation key step by step instructions (let's look at the example of a button for the popular Geberit installation):
- Remove the flush button. To do this, just lightly press on its lower part and move it upwards to remove it from the mount;
- Remove the key frame. Using a screwdriver, unscrew two screws and remove two plastic pushers, remove the clamps;
- We disassemble the flush brackets;
- We remove the partition by squeezing the two latches on top;
- Turn off the water;
- We disassemble the water filling valve and remove the rocker arms;
- Remove the drain valve retainer by squeezing the two petals in its upper part;
- Remove the flush valve.
It is quite large in size, and in order to pull it out through the small window, you will have to disassemble it from the inside of the tank. To do this, you need to remove the top part of the valve. The overall length of the valve will be reduced, which will make it possible to disassemble it in more comfortable conditions.
Source
Are there any differences in repairing a drain tank with bottom and side connections if it does not fill?
Bottom-connected tanks use a diaphragm inlet valve. This creates problems in filling the drain tank with low pressure in the water supply, since the water pressure will not be enough to squeeze the valve and fill the tank.
Another common problem is water leakage at the junction of the underwater valve tank.
Repair of a tank with a bottom supply is carried out after removing the lid and shutting off the water. The problem is then repaired in the same way as when repairing models with a side valve.
Are there any differences in repairing tanks with a button, lever or double flush if the water does not flow?
People who are accustomed to old-style flush tanks often do not know how to fix a tank with a button.
But in fact, there are practically no differences between these systems. For many, disassembling such a drain itself is problematic. But the design is very simple to understand:
- First the water is shut off.
- Afterwards, the drain tank is emptied.
- Then, carefully unscrew the nut near the button.
- is removed .
Further actions will depend on the nature of the breakdown.
A tank with a double button is popular due to its economical water consumption. The principle of disassembly during repairs in this case is the same as for a tank with one button.
When may it be necessary to remove the flush plate?
The main elements of the installation - a steel frame and a built-in flush cistern - are hidden behind the wall. The only part that is outside besides the bowl is the drain button. It can be installed on a front or horizontal surface. Installation features depend on the location of the technological hole in the tank, through which the fill valve and drain fittings can be removed and installed.
Spare parts for toilet installation
Installations from trusted brands last a long time and ensure trouble-free operation of the flush system. The tanks are equipped with a built-in overflow system. This means that if the fittings break, water will flow into the toilet, and not onto the floor behind the wall. But even with the best plumbing, over time, filters and hoses become clogged with dirt, gaskets wear out, and parts of the lifting mechanism or drain valve break.
Preparation for installation
Necessary tool
It begins with the acquisition of the necessary components, preparation of the workplace and tools. A hammer drill will be needed to make holes in concrete or brick, and a float level (convenient size 50-60 cm) to control the vertical and horizontal orientation of the product in space. You will also need: a set of wrenches, a hammer, drills or drills with carbide tips, possibly pliers, screwdrivers, a construction knife. To accurately determine the location where the toilet installation will be installed, you will also need a pencil and a tape measure. Having everything you need on hand will speed up the assembly process and save your nerves.
What to consider
At the preparation stage you need to consider:
- the accuracy of the niche marking and its suitability for installing the purchased model of equipment;
- It is better to purchase a toilet-installation product as a whole set in order to save yourself from selecting or adjusting equipment elements to match their sizes, from mismatching inlet and outlet holes;
- When purchasing, carefully check the completeness of the parts (supporting frame, flush keys, flush cistern, presence of adapters, fixing elements);
- the choice of fastening method for a block or frame structure, on which the successful implementation of installation work depends;
- You can select a model with electronic control and a convenient location of buttons for draining. Such products provide special comfort in subsequent use.
Taking measurements and markings
The diagram of the marking stages for installing a toilet is presented in the following parts:
- a center line is drawn on the wall, passing through the center of the future installation;
- the clearance between the wall and the structure is measured (it must be at least 15 mm, more is allowed);
- marks are drawn on the wall where the tank for draining the water will be located;
- marks are left on the floor, as well as on the wall where the structure will be fastened.
Accuracy and attention to detail at the preparatory stage will greatly facilitate subsequent assembly activities.
How the installation flush button works and works
Modern installations can be equipped with mechanical and pneumatic flush control systems.
In the first case, the force from the key is transmitted mechanically to the upper rods of the reinforcement. When you press the button, the rocker arm block, which is located in the tank, is activated, the membrane rises and the water is drained.
In the second case, instead of a rocker block, a hydraulic lift with pneumatic hoses is used. The force from the flush button is transmitted to it pneumatically through silicone hoses. The drainage mechanism, onto which a special set of nozzles is placed, is activated by water pressure.
In most installations, dual-flush keys are installed. When you press the left one, both rocker arms are raised or two tubes are activated, and the maximum volume of water is supplied to the toilet. When using the right one, you save money and benefit from reduced drainage.
Adjusting the water level
Violation of the optimal volume of filling the installation tank leads to unstable flushing at low levels or excessive water consumption at high levels. You can easily adjust the required amount of liquid with your own hands.
By dismantling the button and partition, you gain access to the fittings. By turning the pin, the float is lowered or raised, lowering or raising the fill level accordingly.
The Geberit drain block is equipped with flag indicators that regulate the volume of large and small drains. Details from 2:45: , also watch the previous video from 2:25.
Vacuum systems from Grohe are equipped with an original mechanism for adjusting the volume of large and small release. The large drain is adjusted with a gate plug.
Economical drainage is regulated by moving the float along the flask. In the upper position, the minimum amount of liquid flows out, the lower position corresponds to the greatest discharge for the economy mode.
Grohe recommendations for adjusting the Rapid SL system:
How to remove the button from the installation tank
Removing the key for maintenance and repair of a concealed cistern, as well as reconnecting it, is quick and does not require tools.
Step-by-step instruction
- Remove the outer decorative panel with keys from the fastenings - press on the lower part and gently pull up.
- Remove the frame - turn counterclockwise, pull out the plastic holder and pusher.
- Remove the retaining baffle by carefully lowering the two brackets on the top.
- Pull out the rocker arm assembly - lift the front part slightly and remove it from the reservoir.
- Turn off the water - close the shut-off valve and disconnect the flexible line from the fittings.
- Remove the fill valve and drain mechanism to wash the filter or replace it.
Despite the height of the valve and the limited dimensions of the technological opening, the drain fittings of the installation can be removed as an assembly. To do this, simply tilt it and pull it out diagonally.
Basic malfunctions of the toilet bowl
You can repair toilets yourself if:
- a small crack has formed on the bowl;
- the cuff connecting the device to the sewer has worn out;
- the toilet is clogged.
Repairing cracks
A crack in the toilet can occur as a result of:
- mechanical impact on the toilet bowl;
- flushing hot liquid into the toilet.
Minor damage to various parts of the toilet bowl
If a crack has formed in the upper part of the bowl or at the place where it is attached, the fault can be eliminated. If there is a crack in the lower part, a complete replacement of the plumbing product will be required.
To fix a crack you will need:
- drill with a small drill bit;
- sandpaper;
- Sander;
- any solvent;
- epoxy resin or other similar glue.
Repairs are carried out in the following order:
- The ends of the crack are carefully drilled to prevent further divergence. Drilling the bowl must be done very carefully to prevent damage. If the toilet cracks during the work, it will need to be replaced;
- The crack is cleaned along its entire length;
- the surface is degreased;
- the prepared surface is filled with resin and left until completely dry;
- the resulting seam is sanded.
Repairing a cracked toilet bowl
Cracks formed on the drain tank are repaired in a similar way. Repair of the tank lid is most often not carried out, since the low cost of the products allows for a complete replacement of the cracked surface.
Replacing the cuff
If a puddle forms under the toilet, the reason lies in the wear of the rubber cuff, which is the seal between the toilet flush and the sewer pipe.
Toilet leaking due to sewer cuff
The cuff is replaced according to the following scheme:
- The old gasket is dismantled. To do this, you can use an ordinary knife;
- the surfaces of the pipe and sewer inlet are cleaned of contamination;
- all surfaces are treated with sealant for a better fit of the new gasket;
- a new cuff is inserted into the sewer hole and then placed over the toilet flush. For strength, the joints can be additionally treated with silicone sealant.
Replacing the sewer cuff on the toilet
The described method is suitable for toilets with oblique and horizontal outlet. If a toilet with a floor outlet is leaking, then replacing the cuff requires preliminary dismantling of the plumbing.
Removing blockages
The cause of slow drainage of water from the toilet bowl is a clog.
Clogged toilet drain
To help deal with the problem:
- various chemicals, for example, Tiret turbo;
- plunger;
Clearing a blockage using a plunger
- plumbing cable.
Removing a blockage with a plumbing cable
How to set the installation key
Installation of the button after maintenance, repair or re-equipment of the fittings is carried out in the reverse order.
Procedure
- Install the drain and fill valves into the tank.
- Connect the water and adjust the float using the pin.
- Place the rocker arm block - fix it at the required level and pick up the drain fitting rods.
- Replace the partition and snap the top latches into place.
- Install the landing frame - insert and fix the holders by turning one up and lowering the other down, install and tighten the pushers.
- Replace the flush plate faceplate.
When converting the drain mechanism, the rods are removed and two nozzles are installed. A Y-shaped reinforced hose is connected to the flexible reservoir line and the hydraulic lift, which is installed instead of the rocker arm block. The lift is connected directly to the pneumatic unit and remotely to the flush key using a pair of silicone hoses.
The main reasons for poor fluid flow into the toilet tank, and what to do about them
If the problem is still in the tank, then the reasons may be different:
- incorrect placement of the float;
- damage or clogging of the supply pipe;
- clogged area where the hose is connected to the tank;
- rust in the filter.
Important! The cause of the breakdown may well be overtightened fasteners (nuts, bolts, etc.). Connections must be checked carefully. Everything should be screwed tightly, but not overtightened. Another source of problems can be the accumulation of mucus inside the plumbing fixtures.
The float is skewed, why is there no water in the toilet?
When the toilet doesn't fill with water at all, the float is unlikely to be the problem.
But if water still flows, but not in the required volume or accumulates in places not intended for this, then it is worth checking the location of the float.
When you open the toilet lid, you immediately see the mechanism and lever ending with a float buoy. He is responsible for collecting water to the required level.
The most common breakdowns of the toilet cistern and troubleshooting methods
The main malfunctions that arise during long-term use of the toilet are usually associated with the flush cistern. Before proceeding with the restoration of the mechanism, it is necessary to study its structure in detail, which requires the presence of drainage and water collection systems.
The principle of operation of the device is as follows: after pressing the button located on the toilet tank, the drain hole closes and water is drawn in. The filling level of the mechanism is controlled by a float, which rises as the liquid in the system increases. After reaching the maximum permissible level, the piston closes the inlet pipe, as a result, the filling of the structure with water stops.