In order to avoid cutting the tiles, when laying them on the floor in the toilet, the toilet bowl must first be dismantled. If a heated floor system is provided under the tiles, then further installation using fasteners that require drilling is undesirable. It is necessary to glue the toilet to the ceramic tiles. For this, certain adhesive mixtures are used.
In what cases is it recommended to install toilets with glue?
The method, which takes into account the use of adhesive compositions, is gaining more and more popularity among professional craftsmen and self-taught people every year. Most often, this installation option is chosen when a heated floor system is located under the tiles in the toilet room. In this situation, drilling into the cladding may damage it.
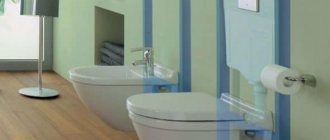
Note! This method can also be chosen based on aesthetic considerations. Plumbing fixtures that are not equipped with fasteners look more stylish and impressive in the toilet room.
It is not difficult to carry out such installation correctly, but it should be remembered that installation using an adhesive composition takes quite a lot of time. This is due to the fact that you need to wait until the glue completely hardens. If you ignore this rule, then the connection will become unreliable, and the toilet will wobble or even completely move away from the tile. In order for the adhesive to harden, you must wait 12 to 24 hours.
Installation of a toilet using a closed method
The method involves performing many rather difficult actions. Therefore, without having the appropriate skills and qualifications, it is strongly recommended to seek help from specialists, without fail formally drawing up an agreement for the provision of services.
In general, the step-by-step installation algorithm using the closed method looks like this:
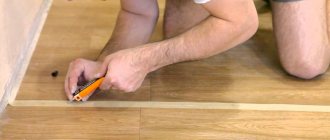
- First, fitting is done, the optimal location of the unit is determined, and the toilet is outlined along the contour with a marker.
- Next, you need to mark the surface area for installation of internal fastening systems.
- The next step is to place the fasteners on the floor using dowels.
- Installation of the product using a technological void on a mount and subsequent fixation with bolts. It is recommended to use silicone gaskets - this reduces the risk of equipment damage.
Types of adhesives
Gluing a plumbing fixture is easy. This method is much simpler than drilling holes and installing fasteners. To bond the surface of a toilet bowl with tiles, a variety of adhesive compositions are used, which are suitable in their characteristics for this purpose. Let's look at the most popular of them:
- epoxy adhesive;
- silicone sealant;
- liquid Nails.
There is another non-standard option that takes into account the use of cement mortar. We will also look at it in this article. Some of these options are more suitable for DIY, while others are not recommended for beginners.
Method No1. Fixation with dowels
The use of dowels and bolts is a fairly popular method of fixing a toilet. The method is simple and practical, but not without its drawbacks. First of all, the tiles will have to be drilled. This must be done carefully and carefully, because the slightest mistake can ruin the flooring. In addition, the use of dowels is designed more for lightweight products, and therefore it is better to use the adhesive method to fix a heavy model.
How to fix a toilet using dowels
To fix it on dowels, you should prepare everything you need:
- roulette;
- ammonia;
- pencil or marker for marking;
- a napkin or rag (preferably microfiber);
- electric drill;
- drill for it (exclusively for concrete).
Toilet fasteners
Less commonly, you may need a small piece of linoleum, sealant with a glue gun. Well, everything you need is at hand, so we can proceed directly to the work process.
Step 1. First, the toilet is tried on and pre-installed where it will stand. The ease of use and the ability to connect to water supply and sewer systems are assessed. You can also shake the bowl - this will help determine the levelness of the floor under the toilet.
Pre-installation of the toilet
On a note! If the product is unsteady, then before fastening it, a piece of linoleum, previously cut to the shape of the support, is placed under it. As an option, you can treat the joint with silicone sealant. Sometimes the problem is not the unevenness of the floor, but the toilet itself. If so, then you need to level the support and clean it with sandpaper.
Step 2. Next, the installation location of the device is determined more precisely, for which you will need a tape measure. Holes for future fasteners are marked.
Future holes in the floor are marked
Step 3. The product is removed, and large cross marks are made at the designated points.
Cross marks are placed
Step 4. Holes are drilled in the tiles using an electric drill. It is important to work extremely carefully so as not to damage the tiles, and also to ensure that the tool operates at low speeds.
Tiles are drilled at low speeds
Photo of the drilling process
The drill needs to be wetted from time to time in cold water.
Step 5. Next, the holes are drilled in the concrete. The speed of the electric drill should be higher or, alternatively, you can use a hammer drill instead (it is better suited for this).
Concrete being drilled
There will be plenty of dirt and dust after drilling
Step 6. The tile is cleaned of dirt and dust (and after drilling this “good” will be enough). Then the surface is degreased with ammonia.
Cleaned tiles
Step 7. Now you need to insert dowels into the holes that were made earlier.
Dowels are inserted into the holes
Step 8. The bolts are checked to see if they fit into the dowels properly. You can replace the fasteners with others if the ones included in the kit are of dubious quality.
The bolts included in the kit should fit properly.
Step 9. The toilet is installed. The holes in the tile must match those in the support.
Step 10. If there are no problems, the bolts are inserted into the dowels, while you should not forget about the washers - made of rubber or plastic. The bolts are tightened, but carefully, otherwise there will be a risk of damaging the bowl. After this, the caps are hidden with special plastic covers. That's it, the toilet is successfully secured to the floor with dowels!
At the end, all that remains is to tighten the bolts
Epoxy adhesive
The easiest way is to purchase this substance in a store or order it online. You can also make epoxy glue at home, but to do this you need to maintain the proportions of the ingredients. To make it, the following components are mixed:
- epoxy resin (10 parts);
- cement (20 parts);
- solvent (2 parts);
- hardener (3.5 parts).
Epoxy glue
After preparing all the necessary components, you need to heat the epoxy resin to a temperature of 50 degrees. Next, a solvent is mixed into it. The next step is to add a hardener. Cement is added last.
Important! The resulting composition must be mixed very thoroughly. You can use the finished glue within 2 hours.
Epoxy glue has many benefits. But the most important thing is that it ensures high strength of the finished connection. Such a seam will last reliably for many years. The ability to prepare this composition with your own hands is also a big plus.
Interesting: 6 ways to disguise pipes in the bathroom
Conclusions and useful video on the topic
One of the options for attaching a plumbing fixture to the floor is discussed in the following video:
Which method of installing toilets is the best is up to the owner of the property to decide where the plumbing is to be installed and secured.
However, when choosing a technique, it is recommended to take into account the possible loads on the toilet, the material of the device (faience, porcelain), as well as the design features of the toilet room. A careful approach to business will definitely help you achieve the desired result.
Would you like to tell us how you installed the toilet yourself? Do you have useful information and photographs on the topic of the article? Please write comments, share your impressions and ask questions in the block below.
Silicone sealant
The most common fastening option involves the use of silicone-based sealant. It has the same advantage as epoxy glue - it is easy to use and does not require complex dismantling work. Installing a plumbing fixture without drilling or bolts eliminates the possibility of chips on its surface, which is also a plus.
However, when using silicone sealant, some problems may arise. For example, the use of this product may lead to displacement of the housing. But if you choose the right type of sealant and follow the installation instructions, there should be no problems.
Silicone sealant
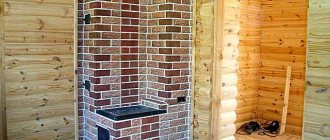
The toilet has a heated floor, what should I do?
Under normal conditions, experts always recommend attaching the toilet with bolts. However, in the case of heated floors, this method cannot be used, since there is a significant danger of hitting the heat pipes when drilling. The consequences of this will be extremely sad; this cannot be allowed to happen.
Therefore, the only way out of the situation is fixation with glue. First you need to remove all dust and dirt, sand the area and degrease, and then start applying glue.
Liquid Nails
Liquid nails are also quite common. This adhesive material will help with the installation of plumbing fixtures on tiles. Installing a toilet with liquid nails has some nuances. In order to install with liquid nails, it is necessary to apply them to both surfaces being joined. Next, you will need to disconnect the toilet from the tile and lay it on its side. You should wait a certain amount of time, after which the final installation of the device is carried out.
Note! As a rule, the waiting time between preliminary and final installation of the device is indicated on the label of the adhesive composition.
To prevent the plumbing fixture from wobbling, it is recommended to apply a seam of liquid nails around the perimeter of the base of the toilet connected to the tile. After this structure hardens, it will be ready for use. The reliability of this method is quite high.
Interesting: We build a toilet in the country house ourselves
Preparing for work
To glue a toilet to a tile without drilling, you need to prepare the plumbing and base, and collect a certain set of materials and tools. For installation you need:
- spatula and brush for applying glue;
- notching tools - chisel and hammer;
- adhesive composition and sealant, if needed;
- degreaser;
- tools and materials for connecting the toilet to the sewer and water supply.
They place plumbing fixtures on glue. The console model cannot be glued to the wall.
Cement mortar
The use of cement mortar for this purpose is a rather original solution. However, there is no need to doubt the reliability of this method. When using cement mortar, the structure is firmly fixed. But this option for installing plumbing also has some disadvantages.
The main disadvantage of using cement mortar is the difficulty of dismantling the structure. If there is a need to replace the toilet, then you will literally have to sweat.
Cement mortar
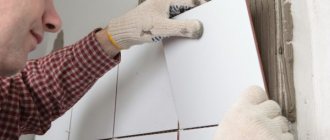
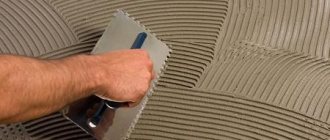
Important! The peculiarity of this method is that before applying concrete to the tiles, it is necessary to make notches. This is required in order to increase the adhesion of the solution to the surface. Notches can be made using a hammer and chisel, but you should be extremely careful, as you can damage the facing material.
After applying the cement, you need to press down the toilet and wait a while. Excess cement, squeezed out under the weight of the plumbing fixture, is collected using a spatula. Complete hardening of the cement will occur after 24 hours.
The procedure for attaching components to the toilet, connecting to the sewerage system and water supply
The procedure for attaching components to the toilet after installing it on a tiled floor. The process consists of the following steps:
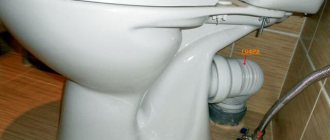
- A corrugated pipe is installed through which the product will be connected to the sewer pipe. This element prevents the spread of stench in the apartment, so it is important to use high-quality corrugation. During installation, the pipe must be supported with both hands, so outside help will be required.
- Using bolts and other parts included in the kit, the drain tank is secured.
- The plumbing is connected to the water supply.
The procedure for connecting to the sewer depends on the design of the toilet, in particular, on the type of outlet:
- models with direct release are most common. Despite the fact that they can only be mounted on a vertical riser at a certain angle, the procedure itself is quite simple. Connection to the sewer system is carried out using a sealing or eccentric collar;
- Stand-up toilets are also quite common. Their main advantage is the ability to install at a minimum distance from the wall and at any angle. Before installing the plumbing, you will need to install a flange with a lock, then you need to connect the sewer pipeline to it and install the toilet on top;
- mounting a model with a side outlet is similar to installing a product with a direct outlet, but it is important to maintain a certain angle. The procedure uses an eccentric or a sealing coupling.
In most cases, a corrugation is used to connect directly to the sewer outlet. It allows you not only to adjust the distance between the toilet and the sewer hole, but also to change the angle of inclination.
Due to the presence of a membrane inside the corrugated pipe, a tight connection is achieved, but silicone sealant is often additionally used for waterproofing.
When installing the corrugation, it is important to prevent it from sagging, otherwise liquid will stagnate in it, and blockages will often form.
Connections to the water supply also vary in type, depending on the design of the toilet:
- if there is an internal water supply system, a flexible hose or a special copper tube is used for connection. As a rule, when sold, such elements come complete with parts for fastening to the floor, but it is advisable to clarify this point with a consultant separately. Sometimes it happens that the tap thread and the thread on the copper tube do not match, then an adapter and sealing elements will be required;
- With an external water supply system, the connection is easiest. Typically, no additional parts are required.
Regardless of the method of connecting to the water supply, all connections should be coated with special sealants for plumbing fixtures to ensure waterproofing and minimize the risk of leakage.
Right choice
You can find silicone sealants on sale in different packages: cartridges, tubes, sprays. The cheapest ones are the usual formulations in tubes that have an elongated spout. Cartridge sealants require the additional purchase of a special gun. They are usually purchased for processing large areas.
Silicone sealant must not only be used correctly, but also purchased with a serious approach to the issue. To begin with, you should choose a composition that matches the color, although most often craftsmen prefer transparent or white products. There are also several other factors to consider.
Best before date
Sometimes sealants with expiring shelf life are sold at a large discount. You should not be fooled by tempting offers: usually the products are thicker, less elastic and may partially lose other beneficial properties, especially fungicidal ones.
Undamaged packaging
If there is even a small crack on the body of the product, it will quickly dry out from contact with air. When purchasing, you need to make sure that the integrity of the tube or other packaging is completely preserved. After uncorking, you need to cover all areas that require this in literally 3-4 days, otherwise the sealant will begin to dry.
Firm
Reliable, proven brands produce high quality products. The best proven sealants are Titan, Knauf, and Soudal. The downside is their higher price, because a well-known brand always has a slightly inflated price for the product.
Place of purchase
Sealants are sold everywhere, even in supermarkets. You should not buy them second-hand on the market; for this there are specialized departments or construction and hardware stores, where the goods are probably not expired.
Common Mistakes
The most common mistake is poor surface leveling. As a result, equipment breakdown and leakage may occur. To do this, you need to have a building level on hand.
Poor sealing can lead to unpleasant odors and unwanted leaks. You need to use only high-quality components with good rubberized gaskets.
There is no need to skip the point of cleaning all pipes from contamination so that the service life of the equipment is longer. If a leak in the drain barrel is detected, it is necessary to check the serviceability of the valves.
Installing a toilet is not a complicated process; you can do it yourself. The main rule is to follow all instructions and recommendations for its installation.