Quite often, after taking a bath, the owners of an apartment or country house are faced with the problem of water accumulating on the floor surface. Simply put, a puddle forms on the floor, the cause of which is a loose joint between the plumbing bowl itself and the walls of the room.
You can call a finisher, or you can try to deal with the problem yourself. After all, sealing the seams between the bathtub and the wall is not the most difficult operation. The main thing is to strictly adhere to the chosen technology and carry out all the steps it provides sequentially.
When is silicone grout required?
Every owner wants their kitchen and bathroom to look aesthetically pleasing after renovation.
But even the most beautiful tiles and drywall will look bad if the seams between individual segments look rough and sloppy.
In addition, drywall, even if perfectly adjacent to the wall, can crack at the joint. And in the bathroom and kitchen, it is necessary to protect the boundary between the sink and the wall from leaks.
Often, plastic corners or jointing (grout) are used for the inner edges of tiles. But the corners do not fit tightly, and dirt accumulates under them due to humidity. And the edge worn with jointing becomes cracked over time. In this case, silicone grout is the most reliable method.
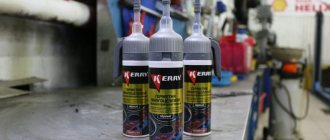
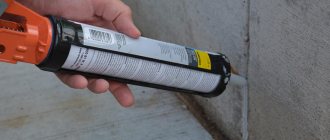
Sealing the joint between the bathtub and the wall using polyurethane foam
Filling the seam between the bathtub and the wall with foam is one of the easiest ways to solve the problem. Especially compared to the outdated solution method. And one-component polyurethane foam, which has excellent water-resistant qualities, is best suited for these purposes. You just need to work very carefully, since polyurethane foam that gets on tiles, painted surfaces, or even hands is extremely difficult to clean off later.
The “foam” process of sealing seams is simple:
- first the seam is cleaned, degreased and thoroughly dried;
- the foam in the container is shaken properly and poured into the cavity of the leaking joint;
- 40 minutes are allotted for complete foam drying in a room with high humidity;
- excess foam along the edge of the bathtub is carefully removed with a painting knife;
- Then the sealed joint is designed at the discretion of the master.
Important: during the drying process, the polyurethane foam increases in volume several (up to 30) times. Therefore, it is necessary to clearly measure the amount of composition to be laid.
You will see a detailed description of the process of sealing a joint using foam by viewing this review:
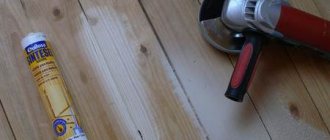
Required Tools
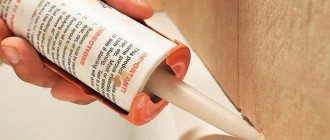
What you need to create a beautiful silicone seam:
- A gun for silicone or a tube (before starting work, you need to cut its nose at an angle of 45 degrees. Make a hole slightly larger in diameter than the width of the future seam).
- A tool for forming a seam and removing excess grout.
- Sponge or cloth.
- A container for soap solution or detergent, and if you chose the dry method, masking tape.
- A small unnecessary container for removing silicone residues.
As a tool you can use:
- Special spatula.
- A plastic card with the corners cut off (the cuts should be slightly wider than the future seam).
- A stick with an oval edge (wooden, plastic, plexiglass).
A special spatula for creating an even seam.
Don’t forget to prepare the work area - it must be cleaned of dirt and dust and degreased. Then choose one of three ways to create a smooth joint with caulk.
Preparing the surface for sealing joints
Before embedding, it is recommended to carry out preparatory work.
Soap solution
Soap solution to remove old composition
To remove old composition, prepare a soap solution. To do this, take 100-200 g of water, grate 15-30 g of soap into it, and mix the mixture thoroughly. The work itself is carried out like this:
- Using a napkin or your finger, apply the soap solution to the old sealant, and then use a putty knife to carefully remove it from the surface.
- During removal, periodically dip the spatula into the soapy solution. Upon completion of work, wipe the surface dry with a cloth and degrease it (for example, using white spirit).
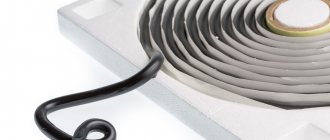
Sealing cord
If the seam width is more than 5 millimeters, it is recommended to purchase additional sealing cord. It performs two functions - it strengthens the sealing structure and also minimizes the consumption of sealant. There are two types of cord:
- Open-pore is an excellent choice for bathrooms, toilets, and kitchens.
- Closed cell - suitable for ordinary rooms, including living room, bedroom, nursery, hallway.
Masking tape
Masking tape for an even joint
If you want to get a clear, even joint without any sealant residue, it is also recommended to purchase additional masking tape. It is glued on both sides of the joint before sealing work is carried out. After sealing the seam, it is carefully removed.
We use masking tape
Apply masking tape on both sides of the joint (professionals recommend using Eurosel, Tesa) and apply silicone. This method is also called dry grouting because the tiles are not wetted. If you accidentally missed any area, you can add more grout.
Using masking tape to create an even seam
The advantage of this method is that the surface around the seam remains clean. This is the best option for beginners as there is an opportunity to correct mistakes.
Sealing a seam in a bathroom with tape
One of the most effective methods of sealing the joints between the bathtub bowl and the walls is to finish the seams with a special border tape. But only where we are talking about very small gaps.
Self-adhesive border tape is one of the easiest modern finishing materials to use. It is a strip of super-thin and super-durable plastic with a highly adhesive layer of sealant on one side. This tape is very elastic and fits perfectly into the corners of the joints, sealing them securely and making an insurmountable barrier to moisture penetration.
This type of border strip is especially relevant for bathrooms whose walls are tiled. And sealing the seams between the bathtub and the tiles with tape is a very simple process that does not require any special skills. However, this operation must be performed in stages:
- cleaning, degreasing and drying the joint;
- peeling off the paper fuse from the curb tape;
- warming up the released sticky layer (this can be done using a regular hair dryer or a construction hair dryer);
- applying with simultaneous alignment of the tape on the seam;
- gluing the applied border tape along the joint;
- pressing and smoothing the tape over the surface.
The advantages of this method of sealing seams between plumbing equipment (bathtub) and walls are obvious:
- Speed.
- Simplicity.
- No need for any additional and/or finishing.
An example of using border tape from one of the German manufacturers is presented in the video review:
How to seal a wall-to-floor joint
The sequence of actions is important here. First, all vertical wall joints are treated with silicone. After they have completely hardened, we take up the silicone seam on the floor. Apply silicone along the corner, then moisten it with a soap solution and remove all excess.
The wall-ceiling junction is formed in the same way, but the sealant for it is replaced with acrylic (it can be painted later).
As you can see, there is nothing difficult in making an even silicone seam. Start with the simplest method - and everything will work out!
Sealing the joint between an acrylic bathtub and the wall
Acrylic bathtubs are installed in many living spaces today. People are increasingly choosing just such bath bowls (or liners), because they look beautiful in appearance and are incredibly easy to clean.
However, when installing an acrylic bathtub, the same problem of leaking joints between the bowl itself and the walls can and often does arise.
There are several ways to close the gap and seal the joint efficiently:
- acrylic or silicone sealant (and here it is better to take an antiseptic composition);
- installation of a special plinth;
- use of polyurethane foam.
But the best option, of course, is to use a sealant. Acrylic or silicone – it doesn’t matter, but its composition must have the following properties:
- adhesiveness;
- plasticity;
- absolute resistance to water;
- tint stability (should not turn yellow, become covered with stains, etc.).
In addition, such a sealant must be completely safe for human health. To do this, you must carefully read the component composition of the product printed on the label. A truly high-quality sealant should not contain any organic solvents. For example, acrylic and silicone sealants made in German, Czech, Belgian and Turkish have gained the trust of buyers on the market.
As for the actual process of sealing the joint between an acrylic bathtub and the walls using sealants, it is absolutely identical to the above-described method of sealing joints using sanitary silicone sealant (for other surfaces).
Of course, the gap to be sealed must be clean, grease-free and dry. And on top of the sealant layer, you can apply a thin and elastic curb tape as an aesthetic finishing coating.
Prevention
Before using silicone sealant, read the instructions and composition of the building material. The information may be useful when choosing a means of removing silicone from a stained surface.
To avoid problems with removing sealant stains from plastic, glass and tiles during construction work, use plastic film. This way it will be possible to protect the clean surface from the ingress of building materials. Don't forget to wear rubber gloves and protective clothing. Wash off excess building material with a damp cloth and wash clothes immediately after completing the work. Do not leave an open vial of silicone near a clean surface. If it was not possible to avoid complex contamination, then use the methods listed in the article for removing silicone from various types of surfaces.
Types of spatulas
Grouting tools can come in different sizes and shapes. It is more profitable to purchase not one device, but several copies of different configurations in a set.
Shape and size
In each case, a specific spatula is used. The most common shape of the product is square. Sometimes it is made with protrusions on each edge. The corners of such a device converge at an angle of 45°. The tool is universal in purpose. It will allow you to create various seam options, differing in height, thickness and other parameters.
Often a rubber spatula for a bathtub has a depression in the center to make it easier to hold in your hand. Due to the sharp edges, the tool fits tightly to the surface and easily removes excess sealant after application. For hard-to-reach places, triangular devices are produced; they allow you to seal the sealant in hard-to-reach places. It is important to choose the right tool shape when working so that the seam is continuous.
Material
The material is responsible for the durability of the spatula and ensures its easy sliding over the surface. Models made of rubber and silicone are most suitable for this purpose, although they also need to be treated with a soapy mixture before starting work to reduce the adhesion of the sealant.
Tools made of plastic and rubber are less practical as they become deformed over time. But the undoubted advantage of plastic and rubber spatulas is their high density. Here, each master himself chooses which properties of the tool are his priority.
Spatula manufacturers
The production of spatulas has been established not only abroad, but also in Russia. The quality of domestic products is competitive and not inferior to imported analogues.
The most famous companies producing tools:
- "Our tool";
- "MasterPlast";
- "Politex South".
Products from Chinese manufacturers have affordable prices, but their quality is somewhat inferior to instruments produced by European brands.
The most well-known foreign companies producing devices for making seams:
- "Startul Master" - Poland;
- "Storch" - Germany;
- "Soudal" - Belgium.
You can choose a tool from an unknown manufacturer without markings. After all, its properties are easy to determine visually and by touch; this product is not complicated. The set includes from 7 to 15 spatulas, and devices for sealing and grouting joints are sold individually.
Criterias of choice
When choosing, they are guided by such criteria as the hardness of the surface being treated and the characteristics of the sealant. The selection principle is as follows: the softer the finishing material, the harder the spatula should be and vice versa. The density and viscosity of the sealant is also taken into account. For example, it is more convenient to apply a viscous silicone-based composition with a hard plastic spatula.
Taking into account exactly where the seams need to be sealed, use a corner or a regular square spatula. If wood was used in the finishing, use a tool made of rubber or silicone so as not to damage the surface. For hard-to-reach places, a small-sized product with a suitable configuration is suitable.
Content
What difficulties can you encounter when applying sealant to a seam? From the outside, everything looks as simple as possible: cut off the cap of the tube with sealant, squeeze it out evenly along the entire seam and then trim it. But when you get down to business, you realize that everything is going wrong. To straighten a finished seam, especially if it is long, you have to stop and after some time start from where you stopped. But even if you do this carefully, all the irregularities in these places will still be visible. Trying to smooth them out on sealant applied 5-10 minutes ago will also not work: the surface of this material has already begun to harden and the composition, which has lost its plasticity, is covered with pimples. We will tell you below how to avoid these and other common mistakes of all beginners who are just about to learn how to use sealant.
How long does silicone bathroom sealant take to dry after application?
Drying times for silicone sealants vary from manufacturer to manufacturer. But regardless of its composition, it can dry in different ways. This depends on the type of surface, the thickness of the applied layer, and the temperature in the room. The top layer of sealant ceases to be sticky after about 20-30 minutes, but inside it still remains liquid.
After a few hours, the silicone hardens and takes about a day to dry completely. For deep and voluminous seams, it may take even more time - up to two days. And all this time it is necessary to protect the composition applied to the seam from moisture that may get on it, that is, it is better not to use the bath.
Removing old seams
Grout manufacturers advise using special knives to quickly remove old silicone, but I wanted to make the repair as inexpensively as possible and at the same time experiment, so I made do with an ordinary narrow stationery knife. Let me tell you, he did the job perfectly. If the grout refused to give up without a fight, I would have to use a special product to remove the old silicone.
Please note: if you are squeamish and even in a nightmare you cannot imagine yourself working as a plumber, then ask someone else to remove the old sealant and clean the seams. This is a much messier job than it might seem.
Quartblog Digest
How to clean a bathtub: 7 useful tips. We clean the bathtub using available products. We clean your bathtub at home quickly, easily and effectively!
Spring cleaning: 8 spots you forget to clean. Are you sure that not a single speck of dust will escape you? We are sharing a list of places that you should not forget about if you want to achieve real cleanliness. Cleaning the apartment with your own hands, with 100% cleanliness.
House order: 7 steps from Tony Hammersley. If you follow these tips daily, the house will be in order, and general cleaning will become much easier, the author of the blog A bowl full of lemons is sure. How to keep your apartment tidy: 7 correct and effective steps.
Cleaning the kitchen: 7 objects to pay close attention to. Are you planning to clean the kitchen? Let's share some useful tips! It's okay if you don't have time to clean your kitchen every day. It is enough to keep the most important items in order.
READ How to build a brick cellar with your own hands
7 aromatic herbs that purify the air in the apartment. Double benefit: air purification and healing aromas: grass in the apartment as a source of pure oxygen.