The appearance and durability of skirting boards largely depend on the quality of their installation.
To secure them firmly, use acrylic sealant. Installation of the plinth is the final stage of finishing the premises. Floor and ceiling decorative elements complete the design of the room. The products are widely popular because they are highly resistant to mechanical damage and are easy to maintain.
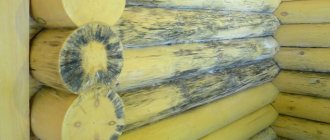
Skirting boards are often made of plastic and wood. Less commonly used for their manufacture are MDF, steel alloys, ceramics and natural stone. One of the important conditions for the long service life of protective elements is their correct installation. Acrylic sealant for baseboards will ensure reliable fixation.
How to properly glue polyurethane floor skirting boards?
Installation of polyurethane floor plinths
- floor
is being prepared . They must be thoroughly cleaned and degreased; - The plank is coated with glue on the reverse side. There are special grooves (shelves) here. The composition must be applied specifically to them, as well as to the ends;
Interesting materials:
Sanguine who is this? Sarcasm what is it? Sata what is it? Sata iii what is it? Sata raid ahci mode what is it? Scr what is it? Sdd what is it? Sdd what is this? SDR what is it? What is Sdram?
Advantages of modern sealants
To ensure a tight fit of the baseboard to a horizontal or vertical surface, it is important to choose a high-quality sealant. The sealing mass must have the following properties:
- ensure reliable adhesion,
- withstand deformation within 5-10%,
- be sufficiently elastic and easy to spread,
- do not slip when sealing the walls,
- be chemically neutral and safe for the environment,
- be resistant to mold and mildew, UV rays, and moisture.
Belinka products meet all quality criteria. Slovenian-made sealants have good adhesion to various types of substrates, are easy to apply and are suitable for processing various building materials, including wood and plastic.
Methods of fastening MDF plinths
There are three main methods for installing MDF skirting boards to the wall. When choosing one of them, you must immediately consider the possibility of dismantling. In some cases it is necessary, for example, in case of an emergency - when pipes leak and water penetrates under the floor covering.
- So, the plinth can be installed on special fastenings for MDF plinths - plastic or metal clips. Clips come in different configurations, so they are selected for a specific baseboard model, so that they match the mounting channel on the back of the product. As a rule, such fasteners are included with the baseboard. By installing MDF plinths in this way, you can be sure that they can always be removed and then reinstalled without any problems.
- If the wall is perfectly flat, then you can glue the MDF plinth to liquid nails. However, in this case it will not be possible to freely dismantle the floor covering frame. And most likely, during dismantling, the baseboards will be damaged, which means you will have to buy and install new ones.
- Fastening the baseboard with self-tapping screws. In this case, the planks are screwed directly to the wall and can be dismantled if necessary. True, the dismantling process will take longer than in the first fixation option. However, it should be noted that if for a wooden plinth such a fastening turns out to be strong, then for MDF products it is still not reliable enough. Therefore, if this method is chosen, it is often combined with glue, which means that quick dismantling of the planks will be impossible.
In addition to the methods of fixing the MDF plinth to the wall, it is also necessary to consider additional elements with the help of which its individual parts can be connected to each other. If the corner joints of a wooden plinth need to be perfectly adjusted to each other so that the gap between them is minimal, then for MDF plinths special connecting elements are provided, both for corners, external and internal, and for splicing in straight sections.
Adhesive sealant for seams white
CEMMIX Adhesive-sealant for seams is a one-component polyurethane sealant for sealing various seams, junctions of steps and walls, entry of pipes and ventilation systems and rigid-elastic gluing of various materials.
More details
Seams made with Cemmix Seam Adhesive-Sealant can be painted, and the sealant is available in four color options.
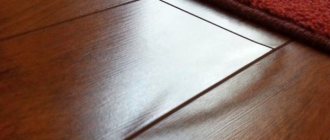
The difference between acrylic sealant and silicone
When choosing an acrylic sealant, it is often compared with other analogues. For clarity, let's try to find differences with silicone:
- In terms of popularity, silicone sealant outperforms its friend, but is significantly inferior in cost. In addition, acrylic can be painted after drying, but silicone cannot;
- Silicone has better moisture resistance, and the acrylic product contains antifungal additives that prevent black mold from developing on the seams;
- acrylic dry joint can be updated. This option will not work with silicone;
- The aesthetics of acrylic seams is higher. Even a clear silicone joint produces a visible white stripe;
- Any beginner can work with the acrylic composition, since the defect is easily washed off with water or cut off dry with a knife. The silicone first has to be cut off, and then the remaining traces have to be washed off for a long time with solvents and various removers.
When using acrylic, you must remember that, like other materials, it has its own areas of application.
Where to begin
Before the procedure, I recommend dismantling the floor plank and studying the scope of work. The dimensions of the defects between the floor and the wall can be much larger than what is visible through the baseboard. The absence of a physical barrier will make the procedure easier.
I carefully lift the wallpaper at the bottom of the problem area. I wash away the whitewash and remove the old layer of enamel. I leave the area to dry or dry it with a fan. Upon completion of the work, I will glue the trim back, returning the surface to its original appearance.
If there are light objects in the room, I advise you to cover them with film or construction fabric. During the process, dust or splashes from solutions fly around the room. When using liquid compounds, do not protect the floor with paper, otherwise the substance will easily get wet.
How to cover the joints of ceiling plinths
For high-quality design of polyurethane and foam products, it is recommended to use ordinary acrylic putty. It is quite durable, dries instantly, and is not afraid of moisture. The whitish tint of the material allows it to be used for working with fillets, which are subsequently planned to be painted.
When sealing seams, especially when it comes to corners, careful sanding of the cornices is required. To obtain a smooth surface at the joint area, it is necessary to use sandpaper with minimal grit.
Advice! Large cracks reaching 3 mm are best sealed with gypsum-based putty material. To prevent the gypsum from hardening in advance, a small amount of PVA glue is added to the mixture.
Sealing seams after installing wooden baseboards is much more difficult. Acrylic putty and gypsum solutions with the addition of PVA glue are also suitable for this procedure. Similar materials are used to seal small cracks. The treated surfaces are then carefully sanded to give them a more attractive appearance.
Before sealing the joints of a wooden ceiling frieze, it is important to prepare the walls well. The noticeable unevenness of the latter creates the prerequisites for increasing the holes between the baguette and the wall after the wood dries out. Otherwise, in order to get rid of the gaps, you will have to use a significant amount of putty. Most likely it won't look very nice. In addition, after a while, the dried putty mixture may crack and fall out of the hole.
After sealing the gaps between the ceiling plinths and walls, excess material should be removed and the surface should be thoroughly treated with sandpaper Source stenamaster.ru
Floor design
A typical floor structure includes several layers:
- underlying layer (for floors on the ground);
- waterproofing;
- screed;
- leveling layer or finishing screed;
- fine coating.
The final floor covering can be made from various types of materials;
- concrete;
- tiles or porcelain stoneware;
- linoleum or PVC tiles;
- bulk polymer materials;
- laminate;
- piece or panel parquet;
- parquet board;
- wooden edged board.
Device Features
High-quality repairs are not complete without an attractive ceiling plinth (other names - frieze, baguette, fillet). It can be used as a decorative element when creating any type of ceiling. As a result, such a coating will look elegant, and flaws (if present) will become less noticeable.
Today, manufacturers produce a huge range of ceiling structures with all kinds of shapes and sizes. Therefore, you can always choose the most suitable products for your home that will fit perfectly with the planned interior.
Baguette is a ceiling element that can independently decorate a room, while simultaneously hiding all flaws and unevenness Source diychatroom.com
Installation process
To perform proper joining of the planks, you should prepare the following tools:
- miter box;
- hacksaw;
- glue;
- rags.
Installation of fillets must begin from the entrance, having first removed dust from the wall. The latter will allow the elements to stick to the base much stronger.
Procedure:
- Carefully coat the baseboard with the selected adhesive.
- Press the bar firmly against the wall.
- Remove droplets of glue that have come out from under the product attached to the base with a clean rag.
To get a beautiful joint, it is recommended to use a miter box. You need to cut the part at an angle of 45°, then remove the excess (protrusions) with a sharp knife. The second element is cut so that it matches the profile of the first. In this case, the contact of the parts will be as tight as possible.
Helpful information! In construction stores you can purchase ready-made corners, which allow you to avoid labor-intensive adjustment of corners. The latter greatly facilitates the work of inexperienced craftsmen.
Smooth corners cannot be made with a regular knife; it is best to use a special device - a miter box Source stroy-podskazka.ru
Types of laminate compositions
Today, 4 main types of sealant are offered for laminate:
- Acrylic. As a rule, this is a composition of brown or dark shade to match the color of the lamellas.
- Silicone. It can be transparent or brown.
- "Liquid plug". By and large, this is the same silicone sealant, but using cork chips.
- Gel-like. The sealant resembles silicone glue, but has a more liquid form.
This also includes special mastics, grouts and wax compounds that are used to care for laminate flooring and seal joints.
Sealant-gel for laminate
Essentially, it is a composition of hardeners based on silicon gel and artificial resins. This allows for durability and stability of the lamellas. The product is not flammable, does not thicken under the influence of elevated temperatures, and withstands aggressive detergents.
It has high fluidity, so it easily penetrates into the seam. If you use the liquid composition correctly, the gel will not allow moisture to seep into the compressed cellulose fibers, but will displace water from the thickness.
Silicone sealants
These are effective substances with a water-repellent effect that have gained enormous popularity.
Advantages:
- withstand a wide temperature range;
- reliable;
- elastic;
- serve for a long time;
- easy to apply.
Among the shortcomings, it is necessary to highlight the insufficient extrusion of the composition from the seams. If during installation of the lamellas the sealant gets into the lock, the slabs may not snap into place. In addition, silicone mixtures do not allow moisture vapor to escape from under the coating.
But these compounds perform their main function – to provide strong protection of joints from water. Moreover, they avoid the appearance of creaking lamellas. Inside the locks, the sealant prevents the plates from rubbing against each other.
Acrylic sealants
If you need to tightly seal the seams, then acrylic paste for joining laminate flooring is ideal. The product is sold in plastic tubes for ease of use with a gun.
If we compare the general properties, acrylic sealant is not inferior in elasticity to silicone. After drying, it creates a rigid and durable connection, but sometimes crumbles during impacts, and is eroded during prolonged contact with moisture.
Attention! The main advantage of acrylic is the huge selection of colors for any type of laminate. You can precisely select the colored sealant so that the joint on the lamellas will completely blend with the background of the laminate. Acrylic is unrivaled in this regard.
But the paste is not used during the installation of slabs; it is very dense in consistency in order to securely snap the lock into place. The composition is applied after finishing the masonry; it is even recommended to use it after the furniture has been installed and the slats have taken the required position.
Wax for laminate
In appearance, wax is similar to a cream or paste. Sold in tubes or tubes. Due to its elastic consistency, it can be easily applied with any tool.
Wax sealant does not dry out and is not subject to thermal deformation, like, for example, acrylic. However, when cleaning the floor covering with detergents, it is partially washed out.
You can completely wax the lamellas, but this is not a good solution. To begin with, the consumption of the product increases significantly, and the composition is only useful for compounds.
Wax sealants are used both during installation and during subsequent use of the floor covering. It is advisable to wax the joints approximately once every 2 months.
Mastic
If the laminate has already been laid, and it is necessary to improve the tightness of the tile seams, then a special mastic will help with this. Its characteristic feature is not only the grouting of joints, but also the removal of small scratches.
The use of this product protects against moisture, temperature and the formation of defects over a long period of operation. It is recommended to choose transparent formulations. They will give the surface the appearance of a new floor covering.
Mastic is made in the form of an aerosol and liquid:
- the aerosol is simply sprayed from a container and, if necessary, rubbed with a rag to obtain a uniform coating;
- liquid mixtures are similar to an emulsion; they are applied along the joints with a brush.
Grout
This product is intended to treat cracks, scratches and other defects that appear when laying laminate flooring. There are many color variations in stores; you can easily choose the shade of the lamellas.
The composition of the grout resembles a paste. It is applied with a plastic spatula to scratches, crevices, cracks and other deformed parts. Excess product must be removed within half an hour using a dry sponge. If more time has passed, a special solvent is required to wipe off the residue.
Liquid plug
Of all the materials on the market for sealing laminate joints, “liquid cork” is one of the best. By and large, it is a composition of transparent silicone and cork dust.
As a result of mixing these components, the product received several important advantages:
- allows moisture vapor to pass through;
- has high elasticity, which exceeds the performance of other sealants by almost 3 times.
Using liquid stopper is the same as applying acrylic sealant from a plastic tube, but it protects the edge joints while allowing moisture vapor to escape naturally. The substrate does not rot and is well ventilated.
Attention: Liquid cork is absolutely not suitable for covering locks. Even when a small amount of this sealant penetrates into the grooves during the installation of the floor, this will lead to unpleasant consequences. It is difficult to remove dried cork silicone from the lock, and it definitely will not allow the connection to snap into place.
We use glazes
In order to apply glaze to a ceiling plinth with stucco, you will need:
- a can of glaze or a spray bottle;
- brush;
- sponge or rag.
The order of its application is as follows:
- spray glaze over the surface;
- take a brush, sponge or rag and rub to obtain a tinted effect.
Patinating the ceiling plinth
To make a simple ceiling molding look like an antique, it needs to be patinated using glaze. It's not difficult to do this:
- we buy glazes in the colors Taire and UMBER;
- Apply Taire-colored glaze in an even layer to the top and bottom of the ceiling plinth, leaving the middle unpainted;
- Now you need to use a sponge to shade the area where the painted area meets the unpainted area. At the same time we remove the outer layer of paint. At the same time, the convex relief will become lighter and brighter, and the indentations will contrast with the color of the reliefs;
- To emphasize the relief, we use UMBER color glaze.
Here is a clear example of creating an antique effect on a ceiling plinth:
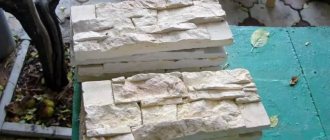
Create a stone effect
If our plinth has a large, eye-catching pattern, then it can be given the effect of a natural stone, slightly dirty surface:
- Apply TAIRE glaze in a thick and even layer to the surface of the baseboard;
- shade the surface with a brush to form light strokes;
- Using the Umber glazer, we cover the surface with dark spots;
- shade;
- apply small strokes of dark color, remove excess;
- let the surface dry;
- we apply strokes to the reliefs using bronze glaze;
- leave to dry.
In a room designed in the Baroque style, a gilded ceiling plinth would be appropriate.
Gilded plinth
To work you will need:
- glaze of gold or silver color;
- thin brush;
- rag.
- dip the brush into glaze;
- take a rag and remove the paint from the brush;
- Place the brush on the protruding part of the pattern and slowly move it horizontally. In this case, the paint will remain only on the bulges.
You can familiarize yourself with the process of preparing for painting and the painting itself using these videos:
Source
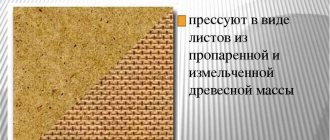
MDF products
The original version of MDF is created by pressing sawdust under high pressure and high temperature. The result is a dense, environmentally friendly material.
Additional adhesives are not needed, since a natural agent, lignin, is released under thermal influence. It tightly binds small particles into a single structure.
MDF blanks
MDF is a fine fraction, small wood residues are used.
There are unscrupulous manufacturers who use chemical compounds in production. In order not to buy a potentially dangerous material, you need to study the manufacturer's ratings in advance and read reviews from previous customers.
When creating the material, incompletely processed raw materials are used. The produced blanks are cut and processed on a milling machine for molding and applying a relief pattern. The front part is laminated with a polymer self-adhesive film.
There are models with an insert that helps hide fasteners after installation.
Panel with decorative strip
Sometimes the front surface is painted or covered with veneer made of expensive wood. The resulting products are indistinguishable from natural wood.
Painted products are treated with paint that protects against the negative effects of air humidity and detergents. When a specific shade is required, you can buy primed blanks in a light color. That’s what they’re called – for painting.
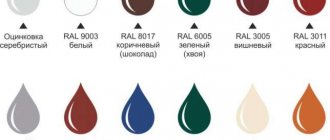
Choose skirting boards in accordance with the state of affairs. It is important to buy the best option in color, shape, size to fit into the design style.
Often the required models are offered when purchasing flooring. The hardware store will present a possible color palette that matches the selected flooring. All that remains is to find a shade that matches the color of the walls and furniture.
The combination of painting the MDF plinth with the frame of the doorway looks great. The difference from the floor covering is one tone. You can freely take the same color as the ceiling elements.