Venetian plaster is an ideal way to cladding walls to look like polished marble. Forget about banal wallpaper - be closer to Italy! Venetian plaster in the bedroom, office or kitchen - it always gives an elegant and chic look to any room, has a “delicate” texture, shimmers in the light and hides any surface imperfections. Have you watched how marble or granite shimmers? What about noble onyx or jasper? Believe me, this wall covering is much more beautiful than wallpaper, because it contains Italian charm, luxury and aesthetics! Venetian plaster for interior decoration is suitable in all respects.
What is Venetian plaster and its composition
If the wall in appearance resembles a marble surface, but there are no seams on it, it is finished with Venetian plaster. This finishing material was invented centuries ago in Ancient Rome. When someone came up with the idea of mixing marble dust and slaked lime. The result was an elastic composition that looked like natural marble on the walls. For a clearer pattern, natural dyes were added to the mixture.
Venetian plaster is applied to walls, ceilings, columns
The most popular was clay. The walls had reddish or pinkish (depending on the color of the clay) stains, which made the decoration more similar to natural marble. To make the coating durable, the plastered surface was covered with a layer of wax, which was then polished. The walls were indistinguishable from marble. Only there were no seams.
And only centuries later, during the Renaissance, Venetian plaster appeared in Venice, where it began to be used instead of marble slabs. The technique for applying it was not simple, but working with Venetian plaster is much easier than adjusting and polishing marble slabs. Therefore, this type of finishing has become very popular. It was used to decorate walls, ceilings, and columns in palaces. The finish was beautiful and durable, and did not respond well to changes in humidity and temperature, which, in the high humidity of Venetian canals, led to literally widespread use of this material. The popularity was also facilitated by the fact that marble dust is easier to import and is cheaper. The remaining components were added locally mined. The fame of this beautiful finishing material quickly spread among merchants, and they called it Venetian plaster. Since then it has been like this.
Decorative Italian plaster can be light or rich in color
The composition of Venetian plaster described above - marble dust, slaked lime and coloring additives - is still used today. Absolutely natural finish. But there are compositions in which synthetic dyes (acrylic) are added or modern binders are used instead of lime. There may also be sap from rubber trees, crushed granite. Whether all or some additives are contained depends on the manufacturer, but this material is also called Venetian plaster, since the main component - marble dust - remains the same.
Features of decorating walls in the kitchen
Due to its high level of fire safety, this material is excellent for decorating walls and ceilings in kitchen areas where stoves equipped with open gas burners and other open window sources are installed.
Thanks to the unique qualities of Venetian tiles, it is possible to use them in quite a variety of options when carrying out finishing work.
The most common options include:
- Formation of marble walls;
- Craquelure;
- Using mosaic chips;
- Art concrete.
Each of the listed options is characterized by features that must be taken into account.
The journey of Venetian plaster to Russia
The Venetian woman gained particular popularity in the romantic but “raw” city of Venice. Numerous canals repeatedly flooded its facades, and high humidity contributed to fungal infection. Residents needed to decide: what to cover the walls of their houses with in order to protect them from the formation of mold. It turned out that there is no better material than lime plaster, and the low cost of the composition made it possible for people with different incomes to buy it. For Moscow and central Russia, Venetian is more of a decorative plaster for interiors, rather than for facades. Today, buyers have the opportunity to purchase both classic Venetian plaster, the composition of which has not changed for several centuries, and acrylic - rich in improving ingredients, but with some differences.
Advantages and disadvantages
Let's look at the main pros and cons. The initial advantages are high strength, longevity and beauty.
In addition to them, the decorative Venetian has the following advantages:
- unique decorative effect: the surface is given the appearance of natural polished marble or other semi-precious stones, valuable mahogany, metals, silk (this material is best imitated by silk plaster),
- environmental friendliness,
- possibility of application on various substrates (the main thing is that they are leveled),
- easy to restore,
- resistance to various influences (temperature changes, high humidity, which can be withstood by the stucco allow it to be used for facades),
- crack resistance,
- fire safety,
- quick drying,
- provides a healthy microclimate (the walls under the coating breathe),
- If desired, you can easily repaint it in a different color.
The multi-layering and structure of the coating when the light falls at an angle creates a fascinating effect of internal glow, natural gems. Glossy Venetian marbled plaster does not tire the eyes, but serves as a rest for them.
The disadvantages are:
- high cost of work and finished compositions,
- labor-intensive (physical strength is required for careful, painstaking work),
- the need to master the application technique,
- emphasizes unevenness and other defects in the base.
The battle between classics and acrylic: which is better?
What kind of material to buy for wall decoration depends on the designer’s idea, budget and client’s wishes. For a coating that has the maximum resemblance to a natural marble surface, you need classic Venetian plaster with air-lime, which is applied to previously prepared and carefully leveled walls (by eliminating defects, sanding, covering with putty, and then impregnating). Such work is sometimes carried out by a master of artistic design, who draws in detail the original marble patterns, down to barely noticeable veins. Of course, the services of an artist will increase the cost of finishing work. If the ideal accuracy of reproducing the marble texture is not important, then it is better to buy acrylic decorative plaster. Made from environmentally friendly water-based latex, it has the same strength characteristics as its limestone counterpart. And together with protective wax, the coating becomes invulnerable to moisture, so it is used for finishing walls in damp rooms - bathrooms, showers, etc.
Benefits of using Venetian tiles in the kitchen
Considering that, due to the modern rhythm of life, people get together less and less often, special attention must be paid to the decoration of the kitchen. After all, this is where family members gather after hard days, and therefore special attention must be given to finishing.
The main aesthetic as well as practical advantages enjoyed by decorative plaster include:
- Homogeneous surface;
- Widespread, which will help to form a complete picture of what problems can be encountered when using a certain option;
- UV resistance;
- High level of hygroscopicity;
- Ease of restoration if certain deficiencies occur.
Golden glow or noble mother of pearl
Venetian-decorated walls become mirror-smooth. You can never achieve a similar effect with paint or wallpaper. The texture design is always exclusive, because the wall is created spontaneously, at the hand of the master. Overlapping each other, several thin translucent layers create a fantastic, unique pattern:
— Veneto – classic Venetian plaster, made with the best lime, aged for 36 months after slaking. This makes the finish unsurpassed in hardness and beauty of the pattern.
— Encausto – for an impeccably smooth, artistic “marbled” finish with piquant terracotta ripples.
— Imperiale – to give the walls a delicate, sophisticated golden shine. An inexpensive way to showcase luxury walls.
— Marbella – to recreate the antique roughness of marble. A luxurious illusion of imperfection for a perfectly even finish.
— Marmorella – to give surfaces a calm and self-sufficient matte finish, an optical trap for fans of polished stone. The price of such a coating, unlike marble, will be low.
— Tierrafino – the nobility of subtle mother-of-pearl shimmer combined with the surface, rough processing of marble - visible, but intangible.
— Trevignano – the radiance of immaculately polished marble, in which, like in a mirror, silhouettes and interior items are reflected.
Examples of designs and drawings
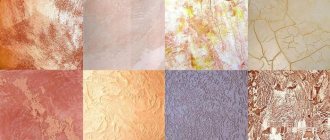
Photo examples of the most interesting drawings and designs.
Gloss
A fairly common decor option. The glossy surface is created using a final layer of wax or polishing. This texture is very pleasant to the touch and has an incredibly amazing shine.
Nacre
By adding mother-of-pearl to the plaster mixture, an iridescent effect is created with a faint shimmer and a slight glow of pearls. This textured material allows you to create a truly exclusive and original interior.
Colored (two-color or more)
Various combinations of shades or color transitions in the form of a gradient will be perfect for decorating any style trends and will become a bright and expressive touch of the entire room.
Under gold
Using this exquisite golden decoration, it is possible to fill the atmosphere with luxury, wealth and grandeur without crossing aesthetic boundaries.
Under concrete
It has an unusual appearance and has high performance qualities. This unique slightly rough texture, which does not have a pronounced relief, is obtained by adding small pebbles and sand.
Silk
Wet silk has a rich texture with a unique signature. This decoration creates incomparably beautiful visual effects that turn the room into real palace apartments. The silky texture is obtained with the help of fibers and shiny elements.
Sand
Such multifaceted decor can have a different appearance, for example, create imitation of river sand, sandy wind or dunes.
World map
The scattered outlines of continents and islands made on the surface look exclusive and bring the spirit of travel to the environment.
Why is she popular?
This type of plaster very skillfully reproduces the imitation of natural stones - marble, granite and other expensive rocks. This type of finishing was invented in ancient Rome and for more than two centuries continues to be popular as the most sophisticated and expensive. It is characterized by some pomp, so Venetian plaster is not suitable for every interior.
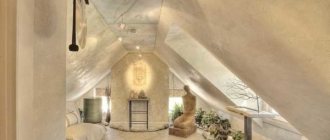
It looks most appropriate in spacious living rooms or bedrooms, salons, swimming pools and offices; this is a kind of sign of luxury. If the room is small, then it is better to limit yourself to partial decoration in the Venetian style.
Features of the formation of marble walls
When using this option, a special plaster mixture is used, the shades of which can range from the lightest to the most saturated dark shades.
- As for marble patterns, they can also be either quite wide or narrow, almost thread-like.
- In the latter case, they can be applied to the surface to a greater extent.
There is also a coating characterized by exactly the same pattern as marble, which makes it practically indistinguishable from the corresponding coating.
Types of Venetian
There are several varieties of Venetian, differing in appearance, composition and method of application.
Craquelure
It has an antique effect and features intricate patterns with cracks. This decorative technique is achieved through a special craquelure varnish, which, when dried, tightens the plaster layer and forms fractures.
Carrara marble
To achieve an imitation of Carrara marble, several layers of plaster are applied, differing from each other by half a tone. The result is a rather expensive finish that plays with a variety of tints.
The photo shows walls decorated with Venetian plaster with the effect of Carrara marble.
Veneto
It has a semi-matte surface with the effect of polished marble. This design option will undoubtedly give the room nobility and aristocracy.
Marseille wax
This unusual visual effect is obtained due to the addition of wax, which not only transforms the appearance of the entire coating and adds additional chic to it, but also improves its technical characteristics, for example, this finish can be used in rooms with high humidity levels.
Trevignano
Thanks to layers of different colors, this surface has iridescence and a special play of light. Using a polymer mixture and a certain application technique, an imitation resembling the travertine rock is obtained.
The photo shows Venetian Trevignano plaster on the wall in the dining room.
Marbello
This texture looks very elegant and expensive; in appearance it looks like velvet with streaks of gloss. Marbello can also change shade depending on the lighting angle.
Encausto
Dark matte surface that resembles granite. Using a finishing wax coating can further enhance this effect.
Pros and cons of finishing
Advantages and disadvantages of this decorative finish.
| pros | Minuses |
| Venetian coating is quite strong, durable and can last more than 15 years. | Quite a high cost. |
| Venetian is safe, environmentally friendly and hypoallergenic, since it contains only natural ingredients. | Complex, painstaking and time-consuming finishing. |
| It has a very aesthetic appearance and creates stunning visual effects in the room. |
Types of decorative coatings
The main types of Venetian coating.
Natural (classic)
This variety is applied using the traditional multi-layer method. Classic Venetian plaster contains marble chips, binders and various additives that provide good strength properties.
Imitation or what to replace
Plaster imitation options.
Wallpaper
They perfectly imitate the Venetian and allow you to get an equally attractive result without extra costs and complicated application.
Tension fabrics (for ceilings)
Tension products with such imitation are particularly beautiful and sophisticated, but they are a rather unusual and not yet very common interior solution.
Panels
Lightweight panels are easy to install, perfectly hide surface unevenness and are in no way inferior to the original in appearance.
The photo shows wall panels with an imitation of a plastered surface.
Tile
It combines well with a variety of materials and is resistant to mechanical stress and temperature changes. The tiles perfectly imitate stones, such as pink or amber onyx, gray granite or deep green malachite.
Design options in various styles
Thanks to the huge assortment and many options for unusual and original design, this finish can be used in any style direction.
- Classic.
- Art Deco.
- Loft.
- High tech.
The photo shows dark Venetian decorative plaster on the wall in a high-tech kitchen.
Venetian plaster has a visually attractive appearance and easily allows you to decorate a wide variety of interiors, giving them an even more beautiful, harmonious and complete look. For example, for a classic style, this finish can be complemented with baguettes, moldings or stucco.
The photo shows a classic bedroom and walls decorated with a glossy Venetian finish.
What you need to know about Venetian plaster
- The polished marble effect can be achieved with any type of Venetian plaster. If you choose a lime-based material, it is better to have it applied to the walls by a qualified craftsman.
- The pattern of polished marble fits into any architectural and interior style. However, keep in mind that smooth polished walls will make the room cold and uncomfortable.
- Before applying Venetian plaster, you need to prepare the surface. The wall should be free of cracks, scratches and stains.
- To apply Venetian plaster, you will need a primer, a backing, the material itself and wax - all from the same manufacturer, as well as a trowel.
- Acrylic Venetian plaster is easier to restore. To give it a fresh shine, you can apply wax and repeat the polishing procedure.
The tool and its features
Metal tools - trowels and spatulas, should be made of stainless steel and with rounded edges, and the working surfaces should be polished. To do this, the corners on new spatulas are cut with metal scissors, the edges are processed with a needle file and fine sandpaper, or special ones are purchased. tool.
The trowel and spatula for work (in any of the techniques) should not have any nicks. The spatula must be sharpened. When working, the surface of the spatula/trowel is regularly cleaned with a damp cloth so that when the mixture dries out, the remaining mixture does not interfere with the quality application of the solution to the wall.
Buy quality tools from reputable manufacturers. This way you will save yourself from a lot of troubles
The necessary tools for working in the Venetian technique:
- narrow (60 mm), wide (200 mm) spatulas,
- 2 Venetian trowels,
- construction mixer,
- containers,
- roller,
- masking tape,
- skins No. 220, No. 120,
- ruler,
- flute brushes, maklovitsa,
- clean rags
- sponge,
- thin brush to apply cracks.
Application technology
Applying Venetian plaster with your own hands is a difficult task. The problem is that this is a creative process and there are a lot of ways to apply it. Different movements result in a different surface appearance. Without experience, it is impossible to predict what you will succeed. You can only find out which movement will lead to which result through experimentation, that is, you have to try. But. Venetian plaster is not cheap at all, so the experience turns out to be expensive. Although, you have to study somehow...
There are different application techniques, the look is very, very diverse.
The only thing I can recommend is to plaster a piece of plywood with an area of at least 1 square, or better yet 2, sand it, coat it with a primer and try to apply Venetian plaster on this surface, perfecting the technique. It is not recommended to start finishing immediately. Most likely, you will have to remove everything and redo it all over again, which is annoying, expensive, and time-consuming. If you're lucky, you can find dealers who teach you how to work with Venetian plaster. They provide materials and a stand for work, and show how to do it. But this rarely happens.
What surfaces can be finished with Venetian
The Venetian allows working with various types of surfaces. It holds up well on:
- brick;
- foam block;
- concrete;
- aerated concrete;
- tree;
- drywall.
Venetian plaster can be applied to any surface.
The main requirement is preliminary preparation and leveling of the base.
Preparatory work
The base on which Venetian plaster is applied must be perfectly level. It is pre-puttyed and leveled until absolutely smooth. Use latex putty. If you apply the composition to an uneven wall, it will only highlight the imperfections and increase the consumption of the Venetian. You can level it with a base layer, but such leveling will be very expensive.
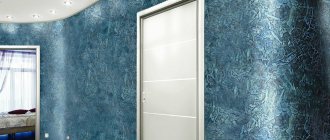
This is the wall you can get
A flat wall is coated with a deep penetration primer. Preferably in two layers. This will ensure good adhesion of the finish, remove dust that remains after sanding the plaster, and prevent the development of fungi. After the wall has dried, you can begin work.
Preparing the wall plane
Finishing does not require haste, but diligence - careful work with each layer, and especially careful preparation of the base for decorative finishing.
The base should be:
- impeccably leveled - align according to the beacons and do not forget about putty,
- reinforced with reinforcing mesh if necessary (if the base is weak),
- degreased - for this you can use a soap solution,
- free from stains
- primed (often an acrylic primer is used for work),
- processed with sandpaper and then removing the resulting dust - remove the dust using a clean broom or vacuum cleaner,
- dried (at least 6 hours).
When installing the mesh, do not forget that the glue is applied before and after installing the mesh, and not just on top of it.
It is advisable to prime the wall twice before finishing to ensure good adhesion of the finish to the wall.
Mixing and tinting
Venetian plaster is sold in buckets and has a pasty appearance. The basic version is white, tints are added to obtain color, and for different effects there are decorative additives - mother of pearl, sparkles, etc. You can color the composition in the store or yourself.
For tinting yourself, you will need a drill with a mixing attachment. In some cases, Venetian plaster is coated with a layer of water to prevent it from drying out. In this case, before use or coloring, the water is drained. Then, using a drill attachment, the composition is mixed until smooth. And only after that the dye is poured into the mass, mixed for several minutes (5-10) using a drill and nozzle.
Mix well until the color is uniform. It takes 10-20 minutes
When mixing, be careful: the composition often does not stain near the walls of the bucket. Having taken out the nozzle, take a clean wooden block of small cross-section and run it along the walls. Most likely, there are places where the dye did not get into. Run the block along the walls several times, ensuring that the walls have painted material. Mix the mixture again with a drill until the color is uniform. This procedure can be repeated again to be more sure. There is one more nuance: some manufacturers recommend waiting 12 hours after staining.
When tinting yourself, you must remember that some compositions change color when drying (not all). Therefore, to determine the future color, you need to make tests: apply a couple of strokes and wait until it dries. Based on the results, either add dye or an untinted composition.
Also remember that if you hand-tint, you won’t be able to repeat the same color. The new batch will be different. Therefore, the material must be painted in larger quantities than expected consumption: it is better to have something left than not enough.
Crecolure as one of the new trends
As for such a coating as craquelure, many note its significant difference from many other options. Now there are many options, the most common of which are imitation of cracked soil or desert.
Specific options may include plaster options that imitate, for example, eggshells or cracked whitewash.
There are two most common ways to apply this finish:
- As a completely independent option, with which the entire kitchen area will be finished;
- As a combination option, used, for example, to finish a work wall.
Rules for applying layers
When applying Venetian plaster, there can be from two to ten layers. It all depends on the desired result. And the correspondence between the “desired result” and the actual one is a matter of experience.
You can make this beauty with your own hands... if you practice beforehand
The layers are applied in different ways, but each of them is leveled and sanded until smooth, each one must be allowed to dry. And only after the latter has been applied and dried, the surface can be covered with wax - beeswax or synthetic. Depending on the type of wax, the result is either a glossy surface (beeswax) or a matte surface (synthetic based). Walls coated with a synthetic protective composition also become water and moisture resistant, so if you want to decorate the walls in the bathroom with Venetian plaster, use synthetic wax.
Base
The first layer is the base. It is applied evenly, according to the rules for applying ordinary plaster - it needs to be even. It can be tinted, or not. Depends on what background you want to have - white or colored. If 2-3 layers of material are applied, it will shine through them. If there are 5 or more layers, most likely it will not be visible (again, it depends on the type of composition).
A small amount of the compound is applied to the trowel and rubbed over the wall.
To accurately decide, read the manufacturer’s recommendations or watch master classes on how to apply Venetian plaster. To feel the difference, try doing both on a piece of plywood. It's more reliable.
Second and subsequent
The second layer of Venetian plaster, and all subsequent ones, are applied with chaotic strokes. The composition is taken on a flexible thin metal spatula or a special Venetian trowel. The composition is applied to the edge of the spatula/trowel and applied to the wall in small strokes in different directions. In this case, you must try not to show the mark from the first touch of the tool to the surface. The subsequent stroke, as it were, closes and lubricates this place. Moreover, it is not necessary to achieve uniformity. The whole point is in the randomness of directions, shapes, lines, bends. About the same as in natural marble.
Application of the second layer - chaotic or in one direction - depends on desire
Venetian plaster dries in 1-10 hours, depending on the composition, manufacturer, temperature and humidity. See the packaging for the exact time. After drying, the surface is rubbed with a dry trowel. At the same time, all differences that remain after applying the layer are smoothed out. The next layer is applied to the cleaned surface, dries, and smoothed. And so on until you get the desired result. And the result is usually this: darker stripes appear through thin layers in those places where, during application, the composition lay more densely. The depth and brightness with which the stripes “shine through” depends on the number of layers applied.
Finishing
The last layer of Venetian plaster must be applied with a thin metal spatula. The technique is called “scraping” and the layer turns out almost transparent. Take a small amount of the compound on a spatula, apply it to the wall, pressing the blade tightly and collect the compound back from the wall. This leaves a very thin layer of material on the wall. At this stage, you need to try to keep the surface level. Small irregularities will be removed when grouting, but you have to try.
This is a tool for applying Venetian plaster - a special trowel
How to select and prepare material
The choice of material directly depends on the characteristics of the design project. Experts recommend adhering to a number of rules when selecting materials:
- The mixture is purchased at trusted outlets or specialized stores.
- The type of solution is chosen depending on the design of the room and the desired result.
- When purchasing, carefully study the expiration date, storage conditions and integrity of the packaging. It is unacceptable to use expired formulations or solutions with opened containers.
- The soil is selected depending on the type of plaster.
The plaster mixture should be purchased in specialized stores.
These are general recommendations that are suitable for choosing any building material. Before starting work, the mixture should be prepared:
- If the solution is ready, then open the jar immediately before use.
- The mass is stirred with a construction mixer until smooth. To do this, set the tool to minimum speed. Mixing time 3-5 minutes.
- If the plaster is powdery, then it is applied according to the instructions on the package.
Kneading is done in small portions. This is due to the short lifetime of the mass.
How to repaint it a different color?
The main color of the plaster is white. It is corrected by adding a special concentrated dye to the decorative mixture. Thanks to this, any shade can be obtained, but you can see it after the plaster layer has completely dried.
Changing the shade of Venetian plaster in the interior is problematic because it is coated with wax. When repainting it, you should follow the renovation instructions: first you will have to remove the applied plaster layer, and then apply a new one of a different shade. You can restore the coating to its original shine by applying and polishing an additional layer of wax, but you will not be able to change the color or pattern in this way.
Tips and tricks
Independent work with the Venetian requires preliminary familiarization with the methodology and technique of applying layers of plaster mortar. The theory is confirmed by practice: test coatings are formed on a sheet of drywall. During the process of laying the mixture, you need to ensure the cleanliness of dishes, tools, and hands.
When decorating, it is recommended to follow the following tips from experienced craftsmen:
- The surface for plaster is leveled. If smoothness cannot be achieved, the base is covered with plasterboard.
- The first layer is primer. This can be acrylic paint white or another color close to the base tone of the plaster.
- The wall is conventionally delimited into sections for ease of application of the solution. The contours of the covered area should be indistinct so that boundary transitions are not visible.
- After cleaning, the last layer is covered with wax (preferably beeswax) and polished with a suede cloth. You should not use varnish to protect the surface unless it is craquelure.
- Beginners are recommended to work with a mixture of large filler fractions. A corrugated surface is easier to form than a smooth one. To apply a pattern or design to plaster, you need the talent of a draftsman.
- Buying ready-made pasta. You need to pay attention to the batch number: the shades of the solution or dry mixture in different groups may differ.
The finished plaster settles in a container to form layers. To avoid heterogeneity of the composition, the solution should be stirred periodically during operation.
History and modernity
In fact, the appearance of this elite type of decorative finish is a by-product of marble processing.
Using ordinary waste, which was stone dust or chips, as well as slaked lime as a binder, it was possible to create a plastering material that gave the walls a marble appearance, but had the undeniable advantage that it was much simpler and easier to work with.
Venetian plaster for interior wall decoration
Having passed through the centuries, the composition of this type of plaster has not undergone too many changes and basically remains the same. This:
- marble (in some cases also granite, quartz and other) chips. At the same time, you should know that the finer the fraction, the denser and better quality the plaster is mixed;
- slaked lime as a binder, which in modern compositions is most often replaced by polymer-synthetic components and additives;
- dye, which can be represented by both natural pigments and synthetic analogues;
- water and/or latex emulsion;
- Some formulations may contain gypsum and other natural or artificial additives.
In addition, modern “Venetian” models come with wax, which is used at the final stage of work and provides not only protection for the treated surface, but also gives it unique depth and beauty.
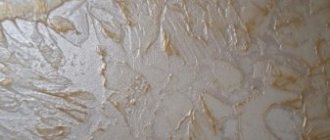
Venetian plaster glitters on the wall
Method of surface preparation before applying plaster
Disadvantages of Venetian plaster
Before diluting the plaster mixture, it is necessary to carefully prepare the surface for subsequent application of the material. Surface preparation includes:
- If necessary, remove old finishing materials - wallpaper, paint, etc.
- Clean walls/partitions/ceilings from oil stains, cement dust and other contaminants
- Pre-sand the protrusions, putty the recesses, fill the cracks with putty
- Sand the surface
- Apply a layer of starting putty and wait until it dries completely. Approximately 3-4 hours
- Then you can apply the finishing layer of putty and also wait for the material to dry completely.
- Carry out the process of sanding the surface again with sandpaper or a grinding machine.
- We thoroughly saturate the walls with primer in 2 layers: apply the first and let it dry, apply the next
- If necessary, paint over the third layer with a primer to match the color of the future Venetian
Technique: main steps
Preparing the walls
Before starting work, it is necessary to properly prepare the surface: it must be perfectly flat and smooth, for which a mandatory layer of finishing putty is applied.
After this, just as when preparing walls for painting, the surface should be treated with sandpaper.
Preparing the walls
If the walls have large differences and it is not possible to level them using traditional methods, a plasterboard structure can be installed, which should also be treated: primed, puttied and rubbed.
Careful preparation of the base is necessary so that after the Venetian plaster, which has a translucent structure, is applied, all surface imperfections do not become the main “decorations” of the interior.
After the preparatory work is completed, a layer of a special primer for Venetian plaster is applied, which in some cases can be replaced with a more budget-friendly option - acrylic paint.
The color of the primer base can be white or match the color corresponding to the main shade pattern of the future coating.
In this video tutorial you will be shown how to properly apply decorative Venetian plaster.
A short master class on repairs
After the soil on the surface has completely dried, you can immediately begin applying the plaster, while observing certain rules and stages of work:
- first, the first thin but continuous layer is applied over the surface to be treated, and after drying, it must be cleaned, eliminating unevenness;
- the second and subsequent layers are applied exclusively with flexible spatulas using arcuate movements, which make it possible to create a chaotic harmony of the pattern;
- Before applying the next layer, the previous one must be completely dry and protected;
- the minimum number of layers of Venetian plaster is, as a rule, at least 4, and the maximum can reach 12-15;
- It is imperative to follow the rule that each subsequent layer must differ in color or tone from the previous one. It is allowed to use contrasting colors or shades in the same palette;
- In many ways, the type of future wall decoration depends on the artistic abilities of the master, his ability to carefully and accurately apply short and long strokes, place accents in the form of bright spots, etc. This is precisely the case when “the artist should be a little painter, and not vice versa ";
- after the last layer has been cleaned, wax comes into play and is applied to the surface as a final protective waterproof coating, which simultaneously determines the appearance of the plaster: glossy or matte. Experts do not recommend using varnishes, since sometimes, for various reasons, the coating may become cloudy (of course, this rule is not relevant if Venetian plaster is applied using the “craquelure” technique);
- and, the final chord is polishing the surface, for which soft materials are used, for example, suede.
Despite the fact that each layer dries quite quickly, depending on the room temperature and humidity - from 20 to 40 minutes, you can touch the surface no earlier than after 6 hours.
And the room will be ready for use no earlier than in a week - it is during this period that the coating will completely dry.
The following video presents a master class on applying Venetian plaster.
The main difficulty when working with Venetian plaster is that it is not possible to finish the entire wall at once, so the work is carried out in parts, covering approximately 1 m2.
But at the same time, when applying the second and subsequent layers, you need to retreat from the edge of the first (base) - in this case, the transitions between the parts will be invisible.
DIY making
It’s easier to purchase ready-made powder, but many masters mix the Venetian powder themselves. However, there is a huge risk of mixing a low-quality composition. But if you do everything correctly and have the main components, the result will be no worse than store-bought mixtures. Among other things, there are special advantages of a self-prepared solution:
- cost savings;
- eliminating the inclusion of low-quality components in the mixture, since the master himself purchases the necessary components and knows what he is mixing into the composition.
The master must have the skill of working with the Venetian and have an assistant nearby, since it will not be possible to cope with the dilution and application of the solution alone.
Popular interior decoration products
The choice of plaster is large, but there are the most popular mixtures, whose quality has been confirmed by time and craftsmen.
Ceboart marmorino
Plaster based on slaked lime with the effect of ancient stone. It has a marbled texture with veins. Initially white, can be tinted. Used in rooms with increased operational load.
Ceboart stucco
The mixture is also lime-based, but with a shiny, glossy marble effect. It is economical in consumption and produces a deep black color. Easy to polish. If necessary, it can be additionally coated with a protective material.
The Ceboart stucco mixture is one of the most popular.
Ceboglam
Finish coating based on metallic pigment and wax. Used to add additional shine to the surface. Sold in 4 ready-made versions: silver, gold, red gold, copper. Easy to wash and does not let water through.
How to update?
If used carelessly, chips and cracks may appear on the plaster. To return the coating to its original appearance, it is necessary to update only the affected area.
- The repair area and the edges of the chips are cleaned of pieces of decorative material and dust using a brush.
- Apply primer to the cleaned area.
- Defects are smoothed out with plaster mortar. If necessary, after drying, the putty is rubbed until perfectly smooth.
- To update the plaster, use the same decorative material that was used previously. The mixture is applied with a soft spatula to the area to be repaired. If it is not possible to identify the manufacturer, then white acrylic plaster is tinted to match the color of the main finish.
- After the decorative mixture has dried, it is covered with a layer of wax or glaze varnish.
- The renewed area is polished with a soft cloth to a uniform shine.
IMPORTANT! The quality and durability of the renewed coating depend on how the primer and putty are done.
Elimination of defects
Material classification
When there are so many advantages to using Venetian, all that remains is to choose which coating is most suitable.
Embossed
You can prepare and apply it yourself if you study the technology in detail, test your skills on primed cardboard or a small section of the wall.
The relief is obtained due to the presence of large stone granules in the mixture; it is interesting because the same pattern cannot be repeated. This coating makes the room memorable.
Smooth
Due to the variety of highlights and marble transitions, the finish looks deep, despite the lack of relief. And also the sun reflects off the smooth surfaces of the Venetian, making it seem to glow from within. Can be glossy or matte, as desired.
Artistic
With the help of the Venetian, paintings and amazing drawings are created. The finished work is amazing, but requires experience in finishing and careful preparation.
Artistic finishing requires a lot of experience.