When finishing vertical surfaces in residential premises, the first thing that comes to mind is painting, whitewashing walls and wallpapering. However, among the rich variety, you can choose another, quite appropriate option - decorative plaster. It is divided into subtypes, differing in application technique, plaster compositions and final appearance.
Features of the material
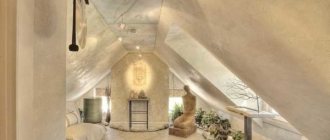
Venetian is one of the types of wall decoration with plaster, which was used by the Greeks and Romans since time immemorial. Plastering surfaces with Venetian plaster allows you to imitate a valuable stone, giving the wall sophistication, grace and originality, which other materials are not capable of.
When working with Venetian plaster, it is very important to adhere to the technology of applying it to walls. To master the technique, you need to practice for some time and watch how an experienced master performs the work. If you put in maximum desire and effort, even a novice finisher can master the peculiarities of applying plaster and will be rewarded with an unsurpassed result.
What's included
This plaster contains the following components:
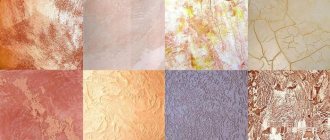
- stone dust. This is the basis of the material; the following stones are used: malachite, onyx, limestone, granite, quartz, marble. The degree of grinding of the stone varies: the finer it is, the more delicate the pattern is. With coarse grinding, the finished surface looks like rough ashlar;
- binder. Slaked lime is used for binding. acrylates are also allowed to be present in the composition (they can be either pure or combined with lime);
- pigment. Pigments can be organic or inorganic.
Benefits of use
What is Venetian plaster?
Why is this plaster composition so popular? The most significant reasons for the demand for Venetian plaster are:
- long service life (finishing can “stand” for more than 25 years without losing its original qualities and attractiveness);
- environmental friendliness (the components are absolutely natural, which makes it possible to decorate even children’s rooms with such plaster);
- easy to maintain (such decorative material is not afraid of moisture and mechanical damage, and is not susceptible to aggressive detergents).
Advantages
The original properties are preserved for a long time, the paints do not fade, the coating is not afraid of mechanical damage, serious effort must be made to damage it. The elements included in the composition have good adhesion, so they do not peel off or crack, unless this is done specifically (craquelure).
The composition of natural ingredients is environmentally friendly, and in its finished form it resists the external aggressive environment well, for example, when cleaning using modern chemicals. This finish requires minimal maintenance, washes well, does not absorb odors, and is resistant to dampness, so it can be safely used for decorating rooms with high humidity.
A very wide color palette, layer-by-layer application can create unique special effects on the surface. The pattern is unique and inimitable, even if you keep the proportions and take similar components, it will not be possible to repeat it due to the specifics of the application technology. The ability to create a textured finish that gives the walls or ceiling a noble and solemn character.
Preparing the necessary tools and materials
Considering that Venetian plaster is increasingly used to decorate interiors, its price is a bit steep. The table below shows the average cost of Venetian plaster.
| Type of material | Cost, rub/m2 |
| Classic | From 800 |
| Marbled | From 1200 |
| Decorating with brushes, sponges, tampons | From 600 |
| Antique | From 700 |
| Smooth finish | From 750 |
| Author's work | From 1200 |
But, there is absolutely no need to run around construction stores in search of the most budget-friendly option, because there is nothing easier than making Venetian plaster from ordinary putty.
Preparing the mixture
An alternative to ready-made compositions, the purchase of which is associated not only with financial costs, but also with time delays in deliveries from foreign manufacturers, can be the preparation of Venetian from available raw materials - acrylic putties from Russian manufacturers. Putty for Venetian plaster is prepared using two or more containers: about 60-70% of the base (acrylic putty) is tinted using light acrylic or natural dyes, mixed until a uniform shade and creamy state is formed, the rest of the base is mixed with a darker color and achieved similar effect.
The mixture dries quickly and should be used within a few hours as... After hardening, it is only suitable for discarding.
To prepare a textured mixture, you can add marble chips or quartz sand and mix thoroughly to obtain a homogeneous mass. It’s easy to understand how to make a Venetian from putty, but to achieve the intended decor you will have to experiment with the amount of coloring pigment. When making a coating with your own hands, you will have to prepare a piece of the wall for experiments: when mixing and applying layers, the final shades may be far from intended, the number of layers must be calculated after the fact.
If you make the mixture yourself, you should experimentally paint a small area in 2-3 layers and wait until the coating dries. Wet and dry coatings look different, and the required number of layers can be determined.
Preparatory moments
Before you start mixing the substance, you need to take care of the tools that will be needed during the work, namely prepare:
- a couple of plastic buckets;
- construction mixer or drill with an attachment for mixing construction mixtures;
- steel graters with different sizes of working blade;
- spatulas with rounded edges;
- brushes and roller;
- grinding floats;
- etc. additional items (pencil, tape, level, ruler, sandpaper, sponge, etc.).
Advantages of Venetian plaster
When the tool is ready, you can prepare the surface for the upcoming work. To do this you will need:
- Level the walls. In order for Venetian plaster to lay flat on the surface, the walls must be perfectly smooth without defects. To remove all blemishes on the walls, you can use gypsum masses, which are easy to work with and dry quickly.
- Clean surfaces. It is very important to remove all kinds of debris, dust, remnants of building mixtures, etc. from the walls. Cleaning can be done with fine-grained sandpaper.
- Carry out processing. When the surface is ready to apply plaster, it must first be primed. As a rule, such preparation does not take much time; 2-3 days will be enough. To prepare the plaster yourself, you will need:
- get dry putty;
- select the necessary dyes;
- select additional components if you plan to create a relief;
- buy wax.
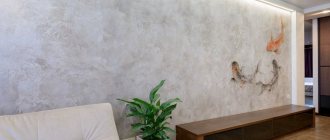
Venetian plaster in the interior
The process of preparing the solution is simple. The first thing to do is mix a substance that gives relief (for example, marble chips) with a dye. Please note that you need to make the calculations as correctly as possible, because if you prepare less plasters of the desired shade than required, the next batch may be very different.
Then the resulting mass is mixed with dry putty and kneaded until smooth. To evaluate the color of the resulting mass, a little of the substance can be diluted with water. If the color is not saturated enough, you can add dye. When the shade of the mixture matches the expected and desired result, the entire mass can be diluted with water by pouring in the liquid in a small stream, constantly stirring with a construction mixer. During such manipulations, a solution of a creamy consistency should be formed.
Which one is better to choose?
From all the variety, it can be difficult for an inexperienced craftsman or a beginner to choose the optimal type of Venetian in a particular case.
The type of application is determined by the interior of the room.
For a classic interior, pastel, light shades of fine-grained plaster are suitable. A rougher, rougher texture will look organically in a high-tech, minimalist style. They welcome gray and graphite tones. In spacious rooms you can safely use bright, rich colors.
For a classic interior, pastel, light shades of fine-grained plaster are suitable.
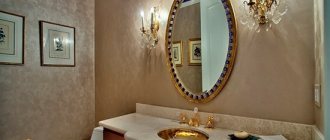
In the bathroom, preference is given to smooth surfaces. They are easier to care for. In addition, the additional coating in the form of wax provides greater moisture resistance. The risk of mold and mildew increases on textured surfaces. The same color scheme and finishing texture will help to unite the living room and the corridor. This maneuver will create more space in the hallway.
In the bathroom, preference is given to smooth surfaces.
In the bedroom you can combine colors and textures, highlighting individual fragments. In rooms with a sufficient amount of natural light, cold colors are chosen and, conversely, in rooms where there are more artificial light sources, warm colors are more suitable.
In the bedroom you can combine colors and textures, highlighting individual fragments.
Features of applying plaster
Despite the fact that Venetian plaster can be made from ordinary putties, the final result also depends on the technology for applying the composition. To create a truly beautiful coating, you need to know a little secret - you need to apply the composition at least 8 times, and then apply the finishing layer.
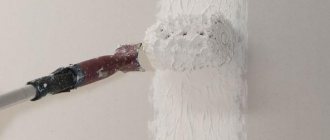
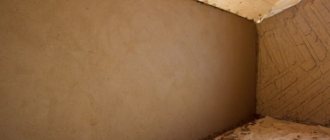
When decorating the walls with the first layer of plaster, it is applied to the entire surface, wait for it to dry and repeat the manipulations. All subsequent layers must be done in separate strokes, forming a unique texture of the natural material. The photo below shows how to putty walls with Venetian plaster. Please note that when the layers dry, they need to be sanded with fine-grained sandpaper to achieve greater blurriness of the pattern.
First layer
Before purchasing mixtures, familiarize yourself with the color palette.
It is recommended to carefully choose the color for the main finish. This tone will appear through all further layers and set the overall tone of the room, so choose light colors for small rooms; experiment with dark marble finishes only in small areas or in very spacious and bright rooms.
Applying colored putty begins from the upper corners towards the center. Having reached the middle of the wall, the work is performed in the same way, but from the lower corners to the center.
Apply the mixture in short strokes.
When treating a wall, you should adhere to the following rules:
- the material is taken in small portions on a spatula and applied to the wall in short strokes. The direction of movements should be different;
- the thickness of the application layer should be minimal, but without gaps;
- If smudges or accumulations of putty appear, the material must be dispersed.
Next, the layer must dry, after which it should be cleaned with sandpaper.
Finish coating
After all layers of plaster have been applied to the wall, you can move on to the finish line. The final result can be either glossy or matte, it all depends on the preferences of the apartment owners. To ensure that the finishing coat lays evenly, the surface should be wiped with a cloth.
To get a matte surface, the wax is applied in one layer, after which it is allowed to absorb. A glossy surface is formed after several layers of wax are applied, for which a mitten or sponge is used. After drying, the surface is thoroughly rubbed. To extend the service life of Venetian plaster, after 5 years the walls can be re-opened with wax.
Stone stains
The quartz primer is painted with color.
A pattern of streaks is applied to the putty walls. This process is carried out with quartz primer, pre-colored.
You can prepare 2 putties, similar in color, but of different shades, then the image will turn out deeper. The spatula should be held at an angle.
The drawing will depend on the size of the tool, the angle of inclination and acceleration of the stroke. When applying the material, you must immediately smooth out the color boundaries.
Clean your instrument regularly. Dried particles of material on the blade can damage the surface, leaving scratches on it.
Having treated the surface completely, it is allowed to dry, after which it is thoroughly sanded.
At this stage, you can add abrasions and enhance the color by sanding a little harder in the right places.
Be careful, too much pressure can ruin the design.