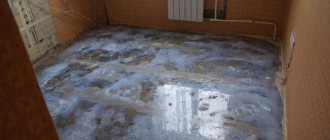
In houses where the floor is not insulated, you have to pay much more for heating, because 20% of the heat is lost .
In addition, a cold floor makes the overall climate of the room less comfortable, because even at an air temperature of +20 degrees, the feet are still cold, which is why a person begins to freeze.
A cold floor also leads to serious colds , so it is very important to insulate it.
We briefly talked about floor insulation with sawdust here, but now we will talk about it in more detail.
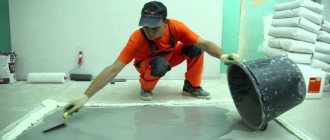
Floor leveling, PVA+ sawdust
Hello, I read various articles on this topic, but could not come to a conclusion.
The problem is trivial, there is a floor in a corridor with a turn, 1.5 m wide made of boards, the difference is maximum 1 cm, we are going to lay linoleum, but we want to level it. The problem is that, taking into account the linoleum, there is 3-4 mm left for leveling (the front door opens into the interior of the apartment, and does not allow plywood to be installed; replacing the entire floor is also not an option). I read about PVA + sawdust, do you recommend using them or some kind of putty (acrylic or latex?), maybe there are other options? Al.ex, with a non-sagging base, self-leveling flooring can also be used using appropriate primers.
ooh555 wrote: You can also use a self-leveling floor using appropriate primers
Firstly, your advice is six months late. Secondly, he is technically illiterate. Apply a water primer to the boards and apply a self-leveling floor on the water. ? The board will pick up moisture, swell, the screed will harden, then the board will dry and shrink, the whole mess will tear, ripple, and will buckle and crack underfoot.
Source
How can you level a wood surface with a mixture of glue and sawdust?
An economical and universal surface leveling method suitable for all wooden floors.
Of course, it will not be possible to get rid of severe defects in the form of mold or rotten bars. A major change of the entire structure is required. But it is possible to patch up minor irregularities and obstacles. To level wooden floors with sawdust, they need to be mixed with PVA glue. The work will also require strips, a spatula and a level. The guides are installed so that they are level. Mount at a short distance from the wall.
Coating preparation
The surface must be well prepared before leveling.
During preparatory work, it is necessary to maintain a certain microclimate in the room. It is better to close windows and doors to avoid drafts. If there is severe frost outside, warm the room to a comfortable temperature. It is advisable to carry out work in the summer, when there is no humidity and fumes.
Installation of beacons
For the prepared floor, you need to calculate the required layer of sawdust.
Preparing the mixture
Here is a universal method for preparing glue with sawdust, which is suitable for wooden floors in any condition:
Application
The settled mixture can be applied to the previously prepared floor.
Thematic forums: reviews from experts
many positive and negative on the Internet about the use of sawdust for floor insulation, but most of these reviews are left by people who have never done this themselves.
Therefore, we have prepared links to several authoritative forums , where users discuss various aspects of such insulation, as well as share their own experiences and give useful advice:
- Forumhouse.
- Auto RU.
- We are building a house.
- Artisan.
Drying time
After leveling, you need to leave the surface to dry for several hours, preferably a day or two. It all depends on the climatic conditions and creating a favorable atmosphere indoors. In order for the sawdust to set well, you must not open the windows and doors for 24 hours after pouring.
It is important to ensure the optimal drying temperature of the surface. Drafts and humidity in the room must be avoided. It is best to turn on the heater for a short time in case of high humidity, and in case of drought, open one thing - doors or windows.
A completely rough finish will be ready for finishing work after 3 days. After this period of time, the main work on laying the finishing base begins.
Useful tips
Experts advise adhering to the following recommendations:
- The surface must be well prepared. The most important thing is that there is no dust or construction debris on it. Of course, the glue sticks all the parts together, but excess debris will interfere with rigidity and cause the final coating to crack over time.
- When applying layers of sawdust-adhesive layer, it is important to observe the following conditions: the coating must be applied layer by layer. This composition shrinks, so after applying a 1 cm layer, wait for it to dry completely and only then begin to apply the next layer.
- The leveling solution can be prepared using wood glue. It is boiled until completely dissolved in water in a ratio of 2:15. Then sifted sawdust and cement are added there - 5 parts to two parts of wood glue.
AttentionThis option is suitable to give a more dense structure to the future coating, for example, when laying laminate flooring, which is very soft in structure.
Leveling the base is easy. To do this, you need to mix them with glue and let the mass swell. Layering is easy to apply. After several days of drying, you can begin the main lining of the final coating.
an interesting way to level a wooden floor
Here they suggested an interesting way to level a wooden floor on your own without using ready-made self-leveling mixtures.
I don’t know exactly the proportions; the builders will do it. here: PVA glue + small sawdust + putty. And the uneven floors are filled with this mixture, then OSB sheets are laid on top of the whole thing.
Who can say anything about this method? Does he have a right to life?
This is just the first thing that came to mind. IMHO money is wasted and hemorrhoids for the future. It’s easier and cheaper to sheathe 20mm. plywood.
What if you exclude it and just mix the putty with sawdust?
Restorato wrote: As a result of the seasonal swelling and drying of the floor boards, cracks will inevitably appear.
The fact is that an OSB board will be laid on top of all this, it seems to me that the cracks under it should not affect anything. or will they still have an impact?
Restorato wrote: Reinforcement is needed for all this rubbish.
and sawdust will not be reinforcement.
This whole thing is supposed to be applied so that in some places where the board “became a step” to fill these holes within 3-4mm.
I leveled the wooden floor under the laminate using KN-3 parquet adhesive. It contains rubber, so this kind of “screed” retains some plasticity and does not crack in the future. The thickness of the layer was different, 1-10 mm, the floor turned out to be completely flat. I also heard about sawdust with PVA, but they didn’t tell me that something else needs to be added there. I didn’t have any sawdust, so I chose the method described above.
Understood. So I’ll rather just make sawdust with PVA (fortunately there’s plenty of sawdust)
By the way, PVA can be diluted with water. As far as I know it is water based. but so that it doesn’t lose much of its adhesive properties, what proportion should it be? Otherwise it's too thick.
Aligned? What happened?
alfina wrote: Aligned? What happened?
Made a wooden floor in the kitchen. I wanted laminate. Changed my mind. Now porcelain tiles. They advised to lay moisture-resistant plasterboard on the wooden floor (leveled 1-2 mm). Secure it with self-tapping screws. Between the plasterboard and the wooden floor there is a foam rubber gasket, like under a laminate, 2-3 mm. Glue caramogranite with Finnish tile adhesive (650 RUR) I forgot the name. Your opinion?
Igor I wrote: moisture resistant drywall
Igor I wrote: foam padding
Most likely, not foam rubber, but polypropylene. For waterproofing, perhaps?
Igor I wrote: Finnish tile adhesive (650 RUR)
GVLV or DSP. What's better?
Aceid is a flat slate.
fox.msc I liked your technology. My plank floor drops 3-4 centimeters towards the edges of the room (hump in the center). Previously, I planned to bring out the horizontal, screwing it to the floor in increments
20cm cubes of varying heights and cover the top with two layers of 10mm plywood “in a spaced pattern”. According to your technology, I think one layer of 10mm OSB will be enough (after all, the base of sawdust on glue should be quite dense), or 2 layers of 6mm plywood “in a spaced manner.”
I wanted to ask how you leveled the mixture? For myself, I see the process as follows: place 10mm plaster beacons on the floor on the horizon on self-tapping screws with pads. And pour a mixture of sawdust and PVA between the beacons in strips and stretch them along the beacons as a rule. Won't the mixture, by chance, stick to the rule and reach for it?
And one more thing: was there significant shrinkage in the area with a thick layer?
Denis1 wrote: For myself, I see the process as follows: place 10mm plaster beacons on the floor on the horizon on self-tapping screws with pads.
for me, for example, this option was unacceptable, since the failures in different places were different. And I didn’t fill the floor completely, but brought it down to the main flat plane. There would be a lot of hassle with lighthouses
Denis1 wrote: And pour a mixture of sawdust and PVA between the beacons in strips and stretch them along the beacons as a rule. Won't the mixture, by chance, stick to the rule and reach for it?
Denis1 wrote: was there significant shrinkage in the area with a thick layer?
noticeable shrinkage begins at a layer of 5 mm. about whether she is strong. It’s hard to say, again it depends on the consistency of the mixture. But with a thickness of 1-1.5cm, the shrinkage is somewhere around 2-3mm. In general, just after drying, you can apply another layer of liquid, so that the gaps from shrinkage are well filled
Source
Comparison of materials
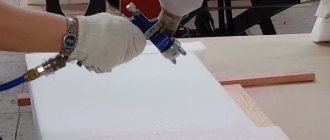
The industry offers various insulation materials suitable for floor insulation, but the most popular of them are :
- sheet foam;
- granulated polystyrene;
- sprayed polyurethane foam;
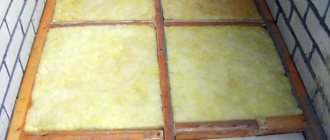
- mineral wool;
- foamed polyethylene.
Each of the materials has slightly better thermal insulation properties , which makes it possible to reduce the thickness of the insulation by 10–20%.
However, the cost of insulation is several times higher, so insulation with sawdust, even with the installation of deepening gutters, is noticeably cheaper.
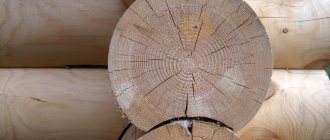
In addition, only mineral wool and polystyrene granules allow air and steam to pass through , making them suitable for use on wood floors with subfloors without ventilation.
The use of other materials will lead to the formation of condensation and rapid destruction of the log wood.
Any materials can be used on concrete floors , but unlike sawdust and lime, they are very attractive to rodents, so if your neighbors have mice, they will soon appear in yours too. After all, mice and rats are constantly looking for new warm places to live, and modern insulation materials meet all their requirements.
All modern materials, except mineral wool, dry out and lose their shape over time, so after 5–10 years the thickness of the layer will decrease and its heat-insulating properties will decrease.
When using mineral wool, another difficulty arises - in order to cut a piece of the required length with smooth edges, you have to suffer.
In addition, the pieces have to be cut with a small margin and then inserted with force, which increases the requirements for the lining. After all, if you cut off the wool without reserve, then there is a high probability of cracks appearing , which will lead to the formation of cold bridges and reduce the effectiveness of insulation.
The same problem arises when using any sheet materials - if they fall into place without serious effort, then cold air penetrates through the cracks, reducing the effectiveness of insulation.
Sprayed polyurethane does not have these disadvantages, however, it completely blocks the movement of air and steam, which is why it can only be used on concrete floors, because wood structures, deprived of air movement, soon begin to rot.
All this allows us to draw an unambiguous conclusion - modern insulation materials do not have any undeniable advantages .
In some ways they are slightly superior to sawdust, but in terms of a combination of factors they are noticeably inferior to them.
In addition, given that the Russian building materials market is filled with fake and counterfeit products , there is a high risk of purchasing material that will pose a health hazard, while sawdust, lime and clay are environmentally friendly products.
Sealing cracks
There are quite a few options for how to seal cracks in a wooden floor.
The most common are the following:
Below we will take a closer look at all these options.
Preparation of a mixture of PVA glue and sawdust
Glue with sawdust
This method is quite universal, as it can be used on different areas of the wooden floor.
In this case, work is carried out in the following way:
Filling cracks with mixture
Note! Before sealing cracks in a wooden floor, you need to make sure that all the boards are securely fixed. Otherwise, they must be additionally attached to the joists with nails or self-tapping screws.
Cement mixture
To prepare the cement composition you need to prepare the following ingredients:
| Components | Number of parts |
| Wood glue | 2 |
| Warm water | 15 |
| Cement | 5 |
| Wood sawdust | 5 |
Instructions for preparing the putty look like this:
The sealing process itself does not differ from the method described above, the only thing is that the composition dries for about two weeks. After this, you need to treat it with an abrasive material to obtain a smooth surface.
Advice! To give the mixture the color of wood, you can add a little coloring pigment or even oil paint to it.
Leveling the floor with a mixture of cement, glue and shavings
It should be noted that this composition, after drying, becomes more durable than the one described above. Therefore, it can be used both for filling cracks and leveling wooden floors in the house.
putty
If you don’t want to bother with making putty yourself, you can use ready-made wood putty. True, it should be noted that this option is the simplest, however, not always reliable. The fact is that many types of putty crack and crumble quite quickly.
Therefore, when choosing how to fill cracks in a wooden floor, it is better to give preference to an acrylic or latex composition. They dry quickly, have no odor and do not crack over time.
Repairing floors with putty
If wood putty is chosen as the material, the cracks in the floor are sealed according to the same principle as described above for other mixtures. It can be applied with either a rubber or metal narrow spatula.
Paste and paper
To create this tool you will need:
This putty is quite durable, and its price is minimal.
It is performed as follows:
In the photo - flour paste
As in all previous cases, in order to achieve a high-quality result, before sealing cracks in a wooden floor, they must be well prepared, cleaned of any dirt and flaking surfaces. After this, you need to fill the space between the boards with the mixture and compact it as best as possible.
Scheme for sealing cracks with cord
Cord termination
This option is good because it allows you not only to eliminate the space between the boards, but also to get rid of their unpleasant creaking.
To perform repairs using this method, you will need the following materials:
The work is performed in this order:
Silicone sealant
If the floors “play” and there is no way to firmly fix them, then it is best to use silicone sealant to seal the cracks in the wooden floor.
The process of applying it is extremely simple:
Due to the fact that silicone remains elastic even after drying, this seal can last quite a long time.
Advantages and disadvantages
PVA-based putty, like any other building material, has its pros and cons. Let's start with the first ones, since there are much more of them:
Advantages
- Very strong adhesion. The presence of glue in the composition, as can be seen from the name of the solution, already implies an increase in its adhesive properties. This putty can even be applied to painted walls;
It is convenient to putty even the ceiling with a PVA-based putty mixture
- Excellent elasticity. Shrinkage processes and cracking are unknown to putty with the addition of polyvinyl acetate emulsion, which improves the quality of repairs carried out with its help;
- Perfectly smooth surface. There will be no sagging, air formations or delamination on the resulting coating;
The adhesive putty covers the base with a smooth, even layer without visible defects
- Environmental friendliness. The composition contains exclusively components of natural origin, which are also practically odorless. There is no need to be afraid of using it in buildings where children or people with allergies live;
The use of PVA putty is allowed in a child's bedroom
- High antiseptic properties. You don’t have to worry about the appearance of mold or mildew, since the material in question contains many antiseptics;
- Snow White. Ideal for applying paint of any shade, or simply as a finishing decorative finish;
Perfectly white PVA putty does not require additional bleaching
- Abrasion resistance. Putty walls will withstand prolonged contact with hands, edges of furniture, and even the paws of pets;
- Compatibility with most materials used in construction, including:
Wood;
The ideal solution for sealing seams between boards is putty made from PVA and sawdust
- Brick;
- Aerated concrete;
- Drywall;
- Foam concrete;
- Chipboard;
- Medium density fiberboard;
- Plaster;
- Dye.
- Possibility of making it yourself.
Flaws
This includes a couple of existing restrictions on the composition in question:
- Certain requirements for the processed base. PVA-based putty mixture cannot be used for treating external and damp walls;
- Impossibility of applying a thick layer due to the risk of cracking.
Sealing cracks in wood floors
Sealing cracks in a wooden floor is required in cases where the boards have dried out over a long period of use and some floorboards have begun to creak. Since wooden floors have been used for centuries, during this time many ways to repair them have been invented, and with the advent of new materials, the possibilities for eliminating defects have expanded even further.
Sealing cracks in wood floors
Therefore, if the need arises to seal cracks, you can always choose the method that is most accessible in execution. To be aware of ways to solve these problems, you need to consider some of them.
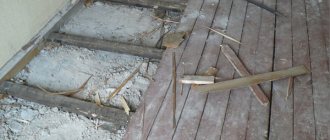
Types of floor repairs
Repair of wooden coverings can be divided into three types:
It is better to dismantle such a floor and carefully sort out the floorboards
Tools for work
— The boards are carefully sorted, healthy and strong specimens are selected from them. If necessary, they are planed a little to even out the unevenly shrunken edges.
— After all repair and preparatory actions, the floors are laid again. In this case, the boards must fit tightly and be secured to the joists.
This type of repair is necessary if sealing the cracks, due to their size, is simply ineffective.
Methods for sealing cracks
Gaps in the floorboards may appear in various areas of the floor, so you need to consider not only the operating technology, but also the options for sealing materials, as well as places where flaws may occur.
Surface finishing may vary depending on the location of the area
Gaps between the wall and floor boards
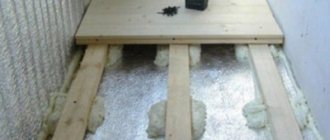
Small distances are always left between these building elements for ventilation and in case of expansion of the material due to changes in temperature and humidity. But if over time they have grown excessively, then they will need to be repaired. This can be done using construction foam, sometimes even adding small pieces of foam to it. The work is carried out in stages:
— first you need to carefully dismantle the baseboards;
- then clean the cracks from dust and accumulated dirt;
- next, seal with foam, and, if necessary, pieces of foam are placed under it;
— after the foam has dried, the excess is cut off exactly along the catchers;
- It is best to seal the seams on top with putty. so that dust does not collect in the pores of the frozen foam;
- Next, you need to wait until the putty dries, and you can put the baseboards back in their place.
Sealing cracks with glue + sawdust
Repair of the floor, in any area, can be carried out with an adhesive composition, which can be made in one of two ways:
Video: homemade putty from sawdust and PVA
This method is often used not only to seal widened cracks, but also to level the floor surface to a smooth state.
Repair using putty
If you don’t want to bother with making complex compositions from numerous ingredients, you can, of course, do something simpler: buy a special wood putty at a hardware store and seal the cracks with it. This option is suitable if the gaps are not large at all. But you need to know that such fall putty is often quite short-lived - it can crack and crumble over time. Therefore, it is better to use it when you plan to then cover the old boards with plywood flooring.
Filling cracks with a ready-made compound
The finished putty is also applied with a narrow or rubber spatula, pressing it into the cracks. After it has dried, you need to level the sealed surfaces using available abrasive wood processing products.
Sealing cracks with paste and paper
This method is easy to implement and not at all expensive. To perform such a process, you will need paste, paper and a little copper sulfate or, as it is also called, “blue stone”. This ingredient of the composition is necessary so that nests of various small insects do not appear in the adhesive mass over time.
Sealing cracks with cord
A method of sealing cracks, not only between floorboards, but also in walls, has long been known, using a cord selected according to the width of the holes. The use of this popular technology will not only help get rid of cracks in the floor, but will also relieve residents from the unpleasant creaking of boards.
An old proven folk method - sealing cracks with cord
For the repair process in this way, you must have twine. rope or cord made of any material, sawdust, wood glue or PVA and putty.
Sealing cracks using slats or wedges
A more complex method of sealing cracks has long been used - using thin slats, hewn at an angle in the form of wedges. These parts must be carefully adjusted and should not push the floorboards too much, but at the same time. completely cover the cracks. The work is carried out in several stages.
A reliable way to seal cracks using wooden wedges
Hammering the slats into the crack with a regular hammer through a wooden spacer
Other repair methods
In addition to the methods mentioned above, there are many other known techniques. In addition, hardware stores can offer numerous modern materials for these purposes.
Tow has by no means lost its relevance in this matter
This material is treated with wood glue and compacted into the cracks using available tools. After the glue has dried, the cracks are tinted to match the overall floor.
Then, after the glue has dried, the cracks are sanded and covered with paint.
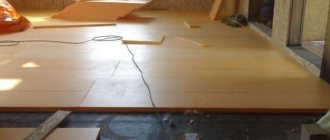
Sometimes it's much easier to simply cover the old floor with plywood.
This option is used in cases where such a number of gaps of different sizes have formed between the floorboards that sealing them is unproductive. Therefore, it will be easier, following all the technologies for working with plywood, to fix it on the floor surface with self-tapping screws and at once close all the defects that appear.
The sealant perfectly closes the cracks and eliminates the resulting creaking. Spreading under the pressure created in the syringe, it covers the entire internal surface without compaction or other effort. This is a durable and fairly reliable material that will eliminate problems for many years.
Sealants made on acrylic and silicone bases that are designed to work with wood are well suited for closing cracks. They are very easy to apply and dry quickly. Therefore, if you have no experience in making special compounds or do not want to tinker with them, but you have the opportunity to purchase a ready-made product for such repairs, you can opt for sealant.
How to make putty
Wood putty. Prepare PVA glue and small sawdust. Take out a small container to prepare the solution. Place sawdust in a container and fill it with glue. Stir everything thoroughly until it reaches the consistency of thick sour cream. Let it dry for 15-20 minutes. The putty is ready.
Concrete putty. Prepare chalk and drying oil. Take out a small container. Mix chalk and drying oil in a container. Stir everything thoroughly until the sour cream becomes thick, let it set a little and dry. The putty is ready.
Putty for painting. Prepare a 15% glue solution, drying oil, turpentine, laundry soap, chalk, and casein paint. Prepare the container. Dilute casein paint with water and heat to a temperature of 60 degrees, then strain through a sieve and pour in drying oil, and then chalk soaked in water, laundry soap and turpentine.
The same putty can be made from a slightly different composition. To do this, instead of casein paint, use glue on the same base. First, mix dry powder materials: chalk, pigment, laundry soap. And then add liquid materials: casein glue, turpentine, drying oil, varnish. Stir everything thoroughly and let it brew until it reaches a viscous consistency.
Select the color of the putty pigment depending on the paint with which you will cover the surface, so that spots and stains do not appear on the wall. To choose the right color and percentage of pigment in the putty consistency, apply it to a small area of the wall, let it dry and cover it with paint on top.
>How to make wood putty
November 22, 2013 Putty
Tell me how to make putty on wood
Tell me how to make putty for a wooden floor. You need to fill the gaps between the boards and chips and then SAND the floor. Our town is small - we couldn’t find any liquid in stores to prepare a putty mass like LEGA STUCCO, only ready-made putties, but I would like to make the color of the putty closer to the floor (that’s why I want to make a putty mass with sawdust from the floorboard). Do not offer putty based on PVA; when sanding, PVA produces dirty snot. Are there any options?
Ask someone from the big city to send the required invoice.
Wood putty
Wood putty is used to fill cracks, nail holes, voids and other defects in wood. If the surface will be painted after filling, it should be treated with sandpaper.
Depending on the material on which the wood putty was made, there are the following main types:
- on an alabaster base.
Wood putty, which is made on the basis of varnish, can be diluted or removed from the surface using thinner or acetone. Water-based putty can be washed off with water. Alabaster putty is produced in powder form, which is mixed with water before application.
The most famous manufacturers of wood putty are Tikkurila and Extra.
Tikkurila wood putty is a special-purpose material that, after drying, adapts to the color of the wooden surface.
The material is used to correct uneven surfaces made of wood indoors. The treated area can be painted, varnished, or stained.
Tikkurila wood putty can be used on doors, panel walls, furniture and other wood surfaces.
- applied using a spatula;
— depending on the thickness of the layer, it can dry from four hours to a day.
The surface on which the material is applied must be clean and dry.
Wood putty Extra is a waterproof material made on an acrylic base, which is used for work both indoors and outdoors. The material has high hardness, moisture resistance and strength. Very easy to match the color of the wood. Extra wood putty can be used as a finishing material, including in conditions of high humidity.
The mixture is used to seal cracks, knots and other imperfections. The surface to be treated must be free of dirt and dry. Old decorative materials must be removed.
Extra wood putty is applied using a spatula in one continuous layer. Layer thickness up to one millimeter.
You can also make your own wood putty. It can be oil or resin based.
Do-it-yourself oil putty for wood is made in this way: take 60 grams of turpentine oil and 280 grams of linseed oil, 30 grams of ground pumice and mix everything thoroughly. Add 12 grams of borax, 20 grams of casein and gelatin, 18 grams of ammonia and 290 grams of water. Stir and place in a water bath. When the composition heats up, it should be stirred until a homogeneous mass is obtained. Before using wood putty with your own hands, it should be cooled.
DIY resin wood putty is a waterproof, fusible mixture. In an enamel pan, stir 200 grams of rosin and 400 ozokerite. Add yellow ocher and stir until smooth. Apply hot. This elastic wood putty will perfectly seal large defects.
Do-it-yourself wood putty is applied using a sprayer or spatula. The material, which has the consistency of sour cream, is used to cover large wooden surfaces, and the dough-like material is used to seal individual areas.
The surface on which you apply wood putty with your own hands must be pre-primed. The material must be spread thinly, forming a flat surface.
The price of wood putty depends on the manufacturer of the material, the container in which it is sold on the building materials market and other indicators.
How to make homemade putty?
How can you make homemade putty yourself and what is needed for this?
You can prepare putty at home. First you need to decide what the putty is actually needed for: for wood or for concrete? First, let's consider the option of preparing wood putty.
In order to prepare strong and high-quality wood putty, we need PVA glue and small sawdust. You can ask for these sawdust in any carpentry workshop. In a small container, mix sawdust and PVA glue. Mix until the consistency of thick homemade sour cream. All. The wood putty is ready.
It is suitable for sealing cracks on wooden products indoors and outdoors. There is one drawback to this putty: it does not last long. It only needs to be prepared in a small amount. This putty dries quickly (about 15 - 20 minutes).
To prepare putty for concrete, mix chalk and drying oil. Mix until it reaches the consistency of sour cream. This putty will not be snow-white, but it is quite strong. Suitable for indoor use only.
Tell me how to make putty for a wooden floor. You need to fill the gaps between the boards and chips and then SAND the floor. I couldn’t find any liquid for preparing a putty mass like LEGA STUCCO in stores, only ready-made putties, but I would like to make the color of the putty closer to the floor (that’s why I want to make a putty mass with sawdust from the floorboard). Do not offer putty based on PVA; when sanding, PVA produces dirty snot. Are there any options?
Composition and characteristics
From the very name of the product it is clear that PVA putty contains polyvinyl acetate-based adhesive, which was invented by English chemists about seventy years ago and is a transparent, non-toxic, chemically inert polymer without taste or odor.
It turned out that this substance mixes well with various plasticizers, does not dissolve in water, but forms stable homogeneous suspensions with it and is a film-forming and adhesive material.
This prompted the inventors to create the well-known glue, which in liquid form has a white or slightly yellowish color due to the addition of the plasticizer dibutyl phthalate. The glue has a barely noticeable specific, rather pleasant, aroma, and after drying it forms a transparent, hard, but rather elastic glassy layer without color or odor.
PVA-based putties are recommended for use in finishing rooms intended for children.
In addition to polyvinyl acetate glue, they contain the following components:
- Chalk is calcium carbonate, chemically precipitated from minerals containing calcium. Gives the putty a pure, opaque white color;
- Ground talc is a mineral that reduces the crystallization time of polymers, therefore promoting faster drying;
- Latex is the stabilized milky sap of rubber plants. Additive to prevent cracking of the putty layer;
- Carboxymethylcellulose is a product of cellulose processing. Gives additional softness;
- Antiseptics and antifungal components. Prevents mold and bacterial growth.
The finished putty composition contains exclusively harmless ingredients, each of which has found its application in medicine, perfumery and the food industry.
The finished putty composition contains exclusively harmless ingredients.
This type of putty is different:
- High adhesion, that is, the ability to have very strong adhesion to other surfaces and increase friction. This characteristic is stronger, the more intense the intermolecular interaction of the glued layers;
- Optimal density and viscosity and good ductility, which greatly facilitates the application process;
- Economical consumption. It ranges from 0.4 to 0.8 kg per square meter;
- Neutral white color. Therefore, the composition is ideal as a ceiling leveling material and creates an excellent basis for painting the treated surface in any color;
- Relatively short hardening time. One layer takes three hours to dry; a day is enough for all layers to dry completely.
The mixture is resistant to temperature fluctuations, withstands a temperature range from forty to one hundred and twenty degrees and a three-time cycle of freezing and thawing without changing its properties.
The composition is ideal as a ceiling leveling material.
Wood putty - what is the technique for making it yourself?
When processing any wood material, wood putty is often used, a video on how to make it is available on the website. It is used to repair irregularities, cracks and other surface defects. We will discuss its types and manufacturing method below.
According to the manufacturing method, there are: factory-made and home-made mixtures. Based on their composition, they are divided into: adhesive, oil-adhesive and nitro putty for wood. The first group consists of self-made putties. They include ingredients made from oil, adhesive and plasticizers. The second group includes compositions made from oil varnish with various fillers or drying oils. An example of such putties can be LSh-2 and LSh-1. It can also be filled paints or glyphthalic varnishes (M-180,175).
The third group includes nitro putties, which are produced in factories. They are called quick-drying mixtures. These compositions are made from resins, cellulose ethers, diluted with appropriate solvents. The mixtures also contain fillers and plasticizers. At the construction site, nitro putties are once again diluted with special compounds (R-645, R-646 and other solvents) to bring the mixture to working condition. A striking example of nitro putties are: ASh-32, 30, 24, MBSh.
Any putty, regardless of which group it belongs to, must have a number of mandatory properties. Firstly, it is important that it is properly connected to the base, that is, it has high adhesion. Secondly, the putty must be homogeneous, that is, not contain any impurities or mechanical inclusions. If they are contained in the solution, this will create a number of problems when installing the putty. Specks can get stuck in the sprayer and also scratch the coating when applying the mixture with a spatula.
Thirdly, it is good if the putty gives minimal shrinkage, since it will be possible not to cover the walls with an additional layer. This will significantly reduce the time of facing work and financial costs. Fourthly, the dried putty should not crack or crumble. It should also be easy to sand. If this is not the case, then the putty composition was of poor quality. Fifthly, the next facing coating (paint, wallpaper, etc.) should easily lie on the walls and dry within the specified time.
Feature of wood pulp
Wood pulp is classified as a raw material that is used to create furniture decorations. It is able to maintain the quality and texture of natural wood. The finished products look luxurious and attractive.
Externally, they cannot be distinguished from natural ingredients. The material has a soft texture that allows it to be shaped into different shapes. For work, special rollers and a press are used.
The finished parts are durable. Most often they are chosen to decorate cornices, doors, window openings and furniture paraphernalia.