Even the most reliable house, built from high-quality materials, will eventually require major repairs. Of course, the concrete parts of the building will last for centuries, but the wooden elements will, of course, wear out faster. In any case, repairing the floor in a house with wooden floors may be required after some time. Moreover, despite all the strength of wood, structures made from it will obviously have to be replaced earlier than those made from concrete. Let's see how to repair floors in a room with wooden floors.
Repairing the floor in a house with wooden floors
Possible problems
Wood, especially if it has been properly processed before construction work, is a fairly strong and reliable material that is resistant to many factors. However, it also becomes unusable over time, and structures made from it may require replacement. Most often, the floors themselves have to be replaced, especially if the floors in the house are wooden. But how do you understand that a major floor renovation is just around the corner and it’s time to take some action?
Do-it-yourself wooden floor repair
So, it is better not to delay the repair of wooden floors, and the very first signals that it is time to start repair work will be the creaking of the floors and their sagging. Moreover, the floorboards may creak slightly, and then you shouldn’t worry too much about their condition, especially if the sounds created when walking on such a floor are not annoying. In any case, repairing just a few slightly creaky floorboards will not cost much, and the work will be completed quickly.
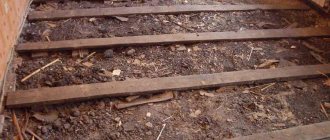
Gaps in the wooden floor
In this case, it is important to identify the creaky places and the reasons for the unpleasant sound - usually it is a poorly secured floorboard or a slightly loose joist. Sometimes it is enough just to tap the joints (where the nails are hammered) with a hammer, and everything will return to normal. If this measure does not help solve the problem with the creaking, then the problem is with lags, and then you need to fix the lag again. It can be strengthened with anchor bolts, pulling it to concrete or wooden floors. All this can be done quite quickly and solve the squeaking problem without outside help.
On a note! The durability of the floors and the need for prompt repairs will directly depend on how well the installation was initially carried out, as well as whether the wood was treated with special compounds before it was used.
Impregnation for wood
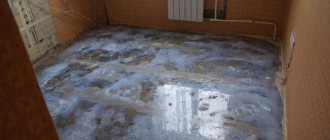
However, the problems can be much more serious. Floors can become completely leaky - unfortunately, wood is susceptible to rotting and becomes rotten over time. Such floors may even fail. Of course, you still need to manage to bring them to this state, but rotting is not always noticeable from above. It happens that it begins on the underside of the floorboards, and joists are also susceptible to this negative process. In this case, the entire floor will have to be replaced.
DIY wood floor repair
On a note! It is often impossible to replace the wooden floors themselves when it comes to an apartment building. There are neighbors living on the floor below, who are unlikely to be happy if someone dismantles their ceiling. So sometimes, if possible, you only have to repair the floors themselves, while simultaneously strengthening the floors.
Wooden floor in the apartment
↑ How to eliminate creaking floorboards
Any wooden floor sooner or later begins to creak. Either this place is used too often, or the floorboards are simply dry, or the joists are split. There can be many reasons. And laying plywood on top may not solve the problem, but only delay its solution.
Floorboards squeak when they are loosely attached to the joists. There are several ways to eliminate the cause.
We drive a wedge between the floorboard and the joist from below
Method 1. If it is possible to access the floor from below, for example, when the floor is the ceiling of a basement, then you can fix the floorboard from below. To do this, one person goes downstairs and the other walks on the creaky floor. Thus, a “creaky” board is determined. We find the place where a gap has formed between the board and the joist or beam, and drive a wooden wedge into it.
We fix the boards with screws at an angle
Method 2. If there is no access from below, then screw in a screw from above at an angle. To do this, we drill holes in all the joists and fasten the boards with screws. We putty the screw heads. And when the putty dries, we sand the surface.
Method 3. If the cause of the creaking is the friction of the boards against each other, then you need to walk along the floor and find the “causing” places. Then pour talc or graphite into the cracks between the floorboards or drive in wooden wedges.
Diagnostics: when is repair needed?
Without a thorough examination and identification of the condition of the floor, it will not be possible to understand whether it needs to be repaired. So before you decide on a major or cosmetic repair of the foundation, you need to diagnose it. The presence of certain signs will help make a decision about the need for repair work, as well as what generally needs to be done to revive the foundation under your feet.
Before repairs, the floor must be inspected
Table. Basic parameters for assessing the condition of the floor.
| Parameter | Characteristic |
| Sound during floor examination | You need to tap the floors with a hammer and listen to how the wood sounds. If the sound is dull, then the wood is already beginning to rot or is rotten and needs to be replaced. |
| Condition of nails | Nails can show where boards have rotted. In places affected by rot, the metal will be rusty; it becomes so due to the processes of ongoing decay occurring next to it. |
| Lag condition | It is assessed by probing these elements with an awl. It is recommended to walk along the entire length of each joist. The tool should not easily enter the wood, but if the situation is the opposite, it means the logs have rotted. Most often, the softest wood is found in the area of the ends of the beams. |
| Smell | If an unpleasant odor seeps between the floor boards, then the likelihood of the boards and joists rotting is very high. In any case, if there is an unpleasant odor, it is advisable to disassemble the floors to understand the reason. |
| Condition of the floorboards | If the floorboards sag and squeak, are severely curved, or crumble, then the floors definitely need to be repaired. |
On a note! Wooden floor elements can also be damaged by wood-boring beetles. In this case, the boards will also have to be changed. Most often, insects attack wood that has not been treated with a protective compound.
These logs definitely need to be repaired.
By the way, despite the fact that the floorboards themselves may be in perfect condition, it is still recommended to check the joists. The floor itself could have been re-laid at one time, but the joists were unlikely to be completely changed. It is especially important to spend enough time checking the floors if we are talking about a secondary home or an old house.
Repairs may also be required if the floor is very cold. Perhaps the insulation under it either served its purpose, or it was not there at all. Laying new insulation will help make your stay at home more comfortable. This is true for apartments on the first floors.
Gaps in the floor - what to do?
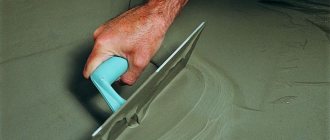
Screed structure
The photo shows that the screed (concrete or cement-sand) resembles a multi-layer cake. For high-quality pouring of the mixture, it is necessary to have a “pillow”, and it is advisable to make the bottom layer from river sand, pouring it at least 20 millimeters thick.
Before this, a polyethylene film or roofing material intended for cut-off waterproofing is laid. The edges of the material should be placed on the walls higher than the future layer of mortar. After the replacement of the joists in a wooden house with a screed is completed, the excess can be cut off.
Fine crushed stone or expanded clay is poured on top of the sand cushion. The second option is more preferable, since a thermal barrier is created, as a result of which the cold coming from the ground does not reach the cement.
The thickness of this layer depends on the degree of thermal insulation that is required and on the fractions of expanded clay.
Their size can be:
- 5-10 millimeters (small);
- 10-20 millimeters (average);
- 20-40 millimeters (large).
When the size of the fractions is less than 5 millimeters, such material is called expanded clay sand.
A pillow is considered to be made with high quality if the granules overlap each other without gaps. As for expanded clay, which has medium-sized fractions, the height of the backfill layer cannot be less than 50 millimeters, but if necessary, this parameter is increased to the required value.
The topmost layer is cement mortar - it is poured, focusing on the beacons. When the floor joists in a wooden house have been replaced, the final finishing begins, installing the flooring of your choice: wood, laminate, ceramic tiles, etc.
Types of floor repairs
Absolutely any floors can be repaired, no matter what condition they are in. Elements of their design are either completely or partially replaced, but nothing is impossible here. Depending on what needs to be repaired, one or another amount of work will be carried out.
So, in the simplest cases, cosmetic repairs are carried out. That is, these are works that help correct minor defects. They can be carried out if you want to replace only the floor covering or slightly strengthen the floorboards. This also includes filling cracks and similar types of work. Cosmetic repairs will tidy up the appearance of the floor and correct minor imperfections such as creaky floorboards.
Minor defects can be easily eliminated
However, when the situation with the floor is really bad, only major repairs will help. It is carried out if the base and ceilings are completely rotten, the wear of the wooden elements is already critically high, and cosmetic repairs are already useless.
On a note! Major repairs of floors are carried out in houses that were built more than 40 years ago, but rarely before. Previously, wooden floor elements were almost not treated with protective compounds that prevent rotting, and therefore, in old houses, major floor repairs are the only measure to correct the situation and restore the possibility of comfortable use of the base.
Wood floor repair
Figuring out what floor repairs to do is not difficult. If the paint has peeled off the floorboards, there are small cracks and the floor creaks a little, then a modest cosmetic repair is sufficient. If the base creaks a lot, the floor is cold, or sag under the weight of heavy furniture or when walking on it, then you will have to do a major overhaul.
Briefly about the main thing
The floor in a private house can be installed directly on the ground, if it is not peat or black earth.
A rough concrete slab can be a foundation, supported by walls, or placed between them.
Traditional option: soil bedding up to 0.6 m high, concrete layer, waterproofing, insulation, screed.
Instead of a layer, a profiled waterproofing membrane made of LDPE can be used.
Expanded clay with a fraction of 4 mm or more can be used as insulation and backfill.
The thickness of the insulation needs to be calculated so that it is warm enough and does not overpay for the material.
Ratings 0
As for the "Stalin" rifles...
Stalinka buildings are quite old houses that were actively erected during the USSR period until approximately the beginning of the 60s. The apartments have very high ceilings, spacious rooms, and large windows. And there is another interesting feature - wooden floors. And this aspect greatly complicates the possibility of repairing the floor. While the floor covering itself is easy to replace, problems may arise with the floors. By the way, at one time some Stalin buildings were restored, and therefore they may have reinforced concrete floors. But there are still those in which they can be made of wood. If we talk specifically about Stalinist buildings, then before imagining all the horrors of replacing wooden floors, it’s worth finding the house’s passport and seeing if it states that the floors have not been changed. Much depends on the year of construction - houses from the 30s may have wooden floors, and houses from the 50s may have reinforced concrete.
Wooden floors
It is also important to understand that not all ceilings could fail even after so many years of operation. Much depends on how the house was built. It is important to take into account that when repairing a floor in a Stalin building with wooden floors, you cannot make a heavy new foundation. It should be as strong as possible, but light so as not to create unnecessary stress.
Important! Wooden floors, even now, are extremely rarely completely replaced, since this is a very expensive procedure that requires the participation of not only the apartment residents, but also the neighbors below. Often, even if the condition of the subfloor is quite poor, a decision is made to simply strengthen it rather than completely change it.
Repairing a wooden floor - photo
Dismantling of floor coverings
The main step when replacing or insulating floors is to first dismantle the baseboards around the entire perimeter of the room. At the same time, no special skills are required here; the main thing to remember is to be careful and attentive during dismantling, so as not to disrupt the electrical wiring, sewerage, plumbing and heating.
After completion of dismantling, remove all accumulated construction debris.
As a rule, long boards and translations are cut right in the room or passed through the windows and taken to specially designated areas for collecting construction waste.
Features of floor repair
Major floor repairs are not an easy task, but it is quite doable if you have the time, desire and some skills. If there is no “fighting spirit”, then it is better to immediately look for a team of good craftsmen who can be entrusted with this task, and it is better to refuse to carry out the work yourself. Floor repair will involve the following work:
- thorough inspection of the base;
- identifying problem areas;
- dismantling the finishing coating;
- inspection of logs;
- removal of old insulation, if any;
- complete or partial dismantling of logs;
- complete cleaning of the surface of the floors and their inspection, assessment of their condition;
- installation of a new lag system or installation of a dry light screed;
- installation of finished floor covering.
Replacing the floor in a Stalin building
It is important to remember that, in addition to materials for the floor construction, you will also need to purchase waterproofing material and insulation, especially if the apartment is on the ground floor. If the logs will not be completely removed, then it is important to evaluate the distance between them - in old houses it can be very large, and then it is recommended to make intermediate logs between the main ones.
To carry out a major overhaul of floors, dismantling must be carried out completely, that is, not only remove decorative coverings such as linoleum or parquet, but also remove old floorboards and, in many cases, even logs. The dismantling procedure is quite difficult and difficult; you have to make a lot of effort to dismantle the old floors. You will need to remove a lot of debris that is generated during the dismantling process, and you also need to be prepared for this.
Parquet dismantling
Materials for processing logs
In order for logs to be used for a long time, it is important to protect them from harmful environmental influences: precipitation, wind, dampness. Therefore, before installation they are treated with various means.
Bioprotective compounds
Bioprotective compounds protect wood from fungus, mold, and insects. The protection period is from 25 to 30 years. Concentrates are used. Sometimes pigment is added to them, with which you can ensure uniform application of the product. Bioprotective products are environmentally friendly, do not emit toxic substances, and are hypoallergenic. The smell is slightly perceptible. They are applied before installing the floor.
Leave-in antiseptic
A non-washable antiseptic is necessary to protect against high humidity and temperature changes. Product consumption: 400 g per 1 m. To achieve a certain result, it is important to apply up to 4 layers of the product. Neomid works well.
Folk remedies
Folk remedies include:
- transformer oil. It penetrates deep into the pores of the material and protects it from pathogenic microorganisms;
- resin Birch resin protects against fungus, mold, rot and bugs. but does not protect against fire;
- used motor oil. It has good protection against insects and bacteria. Its cost is low, but a significant disadvantage is the strong odor that does not disappear for several months.
How to repair floors in a house with wooden floors?
Step 1. First of all, as mentioned above, you need to completely dismantle the entire structure of the old floor, leaving only the floors and support beams in place. All debris must be removed immediately so that it does not interfere with the work.
First you need to dismantle the floor
Step 2. In this case, the craftsmen will install a system of adjustable floors, that is, adjustable joists will be installed. They will be attached to plastic bushings and bolts. Plywood 12 mm thick will be laid on top of the logs. Insulation and vapor barrier material will also be required. You will need a timber board 100x50 mm, logs 60x40 mm. All this must be purchased in advance in the required quantity.
Materials required for work
Step 3. Even before starting work on installing a new floor, it is necessary to lay all communications that may be located under the floor. This could include electrical wiring and water supply pipes.
Communications need to be laid out in advance
Step 4. All work must be performed based on the desired height of the final floor. In order not to make a mistake with the level of laying the lag, it is important to use a building level. The support points for the new floor will be load-bearing wooden beams, on which new support beams will be laid, which will become boards measuring 100x50 mm. They need to be laid at equal distances from each other on the main support beams and secured with reliable bolts.
Using a Laser Level
Step 5. Next, on the laid 100x50 logs-boards, you need to begin installing an adjustable floor, for which a 60x40 mm beam is used as a support. It will be like a second level of lag, a kind of sheathing. The step between the second level lags is 30-40 cm.
Adjustable floor installation
Another photo of the process
Step 6. In each 60x40 mm board, you need to make holes for plastic bushing bolts with a diameter of 24 mm and immediately make a thread inside them, into which you want to insert the bushings themselves. The length of the bushings is 10 cm. Thanks to the presence of such elements, the floors can be adjusted in height to the required level.
Holes for plastic bushing bolts
The bushings are inserted into the holes
The floor is height adjustable
Step 7. Under each bushing on the joist you need to place a metal washer, which will not allow the wood to wrinkle over time under the influence of the load on the floor. You need to insert a long bolt inside the bushing, which is screwed into the lower support beam.
Metal washers are placed under the bushings
You need to insert a long bolt inside the bushing
Step 8. The protruding parts of the plastic bushings need to be cut off.
Excess bushings are removed
Step 9. Next you need to lay a vapor barrier. The material is laid in accordance with the instructions supplied with it until the insulation is laid. It covers all the free space between the joists and the joists themselves. It is also important to lay individual strips of material overlapping.
Laying vapor barrier
Step 10. After this, the free space between the joists must be filled with insulation sheets, adjusted to size. The insulation should lie tightly enough so that cold bridges do not form in the future.
Insulation is placed between the joists
Laying insulation
The material should lie tightly enough
Step 11. The vapor barrier layer can be attached to the joists using a construction stapler. This will ensure reliable fixation of the material.
A construction stapler is being used
Step 12. Next, you can install a layer of plywood on top of the joist system. So, the sheets need to be placed with a small distance (several mm) from each other and at some distance from the wall. All sheets of plywood can be easily adjusted to the required dimensions if necessary. It is important to remember that the joints of plywood sheets in adjacent rows should not coincide; the sheets should be laid with a slight shift.
Plywood is laid
There should be a small gap between the plywood and the wall
If necessary, sheets are trimmed
Step 13. Sheets of plywood need to be screwed to the joists with self-tapping screws in increments of about 20-30 cm.
Screwing plywood sheets
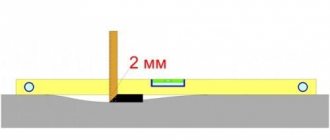
Step 14. When the floor is ready, you need to use a long rule to check the floor level and see if it is level. An error is allowed, but small - no more than 2-3 mm. In general, you can now install almost any type of flooring and enjoy the updated floors.
Checking the evenness of the finished floor
Prices for floor boards
floor boards
Video - Installing an adjustable floor in a Stalin building
The process of replacing non-grooved boards
An entire floorboard that does not have lock joints, or part of it, can be removed without completely dismantling the entire floor surface, since it is not rigidly connected to the adjacent wooden elements.
When replacing the floor in a wooden house with your own hands, before removing the board you need to find out the location of the joists and remove the baseboards. You should also find out the presence/absence of communications under the floor.
To remove the floorboard completely, you need to pick up the board from the edge with a crowbar, place a wooden block under the jack, and then carefully lift it up. Wooden scraps are placed under the raised element to fix the gap. The unnecessary part is sawed off and, acting in a similar way, moves to the opposite edge of the board.
In the event that the decision is made to dismantle the floor and install it with the reverse (non-worn) side up, the work should be done according to the sequence described above, except that sections of the boards are not sawed off. Before you begin replacing the floor, it is necessary to treat the wooden elements with antiseptic impregnations.
To replace a fragment of a floorboard, you only need to cut out the area that has become unusable. The main thing is that the logs and utilities are not damaged during cutting. If the cutting line falls on them, the area to be repaired should be expanded. The part to be replaced must rest on at least two joists, and the point of contact between the old board and the patch must be on the joist.
A new part, made from a sawn section, is placed in place and fixed to the joists. The fasteners are supplemented by driving nails into adjacent floorboards at an angle of 45º. The restored floor is sanded, coated with a layer of varnish or painted.
Dry screed
We can say that this option is ideal for creating the best floor in the apartment. This technology does not involve the use of water at all. Perhaps that is why it can be classified as a screed only formally. To a greater extent, this coating is similar to wooden flooring.
The implementation of a dry screed begins with the installation of beacons, relative to which a backfill is made at the horizon level, for which fine granular heat-insulating material is taken. Gypsum fiber boards are laid on top of this layer. In terms of its technical characteristics, the resulting coating is similar to a cement-sand floor screed. This allows it to withstand all emerging loads for a long time.
When using a dry screed, it becomes possible to replace a wooden floor with laminate, tiles and other types of floor coverings. There are no restrictions in this matter.
The only drawback of each type of floor screed is the cold. It is impossible to walk on such a surface barefoot. The only way to insulate it is to install heated floors.
Final stage
First, insulation is laid between the joists, then a polyethylene film is laid, which serves as a waterproofing material.
Required:
- thermal insulation material;
- vapor barrier film;
- construction stapler and staples;
- self-tapping screws;
- screwdriver
The next stage of work is thermal and sound insulation of the floor. As joists and lintels are installed, cages are formed that must be filled with protective material such as rock wool or glass fiber boards. To ensure the best indoor comfort, the thickness of the material should be equal to the thickness of the log, that is, it should be 150 mm. In this case, not only sufficient sound insulation of the room will be ensured, but also its thermal insulation.
The material should be inserted into each “window”, then covered on both sides with a vapor barrier film with an overlap of 150 mm. It is best to attach the film to the joists themselves using a construction stapler
To avoid saturation of the wool with moisture and, as a result, freezing of the structure, it is necessary to pay special attention to those areas of the ceiling where, on one side, there may be a negative temperature. In this case, this place must be provided with a vapor barrier layer as much as possible.
Next, you should move on to the rough flooring, which can be done either with edged boards or sheet materials. You need to choose the base of the floor based on the finish. For example, if laminate will be laid in the future, then the base must be made of plywood, the thickness of which should not be less than 18 mm. The subfloor must be attached to the beams with self-tapping screws, since they press the board very tightly against the joist and hold it tightly.