Have questions ? Call!
When it is planned to carry out major repairs in a Khrushchev-era building, many specific features of such houses should be taken into account. This article discusses them and reflects methods for updating the floors in these buildings of this type.
In the USSR, such houses were built en masse and were intended for temporary residence. And today, replacing wooden floors in Khrushchev-era apartment buildings is not just a modernization measure, but also an improvement in life safety.
Don't start renovating until you read this.
What floor to install in an apartment Warm floor in an apartment: a modern choice How to fill the floor in an apartment
What can the floors look like in an apartment in an old house?
The wooden floors here are formed of five layers:
- Lower. This is a reinforced concrete slab. It is covered by other layers. She doesn't need any special finishing.
- Waterproof layer. It spreads immediately to point 1. Usually this is rolled roofing felt. The method of laying it is an overlap of 10 cm. Another layer of waterproofing is placed on it - liquid bitumen mastic. It forms a solid layer of coverage. Waterproofing in bathrooms is being installed more carefully.
- Noise and thermal insulation. It covers point 2. It is usually represented by glass wool.
- Cement strainer. Located at point 4. It was designed to accommodate parquet, linoleum flooring or joists. Usually the floor in Khrushchev did not have it. And the plank structure was rough.
- Flooring. Usually, boards with a density of 2.5-4 cm were used.
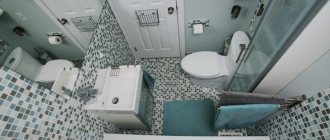
In the kitchen areas, linoleum was laid in massive square-shaped pieces.
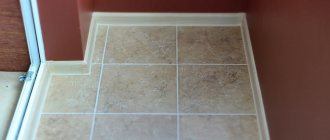
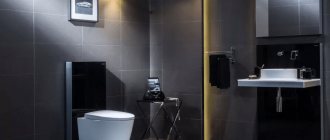
In the bathrooms, the floor was made of small ceramic tiles. Before this, a screed must be arranged.
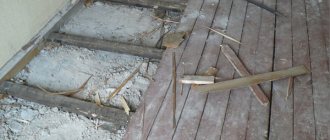
The wooden floors gradually dried out and cracks formed in them. They could swell under the influence of moisture.
Features of repair and replacement of floors in Khrushchev
For your information
This process involves laying the beams needed for the joists. We also use sand here to level the tiled surfaces.
When replacing an old floor in a Khrushchev-era building, the differences even in tolerances reach 1-2 cm. If they are not met, the difference is more significant. Therefore, it is more logical to make a cement screed.
But before it, expanded clay is used as a heat and sound insulator.
Proper dismantling procedure
What are the features of repairing and replacing floors in a Khrushchev-era building? The beginning here is formulaic. We dismantle the previous structure. We remove boards or parquet. Here we use a nail puller.
If there is an uneven or damaged layer of screed, carefully break it with a hammer. When there is insulation under it, then we pry it off from the bottom and crack it over the entire area. The elimination concerns all layers up to the slab.
We install waterproofing in the kitchen and bathroom. If necessary, we apply sound insulation to it.
If the customer’s apartment is located on the ground floor and there is no basement below, we provide thermal insulation. If it is available, the client himself determines what kind of insulation to install - sound or thermal, or both.
Question about screed
How to arrange it correctly? We upload it to:
- Floor slabs between floors.
- Expanded clay insulation layer.
- A layer of glass wool/basalt wool or polyurethane insulation.
Before pouring, we cover the cotton insulators with hydro- and vapor barrier sheets.
An alternative to them is a very dense polyethylene film.
When replacing the floor in an apartment, we prepare a screed from the following components:
- Cleaned sand.
- Cement.
- Special plasticizers.
- Modifiers.
- Water.
Make the composition quite liquid. And after pouring, it spreads over a horizontal surface.
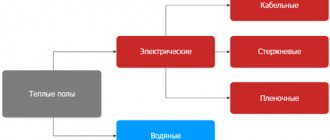
On this layer we can lay:
— pipelines of the water-type “warm floor” system,
— cables of an electrical analogue of this technology.
We cover such communications with a second layer of identical screed. The next stage when replacing floors in an apartment is laying the selected coating.
Preparing the base
A common stage of work for all types of screeds is preparing the base. Performed in the following sequence:
- We disassemble the old flooring, skirting boards and joists:
- remove insulation and waterproofing;
- dismantle the old screed;
- We remove construction waste and vacuum the surface;
- We carry out repairs of reinforced concrete floors: we seal seams, deep irregularities and cracks with cement mortar;
- carefully prime the finished surface and wait for it to dry completely;
- Using a laser or hydraulic level, we carry out markings, determining the highest point of the base and calculating the screed mark from it. Along the perimeter we draw a horizontal line on the top surface of the screed.
About rough and finishing coatings
This work cannot be done without lags - special beams. We put on them:
1. Rough coatings for laminates, linoleum, carpet, etc.
2. Finish coatings. Their material is pine or spruce boards. For effectiveness and durability, we coat them with colorless varnish.
For rough coatings we use the following options:
- OSB,
- Chipboard or fibreboard,
- plywood,
- MDF
A must read
What floor to install in an apartment Warm floor in an apartment: a modern choice How to fill the floor in an apartment
Final coating
We lay it only on a rough base or screed.
To install parquet flooring, we use heat-resistant bitumen mastic or an adhesive mixture. What you should not do with parquet is install it directly on rough wood.
We first leave the linoleum on the floor unrolled for several hours. This is how the wrinkles come off. When varying it with an image, we move the joint areas until the patterns are harmonious. Trim if necessary to match the patterns. During the gluing process, eliminate bubbles and carefully glue all areas.
Important
We lay the laminate dry. Then we adjust the images on the panels. Next, carefully glue it on the basis of the drawing.
We glue cork tiles only on a thoroughly leveled and cleaned floor.
The permissible humidity of the rough base is a maximum of 5-6%, room temperature: +22.
We fix the skirting boards only on the wall.
We place the interlocking cork plates directly on the floor without gluing. Their installation is identical to working with laminate.
Overhaul. Khrushchev and Brezhnevka
Apartments of Khrushchev and Brezhnev models do not at all correspond to modern standards. And today these are far from hits in the real estate market. In Brezhnevka and Khrushchevka the parameters of the premises are quite small.
Often their residents want to redevelop them. And in this process we will definitely dismantle the old floor.
Next, we clean the concrete slabs and fill in any excess holes.
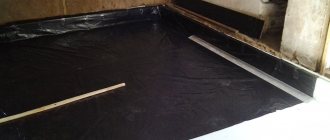
We carry out the operation of replacing a wooden floor in a Khrushchev building by pouring a screed. We lay waterproofing on the concrete base: a very dense polyethylene film. An alternative is a liquid type of mastic in 2-3 layers.
We cover it with expanded clay - this is a thermal insulator. And we fill it with a cement-sand composition.
When installing screed in the bathroom and kitchen area, we immediately install the “warm floor” system. The owners themselves decide which variation to install: water or electric.
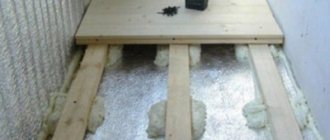
This is the most budget-friendly move in terms of re-laying the floors in the apartment. We create the subfloor from edged boards, moisture-resistant plywood and chipboard. We install them directly to the joists. We cover them with the coating chosen by the client.
When repairing and replacing floors in Khrushchev, the features of the work are as follows:
- The thickness of the film applied to the dry base is at least 1 mm.
- We install the logs using a level over the entire surface area. Their distance from each other: 50-60 cm.
- We fill the voids between the joists with mineral wool or expanded clay.
- We attach boards, moisture-resistant plywood or chipboard to the joists (this is a raised floor). We retreat 1.5 cm from the walls.
- The created surface is covered with the final coating.
Replacing the old floor in such apartments, we come to the final phases: the final floor covering.
Today there is a huge range of materials on sale, and choosing original options is not difficult.
For residential premises, I recommend any of these five versions:
- parquet,
- carpet,
- linoleum,
- cork,
- laminate
The bathroom and kitchen are the places where we usually install tiles, self-leveling floors, linoleum, and also porcelain tiles.
Work from the basement
It is possible to insulate an apartment on the ground floor from the basement side. For this purpose, thermal insulation material is attached to the ceiling in the technical room. It can be polystyrene foam or polystyrene foam, which are simply glued on. Mineral wool is also suitable for this purpose. But attaching it will be more difficult. To do this you need:
- fix the bars a couple of centimeters thick than the insulation layer;
- lay mineral wool between the elements of the installed structure;
- Using a stapler, install a vapor barrier membrane on the surface
- cover the structure with plywood or fiberboards.
Replacing the floor in an apartment with your own hands
If you are thinking about replacing the floors in a Khrushchev building with your own hands, first you need to study their structure.
It has already been indicated above. This is five layers. Schematically, the picture looks like this:
Next, you must decide on the type of repair: cosmetic or major.
When implementing the first, the following operations are required:
Eliminating cracks.
- Dismantling the old covering.
- Installation of a new floor
Have questions ? Call!
Fighting small cracks
How to effectively eliminate such shortcomings? Putty and high-quality laminate will help here.
Work can be carried out without opening the coating. The cracks need to be thoroughly filled with putty. In this process, the boards should be looped. Upon completion of the operation, lay the underlay and lay the laminate.
Elimination of large gaps
These are what I call gaps exceeding 6 mm. This requires dismantling the floor plinth and floorboards.
Old wooden baseboards should be carefully removed around the entire perimeter of the room.
Carefully lift the boards with an axe. Pull out protruding parts.
Worn wood floors should also be removed. Before doing this, study the conditions of the lags. Replace damaged components.
Advice
Do the same with the boards. Replace defective parts with new ones. Install them tightly and mount them using self-tapping screws.
After which the baseboards return to their positions. You can lay linoleum or carpet.
Treat new supporting elements with an antiseptic.
Possible mistakes
When laying mineral wool, you need to wear protective equipment
. There are several common mistakes that beginners often make when insulating floor coverings:
- Large gaps between sheets of insulation. They must be sealed with sealant or foam.
- Working without protective equipment. If mineral wool is used for insulation, you must use gloves and a respirator.
- Lack of waterproofing. It is necessary to use plastic film for additional protection from high humidity.
Mistakes can also include incorrect choice of insulation.
Eliminating squeaks
When the boards rub against each other, the floor creaks. We usually eliminate this dilemma by driving wedges directly into the cracks. We work in areas where squeaks appear.
The second option is talc.
If the floor creaks at the junction of the board and the joist, we make a special stretch of the floor. To do this, we drive in self-tapping screws designed specifically for wood.
The second option is polyurethane foam. We fill it in the area under the floor.
In general, the causes of this trouble are loose joists and rot in the boards.
We do this:
- We carefully analyze the floor. We replace boards with defects.
- If the condition of all elements is acceptable, then we strengthen their fastenings.
If the floor begins to spring back, it means that the quality of the previous work is rather modest. The floor needs to be re-laid.
We remove the flooring and study the distance between the joists. If it is significant, then this is the cause of the dilemma. Another reason could be the weak thickness of the boards.
Working with lags
Their correct location is:
If they are connected incorrectly, we correct this picture using competent options.
We place more pads under the joists. We fasten the joists only to the base.
We maintain a suitable gap - a maximum of 60 cm.
Important
If the previous workers left the parameters at 70-80 cm, we install another logs, and until the end of the covering. We cover its entire perimeter.
The final phase is laying the flooring. We secure the boards thoroughly.
The second option for strengthening the lags involves the use of crossbars.
.
You might be interested
What floor to install in an apartment Warm floor in an apartment: a modern choice How to fill the floor in an apartment
Major floor repairs
It is necessary when the condition of the floor becomes very bad, the boards creak, rot, crack, etc.
How to reinstall a wooden floor in an apartment in this situation? Work begins with dismantling the old coating.
Carefully remove the logs and all the boards with an ax. We throw them and their fasteners (nails, screws) away.
Create a horizontal line along the perimeter of the surface. This is a measure to achieve perfect floor levelness.
We measure the distance from this line to the floor. Determine the highest point. We make an indent from the floor by a parameter identical to the density of the log.
We make some more notations and measurements: from this mark to the horizontal line. We mark marks in all corners. We connect them with a line.
We beat off a horizontal line using the following methods:
- Using a hydraulic level.
- Working with a laser level.
- Using a level.
Application of hydraulic level
The main device here is a flexible tube. She has control flasks. This makes it easier to make digital markup.
The method is based on the characteristics of the contacting vessels. In them, we place water on a single horizontal designation.
Fill the hose with water. We raise its endings. The water in the flask will concentrate at a fixed level when the vessels are at an identical height.
We work in tandem. It is difficult for one employee to cope.
If air pockets appear, the work becomes more difficult. In this case, simply release the air from the hose and shake it.
The process goes like this: one worker applies one of the ends of the device to the extreme side of the wall. Definitely from the corner.
The assistant is at the other edge of the wall, marks the floor, and applies the second end of the hose to the wall.
The main goal here is to combine the level with the designation. This operation must be repeated at the first end of the water level.
The first worker makes a mark on the wall based on the level in his tube. Using the created mark, we mark a line along the entire perimeter of the room. Here we use the chop cord.
Working with a laser level
This innovative instrument projects a beam. Using it, you get a perfect horizontal line on the wall.
We work based on it; this is a fairly simple and effective way of leveling.
Have questions ? Call!
Surface grinding
Sanding of wooden surfaces is carried out using a sanding machine. This treatment will make the floor perfectly smooth and give the board an attractive appearance. For processing you will need two machines. One is for grinding the main surface, the other is for use in hard-to-reach places.
Grinding takes place in several stages:
- the room is cleared of furniture;
- curtain doorways with wet cloth;
- remove the baseboard;
- if necessary, repair the coating;
- hammer in visible nail heads;
- spray the surface with water;
- Rough scraping is carried out 2-4 times with abrasive No. 40;
- sequentially treated with abrasives No. 60 and No. 120;
- treat hard-to-reach places;
- remove remaining debris.
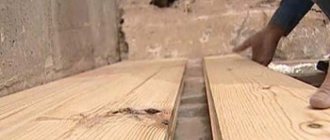
Installation of new boards
Before this stage we treat them with varnish. After complete drying, we install them on the joists. We fasten them tightly to each other.
When we re-lay the floors, we use dowels with parameters 10 x 1000. To improve the strength under the joists, we arrange supports every 50 cm. For this we use bars.
The positions of the lags in relation to the boards are perpendicular. The interval between adjacent logs is 50 cm.
Next, we check them for evenness using threads. We stretch each thread. There should be a millimeter gap between it and the lag.
We fasten the boards with self-tapping screws 6 cm long if the material density is 3.5 cm.
At the joint areas between the boards we keep tiny gaps. This prevents squeaking.
The final stage is laying the flooring. Its choice is made by clients based on their preferences.
When we carry out the indicated operations to re-lay the floors in a Khrushchev-type apartment, we usually end up laying linoleum. This option is chosen most often.
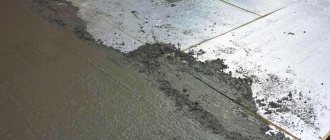
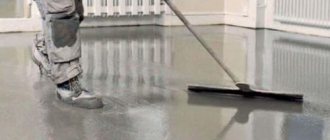
Fill
The final and main part of the work is filling. Clear coordination of actions is important here. Two people must work. One of them does the kneading, while the second helps him. As soon as the solution is ready, the master leaves the first bucket to ripen and begins to work with the second. 30 seconds before the first batch is ready, you need to pour the solution into the far corner, starting to disperse the solution with a special tool. At this time, the second batch will be ready and the third batch should begin to close. The cycle should be repeated until the entire area is filled.
Now the floor seems smooth, but there are still air bubbles in the solution layer. You should not forget about them, because after a while they will float up, and the surface will be covered with a lunar landscape. At the final stage, you need to walk over the surface with an aeration roller. The tool must be special - not one intended for drywall. This roller has a visor that prevents splashes on clothes, faces and the solution itself. Moisture from the spray will evaporate rapidly, especially at high temperatures.
Stalin's buildings
They were erected back in the 50s of the last century. Their floors have a similar structure to the floors in Khrushchev's apartments.
Replacing the floor in a Stalinist building follows a similar algorithm. And the reasons for these operations are standard: the quality of the coating has weakened, there are creaks, noises, rotten areas, etc.
When you plan to replace the floor in a Stalin-era building, we take into account that a larger percentage of the coverings in such real estate are old parquet floors.
We study their condition in each individual case. We determine the type of parquet board used. We also analyze the layout of it.
As a rule, we replace the floors here with a screed with a self-leveling effect. We lay innovative coverings.
In Stalinka, the wooden floor is supported by beams. Concrete beams were placed above the bathroom and kitchen area. The rooms above the living areas are made of wood.
During major repairs, we perform a complete replacement of coatings, starting from the base. We install new logs, arrange all the necessary insulation, without using its artificial form.
In general, the working algorithm is as follows:
- Laying the joists in a perpendicular position to the blank walls.
- Installation of plywood or OSB boards.
- Frame assembly. We place it across the beams. The step is 4 m. We even out differences with pads.
- Arrangement of beacons by area: screw the screws into the beams. The thicker the plywood, the less often the logs go (maximum 35 cm).
- We install new logs flat. We use dry timber with a parameter of 5-10 cm. We treat it with a septic tank in advance. We attach the joists to the floor using glue or self-tapping screws. The width of the boards reaches 3-5 cm.
The butt sections of plywood are placed on joists. To begin with, we outline this material with chalk. We install logs along the line.
We lay the plywood in two layers after the glue has dried. We do not allow seams to match. The type of fastening of the material to the boards is self-tapping screws with a countersunk head.
The heads should not extrude the material. To do this, we drill them.
We use a hydraulic level to level the sheathing.
If linoleum is planned as a finishing coating, we sand the plywood along the seams with a special machine. Then we apply two layers of varnish on it.
If laminate is planned, then we make a backing of foamed polyethylene on the boards.
There is a second solution to reinstalling a wooden floor in an apartment of this type - we make a subfloor.
We lay the lags across the walls and in the direction along them. Between them we place insulation with sound insulation. Its most popular option is polyurethane foam.
Lay plywood on it - this is the backing for the main covering. We fill the space between the joists with expanded clay. This scheme is optimal for arranging parquet.
Panel buildings
They are much newer than Khrushchev and Stalin buildings. But the floor in them also has to be replaced and repaired.
In a panel house, the floor base is concrete. There is no such complex structure here. Therefore, if replacement is necessary, we remove the old coating and thoroughly clean the base.
Usually we create a screed here: dry, semi-dry or wet.
In the first option, expanded clay is used. We cover it with slabs with gypsum fibers.
In the second case, we mix the composition so that the proportions of water in it are very small.
In the third option, we use sand, cement and plasticizers, as well as insulation - expanded clay.
This is a popular method. But we don’t use it when the floor slabs are already heavily loaded.
Today, people are increasingly ordering self-leveling floors. They are easy to prepare and sell, both in panel houses and in older ones.
You might be interested
What floor to install in an apartment Warm floor in an apartment: a modern choice How to fill the floor in an apartment
Expert advice
You must determine the required amount of material, but this can only be done after the coating has been completely dismantled. Experts recommend inspecting the subfloor. Sometimes it happens that hydro- and heat-insulating materials require replacement. When choosing them, it is necessary to take into account the moisture content of the wood, which should not exceed 22.5%. Boards without rotting stains, knots, insect marks or bending will last longer.
The material at this stage may require treatment to prevent rotting and burning. When laying logs on a brick or concrete base, you need to prepare additional supports that you can install yourself. This is required on the first floors where there are no floor slabs.