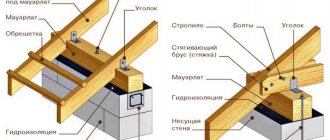
Thanks to the abundance of available construction information on the World Wide Web, many believe that installing drainage from pitched roofs is a fairly simple task: install hooks, hang gutters and correctly continue the system to the foundation. But in fact, you still need to be able to drain water from the roof technically correctly. And then neither destroyed drains in the winter, nor sagging gutters in the hot summer, nor a damp and wet attic are scary.
Not to mention, the gutter system significantly impacts the home's exterior. These are those important details that are not always shown in the visualization of a house project, but which, ultimately, serve as its finishing touch, capable of either perfectly fitting into the designer’s or architect’s idea or hopelessly ruining the entire appearance. Therefore, let's approach this issue with all responsibility!
The need for drainage devices on pitched roofs
You may have already heard about the fashion for unorganized drains that came to Russia. Everything is simple here: we make the slopes wider, move the cornices 50 cm from the walls - and the water flows off the roof itself. Perhaps it’s worth putting a canopy over the entrance so as not to take a “cold” shower at the most inopportune time. But, if you live in Russia, and not in a tropical, arid country, then let's look at this issue more seriously.
Some Russian houses actually do without a drainage system, installing instead a fairly wide canopy that protrudes half a meter from the wall. This option is quite suitable if the roof of the house is flat. But at the same time, enormous demands are placed on the waterproofing of foundations and walls; in addition, the slopes around the house must also be waterproofed as much as possible. And again, such construction technologies are only suitable if you live in a region with minimal rainfall per year.
Understand that once your roof is ready, it’s only a matter of time before the first rainstorm hits it. And the very next morning, looking at the wet walls and foundation, you will understand that a drainage system needs to be installed urgently, and this time organized, consisting of gutters, pipes and funnels. And there are several reasons for this:
- Believe me, no cornices or decorative elements will help cope with the autumn Russian rain, and liquid, as you know, can have a destructive effect on most building materials. And this includes wood, concrete, brick and plaster - everything that the walls of modern houses are made of today.
- Secondly, wet walls of a house immediately lose a significant part of their thermal insulation properties.
- Thirdly, most of the water from the roof falls, in this case, onto the foundation and penetrates under the blind area. As a result, the service life of the foundation of the house is reduced significantly, not to mention the wet underground and problems with the basement.
Therefore, it is vitally important for you to install a structurally correct and reliable drainage system, which will include all the thoughtful elements:
We will now look into how and where all these elements of the drainage system should be located, and what is the main difference between pitched roofs of different designs.
How to secure vertical drainage elements
It is best to provide for the fastening of drain pipes at the stage of laying the walls. But even after completion of the work, no one forbids installing fasteners.
When performing installation, observe the following rules:
- Start installing drain elements from the bottom.
- Drill holes in the walls to install clamps.
- On the lowest clamp, install an elbow with a cut edge, and if the drain is carried out into a storm drain, then use a regular drain element.
- Fasten subsequent elements using a separate clamp in increments of no more than 1.8 m. If the length of the element exceeds 2 m, then it is necessary to install another clamp.
By following the installation rules, you can ensure the strength and tightness of the structure. In this case, the drainage will be reliable and will last a long time. Good luck to you in your construction activities.
Pitched roof drainage system configuration
The shape of the pitched roof is of decisive importance for the complexity of the drainage system. For example, for a simple country house or country house with a gable roof and perfectly straight eaves overhang lines, the easiest way would be to install a standard drainage system with a minimum number of gutters and downspouts.
But if the pitched roof of your house has a lot of creases, overhang jumps, gables or insets, then the entire drainage system will be quite complex. For example, creases in the edge of a pitched roof are most often located where the façade needed to be made more beautiful. And you cannot cross the roof in this place with a simple gutter - it is customary to think about its more aesthetic location. We'll have to tinker!
Closed drainage system
The architectural configuration of the roof directly determines the design of the drainage system and its appearance:
The hip roof and similar architectural elements are arranged as a closed system. Such a drain always goes around the building or its individual architectural element along the entire perimeter. A plug for the gutters is not even installed here, because in this design all the drainage elements are connected to each other and there are simply no blind branches.
Also, as for the hip roof, rain and melt water coming from the slopes must be drained simultaneously in both directions. The drainpipes here are also located in the corners:
In closed systems, drainage pipes must be calculated so that they rest on the total area of the roof and roundings are made upward, not downward.
Open drainage system
Thus, a standard gable roof provides two separate lines of gutters, each with its own drain. That is, in simple terms, a gable roof drainage system is two open systems.
If we are talking about gable, multi-slope and multi-slope roofs, then water is drained through gutters to pipes, which by all standards are located after the corners of the walls, and to pipes that are placed exactly in the middle of these walls:
Complete set of spillways
Complete set of the drainage system
The method of installing the drainage system largely depends on the configuration. The drainage system consists of two main parts. Gutters (trays) are fixed to the roof eaves; their purpose is to collect liquid from the slopes. The second element is the pipes into which water flows from the trays, which is discharged into the sewer system naturally. Also required:
- Funnels;
- Brackets;
- Clamps;
- Plugs;
- Bends.
The drainage system includes nets to protect against contamination, tips, corners and elbows, extensions, and studs. Manufacturers rarely change designs slightly, but they usually look the same.
Aesthetics or practicality?
A standard drainage system performs a utilitarian function - it removes water from the pitched roof of a house away from its walls and foundation. Usually its aesthetic function is not given much importance, but this does not mean that it is unimportant.
That is why the modern market offers fully equipped gutter systems, the elements of which can be easily connected to each other. Such gutters and pipes are available in semicircular, trapezoidal, semi-elliptical, box-shaped (also called rectangular) or square, and even imitating the shape of a cornice.
The most popular in Russia are semicircular gutters, turned inward or outward. Moreover, such edges also serve as stiffening ribs, which increases the mechanical ability of the elements to withstand loads. But the elliptical shape has good throughput, and is indispensable for large roofs. In any case, it is quite difficult to make a mistake with the profile of the drain, but do not forget that the correctly selected shape of the gutters in its own way complements the aesthetic appeal of the house.
This video will tell you how to choose a drain for a pitched roof that is not only aesthetic and pleasing to the eye, but also as practical as possible:
Types of brackets
This fastener is available in three varieties on the market:
- Long. Standard products used when roof sheathing is not installed and roof decking is not installed.
- Short. Used for installation on the wall of a house or on a front board. There is an option for attaching to the ends of the rafter legs, but this option is not the most successful, because the screws will be screwed into the lumber in the direction of the longitudinally located wood fibers. This is an unreliable mount.
- Universal. A collapsible design that can be used in any situation related to the installation and fastening of brackets. The size of the shank of the latter can be changed: increased or decreased. This is the main advantage of this variety.
Available types of brackets for fastening gutters
Subtleties of design and installation of drainage on pitched roofs
The drainage system must first be designed by making the necessary calculations and determining the location and length of gutters and pipes, their width and depth. Typically, the number and width of the gutter depends on the perimeter of the roof and the area of its slopes.
In any case, try to adhere as much as possible to the recommendations of the manufacturer of the system you purchased. But sometimes you have to install a rather complex drainage system, and you can’t do it without additional calculations.
Drainage system for pitched roofs
The simplest drainage system is for pitched roofs. Water from such a roof is directed only in one direction, and it is not difficult to “catch” it. In addition, if we are talking about one-story houses, they often have a chain attached instead of drainpipes and gutters, and it is much less noticeable on the facade.
Such rain chains are especially popular in Japan, where they play the role of a kind of decorative element. They are most often made of copper, and the main architectural tasks that are set for them are to have a complex spatial shape that is pleasing to the eye and alternate with decorative bowls. But, unfortunately, modern manufacturers of drainage systems for Russian latitudes do not take into account such innovations and do not produce special drainage parts for connection to the chain.
Therefore, if you still want to build something similar for a beautiful effect or simplicity of the system, then remember two simple rules:
- The chain should be tensioned so that it does not move from side to side. And to do this, simply bury its end in the ground or press it down with rubble.
- To prevent the walls from being splashed with water, such chains must protrude from the edge of the roof by at least half a meter.
Believe me, bringing this idea to life will not be difficult! Here are two of the simplest examples of its implementation:
Installation of drainage on a gable roof
For a standard gable roof, drainpipes should be placed at all external and internal corners. There they are almost invisible, and in fact, this is their natural location. From a technical point of view this is also correct.
As for the location of the gutters, a lot depends on the roof itself:
Our tables will help you calculate the required number of vertical elements and their location for such roofs:
Gutters on roofs of complex shapes
Designing water drainage from a roof with a complex configuration is not easy. Here you need to take water from each individual slope or bay window, and it makes sense to install several drainpipes at once. This is where difficulties arise, which we will now discuss in more detail.
Number of stingrays
If there are a lot of slopes, and the drainage system is designed according to the minimum principle, too much water flow will enter the pipes and flow more slowly throughout the entire gutter due to its volume. And this is a load on all elements at once, and such water freezes faster in winter.
Superstructures and hatches
The second point that concerns the drainage system for a pitched roof of complex shape is that downpipes and gutters are also often necessary in architectural roof structures, above balconies and around turrets. There are technical difficulties here, because it is quite problematic to rid such places of freezing and water penetration. That's why practical minimalism is popular in the construction world today.
But the most interesting task for a roofer is to make a drain around a round turret. After all, it will not be possible to bend such a metal gutter efficiently. Therefore, in this case, they do this: they cut segments of a zinc, stainless or copper gutter and solder them together. After this, it makes sense to paint the drain in the desired color with powder paint to hide the seams.
As for the currently fashionable roof windows and skylights, gutters are not required for them. It is only important to correctly determine which side of the roof the water will flow from and where it may begin to collect. And because The roof of the lucarne has no overhangs; gutters are needed only for large areas and multidirectional slopes.
Excess of elements
Also, a significant drawback of such a drainage system design is aesthetic, since a large number of pipes will already stand out against the background of the walls.
The most problematic places on a pitched roof in terms of installing a drainage system are near the canopy and in front of the entrance to the house. And if the roof itself is not of an elementary design, then it is probably due to the fact that there is far more than one entrance to this house. But it is important that the pipes here are inconspicuous against the background of the facade, and it is quite difficult to hide them in such places. That's why you'll probably see it on veranda posts, in the corner of the house or by the window:
Color solutions
With a complex roof configuration, the gutter itself often has an irregular geometric shape and does not always look symmetrical and pleasing to the eye. Therefore, in this case, its color is selected so that it looks like a natural continuation of the roof and even merges with it.
But if the gutter itself in its entire structure has a beautiful profile, which also emphasizes the shape of the roof, then it is installed as an important architectural element and accentuated, combining it with the color of the facade details so that it stands out against the background of the roof or even contrasts with it. But for now, gray silver gutters are left only on the facades of houses in modern techno or high-tech style.
As you can see, the problem of excess drainage elements is quite easy to solve by choosing the right colors and design of the pipes. For example, match the color of gutters and pipes not only with the roofing, but also with the façade elements of walls, columns, door and window openings. Those. You have three options for choosing the color of a roof drainage system with a complex configuration:
- so that the pipes and gutters themselves are inconspicuous on the facade;
- so that their color, on the contrary, contrasts with the color of the facade or window frames;
- so that the drainage system is an independent and noticeable architectural feature.
But it is much better to intelligently minimize their number without losing quality. And here it is better to entrust the matter to a professional who will correctly calculate the entire system.
Gutter length
Gutter – ensures the evacuation of melt and rain water from the roof of the building.
When calculating the number of gutters for drainage, you should proceed from the length of one product and the length of the cornice, plus the overlap for installation. For example, the standard length of gutters from Metal Profile is 3000 mm. The overlap usually takes 3-4 cm. Thus, if we have a 10-meter cornice, we will need:
- 4 gutters 3 meters each. Their total length will be 12 m, so you just have to cut off the excess;
- 3 gutter connectors, they provide airtight fastening of the gutters to each other or to the corners of the gutter;
- 2 plugs (left and right), since the roof is pitched, the gutter does not go around the entire perimeter of the roof. Place plugs at the ends; they add rigidity to the structure and serve as a stopper for water.
Important technical points
The drainage of rain and melt water from the pitched roof is designed to significantly improve the finishing of the facade and the general condition of the external walls. After all, over time, water can damage even the foundation of a house. That is why there are special regulatory documents SNiP 2.04.01-85, which are responsible for the rules and regulations for drainage construction.
If you want to purchase a ready-made drainage system, then the calculations will be easy for you: almost all modern manufacturers publish special tables on their websites that help determine the relationship between the catchment area and the required parameters of the drainage system. If you are making a gutter for a pitched roof with your own hands, then the graphs and illustrations that we have prepared for you below will help you.
How to correctly calculate the system?
The catchment area is the area of the slopes or their projection on a horizontal plane. And the following formulas will help you calculate it:
It’s simple: when calculating a drainage system, you need to focus on the need for pipes for every 100 square meters of roof. Those. within one slope, the pipe diameter must be at least 150 millimeters. But it is advisable to place drainpipes so that they do not spoil the facade of the building. Just like gutters, it is important to put them in the right places, and not install them wherever possible. If there are chimneys, shafts and parapets on a pitched roof, then you need to add to the area of the slope 30% of the area of the walls that is still above the roof.
Now count the number of angles for the gutter: usually their value is equal to the number of angles on the roof itself, including external and internal. Further, the length of the gutter is usually three meters, and therefore the number of gutters is easy to calculate: determine the perimeter of the roof and divide by 3. Round the result to a larger integer, and you will know how many gutters you will need and whether one of them will need to be cut if the number was not an integer initially.
The next step is to count the number of plugs and gutter connectors. To do this, let's figure out what type of drainage system we are dealing with - closed and open. If the drainage system is closed, there will be as many connectors in it as there are all elements. If it is not closed, there is only one less. You will need to install the plugs themselves on the edges of the gutter:
It is also important to calculate the correct weight of the drainage system when pressure is applied to it by water and snow. For example, a standard gutter holder is designed to support a weight of about 75 kilograms. But here you need to count not only on these indicators, but also on the support area.
That is, if you install fewer holders than necessary, then the entire weight of the liquid and snow will be concentrated at a specific point, and not distributed along the entire length. This is how gutters break! Surely you logically understand that one heavy log, for example, cannot be held by two or three people, but it will not be difficult for ten, because the pressure force is deconcentrated. It’s the same here.
Here is a good example of the correct design of the drainage system of a country house:
How to Install External Gutters
If you ignore the technical requirements for installing gutters on pitched roofs, then water will not only splash the walls, but also flood the basement. So remember a few simple rules:
- Gutters should be equipped with a slope of about 1%, i.e. over a distance of more than 10 meters they should decrease by 10 centimeters.
- It is also desirable that the gutters do not interrupt each other more than 3 times. This means that if the roof of the house has a rather complex shape, you will need additional drainpipes. But at the same time, avoid placing them in internal connections to the wall.
Why? The fact is that this arrangement increases the likelihood of leakage and the rainwater inlet may become clogged. Your main task when designing drainpipes is to ensure that water does not flood those areas near the house where the most trafficked areas are: near the front door, at the entrance to the house and on the main path. After all, here the water quickly freezes on a frosty night and turns into ice, and this is already dangerous. That's why you need to attach the gutters from the bottom outer bracket. In this case, it is important that the outer bracket is 30-50 mm below the edge of the eaves overhang.
Please also note that it is important to correctly organize the direction of the water and the slope of the gutter, which also depends on the configuration of the pitched roof:
The angle of inclination of the gutter also depends on the length of the slope and the cross-section of the gutter itself. Typically it ranges from 5 to 20 mm per meter. If the length of the roof slope or eaves light is more than 12 meters, then the angle must be formed in two directions: to the left and to the right of the middle of the roof. When the drainpipe is located on both edges of the roof, then it is also important to disperse the flow of water and halve its pressure on the drainage system.
They also often forget about such an important point that the eaves overhang itself may in fact be far from horizontal. To do this, it is necessary to check it with a level and already calculate the angle of inclination of the drainage system, plus or minus the existing angle of inclination of the overhang itself, no matter what it turns out to be. Or, if possible, correct this construction jamb.
The distance between drains should be from 40 to 70 centimeters, depending on the drainage system itself. If you do more now because you want to save money, the gutters may become deformed under the pressure of snow or ice. And therefore the ideal step for the Russian climate is 50-60 centimeters:
Here are two great master classes that will help you understand the process:
It will be easiest for you to work with a frontal board, because it is easy to correctly determine the direction of the slope of the gutter and secure the first and last brackets at different levels. Install the drain so that it is mounted at a distance of 25 centimeters from the ground and 15 from the blind area.
How to Install an Inner Gutter
Pitched roofs differ in terms of water drainage from flat roofs primarily in that they have weak points - valleys. We are talking about those internal gutters that must be equipped with the joints of the slopes, because... It is on these elements that the greatest pressure is exerted by the liquid. And the greater the water flow, the easier it is for moisture to penetrate into the inner roofing pie, whereas with flat and inverted roofs everything is distributed more evenly.
Let's look at how to secure a gutter. It can be mounted on a boardwalk, or on a denser, thicker sheathing. The main rule: the width of the flooring from the board should protrude at least 40 centimeters from the axis of the gutter. These boards should be installed directly on the rafter legs:
- Step 1. Nail two bars onto the thickened sheathing at a distance of 5-10 centimeters. Leave a small gap of about 5 centimeters for ventilation between the bars and the valley counter-lattice.
- Step 2: Now nail the sheathing. Bring the ends of the bars to the axes.
- Step 3. The next step is to slightly strengthen the main sheathing with short bars in the valley area.
- Step 4. Now drive one or two bars into the space between the sheathing.
- Step 5. As a result, you should have a length of bars of at least 30 centimeters. At this stage we move on to the inner gutter.
- Step 6. Bring the end of the bars inside the gutter and clamp its side edges at an angle of 90 degrees.
- Step 7. Then bend the gutter along the central axis at such an angle that it is slightly larger than the valley angle.
- Step 8. Start laying the gutter from the eaves overhang, namely from the bottom up.
- Step 9. Place the gutter on the deck and trim it along the contour to leave 3-4 cm.
- Step 10: Secure the gutter with metal staples or galvanized roofing nails.
Each stage of this process is well illustrated in this illustration:
The main thing to remember is: if you are installing an internal gutter on a thick sheathing, then nail the staples into an additional block so that they do not interfere with the even laying of the tiles. We only nail the top edge of the gutter, not the entire length of the gutter.
Now remove the protective strip and glue self-adhesive foam rubber strips with a special water-repellent impregnation along the edges, which will protect the valley from dirt, snow and water.
How to secure vertical drainage elements
And the vertical parts of the drain on a pitched roof need to be secured as follows:
By the way, unlike metal products, in plastic drainage systems you can use both regular connectors and compensation ones. It is customary to install compensation roofs on roofs longer than 8 linear meters. From the name you already understand that glue is not used here. The main task of such a connector is to compensate for the linear expansion of the gutter as the temperature changes.
Here's what it looks like in practice:
And finally, check whether the gutter was installed correctly. To do this, you will need the simplest building level (or hydraulic level), or even better, a leveling level. Plug all drain holes, pour water into the gutters and see if any leaks appear in any places.
Also notice how quickly and easily the water flows when the holes are open. The easiest way to do this is with a regular watering hose with medium pressure.
Calculation of components
Based on the size and shape of the roof, you can independently calculate how many pipes, gutters, brackets and other parts of the drainage system you will need.
Based on the size of the roof, we select the diameter of the gutters:
- If the roof area is less than 50 m2, gutters 100 mm wide and pipes 75 mm in diameter are used.
- Up to 100 m2, 125 mm gutters and 87 mm pipes are used.
- More than 100 m2 - gutters 150 mm and pipes 100 mm (the use of gutters 190 mm and pipes 120 mm is allowed).
In the case of a complex roof structure, gutters and pipes are determined by the largest projection size of the roof part.
The roof area, consisting of parts, is 160 m2. Considering that one drain pipe is enough to service 100 m2 of roofing in projection, for the roof in the example you will need 2 drain pipes located at the corners of the house. The number of funnels corresponds to the number of pipes, i.e. - 2 pieces.
The number of vertical pipes is determined depending on the distance from the cornice to the blind area. Subtract 30 cm from this distance - the height of the drain elbow above ground level.
For example, the height to the cornice is 7.5 m. Then 7.5 m -0.3 m = 7.2 m.
We will need 3 pipes of 3 m each on each side, which means 6 pipes on both sides.
The number of clamps will be 5 for each side (between the elbow and the pipe, between the pipe and the ebb, and between the pipes) and, accordingly, 10 pieces for the entire roof.
Calculation of the number of gutters
The most commonly used gutter size is 3 meters. The length of cornice A and cornice B is 10.3 m. This means we need:
- There are 4 gutters on cornice A (3m + 3m + 3m + 1.3m). This will leave us with another 1.7 m of unused gutter.
- On cornice B there are 3 gutters and the remainder (1.7 m) from cornice A.
- For eaves C and D we use 2 gutters each, that is 4 pieces on both sides.
- In total, 11 gutters of 3 m each for the entire roof.
The number of gutter corners corresponds to the number of roof corners, in our example there are 4.
Calculation of the number of brackets and gutter locks
The brackets are installed at the rate of 1 piece per approximately 50-60 cm. We take 50 cm and carry out the calculations.
Having summed up the numbers in the last column, we find out that in order to attach the gutters, we will need 58 brackets.
The number of locks between the gutters is equal to the number of joints. In our case, this is 16 pcs.
The number of ebbs (marks) is equal to the number of funnels. In this case, you need 2 times more knees for each funnel. Then for 2 funnels you need:
- 4 knees;
- Low tide 2.
If the facade is not level, but has protrusions, you need to purchase elbows to go around it. The figure below will help you determine their number.
List of required items
In total for this drainage system you will need:
- Gutter (3 m) – 8 pcs.
- Gutter (2.5 m) – 2 pcs.
- Gutter (1.3 m) – 2 pcs.
- Gutter lock – 16 pcs.
- Gutter angle – 4 pcs.
- Bracket – 58 pcs.
- Knee – 4 pcs.
- Drain elbow (mark) – 2 pcs.
- Pipe (3m) – 6 pcs.
- Funnel – 2 pcs.
- Clamp (with pin) – 10 pcs.
Pro tip:
Collection and drainage of water from pitched roofs
After finishing the roofing work, the first priority is still draining rain and melt water from the roof, only this time also from the house. According to research, the most water falls onto the ground from pitched roofs. Moreover, this task cannot be delayed: at the very first serious rain, dampness already threatens both the foundation and the walls. So try organizing something like this in your area:
By the way, due to the fact that it is from the pitched roof that the most rainwater flows, it is profitable to collect it on a country farm:
Introduction
The set of rules contains requirements that meet the goals of Part 6 of Article 3 of Federal Law No. 384-FZ of December 30, 2009 “Technical Regulations on the Safety of Buildings and Structures.”
The work was carried out by OJSC "TsNIIPromzdaniy": prof., doctor of technical sciences. Sciences B
.
IN
.
Granev
, prof., cand.
tech. Sciences S.M.
_
Glikin
, candidates of technical sciences.
Sciences A.M. Voronin
,
A.
_
IN
.
Peshkova
,
N.
_
N.
_
Shcherbak
.
Date of introduction 2011-05-20
Rules and nuances of the installation process
It should be noted that internal drainage will work for a long time and efficiently if it is done correctly. You can carry out the calculations correctly, use the best and highest quality materials for its construction, but even the smallest mistake during assembly or installation will lead to big problems. Therefore, you should be very particular about following fairly simple rules.
- If flat small house roof
two water intake funnels
on it .
If the area is large
, then it is necessary to calculate the required
number of water intake elements
and distribute them evenly over the entire roof plane.
The set of rules and regulations states that one funnel
should be installed
per area of 20 m²
. - Funnels
must not closer
than 1 m from the walls of the building. - The distance between adjacent
funnels
connected to the same pipe riser should not be less than 20 m. - If one material was selected for the elements of the drainage system made of metals
, then it is necessary to equip the entire drain
with a heating cable
. This is a necessary measure that will protect the entire system from deformation and rapid failure.
How to properly install internal drains
If the flat roof of the house is multi-level, then each level has its own drainage system with precise calculation of elements, both in quantity and parameters
Particular attention to those multi-level roofs in which the difference between planes is more than 4 m. And once again about the tightness of the joints
This parameter deserves special attention, because repairing the internal drainage system is much more difficult than repairing the external one.
Usually the entire surface of the roof plane is divided into sections. In this case, 150-200 m² are allocated for each riser.
The slope of the roof towards the water inlet should be 1-2°.
The cross-section of the pipes is calculated taking into account the following ratio: per 1 m² of the roof plane a riser with a cross-section of 1-1.5 cm² should be installed. This is the simplest form of calculation, but it is usually effective.
All risers must be installed in heated areas of the building, otherwise there is a high probability that they will simply freeze in winter.
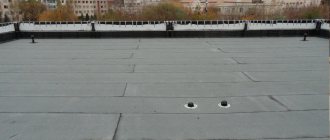
The funnel is installed so as to completely ensure its sealed fit to the plane of the roof structure. Therefore, rolled material is usually laid on top of the sides of the funnel.
To reduce the noise of moving water, it is recommended to cover the pipe elements with noise-absorbing materials.
How to properly install a water inlet
As practice shows, it is the installation of funnels that causes some difficulties. The main thing here is to achieve complete tightness of the clamp. Therefore, a glass is inserted into the hole that is made on the flat roof to install the water intake device. It is this that will form the water intake and ensure sealing.
The glass itself is installed only when the lining carpet is laid on the roof. That is, a waterproofing material that is always laid under the roofing covering, even a rolled one. The sides of the glass should lie on top of the waterproofing, which will already ensure the tightness of the structure. The funnel is secured using adhesives or self-tapping screws.
Then roofing material is laid on the roof. As for forming the hole, it is usually done like this:
- lay the strip roofing material
on top
of the glass
; - then cut a hole with a sharp knife exactly along
the edges of the device
; - Next, install a cap or protective
grille
.
The video shows how to correctly install an internal drainage funnel on a flat roof:
Let us add that funnels consisting of two parts are one hundred percent justified. They easily compensate for movements of the insulation when the air temperature changes.
There is one more point that concerns the effective operation of internal drainage. This is a connection of funnels to one riser. Usually, for this purpose, outlet pipe sections are used, which are laid under the ceiling of the building, but above the ceiling. Since the drainage system is a gravity flow system, these sections must be laid at a slight inclination of 1-2°. They must be insulated with noise-absorbing materials.
And lastly
Equally important is the heating system of the internal drainage system. The most important thing is to prevent pieces of ice from getting inside the system, which will block the cross-section, leading to clogging
Therefore, it is near the water intake funnels that the heating cable is laid. There are many different layout options, one of them is in the photo below.
How to lay a heating cable near a water inlet