All work on laying such a roof, if desired, is carried out independently, by 1-2 people.
We’ll tell you in this article how to build a pitched roof for an extension to a house and how to attach it to a wall.
Types of roofs for extensions
Before moving on to the analysis of roofing structures that are used today for the construction of extension roofs, it is necessary to identify their main elements. We will not go into too much detail about the features of each element; they are clearly marked in the photo below; we will simply note the main ones, which are necessarily present in the roof structure. This:
- rafters that carry the main load of the roof on the slopes that form it:
- Mauerlat , which evenly distributes the loads from the rafter legs onto the walls of the building;
- ridge purlin , which forms the ridge of the roof and holds the upper ends of the rafters.
Let us immediately note that in a log house the functions of the mauerlat are performed by the upper crown of the building, in a frame house the upper frame is performed. As for the ridge girder, it is installed in a system of layered rafters.
Elements of roofing structure Source poclevkin.ru
So, we’ve sorted out the roof elements, let’s move on to their varieties.
Let's start with the fact that the roof over the extension to the house is selected according to two criteria:
- Depending on the design of the rafter system of the main house to which the extension is attached.
- How is the extension located relative to the house?
As for the location, the extension is usually erected from the facade of the building or from one of its sides.
Now, as for the shapes of the roof structure of the attached room.
Shed roof
This type of roof is the most popular among country developers because this design is the simplest and cheapest. But it should be noted that pitched roofs are available in different variations.
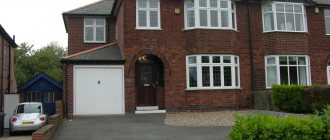
The first option is shown in the photo below. Here you can clearly see that these are just rafter legs, one end resting against the wall of the attached room. The second end can be fixed to the wall of the main house, or racks can be mounted under them, which themselves rest against the floor beams.
Shed roof of the extension Source starer.ru
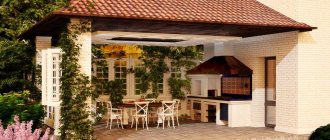
The peculiarity of this design is the formation of a cold roof, so it is often erected over non-residential premises such as a garage, veranda or some kind of utility block. The thing is that the volume of the attic space under such roofs is small. It is rarely used. It is this type of pitched roof that is erected over open terraces attached to the main house. In this case, the roofing system may not be covered with roofing material. But since the Russian climate means a lot of precipitation, even open recreation areas are covered with roofs.
Open terrace with a pitched roof Source m.yandex.ru
See also: Catalog of companies that specialize in roof design and repair services.
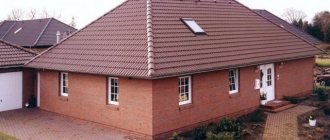
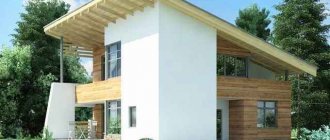
A completely different option for a pitched roof, when the task is to attach a room to the house that will be used for housing. There are other requirements for the design of the rafter system, where thermal insulation measures must be carried out. One option is the design shown in the bottom photo.
Please note that, in fact, one of the roof slopes of the house is redone so that it also covers the extension. That is, the overall roof becomes asymmetrical. But at the same time, it retains all the qualities of the insulated roofing structure under which the attic is organized.
The modification of the rafter system consists in simply extending the rafters with boards whose cross-section coincides with the cross-section of the rafter legs. And then they are all laid with their lower ends on the wall of the extension. Be sure to install a support post under each rafter leg: timber, board, double board.
Shed roof combining the house and the extension Source mebel-go.ru
In general, the option shown in the top photo is very interesting. The reconstructed slope can be left untouched. That is, purchase new rafters and install them without affecting the old slope. The only thing is that you will have to dismantle several sections of roofing material at the ridge girder to install new rafter legs.
But it should be noted that roof reconstruction carried out in this way requires calculations. After all, the load from installing elongated rafters increases. Accordingly, the area of the slope increases, and this means changed snow loads. And all this will affect the external facade wall of the extension. Therefore, based on the calculations carried out, it is necessary to purchase building materials from which the extension and rafter system of the new slope will be erected.
Gable (gable) roof
A gable roof, otherwise gable or gable, consists of two slopes connected by an edge - a ridge. The most practical and common type. The design is characterized by the use of pediments - the side parts of the walls in the form of a triangle.
There are the following types of gable roofs:
- symmetrical;
- asymmetrical;
- broken;
- multi-level.
Design Features
When designing, it is necessary to correctly calculate the load and slope angle, which should take into account the selected roofing material. The project itself is relatively simple and will create a reliable and durable roof with verified data.
Slope angle
The angle is influenced by the amount of precipitation in the area and the strength of wind gusts. The angle determines the roof load indicator. Each coating requires its own angle.
Rafter system options
The gable frame uses one of the possible options:
- layered;
- hanging;
- combined.
When choosing, the span between the walls outside is taken into account. Structural elements - Mauerlat, ridge, tie rods, etc. Their task is to distribute the load, fix or strengthen individual areas.
Source: kak-sdelano.ru
Installation features
Installation consists of installing beams, erecting sheathing and laying roofing.
Advantages and disadvantages
The advantages of a gable roof include :
- possibility of using the attic space;
- ensuring efficient removal of snow and water;
- simple and quick installation, simple repairs;
- the ability to create a variety of projects;
- wide range of suitable roofing materials, low amount of waste during installation;
- low cost.
Design disadvantages:
- During construction, a lot of roofing materials are needed;
- the height of the roof depends on the span;
- the attic will require additional strengthening of the rafter system, arrangement of window openings, and insulation.
This roof option is suitable for small houses: the larger the house, the larger the roof area, hence the costs and difficulties in installation and maintenance.
Design options
Source: m-strana.ru
Source: eplan.house
Source: i.pinimg.com
Source: roof-tops.ru
Video description
The video shows how to construct a gable roof over an extension:
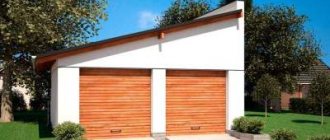
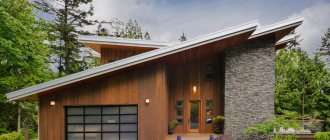
Hip and half-hip roofs
Hip roof shapes for houses with an extension are considered one of the most complex. They contain a large number of elements and components, and therefore the cost of purchasing building materials is considerable. At the same time, many elements are adjusted strictly to size, which guarantees a large amount of waste.
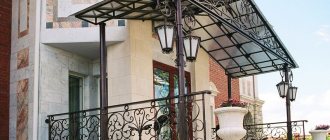
The photo below shows a hip roof project in which the ridge is attached to the wall of the main building. Fastening is usually carried out on special metal brackets or on racks, but with additional fastening to the wall with anchors.
It is necessary to understand that the hip roof consists of different slopes, which differ from each other in shape. Two of them are triangles, the other two are trapezoids. In the project shown in the photograph, a trapezoidal slope is the front one, and two triangular ones are the side ones. At the same time, there is no second slope in the form of a trapezoid, because the roof is being built over the extension, which means that something should not be enough.
An extension covered with a hip structure Source fav-expo.ru
Dome and conical
Cone roof types are installed over round or polygonal buildings. Supporting elements are used for them. The domed roof is considered one of the original and beautiful forms of roofs of private houses.
Dome - used in modern post-modern style
- Thanks to its configuration, the structure can withstand all the vagaries of nature and has increased strength and earthquake resistance.
This roof gives the house a castle-tower look
The disadvantages of this type of roof are:
- The extreme complexity of their installation;
- The inability to place windows on them or create useful space underneath them;
- This roofing option is rarely used for a private home and is one of the most expensive.
Useful tips
It cannot be assumed that the roof over the extension is some other structure. This is an ordinary roof with all known parts, elements, assemblies and fasteners. When constructing it, you will have to make calculations to determine the loads. It is also insulated, shaped and constructed. The only thing that happens often is that this structure is smaller in size than the roof of the main house. In all other respects, this is a traditional construction option.
Therefore, pay attention to these nuances:
- the roofing material of the extension must be exactly the same as that of the roof of the house;
- all wooden structural elements are treated with antiseptics and fire retardants: the first fights mold and fungi, the second increases the fire resistance of the structure;
- roofing material is selected taking into account the angle of inclination of the slopes;
- the minimum cross-sectional size of the timber for the Mauerlat is 150x150 mm;
- The minimum cross-sectional size of rafter legs is 150x50 mm.
Massive option
It is logical to use a powerful seamless reinforced concrete slab as the basis for the roof being used. Such a slab can be poured over a metal profile sheet. You should immediately add special modifiers to the concrete (sold in hardware stores), which make it waterproof.
Next, the roof over the heated residential space must be insulated. To do this, first a layer of vapor barrier is laid on the concrete slab. This could be, for example, a roll of material impregnated with bitumen, glued with mastic.
As insulation, you can take two layers of rigid extruded foam, which is glued to the vapor barrier with construction adhesive. By varying the thickness of the insulation layers, we form a slight slope to drain water.
The formation of the slope ends with a reinforced concrete screed. You can make grooves in it to give the rainwater the desired direction. We add a modifier to the concrete and cover it with water-repellent paint (this can be found, for example, in the arsenal of pool builders).
On top of this inclined surface you can assemble a horizontal flooring from antiseptic boards coated with a good varnish. Rainwater should flow between the boards through grooves in the concrete screed into the drainpipe. In winter, snow can be removed from the decking without fear of damaging the waterproofing.
Flooring assembly
The next step in building an extension for a wooden dwelling is to assemble the floor. At this point, the foundation should be completely ready for use. Let's look at what flooring installation methods exist:
- pouring screed;
- installation of wooden floor.
The first method is more expedient, but it will cost more. To fill the screed, you will need to remove about 35 cm of soil located inside the foundation. Next, a cushion of sand and crushed stone is poured into the bottom of the niche, after which beacons are installed (using a level). Upon completion of preparation, the screed is poured and covered.
A simpler and more environmentally friendly way is to install a wooden floor. For such a covering it is necessary to lay beams (floors). They are fixed to the foundation using special fasteners - anchor bolts. At the next stage, the corner connections of the beams are installed. It is worth saying that such connections are installed along the perimeter of the foundation of the frame extension.
Then it is necessary to lay the cross beams and insulate the structure using a suitable heat insulator. Finally, as in the case of a concrete floor, the coating is covered. Before starting floor installation, it is recommended to study photos of the different stages of this event. This will allow you to quickly understand all the nuances.
Method of attaching joists to a concrete base
You might be interested in: We build a utility block at the dacha with our own hands
Determine the height to which you want to raise the wall
To ensure the found slope angle of the pitched roof, it is necessary to raise one of the walls higher. How much higher we will find out by remembering the formulas for calculating a right triangle. Using them we also find the length of the rafter legs.
How to calculate the parameters of a pitched roof
When calculating, do not forget that the length is obtained without taking into account overhangs, and they are needed to protect the walls of the house from precipitation. The minimum overhang is 20 cm. But with such a small protrusion beyond the building, the pitched roof looks short. Therefore, overhangs of at least 60 cm are usually made on one-story buildings. On two-story ones they can be up to 120 cm. In this case, the width of the overhang is determined based on aesthetic considerations - the roof should look harmonious.
Example of a drawing in ScratchUp
The easiest way to determine how much the roof needs to be extended is in design programs that allow you to draw the building to scale and “play” with the overhangs. Everything should be displayed in 3 dimensions (the most popular program is ScratchUp). Twist through different sizes of overhangs, decide which one looks better (if there is no project), and then order/make rafters.
Construction of a rigid strip foundation structure for an extension to a house
The technology for making a strip foundation does not require special knowledge - it is not difficult to arrange it yourself. It is more difficult to make a high-quality connection to obtain an overall rigid structure.
- We dig a trench along the entire perimeter of the walls of the extension along the marking line. The depth of the trench should match the depth of the main foundation. Width – 10 cm more than the planned wall thickness.
- We lay a crushed stone cushion for the foundation and compact it well.
- We install roll waterproofing along the bottom of the trench. In private construction, roofing felt is mainly used.
- At the junction of the foundation of the extension with the base of the house, we drill holes with a diameter similar to the diameter of the reinforcement (12-14 mm) and a depth of at least 50 cm. The number of holes depends on the number of rods of working reinforcement in the foundation frame - for a strip foundation of medium depth (70 - 100 cm .) 6 rods are enough, running in pairs in three levels.
- We prepare pieces of reinforcement of the required size (hole depth + 25-30 cm for outlet) - we make a longitudinal cut 4-5 cm deep, into which we insert a wedging liner - metal, but it can be made of wood.
- We hammer the reinforcement into the hole. In the process, the liner decompresses the body of the reinforcing bar and jams it, creating a reliable connection. Now the reinforcement outlets can be used as a structural element of the extension base.
- We arrange a reinforcement frame and install it in the trench. We weld the edges of the frame to the outlets of the reinforcement fixed in the main foundation.
- We install the formwork to the entire height of the foundation. In private construction, removable formwork made of wooden or metal panels is mainly used. If you plan to insulate the foundation, then polystyrene foam slabs can be used as formwork.
- We prepare a concrete mixture in the ratio 1:2.5:5 (1 part M-400 cement + 2.5 parts sand + 5 parts fine or medium crushed stone).
- We pour concrete into the formwork. Concrete should be laid in layers around the perimeter. Ideally, pour the entire foundation in one day. You cannot make sharp breaks in the concrete, but if you had to stop the work, then the cut of the “tape” must be arranged in “steps”.
- After the concrete has set, after 2-3 days, remove the formwork and backfill.
I would like to draw your attention to the fact that under normal weather conditions, concrete needs 28 days to fully mature. Within 5-7 days, the concrete intensively gains strength up to 70% of the calculated value, but this is not enough to continue construction work.