To obtain a high-quality finishing plank floor, it is necessary to meet a number of conditions, which include the correct choice of material, careful preparation of the base and compliance with the sequence of laying all layers of the floor structure (hydro- and vapor barriers, soundproofing materials and insulation). In today’s material, we’ll take a closer look at how to lay floors with wooden boards with your own hands.
Wood flooring
Do-it-yourself wooden floors in a private house on joists
One of the flooring technologies is to build wooden floors in a private house on joists.
- We prepare a high-quality base: remove part of the soil (5 - 10 cm), pour out sand and tamp it.
- We lay crushed stone of the same thickness on top and compact it again.
- We lay a vapor barrier (roofing felt, oilcloth) and begin laying the logs on the racks in approximately half-meter increments.
- We fill the space formed between the joists with a heat-insulating pad.
Wooden floors in a private home have a subfloor on which the final covering is laid. This completes the formation. Next, all that remains is to clean it and varnish it.
Application area
Currently, the main area of application for wooden floors is the construction of small private houses. Especially often, floors on logs are installed in wooden houses and log houses, in which the floors between floors are made of beams.
Especially often, floors on logs are installed in wooden houses and log buildings, in which the floors between floors are made of beams
Much less often, wooden floors are laid in city apartments with reinforced concrete floors. However, the technology is still used, especially in cases where pouring a full leveling screed is impossible for some reason.
Wooden floor in the apartment
Sometimes plank flooring is a finishing coating and part of the designer’s idea when creating a renovation concept. In this case, beautiful wood species such as oak, larch or pine are chosen for the flooring. The boards are thoroughly polished, impregnated with an antiseptic and covered with varnish or wax. The result is a very beautiful and durable coating that pleases the eye with the natural texture of wood.
Natural wood floor
Wooden floors can be used even when arranging wet rooms, such as baths and bathrooms. However, this is done infrequently, as it requires careful selection of wood, reliable waterproofing and impregnation of the boards with very expensive solutions that prevent moisture absorption.
Wooden floor in the bathroom
Material requirements
There are only two basic requirements for flooring materials:
Environmental friendliness. If you live in the house permanently, then you can choose respectable coating options such as parquet, tongue-and-groove boards, porcelain stoneware
If a private house is used for living only in the warm season, then you need to pay attention to how the coating tolerates changes in temperature and humidity. In this case, linoleum and tiles are optimal. Strength and Durability
If the house is designed to last for several generations, then the service life of the material is of primary importance. Replacing flooring in a spacious private home requires financial, time and labor costs.
Less significant, but also important requirements include the design and comfort of coatings.
Repair of linoleum, carpet, stone coverings
Repairing the floor in an apartment with your own hands is carried out in stages as follows:
- The most common defects in linoleum can be swelling, cracks, peeling or tears. Such problems can be easily solved like this:
- using special glue, which should be drawn into a syringe and injected under the damaged area;
- then place a weight on this part of the floor and allow time for the glue to dry completely;
- if the damage to the coating is significant, then in this case the sections are replaced with new ones.
- In order to repair defective areas of carpet flooring, you need to have spare parts:
- the damaged area is cut out and a patch is put in its place. It is attached using double-sided tape or glue;
- to prevent the edges of the patch from unraveling, they are pre-treated with latex glue;
- Before cutting and gluing the patch, it is worth considering the pattern, as well as the direction of the pile.
- In order to give an aesthetic appearance to the stone flooring, the following series of actions are carried out:
- various cracks and chips can be easily removed by grinding the stone and then polishing it;
- polishing is performed with special chemicals that are rubbed into the stone and make the coating impervious to dirt;
- Such simple manipulations will help get rid of cracks up to 5 mm deep.
Laying linoleum, laminate and tiles on a wooden floor
Any finishing coating can be laid on wooden flooring. Linoleum can be laid directly on the base. The material is fastened using skirting boards around the perimeter of the room.
Old wood floors are an excellent base for new flooring.
You can lay laminate flooring on a wooden floor with your own hands. First, it is imperative to equip a substrate that will prevent friction of the elements on the base base and eliminate minor differences in the surface. For this, a coniferous or cork backing can be used, which will allow the wooden base to “breathe”. The use of extruded polystyrene foam is allowed.
Note! When laying laminate flooring on a wooden floor, a waterproofing layer is not required.
The joints of the substrate are taped with adhesive tape. Laying the laminate starts from the far corner, moving towards the doorway. The products are attached to each other using the tongue-and-groove principle. The finished coating is complemented by skirting boards, cork expansion joints and overhead thresholds.
It is advisable to lay tiles on wooden floors in the bathroom, kitchen, toilet, bathhouse, sauna and other rooms that are constantly exposed to moisture. The durability of the finishing facing material depends on the correct installation, which must be carried out in compliance with certain rules. Among the wide range of tiles, preference is given to lightweight tiles with low density. The base must be strong, level, and free from damage and destruction.
Laying laminate flooring on a wooden floor is done when it is necessary to hide the defects of the old plank covering, as well as when you want to simply update the interior.
To compensate for the linear expansion of wood, the tiles should be laid with a special adhesive that contains polymer additives that give the material elasticity. Tiles can be laid from the center or from the corner. The glue is applied to the floor or to the back of the product. Crosses are installed between adjacent elements. During the installation process, the coating is checked for level. After the glue has dried, the joints are grouted.
Preparatory work
When choosing materials and methods of floor installation, you should first pay attention to the average soil moisture under the house. In some residential areas, logs are laid on the ground, with cut-off waterproofing laid under them. Such floors reliably last for several decades, but such dehydrated soils are quite rare.
Below we will consider a method of preparing the foundation, which is used almost everywhere in our area. The whole point of this method is to install a concrete screed on a waterproofing pad. In a country house, a concrete screed will serve two functions at once: to insulate the floor from moisture and to serve as a rigid foundation for a wooden floor.
When starting to lay out a concrete base for a wooden floor, you must make a small pit in the house and carefully compact its bottom. A layer of sand 20 mm thick or more must be poured into the hole. You can also add an additional layer of crushed stone under the sand, but this step is often skipped. After you have made the sand cushion, cover it with a cut-off waterproofing material, which can be used as cellophane film or roofing felt. It makes no sense to use vapor-permeable waterproofing, because its properties are not needed at this stage, and the overpayment will be significant.
Laying logs on the ground
The method is used for outbuildings, bathhouses, gazebos, verandas, etc. The wood must be treated with antiseptics. It is better to have a columnar foundation; if you want to make a more durable strip foundation, then it is necessary to provide vents for natural ventilation in advance.
Floor on joists on the ground
How is this floor made?
Step 1. Remove the topsoil. You can use it to fill the beds or level the area in front of the house.
Removing a layer of soil
Step 2 . Mark the columns. The distance between them is selected taking into account the load and size of the logs. The posts can be made of concrete, block or prefabricated. The dimensions of the supports are approximately 40x40 cm, the burial depth is within 30 cm. A layer of sand ≈ 10 cm thick should be poured onto the bottom and compacted.
Step 3. Fill the supports with concrete. To prepare concrete, you should use two parts crushed stone and three parts sand for one part of cement. Water is added as needed. There is no need to make formwork in the ground; formwork from boards or OSB scraps is installed above the ground level. During the manufacture of formwork, you need to use a level; all edges must be strictly vertical.
Wooden floor base
Ready-made concrete pillars
Practical advice. It is much easier to make columns from ready-made blocks. Horizontal alignment must be done along the rope. After the outer ones are aligned with the hydraulic level, a rope is pulled between them. Deviations should not exceed ± 1 cm. This variation is eliminated during installation of the log.
Installation of blocks under logs
Laying columns under plank floor joists, diagram
Step 4. Start fixing the lags; you should also start work from the outermost ones. For precise horizontal alignment, you can use shims. It is not advisable to take wedges made of wood; over time, they will dry out and wobble will appear: the floor will begin to creak unpleasantly when walking. Between wooden structures and concrete surfaces, it is imperative to place two layers of roofing material for reliable waterproofing.
Joists laid on supports
Step 5. After the outermost logs are laid, a rope is stretched between them and all the remaining ones are laid under it. The logs are fixed with metal squares on dowels and screws. To increase stability, it is recommended to install them on both sides. Floor boards can be laid directly on the joists or a subfloor can be laid first. The final choice depends on the characteristics of the operation and purpose of the room.
Wooden floor on joists
Joists laid on blocks and waterproofing
How to make a floor in a private house from boards
The floor is made of planks in one layer. It is the simplest flooring option. This design is suitable exclusively for summer buildings or housing in warm countries. If the building design stipulates that floor beams are mounted in the walls, then the distance from one beam to another is most often too large to immediately lay the boards.
To provide the necessary strength, you will need to lay joists. If you plan to install the floor on top of the support pillars, then the placement of the beams can immediately be made as required.
Now, logs are laid on top of the supporting beams, which are set strictly horizontally; for this, wooden spacers and wedges are used. After checking the location of all the joists with a level, they need to be attached to the beams using nails, and then the floorboard should be nailed to them.
Floor made of two layers of planks
Installing such a floor will require significantly greater costs and effort, but this is compensated by a reduction in heat loss. It is better to use coniferous wood for the construction of the subfloor. To save money, you can use a non-edged board or slab.
Most often, thermal insulation is installed in the space from the rough to the finished floor.
As thermal insulation, you can use expanded clay, a mixture of clay and sawdust, or straw. Naturally, you can also use modern materials - polystyrene foam or extruded polystyrene foam. For thermal insulation, a finished floor (tongue and groove board) is laid.
Concrete floor
The concrete floor is installed in several stages:
- First of all, marking is done. Here it is better to use a laser level. After installing it, he will mark the walls in the right places for the future floor. To mark the level in the center of the room, threads are pulled from the marks in the walls.
- Next we make gravel backfill. This is the insulation in your floor. The ground should be cleared of plants to prevent them from growing through the floor. After this, drive in the stakes so that their level does not reach the level of the future floor by 100 mm. The backfill starts from the wall opposite the door. After filling the entire area, the gravel is leveled and compacted, and the pegs are removed.
- At the next stage, sand is poured, compacted and leveled.
- Proper waterproofing plays a huge role; moisture insulation of a concrete floor is usually done with polyethylene film, the thickness of which is at least 250 microns.
- Next, we fill. First of all, you should set a level of beacons, which are used as wooden or metal slats, the distance between which is from 1 to 1.5 m. The upper edge of the slats should be in contact with the stretched threads. Then, the rope markings are removed.
- Now the space between the slats is filled with concrete, from the end of the room to the door. After this, the concrete is leveled using a rule.
After the concrete has “set,” the slats should be dismantled and the voids filled with mortar. To level the mortar in the cracks, use a “grater” under the plaster. After this, the floor is covered with plastic film for a month. It is better to periodically moisten the concrete. This will make it possible for the concrete to gain maximum strength.
Installation of subfloor
The subfloor is a flat surface, without dips and depressions, on which the finishing coating is laid.
The subfloor performs a number of functions:
- holds insulation;
- distributes the load evenly;
- hides communications, insulating material;
- reduces noise levels between floors;
- reduces heat loss in the room;
- is the basis for finishing coating.
May be interesting: TOP 8 remedies for getting rid of bark beetle
For the subfloor, unedged boards, plywood, OSB, and gypsum fiber board are used. To ensure a reliable base, the subfloor is made in two layers. It is important that the joints and seams of the layers do not coincide with each other.
Floor installation in a wooden house is carried out in the following ways:
- on the logs. This method is used when it is necessary to raise the floor level. To retain the insulation, sheet materials or plank flooring must be laid on the subfloor;
- hem at the bottom. It is performed if it is necessary to save the height of the house. Hemming beams or joists from below is also necessary to support the insulation and other layers of the technological cake. It is not possible to nail the boards with continuous flooring. You need to put insulation between the joists. If it is afraid of moisture, then it is necessary to lay a vapor barrier film on top. Sometimes the filing is done on cranial bars. They are nailed to the sides of the joists from below. These are small bars 10-20 mm. Rigid insulation is mounted between them: polystyrene foam or short boards.
Pouring the floor in a private house instructions
To pour a concrete floor yourself, you do not need any special construction skills. The main thing here is to prepare the necessary consumables and calculate their quantities. If this is done, then filling the floor in a private house will be effective and simple.
Don’t forget, installing a durable and level concrete floor is the key to quality installation of any floor covering. To carry out quality work you must use:
- vibrating rammer;
- roofing felt;
- plastic film;
- expanded clay;
- foam boards;
- reinforced mesh;
- restrictive slats;
- building levels.
Work procedure or instructions for pouring a floor in a private house
1. First of all, you need to prepare the base surface for the future concrete floor. To do this, the top layer of soil must be removed to the required depth. Make an effort to ensure that the plane is as even as possible. Now, it must be compacted using broken bricks or crushed stone. A vibrating rammer will help you with this. If you do not have the opportunity to use such a tool, and you need to arrange the floor in a small area, then compaction can be done manually.
- 2. At the next stage of work, waterproofing and thermal insulation should be installed. It is most rational to use roofing felt for these purposes. If you want to save a little money on installing insulation, and you are sure that the groundwater level will never reach the floor in your house, then floor insulation can be done by laying several layers of a material such as ordinary plastic film. Here your personal preferences and financial capabilities play the main role.
- 3. When the waterproofing is completely installed, you should begin laying the heat-insulating material. For these purposes, you can use expanded clay or foam boards. Although this material is being used less and less, glass wool can also be used to create a heat-insulating layer. When insulating a concrete floor, take a responsible approach to the process of calculating the amount of consumables, otherwise, performing such repairs can cost you dearly.
4. Now, you can begin the process of filling the floor with mortar. Concrete is laid on top of the prepared surface from the end of the room opposite the door, while gradually moving towards the beginning of the room. The use of limit rails, which are set in accordance with the floor level, will help you in this process. It is very important here to strengthen the final layer with a metal frame. To carry out reinforcement, a regular chain-link mesh can be used. Using these actions, you can increase the impact resistance of the top layer.
5. Well, now we can proceed to the final stage. Here you will need to carefully make a screed using a leveling layer of cement, which has been diluted with water, until it turns into a liquid slurry. For these purposes, you can use a special leveling mixture, which is freely sold in specialized stores.
Wooden logs
The wooden floor in the apartment is different in that the logs can be installed directly on the concrete base. If your apartment is not on the ground floor, waterproofing and thermal insulation are not needed in residential areas. If the base is more or less level, simply install the logs and level them in height. And then you need to decide whether to attach them or not.
The most important thing is not to leave space empty
To fasten or not to fasten
When planning a wooden floor in an apartment, you will need to decide whether you will attach the joists to the ceiling or not. Both options are possible. Here are their advantages and disadvantages briefly.
- If the joists are not attached to the floor, less noise will be transmitted to neighbors. This is important, since wood conducts sounds very well and also resonates, amplifying them. The disadvantage of this option is the possibility of squeaks. The structure will not be rigid; movements are possible, which cause creaking. The neighbors will be no more happy about it than they are about impact noise. Believe me.
The joints are definitely attached, but whether they are attached to the base is your choice. - The logs are attached to the slab with anchors. The anchors are made of plastic so that, again, less impact noise is transmitted. On rigidly fixed joists, the chance of getting a squeaky floor is lower, but the transmission of impact noise is better. Additional measures will be needed to improve sound insulation.
The wooden floor in the apartment is made with either fixed joists or simply installed ones. In both cases, to reduce the transmission of impact noise, pads are placed under the joists.
How to improve sound insulation
It is advisable to place sound-damping or vibration-damping pads both under the joists and on top. It turns out that spacers are needed between the joists and the concrete floor, and between the joists and boards. You should also stick it on the ends that are close to the walls. This will also contribute to sound insulation.
In the simplest version, these are pieces of fiberboard. The material conducts vibrations poorly, but is not ideal, since this is not its intended purpose. To improve sound insulation, there are special materials - foamed rubber (for example, Vibrostek-M), rubber and other more sophisticated compounds. They cost more. Especially if you buy from companies that make floors. But the effect of their use is more noticeable. There is similar material in auto stores. By the way, it is cheaper there. It is on a self-adhesive basis, cut into strips. For our purposes, this is what we need. We glue the soundproofing strips to the wood, having previously degreased it.
Fibreboard spacers between joists and boards are better than nothing
One more point: in order for the wooden floor in the apartment to be truly quiet, the space between the joists should not be left empty. The material must be porous. Suitable both loose and in the form of slabs. Loose - perlite sand or crushed stone, in the form of mats - soundproofing mineral wool, polystyrene foam, ecowool, etc. The most affordable and simple solution is mineral wool. If you don’t like the fact that its particles can get into the air, you can cover the top with fabric, non-woven material, etc. It is important to allow moisture/air to pass through. The selected material is stapled to the wood, just below the top edge of the joist.
How to lay an array with your own hands
The solid board is laid on plywood sheets. The base can be either a concrete floor or a wooden floor on joists.
- It is necessary to measure 15 mm from the walls to create a ventilation gap and in case of seasonal deformations.
- The finished floor boards must be laid so that they are located across the subfloor boards. The first row is placed with a tenon to the wall and screwed with self-tapping screws. It is necessary to tighten the screws so that they are covered by the baseboard near the wall. On the second side, the screws are screwed into the groove at an angle of 45°.
- A wooden spacer is placed in the gap between the board and the wall. If the size of the room is greater than the length of the floorboards, then the boards are laid “staggered”. This will make the floor more durable.
- The second and subsequent rows of boards are laid with a tenon in the groove of the previous row, compacted with a mallet and fastened with self-tapping screws on the other side into the groove. If you want your wooden floor to last as long as possible, you need to lay the boards in such a way that the growth rings are located opposite each other.
The parquet board is laid "staggered". Solid parquet boards can also be used as a finished floor. In essence, this is the same tongue-and-groove solid board, only shorter. Its installation is slightly different:
- Can be fixed with self-tapping screws only from the tenon side.
- Installation is carried out only “staggered”.
- If the base is made of plywood, then it is better to glue the parquet board first and then additionally secure it with self-tapping screws.
- If you lay the board diagonally, the room will visually look larger.
DIY plank flooring: how to achieve a cohesive surface
Selecting quality material is only half the battle. It still needs to be installed correctly. Until you start doing it, it seems like what’s so difficult about attaching the boards to the joists. If they were perfect, everything would be really simple. I drove the tenon into the groove, screwed it on, and on and on. But when you apply one board to another, it turns out that in some places it fits tightly to the previous one, and in others there is a gap. So, these gaps need to be eliminated. This process is called "pulling the floorboards together." To work you will need special devices:
- Support. The rough board is well secured to the joists at some distance from the work site.
- Wedges - for holding boards together.
Few tools required - Several pieces of tongue and groove boards 70-80 cm long - 5-6 pieces.
- Hammer.
The first board is attached on the clearly visible side. The last board will be attached to the surface - from above, right through, so that it should be minimally visible. The first board is not attached close to the wall, but at a distance of about 1 cm. We choose the most even one, without “helicopter” and deflections. We install the fasteners in increments of 50-60 cm. In a tongue or groove - you have already decided. If you place it in a tenon, turn this part “towards you”. If fastening is required in a groove, then with the groove towards you.
Lag installation step and fasteners
The cross-section of the log for a wooden floor in an apartment is 50*70 mm or so. The installation step depends on the thickness of the board you are going to lay. For a board with a thickness of 25-28 mm, the logs are placed in increments of about 40 cm. For a board 30-35 mm, the increment is already 45-50 cm, for 40 mm - 55-60 mm. The cost situation is this: with a small pitch, more timber is required, but a thinner board is needed, and it is cheaper. As the pitch increases, less timber is used, but the price of the board increases. In general, you need to consider which option is cheaper. It is difficult to predict in advance, since the situation in the regions is different, and it changes from year to year.
The installation step of the joists depends on the thickness of the boards
To attach the board to the joists, wood screws are usually used. The length of the screw is at least three times the thickness of the board. We take yellow self-tapping screws with a “neck”. Black ones are considered to be of worse quality, as their cap often flies off under load.
Using a wedge
To make a plank floor in an apartment without gaps, you need a wedge. Or rather, two wedges. Take a piece of your tongue and groove board 20-30 centimeters long and saw it diagonally. These will be your wedges. With their help, we will press the boards one against the other - to unite them. For convenience, stepping back 1/3 from the thick part of one wedge, make a “window” 5-8 centimeters in length. It will be convenient to twist the self-tapping screw into this window. Please note that if you are mounting it in a tenon, then the window must be made on the part in which the groove is cut.
Do-it-yourself plank flooring: how to fit one board to another
The operating procedure is as follows:
- We installed the support board and secured it.
- We put the next one in place and inserted the tenon into the groove.
- A hole for a self-tapping screw was drilled above each joist.
- We placed pieces of boards against the support board, so that between them and the one being laid there was only space for installing a wedge.
- We place the wedge over the middle joist, insert tenons and grooves. We hit one of the wedges with a hammer, making sure the gap disappears.
- We screw in the self-tapping screw.
- We move on to the next lag, moving the backing boards, rearranging the wedge, and knocking on it again. And so we attach the entire board to each joist.
- We take the next board, put it in place, insert the tenon into the groove. We remove one of the backing boards. We repeat everything.
Laying a wooden floor in an apartment
This is how you can make a wooden floor in your apartment without gaps yourself. During use, the boards will dry out. Since they were originally fitted tightly, the likelihood of large gaps is low. If it gets really bad, you'll have to take it apart (that's why self-tapping screws are used, not nails), put together new floor boards, and add one or two more. So it’s better to have one or two boards in stock - in case of shrinkage, it’s very advisable.
The last board and the joints of the boards
A few words about installing the last board. It usually has to be trimmed, as it turns out to be wider than necessary. They cut lengthwise and insert the tenon into the groove at an angle. Next you need to pull it towards the penultimate one. To do this, you need a bracket in the shape of the letter Z. One edge of it is hooked to the board, and the other is tapped with a hammer. When the gap is gone, hammer in a nail.
Installing the last wood floor board using a bracket
It’s easier to fasten it with a nail, although you can install a self-tapping screw. It’s easier with nails, but to make the heads less noticeable, use finishing nails. Even if you have to sort through it, the end board will still go to waste. But it is fast, durable, reliable, and unnoticeable. To avoid damaging the wood with a hammer, do not drive the nails in completely at once. Then take a punch and drive it through to the very top.
A few more words should be said about the joints of the boards. It rarely happens that the board goes together without splices. The simplest option is just a butt joint, but the cut must be even. The easiest way to achieve this is with a miter saw. No other tool will give such a result. Then even an ordinary joint will look good. Having cut the ends of the boards to be joined, they are held together by pounding at the ends, then screws are screwed in, retreating 1-1.5 cm. And one more thing: the joint should be located above the joist. The fasteners are installed on both sides to ensure a rigid fixation.
It’s unlikely that anyone will buy a miter saw for one-time use; you can rent one. Well, if you have a tool, it will be possible to make the joint not straight, but at 45°. It looks neater.
Parquet for renovation
Parquet as a floor covering has been known since the 17th century, when it was first used in the palaces of the kings of France. The main advantage of parquet flooring is its environmental friendliness. Modern manufacturers offer a wide selection of colors, sizes and methods of laying parquet and parquet boards, which allows you to renovate the floors in a room in a style unique to each room.
Before laying such a covering, the floors are leveled with a special screed so that the differences in the heights of uneven surfaces do not exceed half a centimeter. Next, the humidity of the room is determined, for which a small piece of plastic film is laid on the floor for a day, the edges of which are secured with tape. If there is high humidity in the room, the film will become covered with perspiration from the inside. In this case, it is not recommended to lay parquet.
The disadvantages of this coating are the high price and instability to moisture. Also, this material cannot be used when installing “warm floors”.
Types of floors
Your home, built independently, will delight you for decades if you choose the right technology for laying and insulating the floor. A wooden house can have a concrete or plank floor. Sometimes heated floors are installed. The system of such floors differs in the coolant and the degree of efficiency of work.
Concrete floor
Concrete floors are strong and durable. It is equipped with a concrete screed. At the same time, the base of the floor is leveled. Any type of flooring can be laid on a leveled base. The screed gains the required strength in about a month at above-zero temperatures. You can do the concrete screed yourself, without the help of specialists, which will save time and money.
The disadvantages of a concrete floor are:
- heavy weight and high load on the foundation;
- low temperature: it's cold to walk on. To increase its temperature, the floor is insulated. Concrete floors can be installed in two ways: on the ground and on the floors. When the house shrinks, cracks may appear on it.
Wooden floor
environmentally friendly wood coating, does not emit harmful substances;
wood is a warm, natural, breathable material that creates a healthy microclimate in the house;
has a variety of textures;
the material is repairable. If some structural elements are rotten, they can be replaced by dismantling the coating partially, not completely;
the number of tools and equipment for installing a wooden floor is minimal.
high price;
complex and lengthy installation.
Methods for laying wooden floors
The installation of a wooden floor can only begin after the frame structure of posts and beams is finally ready. A layer of roofing material is laid on the posts, which serves as good waterproofing. Beams are installed on the waterproofing layer, and for additional strength, logs are fixed to the beams. It’s good when the width of the room corresponds to the length of the logs, but if you have to connect the logs, then it is better that the joints are directly on the supporting pillars, and they are fastened with self-tapping screws.
The structure of the wooden floor itself can be either single or double. Single floors are not very durable and are usually installed in summer cottages. This type of floor does not withstand weather fluctuations well and is not intended for year-round use. To make you feel comfortable in winter, it is recommended to build double insulated floors. It will require a lot of time and the necessary material. But the extra effort is worth it because it increases durability and reliability. To do this, a list of works is performed in a certain sequence:
- Install logs;
- Lay moisture-resistant plywood between them, and lay insulation on top;
- Lay the rough subfloor on the joists.
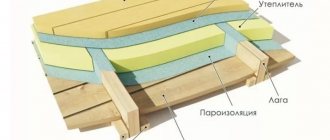
Double plank floor pie
To create a subfloor, low grade boards with a thickness of 15-50 mm are suitable. Such boards, carefully processed, are adjusted to each other. Then the finished boards are attached to the joists using self-tapping screws.
The boards are laid 15-20 mm from the wall. This promotes ventilation and prevents the floor from swelling during seasonal wood deformation. Waterproofing is carried out using a polyethylene film with a thickness of 200 microns, and additional thermal insulation is made of polyethylene foam. The film is laid overlapping, the edges are glued together with tape. You need to make an overlap of 20 cm on the walls and glue it with tape. After this, the finishing floor and finishing coating are laid.
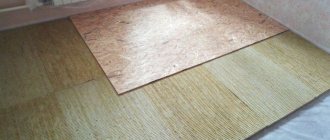
Sheets of plywood or solid wood are used for laying the finished floor. The plywood is placed on top of the thermal insulation layer and secured with self-tapping screws.
The solid board has an attractive appearance, is convenient to lay, and is also easy to use. The advantage of solid wood flooring is that you can apply varnish or paint to the floor and thereby avoid additional costs for finishing materials. Solid boards are produced in two versions: regular and tongue-and-groove. The difference between them is in the installation method. A tongue and groove board is much easier to install. However, before installation, it must lie indoors for three days.
Stage 2 - preparing the base
The tongue and groove boards are laid along joists or beams. In this case, in each individual case, additional conditions must be taken into account:
- In terms of cost, laying a continuous subfloor will be more expensive than structures with logs laid in increments of 0.3 - 0.6 m.
- When arranging a basement or attic floor, they will need to be insulated and insulated from wet steam.
- When installing interfloor floors, acoustic materials are laid in the floor structure.
Wood flooring on OSB boards
When laying a finishing wooden floor on a concrete base, the boards are installed directly on the screed, traditional joists or modern adjustable analogues.
Waterproofing works
Wood, for all its positive qualities, is vulnerable to moisture, which can penetrate into the ceiling regardless of the floor of the structure. In connection with this, when installing a wooden floor on a concrete base or joists, take into account the following:
- To create a high-quality and reliable waterproofing layer, a dense polyethylene film laid in two layers (from 150 microns), dense membranes or weld-on materials are used.
- Waterproofing should have as few joints as possible. When using film, the sheets are laid with an overlap.
- All joints must be thoroughly sealed.
- Waterproofing must be installed on the walls to a height of at least 15 cm.
Self-adhesive waterproofing material
If the base for laying the logs is a floor slab, then the waterproofing layer is laid directly on the screed or expanded clay sand. Using coating waterproofing, you can get a monolithic coating without joints.
Waterproofing can not only protect the finishing coating from destruction, but also protect the property of neighbors in the event of some unforeseen situations. You will find the installation technology in a special article.
Methods for waterproofing a concrete base
Important! Before laying film waterproofing from the surface of the screed, it is recommended to remove obvious irregularities that could damage the integrity of the film.
If the floor is made of beams, then there will be no continuous rigid horizontal base. In this case, a sheet of edged boards is attached to the cranial block. In this case, the vapor barrier material is laid “ladder” on top of the beams.
Wood floor pie
Thermal insulation work
When installing floors on interfloor beams, you can do without insulation. But it is a mandatory element of a two-layer wooden floor located on the first floor of the building above the unheated underground space and in the attic. In the attic, if there is no living room there, the finished wooden flooring is made from edged boards or panels from it.
The insulation is laid in steps
It is recommended to use mineral (eco) wool as a thermal insulation material for wooden floors, which has the ability to absorb moisture and at the same time does not interfere with its evaporation from the wood.
The process of laying insulation - between the lags the material should be placed as densely as possible
The waterproofing layer does not fully protect the wood from moisture, as a result of which, in the absence of vapor-proof polystyrene foam, the wood begins to rot, and mold, fungi and microorganisms form in its structure.
Types of mineral wool
Laying vapor barrier
A layer of vapor barrier must be present in the wooden floor cake. This is due to the fact that the moisture absorbed into the wood and insulation begins to evaporate. Vapor barrier material is needed to release evaporated moisture and prevent excess moisture from the environment from reaching wooden structures. The structure of special vapor barrier membranes allows evaporation to pass in only one direction - outward.
There should be a small gap between the insulation and the vapor barrier material. If the height of the logs is not enough, then a rail of the required thickness is fixed on them
The peculiarities of this layer are that, freely passing through it, moisture is concentrated in the form of condensate on the outer surface of the membrane. In the future, its removal occurs in the process of natural ventilation of the wooden floor structure. In the case of a tongue-and-groove board, this process is organized due to the presence of one wide or several narrow cuts on the back side of each board. To ensure that air can freely flow inside the boardwalk, it is necessary to provide special hatches in its design in the area of the baseboard in the least noticeable place in the room.
Structure of the vapor barrier membrane
Logs and their purpose
Regardless of the floor design, joists are designed to solve a number of basic problems:
- The tongue and groove board is fixed to the joists using self-tapping screws when installing wooden flooring on the floor slabs. Under the finishing coating, insulating and soundproofing material is hidden, and a space is created for ventilation of the structure.
- When installing a finished wooden flooring over a wooden floor, joists are installed if the floor beams are located at a large distance from each other so that the tongue-and-groove board does not sag.
- Using logs and additional materials - spacers, plastic wedges and adjustable floor studs, the horizontal level of the coating is set.
- The logs form a spatial box, which is used for laying insulating material.
Adjustable joists for laying wooden floors on concrete bases
Wooden floor on interfloor beams
A beam of the required cross-section or a board with a cross-section of 50 x 150 mm is used as a log.
Gaskets under joists
Operating principle of adjustable joists
Read more about attaching joists to a concrete floor in a special article.
Pouring a concrete floor
The installation of a concrete floor in a private house begins with preparatory work. First, markings and gravel filling are made on the site of the future floor. The soil is first cleared of plants and the top layer, and then compacted. Next, a layer of gravel is poured, which also needs to be compacted well. In the construction of a concrete floor in a private house, gravel will act as thermal insulation. Sand is poured on top of the gravel. After compacting it, a thick polyethylene film is spread on the surface, acting as a waterproofing material.
How to make a concrete floor in a private house? After installing the waterproofing layer, you can begin pouring the screed. A cement screed in a country house is poured in the same way as a screed in an apartment: levels are set and the mortar is poured, which is leveled from wall to door according to the rule.
When pouring a concrete screed, several features should be taken into account. The solution for pouring must be fresh; for its preparation it is recommended to use cement of a grade not lower than M-300, screening out sand and water. To increase the strength of the concrete layer, you can add special compounds to the solution - plasticizers, which will give the future coating additional strength.
When pouring a screed with a height of 5 cm or more, you can use reinforcing elements or a reinforcing mesh, which is laid on the waterproofing layer before pouring. In the case of installing warm water floors in a private house, the use of reinforcing mesh and the addition of plasticizers to the cement mortar are mandatory procedures.
When the concrete hardens a little after pouring, you can remove the beacons. The voids left after their removal are filled with the same solution. After filling and leveling all the cracks, the floor is covered with polyethylene and left to dry. Drying a concrete floor is a long and responsible undertaking. The concrete must dry on its own within a month; if you have a heated floor system, heating should not be turned on until the screed is completely dry. By turning on the heating elements, you will help the concrete crack before the room is used. When drying, it is recommended to periodically moisten the concrete screed with water and cover it again with polyethylene: if this requirement is met, the coating will gain maximum strength and will not crack.
In order to correctly fill the cement, remove the beacons and dry the concrete, it is recommended to look at photos of the work of builders who specialize in arranging floors in private homes.
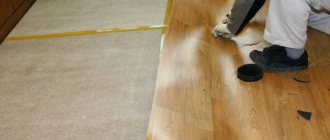
Laying plank flooring on a concrete base
Sometimes in apartments they use the method of laying plank flooring directly on a concrete base. For this purpose, a number of preparatory works are carried out.
First of all, you should carefully level the horizontal level of the concrete base. This can be done using a special composition based on cement-polymer based on the principle of self-leveling floors. After applying the liquid mixture to the floor, it smoothes out on its own, spreading over the surface of the concrete slab.
Waterproofing can be rolled or liquid
The next step is arranging waterproofing. Concrete is covered with special sheets or painted with liquid bitumen or polymer mastics. The next layer, placed between the waterproofing and the plank covering, can be plywood impregnated with water-repellent impregnations.
Boards are placed on plywood to further protect them from moisture or to obtain a more even surface. Plywood is either glued to concrete using construction adhesive or secured with dowel nails. After this, boards are laid on top of the plywood sheets and attached to the previous layer using self-tapping screws.
Finishing
Oak parquet will last for many years.
The finishing touch is applied as a finishing touch. This can be parquet, laminate, linoleum and other types of flooring, which you can choose in a construction supermarket to suit your taste.
Before installing the decorative covering, the wooden plank flooring is covered with a layer of a special polyurethane backing, which is a kind of padding that softens the load of furniture and people. The underlay also plays the role of additional waterproofing protection for the laminate. After installing the flooring, decorative skirting boards are attached along the walls to cover the joints of the floorboards with the walls.
If a private house has an underground floor, then the hatch for it should be cut after installing the boardwalk. To do this, a square is marked in the opening between the joists and a hatch of the required width is cut out using a chain saw.
The sawn pieces of boards will be used to make a cover for the hatch - the “original” boards will ideally fit into the underground opening. All that remains is to fasten the scraps with two crossbars, and use bars or thick boards to put together a porch around the perimeter of the hatch, on which the lid will rest.
With the help of this step-by-step instructions on how to lay floors correctly, you can easily install wood flooring in your home, which is an environmentally friendly and inexpensive material.
Floor repair sequence of actions
You can make a floor from scratch in a private house with your own hands. First you need to remove the old structure, which usually in an old private house is made in the form of a system of logs and wooden covering. If you plan to create a floor covering made of ceramic tiles, you need to make a screed. Tiles cannot be laid on a wooden base. For other types of flooring, for example, linoleum or laminate, you can restore the joist system and insulate the structure.
The process of repairing floors in a private house.
A new floor in a private house with a screed is created in the following sequence:
- The old structure is dismantled and the base surface is leveled.
- A cushion is constructed from gravel or brick chips and sand.
- A layer of film or roofing felt is laid to prevent moisture from penetrating from the soil.
- The level of the future screed is determined and marks are placed on the walls.
- Insulation is laid (expanded clay, polystyrene foam, mineral wool).
- Reinforcing mesh is laid.
- The base is divided into sections of 2 m using slats. The height of the slats must correspond to the height of the future screed (at least 7 cm).
- Cement mortar is mixed and poured into each section.
- The solution is leveled using the rule.
- The finished subfloor is covered with film and left to dry for 2 weeks. Concrete should be moistened periodically.
- After the concrete has dried, a leveling screed is made.
- The flooring is being laid.
Concrete base can be used for any type of flooring.
A multi-layer cushion of crushed stone and sand serves as a shock absorber in case of subsidence and heaving of the soil.
Scheme of pouring a heated floor with concrete.
In addition, it is a container for all communications that exist in a private home. Pipes and wires are insulated in special boxes and hidden under a layer of sand and crushed stone. The bulk pillow is created as follows:
- A layer of gravel (5 cm) is poured, then it is leveled, moistened and compacted.
- A layer of sand (10 cm) is poured, moistened and compacted.
- A layer of gravel (10 cm) is poured and compacted again.
Concrete flooring is more reliable and durable than wooden flooring on joists. It can serve for decades, maintaining its qualities. Concrete does not contain harmful components, retains its strength, remains dry, and does not deform due to temperature fluctuations.
Wooden structures are susceptible to external factors. Logs can be destroyed by pests. When temperature fluctuations occur, the boards become deformed, cracks appear in the floor covering, and the boards begin to creak. Mold can form on wood if there is high humidity. But creating a wooden structure is a more economical way to make a floor in a private home.
Choosing materials for plank flooring
The quality of the material determines the comfort of living, the budget for repairs and operation, and the service life of the flooring.
Dimensions of tongue and groove boards
When manufacturing sheet piles, manufacturers are required to comply with the requirements of GOST 8242:
- marking BP or DP - block and floor covering board, respectively;
- lumber thickness - 2.7 cm block, 2.1 cm, 2.7 cm or 3.5 cm board;
- tongue width - 4 - 6 cm block, 6.4 - 14 cm board;
- dimensions of the locking connection - groove 6 x 7 mm for a block, 7 x 7 mm for a board 2.1 cm and 2.7 cm, 7 x 10 mm for a board 3.5 cm thick;
- board length – 2.1 – 4 m for hardwood, up to 6 m for pine.
Important! The thickness of the sheet pile affects its rigidity and strength, therefore, for the BP-27 beam and the DP-35 board, the beam pitch/jog is 0.6 m, and for the DP-21 sheet pile it is reduced to 30 cm.
Lumber quality
The tongue and groove is made from edged boards of Extra, A or B grade, the output parameters are controlled in accordance with GOST 8242:
- integrity - boards 6 - 14 cm wide are usually solid, wider products are glued using furniture board technology;
- cleanliness of processing - roughness 120 microns for varnishing, 200 microns for painting, back surfaces of lumber have 500 microns;
- humidity – 8% when packed in film or 12%;
A wide board is more convenient to work with and is usually made by gluing, so it is less susceptible to warping. Coniferous species pine/spruce are considered budget, larch and cedar are valuable species, by default impregnated with a natural antiseptic. A solid-length tongue and groove made of hardwood without splicing is always shorter than a coniferous one. This is due to the structure of the wood.
Prohibited breeds for flooring are:
- linden, poplar for the entire range;
- BP-27 and DP-27 made of aspen and alder are suitable exclusively for residential premises;
- DP-35 is not made from alder and aspen.
Important! On the back side, the tongue has several narrow or one wide cut, necessary for air circulation and compensation of internal stresses in the wood.
Clean coating from an environmental point of view
Wood floors come in different types.
When choosing, both price and prestige play a decisive role:
- Solid board is an expensive classic material that is often used for flooring. Perfect for a log house. Solid layers are always quite good.
- Parquet boards are made of wood and are equipped with grooves that make joining easier. The thickness of the standard material reaches 0.25 cm, and the length up to 200 cm.
- Parquet glue board is not much different from the previous version and is not inferior in quality. Has a long service life. Its top layer is usually made of valuable wood, its thickness can be up to 5 mm. Other layers are not so large.
- Regular parquet is a set of planks that have grooves. This material is ideally suited and is often used for creating exquisite floors.
Wood floor repair
Repairing old wood floors begins with identifying creaking floorboards and joists, as well as those parts of the structure that are covered in mold. Defective parts found are replaced with new elements. The entire floor area is treated with an antifungal agent. If certain areas of the floor in the room are more often exposed to moisture than others, then they should be covered with waterproofing materials, since antifungal impregnation alone will not be enough.
Often, cracks form in wooden flooring due to drying out of the wood. You can eliminate them as follows:
- The floor is treated with a sanding machine.
- The cracks are sealed with a primer and another layer is removed with a sanding machine.
- The boards are primed with nitro varnish.
- After the nitro varnish dries, it is primed with a finishing coat (matte or glossy).
The advantages of natural wood
A natural wood floor laid in a living space would be the best option. The tree has a number of positive properties:
- Floorboards are environmentally friendly and do not emit toxic substances or allergens.
- Installing wooden floors is not very difficult. Therefore, it is quite possible to install a plank floor with your own hands. Wood floors will create a cozy atmosphere at home
- The plank floor creates a special microclimate in the room, which has a beneficial effect on the respiratory system.
- A wooden floor is warmer than a concrete floor. Laying a wooden floor with your own hands makes it possible to keep your home warm and create a cozy atmosphere.
Installing a concrete floor
To properly install a concrete floor with your own hands, first make markings and fill the soil with gravel for thermal insulation. A layer of sand is poured on top of the gravel, each layer is carefully compacted. Then the sand is covered with waterproofing material in the form of polyethylene film or sheets of roofing material.
Insulation in the form of crushed stone or another layer of gravel is laid on top of the waterproofing, then the waterproofing is laid again and only then a concrete screed is made. The solution is used only of fresh grade not lower than M-300. To increase the strength of concrete, special plasticizer compounds are added to the mixture.
It is important to dry the concrete properly. Typically this takes three to four weeks.
During drying, the surface should be covered with film and the screed should be periodically moistened with water. Do not use heating elements or turn on the heating in the house before the concrete has dried! Otherwise the surface will crack.
To enhance the thermal insulation of a concrete floor, you can use additional insulation. The concrete is covered with wooden materials on top or a “warm floor” system is laid.
Underground
Don't Forget About Ventilation Holes
When laying your own floors, you should definitely consider making sure the subfloor underneath has ventilation holes. If this is not done, the service life of the deck will be significantly reduced.
It is recommended to make such vents on each side of the foundation, which will ensure high-quality ventilation of the underground space.
If the region in which the house is located experiences windy and snowy winters, a ventilation pipe with a canopy is installed as a barrier against blowing into the underground space.
To improve the quality of ventilation, you can make an additional window fan. A fine grid with a mesh size of more than 10 mm will serve as a barrier to mice and rats.
Installation of wooden floors
When building a private house, many people prefer to make the floor out of wood. This desire to have high-quality wooden flooring under your feet is explained by the desire to use environmentally friendly materials, which include wood. In addition to being highly environmentally friendly, such a floor has a number of other advantages.
Wooden floors are easy to install and easy to repair during use. Due to the low thermal conductivity of the material, such a floor will retain heat inside the house without letting it out. Plank flooring made from high-quality wood has a long service life and an attractive “natural” appearance.
To make a floor in a private house, you need to choose the right wood. The choice of source materials should be based on the design features of the structure itself. The installation of a floor in a country house must necessarily include the presence of a subfloor that acts as an air gap. If such a layer is missing, the wooden floor will quickly become unusable due to exposure to moisture.
In addition, for a good floor it is important to have all the layers of the structure, including joists, rough flooring, hydro- and thermal insulation, finishing coating
The floor in a private house is subject to significant mechanical loads, so for its construction it is necessary to choose wood with good technological characteristics. The boards must be well dried, the recommended moisture content is no more than 12%. Any chips or cracks on the surface of the material are not acceptable. Experts recommend giving preference to coniferous wood; pine, larch, fir, and cedar are suitable. To increase the service life of the future floor, all boards must be treated with an antiseptic and fire retardant.
Installation of a wooden floor begins with determining the locations for the support posts and their installation. The fertile layer of soil around the entire perimeter of the house is removed and removed, gravel is poured in its place, and sand is poured on top of it. Layers of gravel and sand must be compacted well. Waterproofing material is laid on the ends of the support pillars; most often, ordinary roofing felt is used for these purposes.
Next, we make beams that need to be secured to the posts with metal corners. It is better to make floors in a private house with double insulation. Experts suggest first laying plywood sheets on the sides of the beams, and then placing mineral wool or other insulating material on them.
When the insulation layer is ready, you can begin laying the rough covering. The boards of this layer should fit well to each other; ordinary screws can be used to attach them to the beams. It is better to leave some distance between the flooring and the walls of the house: a gap of 1.5 cm can be considered the norm for this part of the floor. These gaps provide ventilation to the entire floor structure and protect the walls from expansion of the floor boards as they subsequently dry out.
A layer of vapor barrier made of polyethylene film with a thickness of 200 microns is laid on top of the subfloor. The joints of individual pieces of film must be taped, and the edges must be folded onto the walls to a height of about 20 cm - the height of the final coating. When the film is laid and secured, you can proceed to assembling the finished floor.
The finished floor is assembled from solid wood boards or plywood sheets. Plywood sheets are easier to attach, but in the end they don’t look very attractive. Therefore, if you want to leave wooden floors in your house, then it is best to immediately assemble the final covering from a tongue-and-groove board, and if you plan to cover it with decorative material, just secure plywood sheets. After assembling the finished floor, plank floors must be coated with varnish, which will not only protect the material from external influences of a mechanical and chemical nature, but will also emphasize the decorative qualities of natural wood.
Do-it-yourself wooden flooring: step-by-step instructions for self-installation
It is quite possible to lay a wooden floor with your own hands if you first study the instructions for carrying out this work. Plank flooring has always been more popular than floors made from other materials, as it differs from them in its natural warmth, environmental friendliness and ability to create a specific, especially healthy microclimate in living spaces.
DIY wooden flooring
Most often, coniferous wood is chosen for flooring in the house. Mostly larch is used, which shows particular resistance to both temperature changes and high humidity. Thanks to the natural antiseptic qualities of this tree, destructive fungal formations do not occur on it, which means that processes of rotting and destruction are excluded.
Floor requirements
Wooden flooring must meet certain requirements, without which the floors will not last long and will not be comfortable for residents. These criteria can safely include:
- Effective sound insulation and thermal insulation of premises.
- Reliability and durability of wooden covering.
- Wear resistance, and therefore durability of the floor.
- Moisture-resistant and hygienic – cleaning the floor should not be particularly difficult.
- The aesthetics of wooden flooring - it should become a decoration of the room.
- Ease of installation work.
To achieve all the mentioned qualities of a wooden floor, you need to choose the right material for its installation.
Material selection criteria
For a wooden floor, you should select high-quality material.
In order for the floors to last a long time without the boards drying out and deforming, when choosing wood you need to pay attention to the following material parameters:
- Grade. For finishing coating, it is better to choose the highest or first grade of board, and for rough flooring, 2 ÷ 3 grades are usually purchased. If the finished floor will be covered with paint, then second-rate material will be quite suitable for it.
Its quality will directly depend on the grade of wood. Even when purchasing the highest grade material, you need to pay attention to the presence of possible defects, such as chips, cracks and knots - they should either be completely absent or be in a minimal quantity.
- It is very important to pay attention to the dryness of the wood. It must have a certain humidity, otherwise, over the years, cracks will appear between the boards, and the floorboards themselves will begin to deform. Humidity for finishing boards cannot exceed 12%, and for rough boards - no higher than 17%.
- The length of the bars and boards should ideally correspond to the length and width of the room where the floor will be laid.
- The standard thickness of floorboards is 120 × 25 mm and 100 × 25 mm. This parameter is selected depending on the step of laying the logs on which the boards will be attached. According to existing technology, these distances must be selected in accordance with the data given in the table:
| Step between joists in mm | Floorboard thickness in mm |
| 300 | 20 |
| 400 | 24 |
| 500 | 30 |
| 600 | 35 |
| 700 | 40 |
| 800 | 45 |
| 900 | 50 |
| 1000 | 55 |
When purchasing any building material, after the necessary calculations have been made, you must add 15% to this amount in reserve - this rule has been tested by experienced builders, so it is recommended to follow it.
Wood preparation
Before installing joists and floorboards, they must be prepared. Typically, flooring material is sold already planed, but if burrs are revealed during inspection, they must be removed using an electric planer.
Treating wood with antiseptic compounds
Next, all boards and bars are treated with antiseptic compounds. This is done to protect them from fungal and mold infections, protection from insects and, to some extent, even rodents.
Their installation begins only after the material has completely dried.
Choosing a floor design
Knowing all the requirements for the covering material, you need to decide on the design of the floor, since each specific case will have its own option, depending on the conditions under which the installation will take place.
There are several main types of wooden floor designs:
- The floors are on joists laid on floor beams. In this case, plywood or boards can be used for the finished floor.
- “Floating” structure - boards laid on a concrete base, but not attached to it.
- Covering fixed to logs laid on the ground.
These methods of installing a wooden floor have become the most popular, as they give creative freedom to the craftsman, who can make his own adjustments to the design. But, one way or another, for each room it is necessary to choose the only option that suits it to a greater extent.
Floor beam system
- The logs, as the basis for the floor, can be attached to floor beams, which, in turn, are laid on a columnar or strip foundation. This is permissible if the room where the floor is installed has a width of no more than 2.5 ÷ 3 m.
Beams are installed directly on the foundation
- To create an air gap, floor beams are often raised above the ground to a certain height, laying them on the upper waterproofed surface of the foundation. They can be rigidly attached to it or simply placed securely on top. The second option is chosen if the foundation has not yet had time to shrink, and when it occurs, it will not drag down the floor system, which will certainly begin to deform from such an impact.
For large spans, additional support columns are installed
- If the room is large (more than 3 meters), columns can be additionally installed between the walls, which will create rigidity for the floor system. All supporting structures under the floor beams must be waterproofed so that the wooden parts last as long as possible.
What should be the thickness of the joists and floor beams? This mainly depends on the free span width (the distance between adjacent support points). Typically based on the following indicators (see table):
| Log section size in millimeters | Width of the room span in meters |
| 110 × 60 | 2 |
| 150 × 80 | 3 |
| 180 × 100 | 4 |
| 200 × 150 | 5 |
| 220 × 180 | 6 |
- After the floor beams are installed, the logs need to be secured to them. The distance between them, as already mentioned, is calculated according to the thickness of the selected flooring boards.
The joists are attached to the floor beams
- When arranging such a “floating” floor structure, the logs, and then the boards, must be located at a distance of at least 12 ÷ 15 mm from the walls, that is, be independent from them. An insulating material is laid into the opening between the walls and the floor system, which will not allow cold air to enter the room, will allow the wood to “breathe”, and will expand freely when there are changes in temperature and humidity.
- When laying logs consisting of two separate sections, their overlap by 400 ÷ 500 mm should be on support posts or on a beam. The logs must be leveled to the building level; if necessary, small pieces of wood are placed under the logs to achieve an ideal horizontal level.
- After the logs are installed and fixed, it is recommended to install a subfloor, for which low-quality boards are quite suitable. To install them, cranial blocks measuring 30 × 50 mm are screwed from below along the entire length of the lag.
A low-grade board is quite suitable for a subfloor.
- Subfloor boards are not always secured to the slabs; usually they are simply laid tightly together. A vapor barrier film is laid on top of the subfloor, secured with staples to the joists and boards.
Vapor barrier film over subfloor boards
- An insulation material is tightly placed between the logs on the vapor barrier - this can be mineral wool in mats or rolls, as well as a dry backfill of expanded clay or slag.
Laying insulation on the subfloor
- Another layer of vapor barrier film is laid on top of the insulation. Its individual sheets are glued together with tape, and then the film is attached to the joists with staples.
The insulation on top is also covered with a layer of film
- The top layer of vapor barrier is necessary to prevent dust and particles of insulation material from entering living spaces. Floorboards or thick plywood will then be laid on top of this entire floor system.
Prices for various types of timber
timber
Joists fixed to concrete surface
Often, to create an insulated layer for the floor in apartments, a wooden floor on joists is also installed on a concrete base. Here the whole difficulty lies in leveling the joists on the surface, especially if it is planned to raise the wooden covering a few centimeters above the concrete slab.
If the apartment is located above the first floor, then most often the logs are laid out, leveled, and then secured to the concrete base using anchors.
Aligning joists horizontally using threaded stud posts
In both the first and second options, the logs are drilled through. To raise the logs above the base, various metal and plastic elements are used. In this case, the photo shows the studs. They allow you to raise and lower the logs on one side or the other, leveling them. The excess section of the stud, after bringing the lag to the desired height, is cut off using a grinder.
In each of the options, insulation can be laid on the concrete between the joists, which will add thermal insulation to the coating and also help muffle noise, both from the lower apartment and from the rooms where joists are installed under the wooden floor. Mineral wool, polystyrene foam or bulk insulation can be used as insulation material.
It is recommended in both the first and second cases to stretch the log on top and secure a vapor barrier film and only then proceed to laying the final coating.
Flooring on concrete surface
Sometimes a wooden floor is laid on a concrete floor without the use of joists. Floorboards or plywood are used as covering. It is advisable to lay a thin insulating material under such a floor - most often foamed polyethylene is used for this, but it is better to choose one that has a foil coating.
Laying a wooden floor without using joists
Separate sheets of backing material are fastened together with tape to create a solid coating - it will make the floor warmer and muffle noise. If plywood is used for flooring, you need to remember that a decorative covering must be laid on top of it. Floors made from fairly thick boards will look respectable if they are covered with varnish, wax or high-quality paint.
Installation of floorboards
Having chosen the boards of the required thickness, it is important to determine the correct direction for laying them on the floor. As many years of experience have shown, the best option is to lay the boards in the direction of natural light, that is, from the window. Therefore, you need to start planning the laying of the boards by marking and securing the joists.
Floorboards have different types of connections:
Types of joining boards for flooring
1. Connection using an insert-liner in the grooves of two boards.
2. Groove-tenon connection in the presence of tongue-and-groove boards.
3. Quarter connection.
The last type of connection is the easiest to install, so floorboards with this type of fastening are most often used. In addition, the “quarter” connection creates a single covering with almost imperceptible gaps between the boards, so it optimally retains heat in the room.
Boards can be attached to the joists in two ways:
Self-tapping screws can be screwed secretly into the locking part of the board
- Nails or screws can be driven into a groove located on the side of the board at an angle of approximately 45 degrees, with the head recessed into the wood. Some craftsmen prefer to do the opposite, driving the screws at an angle into the edge of the tenon.
Fastening can also be carried out through the front surface with subsequent filling of the holes
- In the second option, nails or screws are driven or screwed into the front plane of the board.
- When starting to install floorboards, you must step back 12 ÷ 15 mm from the wall. Later, a strip of insulation is laid in this gap and covered with the installed baseboard. It is necessary for the tree to be able to expand with changes in humidity and air temperature.
Be sure to leave a gap near the wall, which will subsequently be covered with a plinth
- The board is attached to the joists with nails 80 ÷ 120 mm or self-tapping screws 70 ÷ 100 mm. The caps are driven “under the cover”, and later they are sealed with putty matched to the color of the wood.
- If insufficiently seasoned wood is used, the laid floor requires a drying period that lasts 6 ÷ 8 months. During this time, the coating will shrink and dry out, the gaps between the boards will increase, and therefore it will be necessary to carry out the process of relaying it. In this regard, during the initial laying of the flooring, all the floorboards are not completely nailed to the joists, but only the fifth to seventh board is attached. After drying the boards, they must be rearranged, pressed together as tightly as possible and nailed to the joists.
For a tight connection, the boards are adjusted with a mallet through a wooden spacer
- If boards with a tongue-and-groove connection are selected, for a tighter connection, use a mallet, with which the tenons are driven into the grooves through the block. Craftsmen often use special clamps for this, especially in cases where, due to the slight curvature of the boards, installation involves coating the grooves and tenons with wood glue.
- To tightly connect the last board installed against the wall, temporary wooden wedges are used; they are driven between the wall and the board.
- The gap between the boards should not be wider than 1 mm. If the board is not installed in the groove completely, then most likely there is a burr or some kind of roughness left on the canvas, and this flaw must be removed and the tenon must be adjusted to the groove.
Find out how to remove the creaking of a wooden floor, as well as consider the causes of creaking and methods of elimination, from our new article.
Video: laying floorboards using clamps
Flooring prices
Floor coverings
Treatment of the floor surface after final flooring
After the floor has been rebuilt and secured, its surface may need to be scraped off. This process is carried out if, when the board dries, it becomes a bit wobbly and the surface becomes uneven.
After sanding the floor, it is recommended to cover it with a starting varnish according to the grain pattern. After drying, which usually takes 10 ÷ 12 days, the surface is sanded.
The starting varnish helps to identify insufficiently smooth areas on the surface of the boards, and therefore, after it dries, it is easier to find rough spots and carry out additional sanding.
After sanding, skirting boards are installed that will well hide the gaps between the wall and the floor boards. If, as a result of this operation, gaps remain between the floor and the baseboard, they are sealed with putty to match the color of the wood.
Now that the floor has been prepared in this way, you can proceed to finishing the surface with wax, oil, varnish or paint.
The plank flooring is covered with a finishing compound not only to give it aesthetics and respectability, but also to protect it, and therefore ensure maximum long-term use.
Oil treatment
If the boards have a beautiful, pronounced textured pattern, then a special oil is often used to cover it. It makes the floors warmer, not as slippery as when varnished, and also gives it antistatic properties. The oil penetrates the structure of the wood and reliably protects it from the penetration of moisture from the outside, practically repelling it.
Oil treatment of the floor surface
Wood coated with oil is less susceptible to various types of damage, and existing flaws become virtually invisible. The oil does not clog the pores of the wood, preserving its naturalness, allowing the material to “breathe”, which creates a favorable microclimate in the living room.
Floors that are coated with oil must be protected from dust until it is completely absorbed. During operation, such a floor requires special care using special means. It is very important to remember that it is not recommended to place furniture with metal legs on such a surface, as there is a risk of unwanted reactions that may result in dark stains remaining on the wood.
Oiling floors is recommended in rooms with high humidity - bathrooms, terraces and kitchens. This coating is also good for a hallway or corridor, since boards impregnated with this substance are more resistant to abrasion.
There are compositions for floor coverings that do not consist of pure oil, but with the addition of liquid wax, which gives the floors a matte, soft shine. Pure oils are also applied to the surface of wood; they are well absorbed into the surface, are economical to apply and do not require a long wait to dry.
Floor oil can be colorless, or it can have different shades that make the wood darker or give it a special, pleasant and warm color.
The oil is applied in two or three steps. It can be rubbed in or applied with a brush, and its excess is immediately wiped off to avoid the formation of a film on top, which will create uneven coverage.
The oil composition can be applied hot and cold in several layers. The faster the wood absorbs oil, the more coats will need to be applied. The heated composition penetrates much faster and deeper into the pores of the wood, and this coating lasts much longer than with a cold application method.
Waxing the floor surface
Wax is most often combined with an oil finish. So, sometimes waxing occurs with a composition that consists of natural beeswax and linseed oil. This coating protects floor surfaces well from scratches and dirt, as well as from moisture absorption, but will not protect the wood from cracking and intense mechanical stress. The wax coating gives the surface a pleasant matte shine and golden hue.
One of the combined oil-wax compositions for flooring
The wax is applied to the cleaned floor using a wide roller in several layers. The first of them must be very thin in order to be well absorbed into the surface. Next, the floor is sanded, and then it is covered with another layer of the compound and sanded again.
Wax combined with oil is an environmentally friendly coating material and is very good to use in children's rooms and adult bedrooms. Wood that has undergone this treatment has the ability to “breathe”, so the floors will last a long time and create a favorable microclimate in the room.
Varnishing a wooden floor
Varnishing a wooden floor
- The varnish coating can be applied by brush, roller or spatula at room temperature, moderate humidity and absence of drafts.
- The first layer of nitro varnish is applied to the cleaned surface, which will serve as a kind of primer for the finishing layers of the composition. It is applied in a thin layer along the textured pattern of the wood. If necessary, the primer can be applied in two layers.
- After the primer has dried, the surface is sanded well using sandpaper. After this, the floor is washed with soapy water, thoroughly wiped and dried.
- After this, they begin to apply the finishing layers. There may be two or three of them, and each of them is dried and sanded.
Applying varnish to floors is a rather complex undertaking that requires careful selection of the composition for a specific type of wood. Therefore, if this particular method of processing a wooden floor is chosen, it is better to entrust the work to a specialist who will determine the amount of work and select the necessary materials.
The varnish coating is quite fragile and easily damaged by mechanical stress, so it is not advisable to walk on it in thin heels or move furniture. In addition, varnishes are most often produced on chemical bases, which, by clogging the pores of the wood, do not allow it to “breathe”.
Staining a Wood Floor
Recently, paint is rarely used to cover wooden floors, but it still happens, especially in cases where a special interior style is chosen. In addition, paint is used in cases where it is necessary to cover up a not entirely attractive type of wood, since such a coating completely covers the surface of the floor. For this finishing treatment, you can choose paints on different bases: oil, enamel, nitrocellulose, as well as acrylic, water-dispersion and latex.
Sometimes it makes sense to use floor painting technology
Water-based paints are preferable for residential premises, as they do not contain solvents and additives harmful to the human body. They are produced in different color shades, so you can always choose the one that is more suitable for a particular interior.
Enamels and other paints based on chemical solvents are also used for living rooms, but after applying them, the rooms require long-term ventilation, since these fumes can pose a threat to human health.
Before painting the floor with water-based compounds, the boards are coated with a special primer. For other coating materials, the base must be prepared using impregnating compositions, the main component of which is usually drying oil.
The paint can be applied in one, two layers or, in extreme cases, three. It is recommended to choose the “golden mean”, since paint applied with too thin a layer will quickly begin to wear out, and if applied with a thick layer, on the contrary, it will peel off. Each coat of primer or paint must be thoroughly dry before the next one is applied.
The technology for painting a wooden floor in great detail in the corresponding publication on our portal.
So, if you have the basic understanding of working with wood, and also have the necessary materials and tools, you can try laying floors from boards or plywood yourself. If you have questions, you can always seek clarification and advice from articles that will help solve any problem. And at the end of the article - another interesting video on the technology of laying wooden floors.
Video: how to prepare and lay a wooden floor
What repairs and when to do them
Repairing a floor on your own is a rather complex, time-consuming and responsible process. First you need to understand the types of manipulations that will have to be carried out
To do this, it is important to assess the condition of the structure and decide what needs to be done: cosmetic or permanent. repair
Owners of new buildings have a floor with a ready-made and well-made screed. In this case, it will be possible to get by with cosmetic repairs: if necessary, fill in the leveling mixture and lay the floor covering.
An old apartment often requires capital. floor repair, especially if wood was used as a covering. Wooden floors have a limited service life; over time, the floorboards begin to creak or collapse when walked on. There can be no talk of cosmetically finishing a wood covering that has expired.
Types of floor repairs largely depend on the type of coating that will be used. There is a standard classification of coatings used in floor repairs. It includes such materials as parquet, laminate, ceramic tiles, linoleum, solid boards, stone coating, carpet, self-leveling floors.
Finished floor installation
Problems usually do not arise here: the installation technology is quite simple and intuitive. To begin with, the first board is laid. The part is placed in such a way that it does not fit flush against the wall: there should be a two-centimeter gap at the end and long side.
The board is fixed with a bracket, and the next floorboards begin to fit to it. To achieve maximum density of elements, the boards are carefully tapped with a mallet. When the floor is finished, the remaining gap at the edges is closed with a plinth.
Installation of concrete screed
There is no strict thickness of the expanded clay layer, however, it must be at least 40 mm. It is worth noting that the larger the fraction, the thicker the expanded clay layer should be. The thickness also depends on the local climate, in some cases the thickness of such a layer can reach 100 mm. If you cannot decide on the thickness yourself, then use the universal size of 80 mm.
There is no need to dwell in detail on the construction of a concrete screed, because our website provides many articles about its installation. A solution made from sand and cement, or a ready-made mixture, is poured between the beacons installed directly on the expanded clay. Remember that it will take several weeks for the screed to dry completely. This base can last for decades; in addition, it extends the life of the floor itself.
Mounting methods
Depending on the location of the logs, there are several methods for attaching them. Previously, when installing this floor on a concrete screed or reinforced concrete beams, the logs were attached using simple long nails, but this method was not distinguished by its durability.
Currently, more reliable devices are used for fastening - U-shaped fasteners or galvanized metal corners. The corners, on the one hand, are fixed with self-tapping screws to a wooden beam , and on the second - to the base with dowels. The depth of insertion of the fastening into the beam is 3-5 cm. If you arrange the floor on the ground for brick pillars, then the algorithm of actions is similar.
Sometimes the logs are not long enough, so many are interested in how to build up the timber so that it is as strong as solid material. The logs can be joined end-to-end or by notching , and in both cases the length of the extended element is at least one meter. And if you need to increase several of them at once, you need to shift the joining points by 50 cm or more so that the load is uniform.
The logs are fixed to the wooden floor beams using screws . The length of the fasteners must be 2.5 times greater than the width of the joist, and the diameter must be at least 6 mm. To protect the wood from splitting, before installing the fasteners, the joists and beams should be drilled in the required location. And the diameter of the hole should be 2.5 mm less than the mounting diameter.