Home / Components and accessories / How to attach pendants to the ceiling
When starting to install suspended ceilings, you need to know some of the nuances of assembling such structures. In particular, how the suspensions are attached to the ceiling. This part of the frame bears the main load, and the appearance and service life of the assembled structure depends on how correctly the installation of this component of the base is carried out.
Recommendations for choosing Euro suspensions for suspended ceilings
The suspension allows you to adjust the height of the suspended ceiling from the base, thereby hiding its unevenness or creating different levels of the ceiling plane. When installing a suspended ceiling, in cases where, due to communications under the ceiling space, ventilation, fire extinguishing systems, it is necessary to lower the frame of the suspension system at a distance of more than 1 m from the base of the ceiling, we recommend using suspension rods of different lengths.
We recommend choosing a longer rod with a ring that is attached to the base of the ceiling. And the rod with a hook, which is attached to the system profile, is shorter. In this case, it will be much more convenient to adjust the height with a suspension, since the spring will be closer to the level of the frame.
Important: choose high-quality fasteners. The rods (spokes) should be made of galvanized steel, which will extend the life of the suspension and prevent the spread of rust
There are often cheap Euro suspensions where the rod is not galvanized. The very next day after installation it becomes covered with rust. The service life of such Euro-suspensions is extremely short, and the danger of ceiling collapse is extremely high.
Guide bending
There are cases when the profile needs to be given a curved shape (for example, when creating arches). In such situations, before placing the guides under the drywall, it is bent. Despite the fact that modern stores offer already bent guides, the relevance of this procedure remains the same, since they are quite difficult to find.
Using cuts, you can give a piece of profile almost any shape
To carry out this operation, you only need metal scissors. First you need to make small cuts on one “side”. In this case, the back of the profile should not be affected.
Important! You cannot saw the guides with a grinder, as this will damage the zinc layer, which will lead to rust of all floors. The notches should be located at a distance of 5-10 cm from each other
It is worth understanding that the smaller this distance, the smaller the radius the profile can be bent. Then it is enough to apply a little force to give the material the desired shape
The notches should be located at a distance of 5-10 cm from each other. It is worth understanding that the smaller this distance, the smaller the radius the profile can be bent. Then it is enough to apply a little force to give the material the desired shape.
Composition of the Armstrong suspended ceiling frame
How to independently calculate an Armstrong ceiling
Formally, the suspension system consists of three main parts - a set of hangers, a lattice frame made of galvanized steel profile and decorative panels. Suspension designs can be quite different in structure and load-bearing capacity; up to 10 models are used in total, depending on the size and purpose of the ceiling.
Appearance of the frame
In turn, the frame is assembled from four basic components:
- Molding or wall corner for Armstrong ceiling;
- The supporting profile is the basis of the lattice frame; hangers are attached to it;
- Longitudinal profile, same functions, but without hangers;
- Crossbars or jumpers that increase the rigidity of the supporting system;
- Clamps holding the panels to the frame.
To make 1 m2 of rectangular ceiling 1:2, you will need 80 and 160 cm of 370 cm load-bearing and longitudinal profiles, crossbars - 80 cm, corner - 50 cm.
Dimensions and methods of panel connections
When choosing a vinyl or acrylic profile for siding, sizes vary within:
- length - 2.5 - 4 m;
- width - 20 - 30 cm;
- sheet thickness - 1 - 1.2 mm.
There are profiles for siding of different shapes (photo below): herringbone, ship plank (timber), block house (log).
To cut siding you will need a jigsaw, a hacksaw, a knife, and a grinder with a cutting disc.
The panels are connected to each other with an overlap or a lock. This is done carefully, applying force until the upper and lower fasteners come together. The connection should be free, without tension. Otherwise, the panels may bend due to temperature deformation. Violation of horizontality is not allowed, which worsens the appearance of the facade.
Suspension for false ceiling Armstrong
Subtleties of lining the ceiling on wooden beams
The frame can be installed on several types of hanging devices. The main characteristics are shown in the table below.
For small-sized ceiling structures, wire fasteners AP1 are most often used, consisting of two spokes and an adjusting bracket. In terms of adjustment accuracy, it is inferior to models with threaded adjustment, but is noticeably easier to install and operate.
Four main types of suspension
The minimum mounting height is 15 cm, the maximum is 60 cm. Unlike threaded rods, wire models do not sour and can be easily dismantled and reused.
Scheme of fastening on threaded rods
On the wall
It is necessary to mount the suspension on the wall in the following cases:
- Creating a niche.
- Making a shelf.
- Decoration of a suspended ceiling.
- Repair of partitions and walls.
Profiles are mounted on the wall as follows:
Particular attention is paid to windows and window sills. Measure width and length
The marking of the frame begins from the window. Markings are carried out using a tape measure and a level. According to the measurements, points are marked and lines are drawn. The distance between the elements is 50-60 cm. In accordance with the drawings made, choose the sizes of the blocks. You need to be careful when choosing products for the side parts of the window. Mount the hangers. Install the first, outer profile. Adjust placement.
Correct markings and choosing the appropriate type of fasteners for hangers will allow you to get the job done efficiently.
Did you manage to solve your problem using the recommendations from the article?
Yes!
46.15%
38.46%
15.38%
Votes: 299
Euro-suspension for a suspended ceiling: hiding flaws under the frame
Rules for choosing materials for finishing a bathroom ceiling
The Euro-suspension is distinguished by its versatility, which allows the use of this type of fastening when installing various types of suspended ceilings. Most often they are used in cases where the installed ceiling is located at a distance of more than 150 mm from the base one. The suspension is fixed in the base ceiling using a rod with an eye, and the suspended ceiling is suspended using a rod with a hook. The rods are connected with a spring part, which allows you to subsequently adjust the height of the frame.
A universal euro-suspension is a great opportunity to hide all the shortcomings and flaws of the ceiling surface
This type of suspension has undeniable advantages:
- Does not require much effort during installation and replacement;
- Used to install sloping and domed ceilings;
- Withstands loads up to 10 kg.
Auxiliary fasteners
To reliably fasten the sheathing, there are many different auxiliary products that are used to install the frame. Some parts are limited in their functionality, while others can be used to assemble a system that will be sufficient to perform any type of work.
The main components and fittings include:
- two-level connectors for extending CD profiles. With the help of such special connectors, individual parts of a given profile are combined to give them the required length. Before use, the connectors are bent so that they take the shape of a bracket. For work, use self-tapping screws and place them on each side, 2 pieces;
- impact dowel. This auxiliary element of the frame received this name because of the specific installation, in which the screw is driven into it, rather than screwed in with a screwdriver. The dowel and screw set includes products of various lengths. When installing a plasterboard structure, it is recommended to purchase plastic dowels that will not fall through the impact into the void of the concrete floor;
- crabs are used as connecting elements of the CD profile at an angle of 90 degrees on both sides;
- suspension with a spring on which the CD profile is attached to the ceiling surface;
- direct suspension is represented by a bracket and is also used to fix the CD profile to the ceiling;
- dummy dowel. You will need a 6 mm sample with a small cap that will prevent the element from falling into voids;
- anchors or hangers with traction are used to mount the profile to the ceiling base when the length of the direct hanger is insufficient for installation. In this case, the suspension is fixed to the profile, and the rod is threaded through special holes in the adjustable spring. The technical characteristics of the parts allow the structure to withstand loads of up to 30 kg.
Before starting installation work, you will need to calculate not only the profile for the ceiling, but also the number of auxiliary fastening elements.
Purpose and design of the Eurosuspension for the Armstrong suspension system
Euro-suspension is used as a fastener for the suspension system to the base of the ceiling. The most commonly used sizes are 500 mm and 1000 mm. In general, the standard sizes of Euro hangers vary from 250 mm to 3000 mm.
Armstrong ceiling hangers are a universal fastening element. Most often, hangers are used when installing suspended ceilings, for example, grilyato, metal, mineral slabs, etc.
Suspensions are used when installing a suspended ceiling, when the distance between the base and Armstrong suspended ceilings is significant.
Armstrong ceiling suspension in a specialized environment is called Euro suspension.
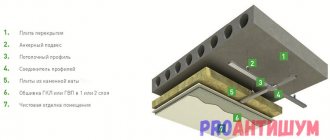
The Euro suspension consists of the following elements:
- rod with a ring - attached to the base of the ceiling;
- rod with hook - attached to the supporting profile of the system;
- a spring that allows you to adjust the height of the frame.
High-quality Euro suspension is a fastening element of the suspension system, made of galvanized steel. It is passed through the holes of the main profile. Euro-suspension provides reliable fastening of the suspended ceiling. With the help of Eurosuspension, additional under-ceiling space is provided for placing and hiding communications, as well as for their maintenance.
The main function of the Eurosuspension is to attach the entire suspended ceiling mounting structure to the base element of the building.
Thanks to the use of Euro-suspension, the surface of the suspended ceiling is smooth, and differences in the base ceiling in the room are hidden.
Purpose of Euro-suspension for suspended ceiling:
- reliable fastening of the suspended ceiling;
- organization of under-ceiling space for convenient placement of communications and their maintenance.
Surface finishing
A suspended ceiling is also good because it allows you to use a variety of finishing options. It can be finished with plaster, painted, wallpapered, etc. But before that, the remaining seams must be sealed. After treating them with a primer and waiting for it to dry, seal all seams, joints, holes from self-tapping screws with durable putty.
Finishing plasterboard ceiling
After waiting for the putty to dry, glue all seams and joints with sickle tape, and then coat them again. The widest seams between plasterboard sheets must be filled with putty material and wait for it to dry completely. It is possible that while sealing the plasterboard seams on the ceiling, you will find some damage - for example, a torn paper layer that has exposed the core of the sheet. Such problem areas should be eliminated in advance. You can, for example, apply serpyanka and apply an even layer of putty on top.
For joints it is better to leave rounded edges of the sheets. In principle, the manufacturers have already thought about this point - the edges of the sheets have a rounded shape, thanks to which the putty will fill the seams to the maximum. Serpyanka tape and a layer of putty must be applied at the level of the plasterboard sheet. For what? The fact is that the edges of the drywall have a narrowed thickness so that the tape can be recessed under the surface level of the sheets.
How to properly seal the seams of plasterboard sheets, the edges of which are cut off yourself? First of all, it is necessary to chamfer, that is, plan the cut edge of the sheet with a special plane or knife at an angle of 45°. As a result, a wedge-shaped groove is formed at the junction of the two sheets, in which the sickle tape can easily “drown” and the putty material will reliably grip.
Serpyanka tape for reinforcing seams
Then, after filling the entire surface with regular putty, apply finishing putty to it. The ceiling is ready.
Armstrong ceiling pendants: what is it
Armstrong ceiling hangers include 6 mm metal rods, which are connected to each other by a curved spring with holes. These rods can be moved and the height of the product can be adjusted. If she is released, then she fastens them very tightly. The upper part of the reinforced suspension rod is profiled in order to securely fix it in the fastening unit.
Correct installation of the Armstrong ceiling involves hanging it from the guide profiles at intervals of 1.2 m. The nodes should have a distance of no more than 450 mm from the wall. In this case, the line of the suspension device is located along the length of the room with a shift in one direction and the other, so that the suspension units are arranged in a checkerboard pattern. The components are supported by additional elements, which are located diagonally from the main one. The massive liners of the system are reinforced at the corners and, if possible, are located tightly to the wall.
Application of suspensions
Suspensions in slatted ceilings
Installation of suspensions in slatted ceilings
- We attach one side of the suspension with a dowel-nail to the base ceiling.
- We insert the other end into precise engagement with the special stringer of the frame: it has factory-ready special holes.
Hangers for sloping ceilings
The special fastening of the suspension to the ceiling creates its slope.
We make such sloping ceilings by simply extending the suspensions:
- We install the building level at the ends of 2 stringers;
- align to the horizon;
- We move the level to the other ends of these stringers, leveling them to the horizon, but slightly higher or lower than the first two ends.
Suspensions in plasterboard ceilings
Suspensions for mounting multi-level ceilings
- Suspensions are convenient when installing large boxes when the length of an L-shaped direct suspension is not enough, as well as when installing leveling plasterboard ceilings.
- This is especially necessary when new ceilings need to be located at a large distance from the base ceiling for technical or design reasons.
- The technology for manufacturing a suspended plasterboard ceiling or plasterboard box involves the use of not only direct hangers, but also rod ones; vernier hangers are also acceptable.
It is better to place the frame into the horizon not with homemade, but with factory-made direct hangers. A correctly selected ceiling suspension guarantees the reliability and quality of the structure, and will also extend its service life.
Features of using straight plates
Despite the apparent ease of the mounting process, beginners in this work often have a question: how to attach suspensions to the ceiling. These elements have several holes for mounting, so some knowledge about the features of their use will still be needed.
In the process of assembling multi-tiered ceiling structures for mounting the plate to the metal profile, experienced craftsmen advise attaching the suspension using holes that, after bending the plank, will look to the sides. The hole in the center is used for fastening to the ceiling itself. This is also more convenient because this hole is a slot and allows you to move the fixation point if it suddenly becomes necessary.
Another nuance lies in the subtleties of attaching direct and adjustable suspensions to the ceiling. To securely fasten them, choosing ordinary plastic dowels will be wrong. For the most durable fixation, a wedge anchor is much better suited. In this case, the ceiling structure is protected from sagging.
Performance characteristics of Armstrong ceiling components
Structurally, panel cladding is just slabs of a certain composition and material, laid on a supporting frame made of galvanized profile. This entire mass of parts and components for the Armstrong suspended ceiling is held on the concrete floor using adjustable hangers.
The frame is assembled like a construction set from individual planks
The main difference in the different types of Armstrong ceilings is the material of the slabs. The specific type of panel is selected according to operating conditions:
- For premises of public institutions, shops and offices, warehouses with constant temperature changes, high dust loads and special fire safety requirements, mineral boards based on pressed granules of mineral wool, latex, gypsum and cellulose fiber are used;
- In medical, sanatorium and hospital institutions, in kindergartens and schools, panels with metal coatings that are highly resistant to ultraviolet radiation and sanitary treatment are used to decorate Armstrong ceilings;
- For swimming pools, baths, laundries, kitchens, slabs made of polymer compositions are used that can withstand humidity up to 98% and temperatures up to 120°C;
- In retail and entertainment establishments, Armstrong ceilings are used with slabs of cellular structure made of mineral wool and fiber, which block noise and sounds well and at the same time have excellent fire-fighting characteristics.
With rare exceptions, when decorative slabs are made of glass, plaster or wood, the characteristics of Armstrong ceiling panels with components allow them to be used in almost any room.
Important! They were especially attractive for production and technical facilities, where the ability to repeatedly dismantle the ceiling trim means easy access to communications hidden in the ceiling space.
Thanks to the suspension system, the slabs are easily removed and just as accurately returned to their place, on the supporting corner profile, so repairing the Armstrong ceiling is considered one of the simplest and most affordable.
Advantages of the material
Knauf acoustics is a material of so-called “dry construction”. By installing such slabs in your home, you will receive the following benefits:
- you can effectively correct the acoustic background in the room for low frequencies;
- simple and quick installation that can be carried out even by one person;
- the slab can be painted without any problems;
- absence of unwanted “wet” processes;
- safety and environmental friendliness of the material. The material does not emit hazardous and toxic substances into the air, such as formaldehyde.
In addition, with the help of such sheets you can finish both walls and ceilings. In this case, no external seams remain. During the installation of the slabs, a continuous surface is formed. This can be achieved by applying light putty if the sheets have a straight standard edge.
Acoustic gypsum boards on the ceiling
Such an acoustic system is very convenient for installation, as well as further operation. Inspection hatches are easily integrated into the system, through which access to a variety of engineering systems is possible.
Thanks to these advantages, acoustic plasterboard has become widespread throughout the world. Today it is used in various situations:
- wall and ceiling cladding to create excellent sound insulation;
- implementation of various architectural projects;
- finishing of residential and non-residential premises: private houses, government institutions (schools, universities, kindergartens), concert or theater halls, etc.
As you can see, Knauf acoustics is an excellent solution for creating reliable sound insulation in almost any room.
Attaching hangers
All suspended ceiling hangers attach the profile to the base ceiling.
Installation of a non-adjustable suspension
Fastening direct hangers for supporting profiles of any length.
- We drill holes for anchors in the ceiling according to the markings and screw the hangers.
- Then we bend down each side of the attached suspension.
- Then, to check reliability, we will pull them with some force.
- We mount it in guide profiles.
- We bend the sides of the suspension to an angle of 90 degrees.
- We set the desired profile level with a stretched cord.
- We drill the profile on both sides of the suspension, then fasten it with self-tapping screws.
- We bend the protruding edges of the suspension to the sides so that they do not interfere with the installation of the sheet.
Adjustable Gimbal Installation
Rod hangers allow the frame to be lowered.
- We drill holes in the ceiling for the anchor.
- We screw a special rod to the ceiling.
- We install the ceiling profile in the guides on opposite walls.
- We put the suspension on the rod.
- We insert the suspension into the profile.
- We set the required profile level by moving the suspension along this rod.
- We fix the suspension.
Adviсe
It is not difficult to install the hangers yourself, but it is worth paying attention to such parameters as the weight and thickness of the material. The choice of fasteners and their quantity depends on this
With high-quality installation, you can get smooth, defect-free walls and ceilings that will last a very long time.
Before installing the fasteners, it is necessary to mark the mounting points of the suspensions with step sizes on the surface. During installation work, it is worth checking the horizontal profile using a level.
For a better fit of the structure, spacer tape can be glued to the back of the guides and hangers. The supporting profiles should not fit tightly to the surface, and the heads of the screws should be below the level of the drywall.
To check the reliability and strength of the fastening, it can be pulled down strongly. If all the elements remain in place, it means that the fastening was done correctly.
Galvanized elements are used not only to avoid corrosion, but also to provide fire resistance. Nylon dowels can only be used to attach guide profiles to walls.
The distance between the main surface and the plasterboard structure must be sufficient to place heating pipes between them, which expand when heated. The wires should also fit properly, without kinks.
When installing suspended ceilings, it is necessary to take into account not only the height of the room, but also the height of the furniture. The tallest is the cabinet, and it should have an optimal distance relative to the ceiling level.
If you want to hang not an ordinary chandelier, but install interesting lamps, it is recommended to use a suspension with a wire rod for multi-level structures.
It is necessary to provide in advance the places where decorative elements, lamps, wall cabinets and more will be placed. This is necessary so that later you do not have to partially destroy the plasterboard covering. It is also advisable to prepare plumbing, wiring and ventilation in advance.
For information on how to attach the hangers, see the video below.
Armstrong suspended ceiling components
Suspension systems are elements made of mineral fiber of different thicknesses and lengths, which are installed on Armstrong guides; they can be fixed with a fastening element to the base of the ceiling. Our company offers a wide range of Armstrong components. These products ensure easy installation and prompt execution of ceiling installation work. As components for suspended ceilings, we can note such elements with the help of which a load-bearing frame is formed.
Armstrong guides are products that ensure a strong installation of a suspended ceiling. To securely fix them under the ceiling, wall corners are used on which a metal profile is installed. To add rigidity to the supporting structure, there are suspensions included in the components for the ceiling. The metal structure is supplemented with strips; they are required to ensure reliable fixation of mineral fiber slabs.
How to mount a metal profile on a wall
Tip: Before installing a wall frame made of a metal profile, all work related to electricity is carried out: wires are supplied to switches, sockets, lighting fixtures, and all household devices.
The technology for installing a wall frame consists of finishing each wall separately.
Installation of a metal profile on the wall
The instructions for attaching the frame to walls made from a plasterboard profile suggest the following procedure for performing the work:
- Walls with windows require special attention when constructing the frame. If you need to insulate walls, vertical profiles are installed at a distance of 50 millimeters from the old slopes.
- The width of the window sill has an influence; when finishing the walls after its installation, the marking of the frame starts from the window. But the thickness of the plasterboard sheet must also be taken into account; it can be 12.5 or 9.5 millimeters.
- A square is applied to the frame and the required distance is measured, adding 5 centimeters on the other side of the opening. You can immediately install a PN to the “bottom” of the window sill, with a pitch of vertical posts of up to 60 centimeters.
- A building level is applied to the risks, which will help transfer them to the side planes of the window sill.
- The marks on the floor and ceiling are connected.
- The profile guides are installed along these lines:
- on the sides of the window, the verticals in this case are marked from these profiles in increments of 60 centimeters;
- one of them must be installed in the corner of the room.
- The hangers are mounted in increments of 60 centimeters, with the center strictly along the line.
- Rack profiles are installed in the guides so that their middle groove coincides with the mark on the floor and ceiling, and then they are connected to each other.
- The level regulates the verticality of the elements on the shelves and base.
- The final fastening is done with self-tapping screws.
- The crossbars are fixed using a “crab”. A horizontal lintel is installed above the opening.
- After the metal frame is completely secured to the wall, you need to sketch out the placement of the transverse and longitudinal profiles. This diagram will be required if there is a need to place paintings on the wall, an additional shelf, or attach a decorative flowerpot to the ceiling.
- In this case, so-called “umbrellas”, “butterflies” and other similar elements are used for fastening, which are fastened according to this principle: when a screw is screwed in, a plastic dowel spreads its “wings”, which ensures reliable fastening on the back side of the plasterboard sheet.
The video in this article will show you in detail how to cover walls with plasterboard on wooden profiles. If all installation work is carried out correctly, finishing the room with plasterboard sheets will be of good quality.
Graduated from the Faculty of Architecture of the Penza State Institute of Architecture and Construction. For the last ten years, he has been a leading specialist in a large construction company in Penza, engaged in the construction of multi-storey residential buildings. Total work experience in the specialty is 18 years. Consults on design issues, selection of materials for interior and exterior decoration, and technology for finishing work.
Ceiling suspension system Armstrong
For ceilings made of mineral fiber on an invisible suspended structure, you can install strips with an edge: SL2 or K2S2.
If you choose a semi-hidden system, then the best choice is the slabs:
- Mineral fiber;
- Metal;
- Tree with edge vector.
Armstrong ceiling design
The suspension system includes a steel frame that includes locking guides assembled in a square or rectangular shape. The main side of the guide profile has a white coating, which is produced on technological equipment. Lamps that are suspended from the base are built into the suspension system. The important guide rails of the hanging device are equipped with vertical slots along the length at a certain interval to secure the slats. The suspended system can be used to install metal, mineral fiber, fiberglass tiles.
The T-shaped profile is made of android aluminum, the ceiling design using the suspension system is of good quality and is durable in use, as well as corrosion-resistant design. Aluminum wall corner is used for installation in many rooms.
The wall corner is considered a horizon-forming component of the frame, which provides the product with an attractive appearance. Suspensions allow you to adjust the level of the suspended ceiling from the main one, covering damaged areas, they create levels of the ceiling surface.
They can be of the following types:
- Rods with springs;
- Brackets;
- Wire.
One of the most common suspension options are products consisting of rods and a spring bracket with holes.
To install the suspended structure, a standard scheme is used, allowing craftsmen to install the product quickly and accurately. The suspended ceiling will serve for a long period of time and is durable in use.
Euro hangers made of galvanized steel from
offers high-quality Euro hangers for suspended ceilings made of galvanized steel.
Advantages of our Euro-suspensions:
- Euro suspension is universal for various suspension systems;
- The zinc coating of the Eurosuspension guarantees protection against corrosion;
- The Euro-suspension does not require painting, as it is located in the closed part of the suspended ceiling system.
We also manufacture custom suspension rods of the required length (from 125 to 2000 mm).
Technical characteristics of the Euro-suspension for suspended ceilings
| thickness (mm) | 0.45; Ø 3.00 |
| length (mm) | 250-2000 |
| standard size (mm) | size (min-max) 100-350, 400-800, 850-1600 |
| equipment | 25x24 — 0.6, 1.2, 3.6 |
| steel | HDGI; steel OTs 08ps 08kp |
| maximum load (kg/m2) | up to 10 kg |
At the buyer’s request, the order may include not the Euro-suspension assembly, but an adjustable spring single Primet suspension and suspension rods made of galvanized wire with a diameter of 3 mm with a ring or hook in packs of 100 pcs.
Euro-suspension made of galvanized steel for suspended ceilings is designed for a long service life and meets the requirements of Russian and international quality standards.
Technical characteristics of Armstrong ceiling panels with components
The standard size of decorative slabs is 60x60 cm; for high-rise ceilings, for example, in industrial premises or entertainment facilities, Armstrong panels measuring 60x120 cm can be used. Structurally, this ceiling is no different from the previous one, the only thing is that there are fewer transverse strips and more installed wire hangers.
Main characteristics of standard mineral fiber board:
- Thickness - 12-15 mm;
- Moisture resistance – water vapor content in the air up to 70%;
- Thermal conductivity – 0.05562 W/m*oC;
- Sound insulation – up to 54 dB.
For your information! Fiber panels are the cheapest, lightest and most accessible, so half of all Armstrong ceilings are built on vermiculite and mineral fiber.
Disadvantages include extremely low mechanical strength and moisture resistance. As soon as you drop the stove once or fill it with water, the material completely or partially fails.
Calculation of the number of components for Armstrong
Armstrong ceiling weight with components per m2
The thickness of the panels may vary, depending on the material and category of the room. The standard thickness is 12 mm, but can be 8 mm or 22 mm. Accordingly, the mass of the structure also differs. For example, the weight of an Armstrong suspended ceiling per 1 m2, when using PVC or mineral fiber cladding, is 2.75 kg, metal panels are tightened up to 6 kg.
The weight of 1 m2 of Armstrong ceiling with panels in a vintage design, for example, made of mineral glass, can reach 11 kg. Decorative panels always come complete with a supporting profile. The edge of the slab must match the shape of the supporting shelf, otherwise it will be impossible to lay the material on the frame.
Of the most popular models, Stepped, Tegular, Square, the latter is most often used for making Armstrong ceilings yourself due to its simple installation scheme.
