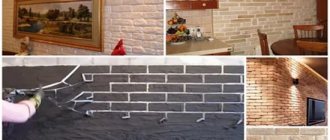
Features of simulating a brick wall with your own hands
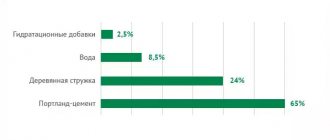
You can make an imitation of a brick wall yourself in so many ways that we don’t even know which one to start with. We will try to describe a variety of techniques and approaches, and readers will choose the appropriate option themselves. In any case, the point is that when applying plaster, a special template made by yourself is used. It is recommended to add strong binders, such as tile adhesive, to typical facing materials. This ensures excellent adhesion of the plaster. In addition, quick-hardening materials should not be used. Let's see how an imitation of a brick wall is performed in practice.
Manufacturers of popular models
If you already have the idea of buying a motor home for your summer cottage, it would be good to find out who produces the models coming to our market. Such products are in demand, which means that the market necessarily contains products created in the USA, Germany, Great Britain, Italy, France and other countries.
The SKIF-2 tent trailer, produced in Belarus, allows you to build an entire palace on the basis of a small rectangular trailer, with enough space for everyone
Various types of mobile housing are also produced in Belarus. The bodies of motorhomes from MAZ-Kupava are made of sandwich panels covered with aluminum sheets. The interior decoration of the home is made from DVPO sheets. The price of Belarusian car dachas varies from 8,000 to 500 dollars.
Template for imitation brickwork
Anything can serve as a template for simulating brickwork. But, in general, these items can be divided into two classes:
In practice, there are also hybrid variations that use one and the other type of template. In this case, the outer frame is made of wood. Imitation of ligating brickwork is done with masking tape stretched inside. Obviously, such a pattern cannot be too large. Otherwise, it will not only be difficult for builders to move it from place to place, but also great difficulties will arise when passing jagged sections of the wall. Builders get out of the situation as follows:
The builder walks around with such a frame and, row by row, process the entire surface of the wall until they get an imitation of a brick wall made of plaster. The advantage of this solution is that it is also possible to work with quickly hardening solutions, like gypsum plaster. During the time that the builder covers a quarter square meter of the wall with the mixture, it will not have time to dry. Due to this, the master has greater flexibility in choosing the material. At the same time, one serious drawback is noticeable. The fact is that when applying the solution over the masking tape, you literally have to tear out the frame from under the plaster. This is fraught with damage to the shape of future bricks. Some may think that the wavy areas of the edges imitate clinker well, but other craftsmen will not like this effect.
That's why we recommend assembling the entire template from thin slats. Its shape will exactly repeat the design already discussed with one exception. The masking tape will also be replaced with wooden slats. In this case, the slightest gaps between the planks can cause some masonry defects. But, as we will see later, this is not so important. The main thing is to securely fasten the planks relative to each other so that the template does not move around.
Finally, by working with only masking tape and no wood strips, the template is created directly on the wall. To do this, an arbitrary area is painted with the desired design. And immediately we see the first advantage of such a solution. Dressing does not have to be regular. We can create both interlocking and longitudinal masonry patterns. Moreover, it becomes possible to imitate rough stones quite accurately. Previous, pre-created templates did not allow you to do anything like this. The imitation of brickwork on the wall turns out to be more natural.
dry waterproofing for bathroom floors
At the same time, masking tape has a couple of significant disadvantages. If the object is large, then pasting the wall will take a lot of time and a large amount of tape will be spent. This is completely unacceptable in professional planned development. But for some amateurs and apartment owners, this method may seem simpler. Because it requires a minimum of preparatory work, the process of applying the mixture itself is not very complicated. The second disadvantage is that the solution should not harden too quickly. Otherwise, it will be simply impossible to tear out the masking tape from under it without damaging the pattern of the brickwork.
The process of applying plaster imitating brickwork
Let's first consider the option with masking tape, as it is the simplest. At the initial moment of time, you need to correctly mark the wall. The easiest way to do this is with a ruler and a building level. It’s also a good idea to get a strip thick enough so that the contour builder can easily be applied to its end. A regular building level with bubbles will do. The process is simplified by the fact that you only need to draw exactly one line with the rail. We will plot all other horizontal lines from the first one up and down using a ruler. Once the process is completed, you can begin simulating ligation of sutures. When laying out the horizontal lines, do not forget to take the trouble to set aside the thickness of the joint in addition to the height of the bricks.
The ligation of the seams is carried out either regularly with one brick overlapping exactly half of the other, or in a random order. Thus, a perfect imitation of a brick wall in the interior is performed. That is, as was written above, the master has greater flexibility to choose the appropriate aesthetic solution. Once the marking of the wall is completed, the process of gluing the tape begins. First of all, horizontal lines are laid out along the entire length. Vertical dressing seams are glued on top. This ensures the creation of a single template from masking tape, which is then very easily torn out from under the applied construction mixture.
The surface is primed before laying the plaster. If waterproofing is required, you must select the appropriate composition at a hardware store. The same applies to the fight against fungus and rodents. Next you need to act according to the instructions for the selected type of plaster. It is strongly recommended to add tile adhesive there to increase viscosity. An even layer of plaster is applied over the template. There is no need to rub this layer or specially level it. The waviness of the surface imitates brickwork even better.
While the mixture has not dried, the tape template must be carefully pulled out. At the same time, the seams remain almost completely clean. Surely many people will want to paint the resulting masonry in some color. A composition made from a range of terracotta or sand-lime bricks is suitable for this. After the wall has dried, you need to use a special tile grout for the seams. The color is chosen according to your own preferences.
Working with a frame template is much more subtle. The process starts from any angle. This is usually the bottom edge. Section by section, the builder goes through the entire wall. The jumpers with masking tape also end up under the plaster layer. In this case, an additional bonus is that you can imitate the natural color of the seams. Here's how it's done. A thin primer layer is applied under the main layer of plaster. A template is applied on top, and then all the work is done in the same way as already indicated above. The tape is carefully removed from under the main plaster, leaving the seams almost empty. But unlike the previous case, after drying these places will have the color of the building mixture. Therefore, all that remains is to paint the ends of the bricks.
wardrobe on a semicircular balcony
The whole problem is not to stain the seams. It is clear that the easiest way is to stick the notorious masking tape there. But this will not be the cheapest option. That is why we consider both of the above methods of making templates to be non-ideal. It would be much better to make a pattern from wooden slats, and below we give reasons why readers can understand all the nuances themselves:
This completes our instructions for simulating brickwork using plaster.
Source
Making a “Brick Wall” stencil with your own hands
This week I saw a wonderful notebook with voluminous decor on the Internet. And I was inspired to try working with a stencil. There were only butterflies and dinosaurs at work, so I had to use my wits! Armed with a new prototyping knife, I decided to create my own template! Perhaps many people make their stencils this way, but maybe my method will be useful to someone.
Materials for work:
— folder for documents;
- a picture with a stencil printed on a printer;
- cutting mat or board;
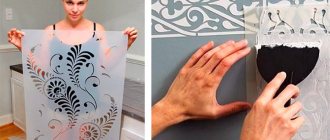
1. First of all, we look for a suitable stencil picture on the Internet (I already have a huge selection). We print on a b/w printer.
2. The document folder must be thick. Cut off the gluing area (mine is at the bottom). We open it like a book.
3. Take some kind of backing (I recommend a piece of plywood or plank for those who don’t have a special mat for cutting). First we put a printout with a stencil, then a page of a plastic folder. Carefully cut through the cells with a knife. I don’t like to repeat the design exactly, and therefore I deliberately change the shape of the cells or the distance between them.
4. Using scissors, we cut out our new stencil, leaving margins for further convenience.
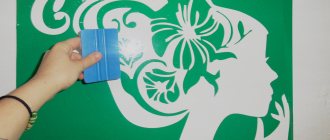
5. Now we need to try it out! I took a frame blank, applied stencils and applied paste using cardboard.
6. After drying, a good clear relief was obtained! I was pleased with the result, which means the experiment was a success!
Creative mood and excellent results to everyone!
Source
What are stencils for plaster and why are they needed?
The stencil is used to decorate walls with plaster on any surface. The decoration turns out to be original, sophisticated, and the room is transformed into a comfortable place with an unusual style.
A stencil is an artificial masonry that creates a decorative pattern that protrudes above the main surface. Drawings can be different, with single or repeating elements. The template can be made with your own hands or purchased in a store. It is permissible to decorate the walls in different styles.
DIY stencil templates for decorative plaster have the following advantages:
To obtain a three-dimensional image, use a thick plaster mixture. Raised decorative patterns can be painted on a vertical, horizontal or sloping surface.
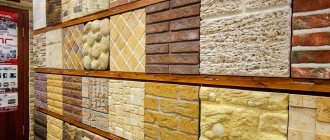
Properties of gypsum tiles
Gypsum tiles have positive properties:
- The tiles are made from gypsum, which is a relatively cheap material.
- Gypsum is non-toxic and does not affect human and animal health.
- When making tiles with your own hands, you save money.
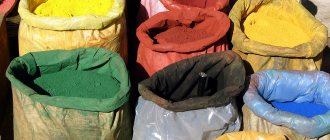
- When you make your own gypsum tiles, you can paint them yourself in the desired color, as well as give them the desired shape.
- Tiles can be made at home in various sizes, widths and thicknesses. It all depends on the future location.
- When making tiles at home, a polymer is added to its composition, which serves as a water-repellent ingredient. This is an important factor when there is high humidity in the house, for example, tiles on plasterboard in the bathroom or on a balcony finished with plasterboard. Gypsum tiles can be made at home
What to make a stencil for plaster from
Impressions on slightly dried plaster can be made using a special shaped roller. Thanks to the templates, three-dimensional pictures, protruding patterns, and unique layers are drawn on the walls.
external finishing of the balcony with corrugated sheets
A stencil for plaster can be made from paper, plastic or silicone.
The paper version is printed on a printer or drawn by hand, cut out according to ready-made patterns. Such templates are attached to the walls with tape and plaster is applied. They have a minimal cost, but are disposable.
Plastic stencils can be cut from bottles or other packaging. The selected picture is transferred to plastic and cut out with a stationery knife. Such templates are attached to the walls with special glue.
The simplest and most reliable stencil is the silicone version. The picture is poured onto a sheet of paper with silicone glue. After complete drying, the paper is removed, and the resulting reusable product is used to decorate the walls.
A mold for gypsum plaster will allow you to decorate in a short time
Surface preparation
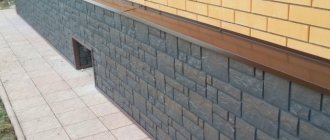
The preparatory stage before finishing the walls with stone is an important process. Bricks must be laid level, using certain tools and devices, for example, a plumb line and a level. Laying of material on the wall is carried out only in a horizontal plane; it is extremely rare that bricks are laid vertically. The seams between the bricks are made identical so that the size is the same width everywhere. The brick wall itself should not be skewed, in other words, perfectly flat. This is where difficulties often arise.
First you need to level the walls in order to lay artificial brick on them. To do this, the old coating is removed from the walls. If the walls are concrete, made of old brick with a large number of defects, as well as other building materials, then plastering work is carried out. But plastering is not always convenient to use; some people simply cannot make a brick wall smooth.
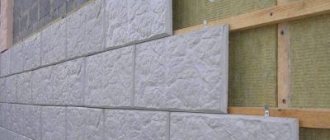
To speed up the preparation of walls for artificial brick, it is recommended to use a simpler preparation method - installing plasterboard or plywood. You can attach a plasterboard sheet with glue to any wall or to a frame. With the help of gypsum plasterboard, the alignment of the walls will be quick, and the plane will be ideal for laying bricks. When the artificial brick wall is ready, you can proceed to the actual design of the apartment or country house.
How to make a stencil for decorative plaster with your own hands
You can make a transparent template yourself from a regular plastic A4 paper folder. The manufacturing instructions are as follows:
A drawing that is too large is divided into several parts. A separate template is made for each element. All the resulting fragments are carefully connected to each other on the wall.
A stencil that is too large is also cut out on a roll of thin insulation.
Reusable plastic stencils for decorative brick plaster
Brick stencils for textured plaster are cut out on thin plastic or linoleum.
The template should have brick dimensions of 25x6.5 cm
Creating imitation brickwork:
The seams can also be slightly tinted with a lighter or darker color than the shade of the simulated bricks.
Silicone stencils for volumetric decorative plaster
The silicone form is made from nitric acid, which is added to the nitrogen chips so that it quickly dissolves. The finished mixture is added to the catalyst. The solution has a rubber-like consistency.
The silicone stencil has a plastic shape, is resistant to mechanical stress, moisture and is completely safe
The silicone mold is made as follows:
Paper stencils for decorative plaster
Thick cardboard or thin plastic is used as a base for the stencil. The selected design is applied to it with a pencil. The pattern is cut out using a knife along the drawn lines. It is important not to damage the internal jumpers.
Paper options for applying decorative patterns are the easiest to use; they are glued to the walls and applied with plaster.
Tulle stencil for decorative plaster
To make a stencil that looks like crocodile skin for decorative plaster, you need to prepare acrylic putty, quartz primer, dyes, several meters of tulle or suitable fabric.
Steps for creating patterns on walls using tulle stencils:
The patterns on the wall are fixed with acrylic varnish, slightly diluted with mother-of-pearl enamel
What kind of glue is needed
The quality of installation of decorative masonry also depends on the type of glue. Each type has its own characteristics and rules of use. Let's consider several options:
- Knauf Perlfix is designed for installing gypsum tiles on a plasterboard base. Not recommended for use on iron, plastic or wood.
- Bustilate can be used when gluing bricks to different surfaces. There is no need to dilute or prepare it; it is sold ready-to-use.
- Mastic is used to apply plaster to concrete, plasterboard, or brick surfaces.
- CMC or wallpaper glue can also be used. But before gluing, you should add a little alabaster to it.
- Litokol X11. This is a cement-based tile adhesive reinforced with cellulose. Sold in bags of 5 and 25 kg. It is used more often in finishing large areas.
- Gypsumite is a mounting adhesive for drywall. Suitable for gypsum bricks. It hardens well and quickly.
- Lithoelastic. It has a polyurethane-epoxy base. Can be used when gluing gypsum bricks to a concrete or brick wall, it is resistant to temperature changes, and dries quickly.
Recommendations and common mistakes
When decorating a room, it is important to avoid mistakes, so you need to familiarize yourself with some tips. Recommendations for using stencils for decorative plaster:
The layout is usually a printed picture, which is transferred to the material for making stencils
In order for the image on the wall to be of high quality, it is important to observe the following points:
If you follow the tips listed above, you will be able to avoid mistakes when decorating walls.
Photos of stencils for decorative plaster will help with choosing a design: