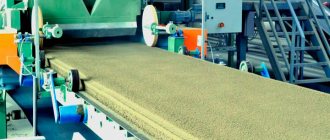
Cement-bonded particle boards (CSP) are in all respects an advantageous material for cladding the foundation of a house. They are inexpensive and allow you to give the base an aesthetically attractive look in a short time.
DSP can be confidently considered a universal finishing material that has not lost its relevance for several decades. Among its advantages are versatility, environmental friendliness, and a fairly wide range of standard sizes and textures.
DSP facade slab
Criteria for choosing cement bonded particle boards
In order to avoid mistakes when choosing DSP, it is recommended that you familiarize yourself with information about the characteristics of these materials. Before purchasing, you must carefully study the product passport and check whether it meets the requirements of GOST. According to them, the composition of each cement-bonded particle board should be as follows:
- wood shavings should make up no more than 24% of the total weight of the product;
- the composition must contain special impurities in a volume of 2.5%: aluminum sulfate and liquid glass;
- the ratio of water and cement is 65% and 8.5%, respectively.
Composition of the DSP
All this data must be present in the passport, which must be accompanied by a certificate. Another important point when choosing a DSP is information about the manufacturer. Before purchasing a product, it is advisable to call the store and find out which factories it offers. Then find information about each manufacturer and, based on it, form your opinion about their products.
Certificate of conformity of the Russian Federation
European certificate of conformity for CBPB
Which paint to choose?
We already said a little higher that the facade finished with DSP does not need additional protection. This is explained by the fact that its surface has good resistance to various atmospheric conditions. But there is also an aesthetic aspect, which is abhorrent by the nondescript gray color of the finished design.
Experts believe that it is best to use the following materials for painting DSP:
- Acrylic paints. This is perhaps the best option for painting such a surface. Good adhesion allows them to interact well with cement surfaces. It is advisable to take products based on a solvent. The fact is that water-based paint tends to have poor penetration into the structure of the product, which does not allow it to stay on the surface for a long time.
- Latex paints. These paints are alkaline resistant. After 100% drying, they form an elastic film with high strength. The moisture protection parameters coupled with vapor permeability are at a high level. This coating can be washed without fear of damaging it.
- Silicate paints. This product has a very high degree of adhesion, which allows the coating to reach deep layers of the material. At the proper height and level of vapor permeability and resistance to any atmospheric conditions.
It must be said that alkyd compounds cannot be used for painting DSP. The fact is that they do not interact well with alkali. As a result, a large number of small cracks may form on the coating, or it may completely peel off after a short period of time.
To summarize all of the above, we can summarize that cladding a facade using DSP panels is a completely simple process. If all the rules are followed and technological features are taken into account, the coating will delight the eye for many years and protect the house from external influences.
Standard sizes, characteristics and properties of DSP
State standardization took into account the slightest nuances of the production and use of particleboard panels. GOST even regulates the degree of surface roughness of the CBPB. According to its requirements, the product must meet the following parameters:
- roughness no more than 80 microns;
- humidity not more than 1300 kg/m3;
- tensile strength within 0.4 MPa;
- bending strength depends on the thickness of the panel and ranges from 9-12 MPa.
Thickness of CBPB boards
All manufacturers of CBPB offer slabs of standard sizes: 320x125 cm and 270x125 cm. However, the thickness of the products can be different: from 1 to 4 cm. Deviations in the length and width of the panels are allowed, but the total error should not exceed 3 mm.
One of the most important characteristics of cement bonded particle boards is weight. It plays a special role during installation. The weight depends on the thickness and size of the slab, so when choosing a DSP, it is recommended to rely on the table.
| Product size (length, width cm) | Panel thickness (mm) | Panel weight (kg) | Panel area (m2) |
| 270x125 | 8 | 36,5 | 3,375 |
| 270x125 | 10 | 45,5 | 3,375 |
| 270x125 | 12 | 54,7 | 3,375 |
| 270x125 | 16 | 72,1 | 3,375 |
| 270x125 | 20 | 91,1 | 3,375 |
| 270x125 | 24 | 109,3 | 3,375 |
| 270x125 | 36 | 164 | 3,375 |
| 320x125 | 8 | 43 | 4,0 |
| 320x125 | 10 | 54 | 4,0 |
| 320x125 | 12 | 64,8 | 4,0 |
| 320x125 | 16 | 85,6 | 4,0 |
| 320x125 | 20 | 108 | 4,0 |
| 320x125 | 24 | 128 | 4,0 |
| 320x125 | 36 | 194,7 | 4,0 |
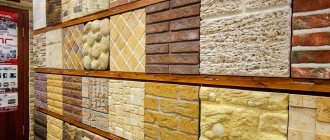
Types of DSP
Cement-bonded particle boards come in several types:
- with a smooth rough surface:
- with milled surface;
- with painted surface;
- with cork coating;
- with stone chips.
Sheet DSP
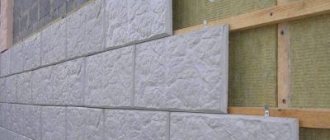
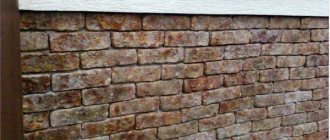
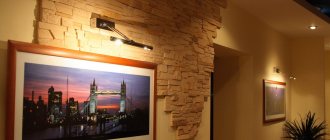
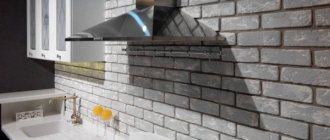
Products with a milled surface deserve special attention. This processing method ensures the aesthetic appeal of the panel by giving it a certain texture. Cement particle boards with brick and stone cladding are very popular. They are able to provide the facade and foundation of the building with a presentable appearance. In addition to this advantage, milled (like all other types of DSP) panels have excellent heat and sound insulation characteristics.
DSP milled and painted
An ordinary cement-bonded particle board of an unattractive gray color. Manufacturers are trying to correct this deficiency by all means. To give the product a spectacular look, they use priming and painting. Both of these methods of surface treatment of DSP provide the product with additional protection from moisture. Therefore, a painted slab is not only more visually attractive, but also more durable. Many manufacturers apply a double layer of paint, which makes the cladding more durable.
In recent years, cement-bonded particle boards with cork coating have become increasingly popular. This environmentally friendly material provides high-quality protection from the effects of electromagnetic radiation, therefore it is relevant for use in geopathogenic zones. The cork coating forms an impressive textured surface on the cement bonded particle board, which can mask the joints between the panels during installation.
Cement bonded particle boards with cork coating
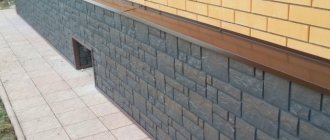
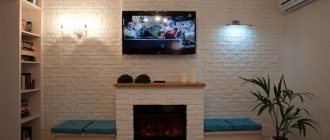
To finish the foundation of a house, panels with a milled surface, painted, finished with stone chips or cork coating are most often chosen.
Decorative DSP board “Brick” yellow
Decorative board DSP "Brick" gray color
Decorative board DSP "Brick" red
Standard gray slabs are not used in building cladding. These products are used in the construction of partitions, rough cladding of floors and walls, and the manufacture of sandwich panels.
Slabs with natural stone chips
Cement-bonded particle boards with decorative stone chips, white birch color
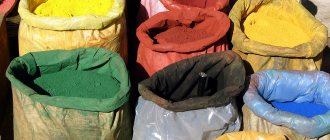
Types of colors of CBPB boards
Facade decoration
Prices for cement bonded particle boards
Cement bonded particle boards
Advantages
Thanks to these and many other advantages, the DSP facade panel is one of the most popular options in the interior design of buildings.
The DSP facade board has significant positive properties:
- environmental friendliness, non-toxic;
- due to the increased cement content, the material does not smoke or catch fire;
- are not susceptible to the negative effects of fungi and insects even during high and prolonged climatic humidity;
- increased moisture resistance: even if the slab is in water for 24 hours, it will swell by less than two percent of its original size. Therefore, façade DSP panels are often used on the base of a building;
- able to withstand more than one hundred freezing cycles without loss of quality;
- durable, does not chip, shock-resistant;
- endowed with excellent sound insulation.
Painting CBPB is also not difficult - the created coating does not require labor-intensive finishing work - any paint used for external work together with preparatory priming is suitable for this.
The DSP façade is easy to install and easy to process. Due to the fact that natural stone chips can be applied to the top layer, this makes the material for exterior finishing quite beautiful and modern. Many people are interested in how to cut CBPB? DSP panels are easy to cut, drill, grind and mill. It is necessary to take into account that the composition of the CBPB board contains cement, so the tool used to process the slab will quickly become dull. In this regard, to process such slabs it is necessary to use special tools for cement-based particle board material.
Thus, DSP for external work in the form of finishing buildings can be used in all climatic conditions, since such boards are characterized by excellent frost resistance.
You might be interested in reading an article about other types of facade slabs.
Preparation of cement bonded particle boards for installation
In order to properly prepare a cement-bonded particle board for installation, you need to familiarize yourself with the features of this material. DSP consists of cement and wood fibers, and therefore has relatively low impact resistance. Installation rules require careful handling of these slabs.
DSP is easy to saw. It is easy to drill holes of the required diameter and depth, including through holes. This is the work that will need to be done when preparing the panel for facing the foundation.
The need to drill holes is due to the fact that the DSP will need to be attached to the racks of the sheathing pre-installed on the base. In order to simplify this task, experts recommend drilling the required number of holes in advance.
DSP: drilling surfaces
This work is guided by the following rules:
- to fix the panel, use screws or self-tapping screws with a countersunk head;
- the optimal diameter of fasteners is 3-6 mm;
- the cross-section of the hole in the slab must correspond to 1.2 times the diameter of the screw used;
- fasteners should be located at a distance of 2 cm from the edge of the panel;
- the optimal pitch between screws is 20 cm, but this figure can be adjusted depending on the lathing scheme;
- the pitch between screws should not exceed 40 cm.
Step between screws
If it is not possible to pre-drill holes in the chipboard, during the installation process, exclusively self-tapping screws with a strong and thin point are used to fasten the panels. The head of these fasteners must be equipped with special blades designed to form recesses and allow it to be hidden.
How to fasten the DSP
To fix chipboards to metal or wooden sheathing posts, you cannot use self-tapping screws designed for working with plasterboard and gypsum fiber board. To drill holes in the DSP, use drills for working with metal or with a pobedite-coated tip.
At the stage of preparing panels for installation, they may need to be cut. For sawing, you can use a circular saw or grinder. A diamond-coated segment disk is installed on the tool.
Prices for popular models of circular saws
Circular saws
DSP: cutting material
DSP: grinding the boards
Before you start sawing, you need to take into account that during this task a large amount of cement dust will be generated. Therefore, when working indoors, it is recommended to use a dust collection device.
Joining seams
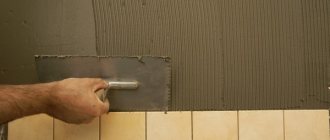
Grouting , as a rule, begins after 24 hours, when the stone is firmly glued to the surface. Tile grout will not work here - it is recommended to use only special solutions that are recommended by the manufacturer of the facing material. These grouts have different colors, which allows you to create the most elegant wall design.
When opening seams, it is better to use a regular plastic bag to fill them with mortar. The same technique is used that pastry chefs use when making rosettes on cakes. Try not to let the grout get on the face of the tile.
Remove accidental stains with a broom or dry brush only after the grout has dried. Never use a metal or wet brush for these purposes.
After the solution has set and there are no fingerprints left on it, smooth out the seams with a special narrow tool (jointer) or a wooden spatula. Setting time depends on climatic conditions and wall surface. Correct and even seams will give the masonry the most flawless appearance.
In the evening, when the mastic has already dried sufficiently, you need to remove excess mastic from the surface of the masonry with a brush or broom and clean the surface of the tile.
Safety precautions
Precautions when laying tiles or stone : Wear safety glasses when cutting tiles; do not use a metal or wet brush when cleaning the tiles from mastic residues - this will cause stains that will later be very difficult to get rid of; Never use acid or oxygen-containing products to clean tiles.
It would also be a good idea to wear protective overalls and, of course, gloves.
Construction of a frame (sheathing) for the installation of DSP
Cement particle boards are mounted on a solid base: a wooden or metal frame. To construct it you will need the following materials and tools:
- galvanized metal profiles designed for working with plasterboard, or wooden blocks with a cross section of 40/40-50/50 mm;
- metal perforated hangers;
- self-tapping screws with anti-corrosion coating;
- drill or hammer drill;
- screwdriver;
- roulette;
- marker.
Sequence of work when installing sheathing
Surface preparation
Step 1. Draw up a diagram of the frame, focusing on the dimensions of the cement bonded particle board: the panels must be installed intact, without preliminary trimming. Based on this rule, the optimal pitch between the sheathing posts is found (but the distance between the supports should not be more than 60 cm).
Lathing scheme
It is more difficult to “extend” (build up) a wooden beam, so the length of the post beam should be equal to the height of the house
Prices for various types of timber
timber
The wood for sheathing must be thoroughly dried and treated with an antiseptic.
Metal sheathing for siding
Step 2. Appropriate marks are applied to the foundation wall with a marker.
Step 3. If installation of hangers is required, mark the points of their attachment to the foundation. If the base is flat and does not need insulation, wooden or metal sheathing posts are attached not to hangers, but directly to the wall.
Rules for installing metal lathing
Marking and fastening bars
The CD profile is attached to the wall using an ES bracket
Step 4. If wooden blocks are used in the construction of the frame, they are pre-coated with a composition that protects the wood from the formation of rot, fungus and mold.
Installation of wooden sheathing
Joining metal sheathing at the corner of a building
Installation of sheathing around the window
Technology of facing the foundation with DSP panels
The finishing of the base with cement-bonded particle boards is carried out using ventilated façade technology. When installing the sheathing, it is extremely important to prevent the racks from deviating from the vertical. If this requirement is not met, the distortion of the frame will lead to bending and subsequent destruction of the particleboard panels when they are attached to the sheathing posts.
All frame supports must be located in the same plane. In order to fulfill this condition, first of all, corner posts are installed, between which the lace is pulled. It will serve as a guide for the correct installation of intermediate supports of the sheathing.
Frame for basement siding
If insulation of the foundation is provided, thermal insulation material (mineral wool blocks or foam sheets) is placed in the space between the frame posts. Any of these insulation materials are attached to the base wall with dowels with wide caps (umbrellas).
Prices for thermal insulation materials
Thermal insulation materials
The ventilated facade technology provides for a gap between the heat insulator and the facing panels. In the case of cement-bonded particle boards, a gap of 0.8-10 mm wide will be sufficient. Therefore, when installing insulation, it is pressed against the foundation wall so as to ensure the required gap.
If the sheathing consists of wooden blocks, before attaching the DSP to them, waterproof the supports. For this purpose, each block in the places of fixation with the panel is wrapped in roofing glassine with bitumen impregnation and the edges of this waterproofing sheet are fastened with a construction stapler.
The DSPs are installed on the sheathing not close to each other, but at a distance of 4-5 mm. First of all, whole panels are mounted, secondly - cut side panels. The screw caps, recessed in the slabs, are covered with gypsum putty, to which a little PVA glue is added. After this composition has dried, the areas where the putty was applied are sanded using fine-grained sandpaper. At the final stage of installation, dust is removed from the cement-bonded particle boards with a damp rag.
False base design diagram
Possible edge and seam designs
Fastening the DSP with self-tapping screws
Decorative seam strips with stone chips
Mounted plinth slabs
Completed finishing of a house with a DSP slab with stone chips
Prices for popular models of electric drills
Electric drill