Facing tiles for exterior use will ensure the attractiveness of the building and protect the walls from aggressive environmental conditions.
Facade tiles can imitate various natural and artificial materials.
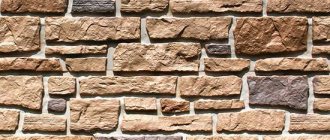
Brick-like tiles are an indispensable material if there is a need to design a facade to look like brickwork.
The tiles will cost much less than natural brickwork, and the design of this type of cladding will give the building a decorative and attractive appearance.
Types of brick-like facade tiles
Brick facing slab is equally suitable for old buildings, as well as for new, newly built buildings. Facade tiles are designed to create a ventilated cladding, which ensures air circulation between the cladding and the wall.
This method of fastening ensures the creation of a normal microclimate in the room . Some types of brick tiles are attached using an adhesive solution.
IMPORTANT!
The variety of brick-like facade slabs is determined not only by a wide range of color solutions, but also by the classification of this type of cladding according to the material of manufacture. In addition, collections of different types of tile products can be of different sizes, shapes, and textures.
There are several types of brick-like facing tiles.
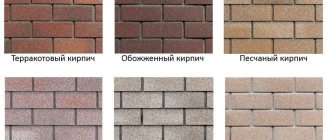
Ceramic
One of the most popular types of slabs for facade finishing. The material contains clay, mineral components and sand. The slabs are formed, then processed through firing and undergoing glazing stages. The surface can have a matte texture, glossy, embossed or smooth .
Ceramic tiles require leveling the surface of the walls - this is one of the disadvantages of cladding. In addition, accumulated dust in the reliefs of the facing surface and in the joints between tiles is quite difficult to remove.
Clinker
This type of brick slab is prepared by long-term firing of clay elements. Under high temperature, the material literally melts, due to which the material is endowed with characteristic qualities:
This type of cladding is suitable for installation in places with any climate. Clinker cladding is not difficult to install; it is quite easy to install. It resembles natural brick, but is quite thin (up to 1.5 cm).
The disadvantage of this type of cladding is the fragility of the material during installation and transportation work. In addition, this type of cladding is quite expensive.
Porcelain tiles
The basis of this artificial material is mineral components: clay, sand, feldspar. The facing material has the following characteristics: strength, frost resistance, durability.
The disadvantages of porcelain stoneware are significant weight and high cost.
Pressed concrete
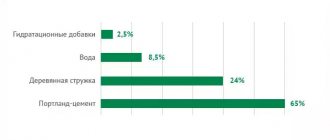
Concrete brick slabs are produced by pressing concrete mixtures with additives: sand, mineral powder, cement, plasticizers. The mixtures are placed in molds and compacted by vibration . This ensures the strength of the material. Concrete slabs can be matte, glossy, or porous.
Concrete coatings are strong, impact-resistant, fairly light and durable. However, this type of cladding slab is not recommended for use in cold climatic regions due to its inability to adapt to temperature changes.
Plaster
Brick-like gypsum tiles are fragile, although they do not differ in appearance from similar materials. Most often, this type is intended for adhesive fastening. But in most cases, gypsum tiles are used for indoor installation. Gypsum facades are ineffective due to insufficient strength.
Facade tiles also differ in the following types:
- basement;
- under brick;
- basement
A good alternative to natural material
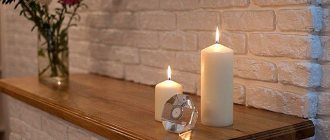
For a long time, brick has been a classic facing material, whose popularity is due to its attractive appearance and excellent strength characteristics. The only drawback of brick is its high price, but there is a more budget-friendly option - decorative brick-like facade tiles. There are several types of tiles, for example, clinker and ceramic, but the greatest demand is for gypsum brick-like tiles for exterior decoration, the price of which in the DecorBrisk company will please even the most economical buyer. Gypsum facade tiles look attractive and accurately imitate the texture of natural brick, while being much cheaper. The undoubted advantage of gypsum is also that it is highly resistant to temperature fluctuations and weather conditions, thanks to which it will serve you for many years without losing its functionality. Gypsum decorative brick-like facade tiles are not exposed to sunlight, so their color will not lose its intensity over time.
DecorBrisk company offers gypsum tiles in various colors, sizes and shapes for indoor and outdoor use. Our tiles will be a good solution for finishing not only walls, but also fireplaces or columns - thanks to which you can easily highlight individual structural elements inside your home. The range of tiles is complemented by corner elements that will help to aesthetically trim the edges of the walls. Brick-like facade tiles not only look great, but also withstand various atmospheric factors and temperature fluctuations. That is why it is a worthy choice for finishing the facade of a house, preserving the aesthetic component for a long time. The material is not too burdensome to clean, so caring for it will not take much time.
Differences from other types of facade tiles
Slabs for decorating the façade of a house can be made not only in the brickwork version. There are other types of facade slabs, but brickwork is universal: there are enough color options to realize any design idea .
If a brick is damaged, it can be replaced with a new one. In terms of performance characteristics, “brick” tiles are not inferior to natural bricks.
The range of color solutions for tiled brickwork is quite wide, which allows you to choose the material to suit the desired design.
Advantages and disadvantages
The main advantage of tiles for external use with imitation brick is the durability of the coating.
In addition, all types of facade cladding slabs have the following positive characteristics:
- hydrophobicity;
- resistance to external factors;
- color stability;
- sound absorption;
- low thermal conductivity;
- durability.
Almost all types are frost-resistant. In addition, the material is resistant to abrasion and aggressive environments. The decorative effect of covering with brick tiles is fully ensured and the design of the building promises to be unique.
The disadvantages of facade tiles imitating brickwork are the weight of some types of structures, as well as the price: compared to similar facade materials, tiles are an expensive type of cladding . In addition, if dropped during installation or transportation, the tiles may crack or break.
Advantages and disadvantages
Clinker facade tiles are used for cladding buildings due to their advantages. The finishing is done in the form of small tiles, for laying which a special adhesive composition is used. Different types of clay are used to produce clinker, so the series has different color shades. The use of synthetic dyes makes the color rich and bright. The tile is characterized by:
- Durability;
- Hydrophobicity;
- Color stability;
- Noise absorption;
- Low thermal conductivity.
The outer side of the tile is coated with a special compound, so it is resistant to abrasion. The finish fully withstands aggressive influences.
Clinker tiles have a high cost compared to other finishes, which is its disadvantage. A tile cracks or splits when dropped onto a hard surface from a height.
Specifications
Brick imitation facade tiles can be presented in two versions:
- in the form of a slab with laid out rows;
- in the form of separate elements (bricks).
The thickness of the tiles differs depending on the material of manufacture.:
- concrete - 24 cm;
- clinker and ceramic - from 0.8 cm to 1.4 cm.
The length of the individual elements is 25 cm, like standard natural brick.
Width may vary:
- 6.5 cm - single brick;
- 7 cm - one and a half;
- 12 cm - double.
Some manufacturers produce artificial bricks in non-standard sizes, for example, 24 x 8.8 cm or 24 x 5.2 cm.
The weight of one brick varies from 360 g and above. Weight directly depends on the composition of the material .
Row panels can be 95 cm long and 65 cm wide.
Features of facing the facade of a country house with concrete tiles
Before we talk about the nuances of installing facade tiles, we will give as an example the work of a portal user with the nickname Anton Tarasov.
Was
It became
Anton Tarasov User FORUMHOUSE
The original object is a house made of sand-lime brick. The second floor is made of cinder blocks, and the blocks are slightly recessed inward, about 15 mm. The masonry leaves much to be desired, and the foundation has floated a little. It is necessary to insulate and improve the structure in a relatively economical way.
The facade area is slightly less than 130 square meters. m.
The first stage of work is virtual. Before you go and order tiles, you need to familiarize yourself with the offered range and understand how the selected sample will look on the facade. To do this, draw a design and select the desired texture and color of the tile.
It should be taken into account that a lot depends on the design of the house. A tile that looks great on the walls of a neighbor’s house may not work well on the façade of your home. Therefore, we are not lazy and carefully choose what we need.
It is advisable, if possible, to go and see the tiles “live” and hold them in your hands: what is on the Internet in pictures is not always true. Despite the coloring (with special pigments) of the tiles in the mass, as well as the desire of the manufacturer to give it maximum resemblance to natural brick, clinker or stone, the imitation remains an imitation. Often, you can tell that the façade is not a natural product by the too large seams between the “bricks”, less often by the discrepancy in the color of the panels, and even if barely noticeable, but still present gaps between the panels.
Among the advantages of concrete tiles, we highlight:
- Possibility of year-round installation, because there are no “wet processes”;
- high speed of work;
- possibility of fastening (due to the relatively small weight and versatility) on walls of any type - frame, foam and aerated concrete, brick, etc.;
- tile resistance to negative atmospheric conditions;
- ease of care;
- durability;
- the possibility of additional decoration of the “masonry” with colored grouts;
- a large number of options for textures and colors of tiles.
The main thing is to understand whether this material is “yours” or “not yours.”
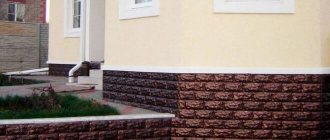
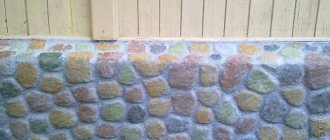
Usually the base is finished “to look like stone”, and the walls - “to look like brick”. If you approach the matter in detail, the end result is an attractive solution, and the facade of the house and the building as a whole become much more beautiful.
Anton Tarasov
For the walls we chose “brick” in light brown tones, finishing the base with brown “slate”, and framing the windows with chipped “stone”.
All work is divided into a number of successive stages. The first external insulation (if required) of the walls. The house, which was being decorated by Anton Tarasov, needed additional insulation. For this, we chose an economical option - stone wool 5 cm thick.
The insulation, 0.6 m wide, was mounted in a horizontal position, sideways, between padded wooden blocks “50s”.
The pitch of the bars is approximately 58.5 cm.
For walls, provided that insulation is installed in the sheathing, it is enough to choose thermal insulation - stone wool, with a density of 35-45 kg / cubic meter. m, although manufacturers advise using stone wool with a density of at least 50 kg/cubic. m.
The wood for the sheathing was chosen for reasons of economy.
Anton Tarasov
I was asked on the portal whether this density of insulation is sufficient and whether it will settle over time. I don’t think so, because... the slab is pressed with sheathing bars. In addition, on one side there is a wall of the house, and on the outside the insulation is covered with a steam-windproof (super-diffusion) membrane and pressed with a vertical sheathing. Where will he go?
The greater the density of the insulation, the higher its thermal conductivity, and the “colder” the walls.
Looking ahead, let's say that to attach the façade tiles, a 15x2.5 cm board was used, placed on a sheathing block every 35 cm, or 48 cm along the axes.
Important nuance : the installation step of the sheathing depends on the model of the selected tile. The fasteners and subsystem for installing the suspended ventilated facade, to which the tiles belong, are selected depending on the wall material and the expected load. For reference: the approximate weight of the panel is 40 kg/sq.m. m. Tile thickness: “brick” - 2 cm, “slate” - 3 cm, corners - 3 cm, windows - 1.7 cm.
Panel dimensions: “brick” - 60.4x15.5x2 cm, “stone” - 58.5x24x2.4 cm.
Our article talks about all the features of facing brick walls in a stone and timber house, the choice of flexible connections, and why a ventilation gap is needed.
The ordered tiles arrived at the same time as work began. All boxes were well packed and there was virtually no damage.
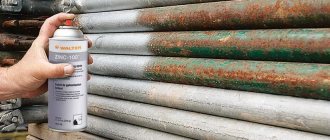
When using wooden sheathing, we remember the need for mandatory antiseptic treatment to protect the subsystem from biological damage. Because the work was carried out at sub-zero temperatures, the user used a special composition that allows use down to -30 °C.
Having stuffed the sheathing bars, they installed the insulation boards in a hurry.
Protected the stone wool with a superdiffusion membrane.
This material allows water vapor coming from the room to escape and ventilate in the ventilation gap, but at the same time does not allow wind and atmospheric moisture to penetrate the insulation.
Note: in this embodiment, the gap between the tile and the film can be called ventilated only conditionally, because From below, the ventilation duct is blocked by a plinth. In addition, on average, for normal ventilation and draft in the ventilation duct, a distance (between the film and the inside of the curtain wall) must be maintained at about 4 cm.
Anton Tarasov
In our version, water vapor easily escapes into the gap, and then evaporates through the micro-cracks between the tiles. This scheme has been verified to work.
The next stage is the filling of the vertical sheathing (subsystem) for the installation of facade tiles.
Before filling the sheathing, we check whether there are any significant vertical deviations of the walls. If there are, then you need to level them by stuffing the sheathing through small pads (if necessary) so that the boards are positioned strictly vertically and avoid collapsing the façade plane.
Deviation from the vertical can be checked with a regular plumb line.
The plinth was mounted on a horizontal wooden frame (the option with a galvanized metal profile is more expensive).
Next, the user began to “lay” the panels.
According to Anton Tarasov, installing the tiles did not pose any difficulties.
The panels are attached to the sheathing using mounting plates embedded in the “body” of the tile during its manufacture using galvanized self-tapping screws with a press washer.
The thickness of the plate is approximately 0.3 mm, width is 1.8 cm.
A plate of such thickness can easily be pierced by the tip of a self-tapping screw, which is driven into the sheathing with a screwdriver.
Having finished one wall, we moved on to the next.
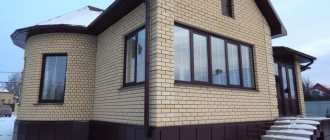
It is already clear that the house has been dramatically transformed, it has a “face”.
To decorate the corners of the house, corner elements were used, which are produced for each type of tile. The corner elements are attached to the additional sheathing in the same way as the tiles, using plates and screws.
Complex components require special attention - places for mounting satellite antennas, video surveillance systems, window elements.
Anton Tarasov
An additional sheathing, a 10x2.5 cm board, was placed under the platbands; along the perimeter of the window, the tiles were fastened with an outlet of 10-15 mm. The “brick” was installed after the windows.
An additional sheathing was installed under the antenna, the tiles were drilled, and the bracket was attached to the wood grouse. During installation, an invaluable universal assistant is a clamp.
The final look of a tiled house.
Main manufacturers of brick tiles
Many competitive manufacturers present their products on construction markets around the world. These are companies from Austria, Belgium, Holland, German tiles are widely used. Russian manufacturers also produce high-quality facade materials.
Leading manufacturers of facing tiles for exterior use:
- Feldhaus (Germany);
- Roben (Germany);
- Heylen Bricks Stroeher (Belgium);
- King Klinker (Poland).
Well-known global manufacturers have their factories in Russia.
Fast delivery in Moscow and the Moscow region
Since the DecorBrisk company is a manufacturer of facing tiles for brick facades, you will not have to overpay to resellers. In addition to high quality products, we offer competitive prices and the ability to order any volume of material, starting from one square meter. The price per m2 of brick-like facade tiles will not damage your budget and will appeal to even the most economical buyer. We will quickly deliver brick-like facing tiles for exterior finishing to any Moscow address and even outside the Moscow Ring Road (check with the manager for delivery conditions to Moscow Region). Same day delivery possible.
- Plinth tiles
Surface preparation
Installation of tiles under brick can be carried out in two ways: using glue and by attaching them to the sheathing.
When using glue, the surface must be cleaned and the wall leveled using plaster. The plaster is applied in a thick layer, and then the reinforced mesh is embedded in it and leveled with a spatula .
NOTE!
The wall underneath the tiles must be fairly level, without protrusions or slopes, so that the tiles adhere evenly and firmly.
The adhesive must be selected with high frost resistance so that the tiles do not fall off in winter.
If the installation is carried out on a sheathing, then there is no need to particularly level the wall, the main thing is that the surface of the sheathing is perfectly flat. The wall should be cleared of debris, bumps should be knocked down and covered with a primer solution for reliability .
Tile installation
The choice of installation option depends on the material: each type of plate requires fastening either with glue or with a frame.
brick tiles :
- the adhesive composition is mixed well according to the instructions;
- first apply glue to the corner and attach the corner elements;
- it is necessary to apply glue to the wall and glue the brick, starting from the bottom row in the left corner;
- To level the row, wedges or special crosses are used.
The thickness of the glue must be at least 0.5 cm. The seams between the elements are sealed with the same adhesive solution.
It takes at least a month for the glue to dry completely, so the time of work should be chosen accordingly.
Ideally, the installation of slabs with glue will be carried out during the warm period.
Step-by-step installation instructions
The technology for installing clinker is similar to the layout of ceramic tiles. It is recommended to lay the material in such a way that the spacing between the tiles is the same width as the spacing between the bricks.
Surface preparation
Before carrying out the main work, the surface is prepared. This procedure is necessary when installing tiles with glue or lathing. If the first method is used, then the surface of the walls is inspected. All irregularities and cracks are sealed with plaster, which is applied in a thick layer. While the solution on the surface has not hardened, a reinforcing mesh is embedded in it. At the final stage, the surface is leveled with a spatula or rule. To ensure strong fastening of the tile to the surface, it is made as flat as possible. When choosing glue, preference is given to frost-resistant options, which will prevent the cladding from falling off in winter.
When using the lathing installation method, it is not necessary to have a perfectly flat wall surface. It removes old plaster that does not adhere securely. After this, cracks and potholes on the surface are sealed with putty or cement-sand mortar. At the final stage, the wall is covered with a primer.
Preparatory work is carried out to ensure high-quality fastening of the tiles and protect the room from environmental influences.
Tile installation
When the base surface is flat, the finishing material is attached with glue. The procedure is carried out in stages:
- The adhesive composition is mixed in accordance with the instructions developed by the manufacturer, which are printed on the packaging. To obtain a homogeneous mixture without lumps, use a construction mixer for mixing.
- The glue is initially applied to the corners of the building and the corner elements are fastened.
- To keep the masonry even, a cord is stretched between the corners. It is recommended to regulate the correct laying of each row; it is checked with a building level.
- The glue is applied to the wall from the bottom row of the left corner, and the clinker is applied to the wall.
- To align the row, you need to use special crosses or wedges.
When laying the slab, make sure that the adhesive layer is at least 0.5 centimeters thick. An adhesive composition is used to seal the seams between the plates. The base dries completely after 30 days, so finishing is carried out in the warm season.
Installation on the lathing
At the initial stage, a profile frame is installed. Metal and wood are used for its production. The clinker is attached to the frame with clips, clamp fasteners, and self-tapping screws. For hidden fastening, anchors are used, and for visible fastening, special fastenings are used.
The tiles are laid from the lower left corner. The tiles are fastened to each other using special elements that are made in the form of a lock. When using a regular panel, fastening requires effort. When attaching tiles to clamps, attention is paid to the features of the fastenings. They must be made of metal and must have a thickness of 0.04 millimeters.
If the clinker does not fit completely on the edge of the wall, then it is cut with a diamond disc. If, when cutting the tiles, the fasteners are cut off, then the edges are fastened with self-tapping screws. The openings are lined with special corners, which are included in the kit. Brick clinker is a durable material that is resistant to environmental influences.
In appearance, the finishing material is similar to brick. But, its price is lower than that of stone, which provides savings on finishing. Cladding requires compliance with installation technology, so it is performed by qualified specialists who have knowledge and skills in this field. When covering, they adhere to the installation rules, which has a positive effect on the service life of the coating.
Installation on the lathing
The mounting frame must be made of a metal profile or wood. Installation of slabs on the frame is carried out using clamps, clips or self-tapping screws. Fastening can be of two options: hidden (performed using anchors) or visible (performed using special fasteners) .
The slabs are fastened to the fastenings that are supplied with the material. It is important to maintain the horizontal and vertical position of the coating during installation.
You need to start attaching the slabs from the bottom corner (left). If this is a regular panel, then the tiles should be fastened together into locking elements with some force.
IMPORTANT!
If the plate is attached to clamps, attention should be paid to the quality of the fastenings: they must be made of galvanized metal, their thickness must be at least 0.004 cm.
A diamond blade should be used to cut tiles. If the fastening elements are cut off, then the hanging parts should be secured with self-tapping screws in the sheathing, and it is advisable to seal the holes for the screws with sealant and crumbs of the material being laid.
For openings, special angles are used, provided complete with the main material..