Step-by-step installation
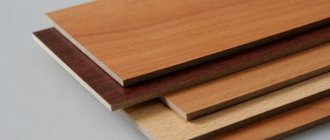
You can finish the base with stone-look panels yourself using a set of the following tools:
- level;
- hammer;
- roulette;
- screwdriver;
- Bulgarian;
- mastic;
- pencil;
- tint sealants.
When starting installation operations, the walls must first be prepared. Metal elements and remaining solution must be removed from all surfaces. Then the walls should definitely be treated using an antifungal agent, which will prevent mold. After it has dried, you can begin installing the panels.
Let's look at step-by-step instructions describing the process of installing siding that imitates stone:
- before starting finishing activities, it is necessary to build a sheathing frame using metal slats or wooden blocks;
- the distance between the planks is 40 cm, this design will provide support for the sheets and help ventilate the space under the wall panels;
- if there is a need to insulate the structure, then an insulating layer is fixed between the sheathing;
- then they attach the starting sheet, carefully checking its location with the building level;
- then they install siding around the windows, the entrance portal, and in the corners of the structure;
- the accuracy of the location of the siding at each stage should be checked using a building level;
- the sheets are connected with locking fasteners, ensuring smooth fixation to prevent deformation of the products;
- additionally, the panels are secured with self-tapping screws, providing a millimeter allowance between them;
- the symmetry of the rows is certainly verified by the building level;
- installation of decorative slabs occurs from left to right;
- when all the sheets are mounted, it is necessary to fix a metal drainage system at the top of the base;
- All installation actions are completed by fixing the corner joints, as well as the connecting decorative strips.
Let's consider the recommendations of the masters regarding the design nuances of finishing walls with panels:
- When selecting material, be sure to take into account the style of the structure. For a building made in loft or country styles, it is better to finish it with rough stone, choosing blocks of the largest possible dimensions.
- If the house is decorated in a Scandinavian or Provençal style, it is advisable to use white stone panels. Also suitable are clinker products that imitate brick laying.
- Stone-look sheets successfully provide accent inserts. Space zoning should be done using elements that differ in texture and color.
- Do the main installation of panels in neutral colors. Place blocks of a rich shade at corners, around window structures, doors and to separate the foundation. It turns out impressive if the entire decoration is done in terracotta tones with light inserts.
- When selecting panels that imitate stone, be sure to take into account the landscape features of the area.
Preparation and tools
Before proceeding directly with installation, it is necessary to prepare the surface for work.
First of all, attention should be paid to the evenness of the walls. Basement siding will give away any of your skeleton (read: unevenness)
And it should also be remembered that when covering the base of a house with synthetic canvases, an excellent environment for the appearance and spread of fungus, mold and other moisture-loving microorganisms can form underneath. Therefore, the walls under the slabs must be treated with an antiseptic or any other impregnation.
A prerequisite before laying the siding slabs is to clean the base from debris, dust, cobwebs, etc., so that the surface is perfectly free of foreign objects.
The next step in preparation will be to decide on the insulation or ventilation of the facade. Since both of these phenomena are very common in today's environment, training should be carried out with these features in mind. With any of these options, it is necessary to make allowances for the purchased materials.
To install basement siding yourself, you will first need the following tools:
- screwdriver - you can use your grandfather’s old screwdriver, but such work will take more time;
- self-tapping screws with a flat head (a lot of screws);
- water or infrared level;
- metal hacksaw or jigsaw.
Of course, each case and each master has its own set of tools. This list is meant to get you started.
As for the components of the siding itself, everything is simple. To install the panels on the plinth, you need: lathing (metal profiles or wooden blocks), starting strip, finishing profile and j-profile. That's it for attaching the panels to the plinth wall. The main parts that make up the siding itself are: sheathing panels with the selected design and corner panels.
Preparing the surface for installation
Since the installation of panels excludes the possibility of access to the wall surface, preparation must ensure several factors:
- A flat plane that allows for high-quality installation of the canvas.
- Stable and high-quality service of wall materials.
- Unhindered removal of water vapor from walls or insulation.
These issues are resolved by carefully treating the surface of the walls to be covered.
Procedure:
- Removing all foreign objects - fasteners, brackets, trim, etc.
- Cleaning the wall of old paint, layers, shedding, etc. If the problem areas are large, the wall must be completely plastered. Small cracks or potholes are sealed with putty.
- The surface of the wall is covered with a layer of deep penetration primer.
Leveling the surface to be covered is important for tight contact of the wall with the sheathing. Even more important is the possibility of full contact over the entire area of the insulation, for the installation of which special glue is used.
If the contact is not tight, then the release of steam will be difficult and there will be a possibility of the walls getting wet, ultimately leading to destruction.
The use of vapor-tight insulation also requires a tight fit to the walls, since high-quality cutoff from the outside air provides for the complete absence of cavities or gaps.
Step-by-step installation instructions
In addition to the plastic panels themselves, fittings are needed that give the cladding a finished look. These are starting, corner, F-shaped profiles. To install plastic panels with your own hands, prepare a set of tools:
- building level;
- marker;
- grinder for cutting blades;
- knife for cutting slabs to width;
- hammer;
- screwdriver
Thanks to a special device, the panels are attached tightly. The joints are overlapped in order, one after another. Wall decoration cannot be done in winter. The plastic material becomes brittle. The panels can easily break under the slightest load.
Step-by-step installation instructions:
- Install a wooden or metal frame. First vertical, then horizontal guides. For metal siding you will need corners.
- If necessary, for noise and thermal insulation, insulating foam material or mineral wool is placed under the frame.
- Install corner posts. First, they are nailed at the very top, without recessing the caps. They are centered and nails are driven in at a distance of 2-3 cm. The lower element should extend 0.3 cm under the upper one so that moisture does not seep through.
- The first panel is installed starting from the lower left corner. The starting rail is fixed. At the bottom of the facade, two nails are hammered into different corners. The twine is pulled between them and the horizontal level is controlled.
- The first row is the most important. From him will come the direction of those who follow. The plates are fastened with screws, taking into account temperature changes, leaving a gap of 1 mm. Each panel is inserted into the grooves of the previous one.
- Frames around windows and doors are installed in the same way as corners. J-straps are used to connect the shaped slopes of the front door and window frames.
Sealant can be used for joints if recommended by the manufacturer. Experience shows that it is not necessary to glue the resulting overlaps between the plates. The use of sealants disrupts heat exchange and impairs the process of condensate removal.
Plastic cladding panels give an unattractive structure a modern look. Such a facade will be reliable and durable. Decorative installation work is carried out quickly and easily and does not require large financial costs. A large selection of decorative solutions allows you to create the home of your dreams.
How much does pleasure cost?
Covering a cottage with imitation masonry siding costs different things. There are budget options, and there are expensive solutions. In any case, the matter will not be limited to the purchase of materials. The estimate must include the costs of installers' services, which are comparable to the cost of the purchased cladding.
! DON'T FORGET to add 20% for cutting!
If you choose plastic, don’t look for the lowest price! High-quality cladding will last longer and reliably protect walls from moisture, mold, mildew, and destruction. For example, materials from the Deke brand with a beautiful texture will cost from 1,100 rubles per square meter. Nylight products will require more serious investments, since you will have to pay from 1,700 rubles per square meter of cladding. You can save money by choosing products from the Dolomite manufacturer. They cost from 650 rubles per square meter. Only the quality of German and American slabs will be higher.
If you want to forget about repairing the external walls of your house for decades and at the same time insulate it, get ready to pay an average of 1,700-2,200 rubles, depending on the insulation. For example, prices for products from the manufacturer “Regent” start around 2,000 rubles.
Figure 10. Estimated price of panels
Russian-made fiber cement siding will cost from 1,700 rubles per square meter. If you choose Japanese panels with a hydrophilic coating, you will have to pay at least 3,000 rubles, but by the standards of human life, these will last almost forever.
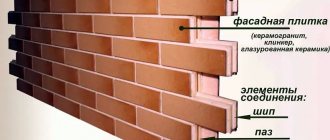
Instructions for fastening cassette facade slabs
Metal or composite cassette slabs for external cladding are a very convenient and profitable material for self-cladding.
External and internal view of the cassette
The installation of cassettes is a whole structure, which includes a metal profile, internal and external corners, platbands, flashings, slopes, and fasteners. Such frames greatly facilitate self-assembly. The work can be done using internal and external fasteners. The visible principle is carried out through special holes with which each cassette is equipped. Usually these are curved steel tiles. The hidden method is typical for cassettes with curved bases. They fit into the slots like a Lego set. For such a system, the installation of an L-shaped profile is required.
Flush mounting cassette
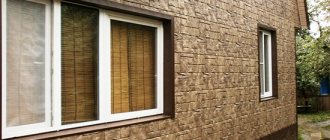
Stone-look facade panels
Facade panels are a type of siding for the exterior of a house. Another name for the material is basement siding, but at the moment it is not entirely correct, since facade panels have already grown from the role of a highly specialized material to a full-fledged external covering. The original purpose of the material was to finish the lower part of the house, more precisely, the visible outer part of the foundation.
At the same time, the auxiliary material turned out to be quite capable of performing the main task, and at a higher decorative level. The aesthetic level of the sheathing fabric made from basement siding is significantly higher than that of traditional siding, this is recognized by all users.
The reason for this situation was the design of the panels, or more precisely, the imitation of brick or stone masonry that they perform. The level of repetition of texture and color is very high, since most often, when making a mold for casting the material, a part of natural masonry from one or another type of stone or brick from which the cast is made is taken as a basis.
The following materials are used for the manufacture of façade panels:
- Metal.
- Fiber cement.
- Vinyl.
- Polypropylene.
- Acrylic. etc.
The most common are polypropylene and vinyl samples, as they have the best price-quality ratio. The strongest property that determines high demand was the high quality of imitation stone walls. The realism of the execution is such that even close up it is difficult to determine whether it is a natural material or a copy. If we consider that the price of facade panels is many times less than that of natural samples of finishing stone, then the reasons for their popularity become clear.
During manufacturing, the surface of a certain type of finishing stone is repeated:
- Tuff.
- Granite.
- Rubble stone.
- Slate.
- Sandstone.
- Dolomite.
- Flagstone, etc.
There are many examples of imitation of one or another type of stone, and each of them has a lot of color options - from light to dark. The total is quite an impressive range of panels; the choice is so wide that it takes some time to simply familiarize yourself with all the offers. In this, facade panels are significantly ahead of traditional types of siding, which cannot boast of such a variety of colors and textures.
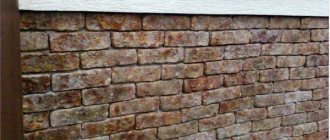
What can you use to make a brick finish?
In order to imitate brickwork, several types of materials are used. Some of them you can buy in the store, others you can make yourself. Among those purchased:
- facade panels;
- siding;
- clinker tiles.
Aged clinker tiles
Brick-like facade panels
Facade panels are often called facade siding. These are actually the same material, differing only in size. The shape of the panels is closer to square, the siding – to rectangular and oblong. The appearance may be absolutely the same. The same materials are used to make panels and siding. The production method is also the same.
Facade panels - imitation brickwork
You can also make an imitation of brickwork yourself. Different materials are used for this:
- decorative plaster;
- cement;
- tile adhesive.
The use of materials of the first group (purchased) eliminates a lot of hassle and “wet” processes, which cannot be avoided when finishing with cement and plaster. Each owner chooses the method of façade cladding that is most beneficial and convenient for him.
An example of façade finishing with panels
Brick cladding panels
Brief description of siding and its types
Siding is a cladding material used for exterior finishing of buildings. It has the shape of elongated narrow stripes with a longitudinal relief applied to them, imitating various options for wooden construction (most often) or, less commonly, masonry.
The strips (panels, lamellas) are equipped with special sides for fastening to the support on one side and for connecting to each other on the other. The design allows you to assemble canvases of any size from them.
The siding is assembled right on site, which is convenient and practical. The panels are lightweight, so they are easy to lift and carry. In principle, it is possible to work alone, but for large areas with long panels, an assistant is needed.
The birthplace of siding is Canada, where it was first produced.
The first samples were wooden; today there are different types of material:
- Wood.
- Metal.
- Plastic (PVC, acrylic, etc.)
- Fiber cement.
- Ceramic.
The most common are plastic (PVC) and metal types of siding, which have the best characteristics or most successfully combine quality with price.
In addition, there are many profile options:
- Under the beam.
- Under a log.
- "Herringbone."
- "Ship board".
- Timberblock.
- Under a stone, etc.
Installation direction:
- Horizontal.
- Vertical siding.
Some types allow installation in both directions at the request of the owner.
Developers are constantly adding to the model range, so there cannot be an exhaustive list; the list always remains open.
What can be used for cladding?
On the construction market you can now find a variety of options for cladding panels that can imitate brickwork. They will differ in the materials from which they are made, in a number of physical and operational properties and other indicators.
Decorating the house with brick panels
Table. Types of panels by structure.
| View | Characteristic |
| With one layer | They are lightweight, but very thin. They are used for decorative finishing, but are not capable of insulating a house, so a layer of insulation must be installed under them. |
| Double layer | In this case, there is a layer of insulation on the underside of the panel. There is no additional need to lay insulating material between them and the wall of the house. |
| With three layers | These are so-called sandwich panels, which have three layers. The middle is insulation, and both outer layers are decorative. |
Facade panels
Also, panels can differ in size and be small composite or solid, with impressive dimensions. The former are easy to combine by color, while the latter are easier to install, as they allow you to cover a large wall space at once.
On a note! The panels can be classified according to their purpose (for the plinth or for the facade), and can also be made from various materials.
Facade panels (siding) under stone
Plastic panels
This is one of the most budget options for wall decoration. You can choose them to suit any style, be it classic or hi-tech. They are very light and thin, and therefore it is necessary to install a layer of insulation under them. They are resistant to frost and moisture, but their service life is not long and is about 20 years.
Plastic facade panels
The most commonly used panels are vinyl or acrylic. The first ones are two-layer and made of PVC. The first layer is designed to protect the panel itself from exposure to light, and the lower, second layer prevents the panel from deforming during temperature fluctuations. The panels have good and strong connecting locks, and therefore there is quite a high demand for them. Acrylic panels are not flammable; they can be fixed directly to the wall or to the sheathing. Unfortunately, acrylic is quite fragile - it is not recommended to use it in regions with harsh winters.
On a note! Plastic panels can perfectly imitate various types of brick. You can also use them to create real patterns on the facade of your house.
Plastic panels
Prices for popular finishing plastic wall panels
Plastic wall panels
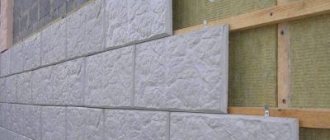
Fiber cement panels
Most often, such panels are used specifically for finishing the facade of a building, but sometimes they are also used for cladding the inside of a house. The material contains cement, cellulose fiber, and special mineral fillers. All components are mixed and pressed, resulting in very durable monolithic panels. The outside is coated with protective compounds that prevent the negative effects of light and moisture.
Fiber cement panels
These panels are frost-resistant, environmentally friendly, they do not burn, and are break-resistant. They are not afraid of moisture either.
Find out what types of fiber cement panels are available for exterior finishing of a house, and also familiarize yourself with the process of their installation in a special article on our portal.
Prices for popular finishing fiber cement wall panels
Fiber cement wall panels
Clinker slabs
Another option that can be used to decorate the facade is clinker panels or slabs. This is a ceramic composite material that will not only decorate the walls, but also provide them with thermal insulation properties.
Clinker slabs
Such panels include a thermal insulation component such as mineral wool or polystyrene foam, as well as decorative facing material (usually tiles that exactly replicate brick). Also, some panel options also have a durable base layer, which will facilitate installation of the material.
Panels in stores are available for every taste and color and can imitate various surfaces. They are easy to install, as they are fixed directly to the walls using special adhesives. The panels are also durable, resistant to various influences and easy to maintain. This is precisely why many masters value them. Their main disadvantage is their significant weight, which means they are not suitable for buildings with a light foundation.
Clinker panels for facades
Prices for popular clinker wall panels
Clinker panels
Polymer sand panels
These panels are made, as you might guess, from fine sand and polymer compounds. They, like plastic ones, are a budget finishing option, and are also easy to install - they can be secured with glue, additionally connected with self-tapping screws.
Polymer sand panels
The choice of such panels in the store is large - manufacturers offer materials of various colors and textures. Moreover, these panels are characterized by increased strength and do not burn at all, as they contain a fire retardant - a special substance that provokes self-extinguishing.
Porcelain stoneware slabs
This is a beautiful and very durable material that can last up to 50 years without complaints. It is made from clay using a special technology, which includes firing the material at temperatures up to 1300 degrees. Pigment additives allow you to give the desired color to the coating.
Brick siding
This is a durable type of panel that is resistant to a variety of types of loads - it does not even scratch. The material is also not afraid of water, since baked clay does not absorb it. The panels do not lose their color brightness for many years, regardless of operating conditions.
Porcelain tiles are a fairly heavy material, so installation needs to be done only on a metal frame. This is the difficulty of working with such panels. Also, if glue was used during installation, in severe frosts the panels may fall away from the walls.
Prices for porcelain stoneware panels
Porcelain stoneware panels
Fiberglass panels
Another interesting panel that is used for home decoration is fiberglass panels. They contain fiberglass and resins and can imitate both brickwork and other types of materials.
This type of panels is characterized by high strength and long service life. They are not afraid of exposure to moisture or temperature changes. Installation and dismantling of the material is quick and easy. Their main disadvantage is the high cost, which limits many who want to make this finishing option.
Sandwich panels
Such panels, also known as thermal plates, have three layers. The composition usually consists of metal sheets with insulation located between them. The material allows you to perfectly insulate the house.
Facade thermal panels
Sandwich panels are easy to install, have a reasonable cost, are durable, lightweight and have increased heat and sound insulation properties. The insulation is usually polystyrene foam, as well as mineral wool, polyurethane and other materials. The service life of this finish is quite long.
Sandwich panels prices
Sandwich panels
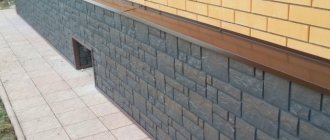
Panels for plinth cladding
In order to decorate not only the facade itself, but also the basement of the house, special panels are used - plinth panels. They contain special substances that prevent the coating from quickly fading or deteriorating when exposed to moisture. At the same time, the plinth panels imitate brickwork no worse than wall panels.
Basement siding is available to look like stone, brick and wood.
Such panels are economical, high quality and have a long service life (up to 50 years). They are not afraid of temperature changes and can withstand changes within the range of -50 – +50 degrees. They are easy to attach and to clean, just rinse with water. This is a lightweight material that can be used for cladding the facade plinth even of a building that has a light foundation.
Find out how to choose vinyl siding for the exterior of your home, and also familiarize yourself with the installation process, in a special article on our portal.
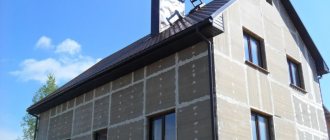
Installation technology of external wall panels
We will talk about constructing a façade from single-layer polyvinyl chloride cladding elements. The panels are mounted on an uneven base on a frame made of galvanized metal profiles.
Facade wall panels can be installed at almost any temperature. Installation is prohibited only in severe frosts, when the thermometer drops below -15°C. Facade cladding work consists of several stages:
- Preparation.
- Lathing for mounting panels.
- Fastening of facade panels.
Preparation
Work on preparing the foundation must be completed before installation of the supporting frame begins. Excess elements, such as an external unit for an air conditioner, are removed from the facade. The flashing and lining of the slopes are removed from the windows. If the facade is wooden, then it must be treated with an antiseptic to inhibit the processes of decay and fungal development. If the facade is stone or concrete, then such treatment is not necessary.
Cladding without insulation does not require a vapor barrier membrane. If external lighting is planned, then the wiring is carried out at the preparation stage.
Lathing for mounting panels
The sheathing for the façade panels can be made of wood or a U-shaped profile. The second option is preferable, since the galvanized profile does not corrode or collapse. It does not need to be further protected.
On a flat base, it is possible to mount the profile directly on a bare wall. If the facade is curved, then a frame is mounted under the facade panels.
The frame consists of brackets and supporting profiles. Using brackets, the frame is leveled. The profile is mounted on the pre-marked surface of the facade. Marking is carried out using a laser level and measuring tape
The first horizontal element is installed 50 mm from the ground. The starting strip for the façade panels is attached to it. The installation step of the vertical guides is 500-600 mm, and the horizontal ones depend on the height of the facing element. Horizontal guides are made of J-profile. For fastening, self-tapping dowels are used with a pitch of 300-400 mm.
Facade panel fastenings
Installation of facade panels begins from the bottom corner strictly from left to right and from top to bottom. The first row is installed on the starting bar. The left end, which goes to the corner, is cut exactly at a right angle.
Then it is secured with self-tapping screws, which are screwed into the nail holes and the body of the wall. The second panel is connected to the first to the junction of the temperature compensators and secured in a similar way. To increase the strength of the structure, the panels can be glued to the starting strip with polyurethane foam.
The construction of a facade from single-layer and multi-layer panels can be done with your own hands. The work is not particularly difficult if the rules and technologies are followed.
The facade panels will be complemented by a wide range of additional elements that allow you to hide minor flaws of a novice installer.
Alternative finishes
Of course, everything described above is quite expensive. The most ordinary facing brick, without any frills in the form of relief on the surface, and especially protective coatings, costs 18-26 rubles. If there is any decor, the cost of the products increases to 45-48 rubles.
The price per piece only seems low, but in terms of the façade the amount is considerable. Plus, such masonry must be treated with a water repellent, and this procedure must be repeated from time to time. Otherwise, there is no point in starting brick cladding at all, because without impregnation it will be covered with efflorescence in a few years.
How to do without bricks
How to get a brick facade while avoiding unnecessary labor and financial costs? And what about those for whom the use of facing bricks is unacceptable for one reason or another. There is always a way out, since the effect of brickwork can be achieved using other materials. This is a brick-like facade decoration, which we will also briefly talk about.
| Material | How to use it |
| We have already mentioned brick-shaped tiles. With its help, you can perform all the same wall design options as with brick - including decorative bandaging of seams. Such tiles can be glazed ceramic, textured clinker, or smooth hyper-pressed. Mounted with glue on a well-leveled base. |
| Today there are also tiles that are mounted on a subsystem, which allows you to avoid wet processes during finishing, as well as, if necessary, perform insulation. These can be ceramic tiles, or tiles made using artificial stone technologies. As a rule, it is sold complete with frame elements and fasteners. |
| Modular materials, the front surface of which is stylized as brickwork, are extremely popular today. These are all kinds of panels that are made from polyvinyl chloride and polypropylene, aluminum, fiber-reinforced cement. They are also mounted on a frame, with or without internal insulation. |
| This type of panels differs from siding-type panels both in structure and installation method. If the previous option is just a skillfully executed imitation, then the front layer of brick-like thermal panels is a natural clinker tile in the shape of a brick spoon. The tile is pressed with a polyurethane or polystyrene foam layer, which is a heat-insulating layer between the tile and the rigid base. That is, thermal panels are not only a finishing material, but also an insulating material. They are mounted either on the sheathing or with glue, but in this case, the base must be properly leveled. |
The options listed in the table make it possible to veneer any walls - including wooden ones, like bricks.
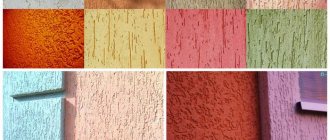
Painting brickwork
Those who are building a new one, or simply want to improve an old brick house, can get by with even lower costs. To do this, you just need to paint the brickwork. Paint not only decorates the surface of the walls, but also protects them from the salt formations mentioned above.
Below we present to your attention several painting options:
- Of course, to obtain a high-quality coating, you need to work hard preparing the masonry for painting. It should be thoroughly cleaned of solution deposits, and it is better to do this using a grinding machine.
- Dust must be removed from the surface by sweeping it away with a brush. The remaining dust will be bound by a primer, which must be selected taking into account the type of paint used. As for the paints themselves, almost all façade options are suitable for this purpose. If the brick is silicate, then you need to use silicate paint.
- For clay brick masonry, it is better to use water emulsions: latex, acrylic, silicone, which are resistant to temperature changes and create a film on the surface that is permeable to steam and impermeable to water.
This paint is suitable for any type of base.
Well, you can tint the paint at your discretion. We only recommend using not natural pigments, which are poorly affected by ultraviolet radiation, but colors of chemical origin - moreover, they have richer shades.
Thus, facade finishing of brick walls using painting will be an excellent way to protect the masonry and give it a good appearance at the lowest cost.
Finishing the foundation with panels: step-by-step instructions
Facade panels for the plinth are installed on the frame.
Work on the construction of the sheathing should be carried out especially carefully - the durability and reliability of the entire structure depends on how smoothly and firmly it is mounted.
Frame elements - profile or timber (Description, types, properties) - can be installed horizontally or vertically; horizontal ones are more suitable for plastic panels.
Work order:
The starting bar is installed at a height of 4-5 cm above ground level. Determine the starting point, using a level, tapping cord or marker, draw a line along the entire perimeter of the foundation. The plank is mounted along the intended line, securing it with dowels. If the façade will be insulated along with the cladding, the frame should be located at a distance from the walls sufficient for laying thermal insulation. The insulation is laid closely, leaving no joints, and secured with plastic dowel umbrellas. Waterproofing material is fixed on top. How to insulate a house with polystyrene foam can be found in this article. At corners, near doorways, exits or entrances of communications to the house, corner strips and a j-profile are installed. Proceed to fastening the panels
The first element is installed on the starting strip, fixed with self-tapping screws along two edges and in 2 places in the middle of the panel. It is important not to tighten the fasteners all the way, but to leave a millimeter gap so that the expanding or contracting panel does not crack during temperature fluctuations.
The remaining panels of the first row are installed in the same way. If the height of the elements is not enough, and a second or more rows are required, then they are made offset, like brickwork. When the foundation is completely sheathed, the last row of panels is covered with plastic sheathing. If after carrying out the work small gaps between the elements are noticed, they are sealed using silicone sealant of a suitable color.
Design
The facade thermal panel for brick consists of a polystyrene foam or polyurethane foam base, which serves as insulation, and clinker tiles that imitate brickwork. Clinker is a brick-like material, also made from special clay and fired at temperatures above 1200 °C.
The thickness of the base insulation ranges from 6 to 10 cm, depending on the manufacturer, clinker tiles are 1.5 cm thick. The expanded polystyrene base is made of polystyrene foam, but not granulated, but foamed. Polystyrene has a density of about 40 kg/m3 and is a very poor heat conductor. The tiles are securely attached to the base with polyurethane glue.
Polyurethane based insulation
To connect the panels together, there is a tongue and groove along the perimeter, and fastening to the wall is done with self-tapping screws and dowels. Special corner panels are used to finish the corners of the house.
Installation
To install the panels you need the following equipment:
- drill;
- grinding machine with diamond disc;
- drywall hacksaw;
- screwdriver
And consumables:
- dowels with a diameter of 6 mm, a length of 80-120 mm, galvanized screws 4.2 mm, the length is the same;
- aluminum or galvanized corner 25-30 mm;
- base profile;
- grout for joints between clinker tiles;
- polyurethane foam of small expansion.
Installation of facade thermal panels under brick can be done using frame and frameless methods.
Frame method (dry facade) Frameless method
The first involves the construction of sheathing if significant unevenness in the walls is noticed.
Work order
First, the facade is checked to see how smooth its surface is, based on which a decision is made on the appropriate installation method. The sheathing can be metal or wood.
Wooden and metal sheathing of the facade of the house
For the latter, the tree must be treated with agents against rot, mold and fungi. The cross section of the slats is no more than 5x5 cm, so that the tree does not “lead.” The panels are attached to the wood with screws with flat heads with a diameter of at least 1 cm. The panel is attached to the metal sheathing with special clamps that form an inconspicuous fastening.
Along the perimeter of the facade, preferably 15 cm below the floor level inside the house, a “horizon” is placed - a strictly horizontal line along which the base profile is placed. A horizontal line can be drawn along the protruding foundation. A corner is attached to the profile.
Starting from the lower left corner, the first facade panel is installed, then the rest along the entire perimeter from bottom to top. If there are no corner pieces, the outer edges of the panels are sawn at a 45° angle so that the two panels form a 90° angle when they meet. First, the tile is sawed with a diamond blade, then the insulation is cut with a hacksaw.
Carefully cut two angles at 90 degrees, try them on, and then fasten them
Having placed the panel at the installation site, a hole is drilled in the wall through the mounting sleeves. The panel is fixed to the wall with screws and dowels. You can pre-cut insulation pads to slightly correct the verticality of the masonry if necessary.
When the lower level of the masonry is ready, you need to check the “horizon” before proceeding to the upper one. When laying on the sheathing, the cavity between the wall and the bottom row of panels is filled with polyurethane foam.
Filling joints with cold-resistant grout. At temperatures below 3° C, a special composition is used instead of water to prepare the grout. It is quite possible to install façade panels with insulation yourself.
Advice from professionals
In order for the erected structure to fully fulfill its functions and serve for a long time, before starting work, it is worth studying several recommendations from specialists in the installation of plastic panels:
- All points of entry and exit of communications into the house must be sealed before cladding begins.
- Plastic panels must be installed at a short distance from the soil level, and not close to the ground.
- Sheathing work always starts from the left corner and goes to the right.
- Fasteners for cladding must have an anti-corrosion coating.
- After completion of work, all gaps and joints must be thoroughly coated with sealant.
To carry out facing work, it is advisable to choose a day when the air temperature is above 0 °C and no precipitation is expected.
general description
Over the past two decades, the concept of a ventilated facade has firmly established itself as the “exterior decoration of buildings.” This option is optimal for insulating and modifying the walls of buildings. The advantage is that the construction of such a structure improves conditions for human life and protects the main walls of the building.
Due to the presence of an air gap between the cladding material and the thermal insulation, which is attached directly to the external walls, cladding with ventilated structures is the optimal protection of facades from the effects of harmful climatic and atmospheric phenomena.
When installing such systems, the main condition is the presence of an air gap and lugs (holes) for air circulation located at the top and bottom of the structure.
Basic rules for installing panels
Facade cladding made of polyurethane, polypropylene, vinyl, acrylic is installed in compliance with thermal clearances. Small gaps should remain between adjacent elements of decorative finishing. The sheathing, made up of a continuous sheet, will increase in volume when heated. Having expanded in the hot season under direct sunlight, the finishing material breaks off the fastening elements and becomes deformed.
Installation of facade panels is carried out gradually from left to right. The parts are attached to the base with self-tapping screws. The outer parts are fixed on the sides of the facade using nail strips.
About 1 mm is left between the screw head and the surface of the part. Do not tighten the plate too tightly. The panels are screwed exactly along the center line.
No glue
The facade cladding is mounted on a frame made of wood and metal. Use this method of assembling panels if necessary:
- improve a wall with an uneven surface;
- install a soundproofing layer or insulation.
On glue
Fixing the slabs with adhesive is only possible if the walls have a perfectly flat surface. For each type of finishing material, manufacturers recommend a specific product.
Pros and cons of the material
Like any facing material, panels imitating stone are not without their drawbacks. However, such products also have the following positive aspects:
- a huge variety of design options regarding the texture and color of products;
- high degree of imitation, providing the full visual effect of a stone structure;
- the small dimensions of the sheets make installation easier and allow the homeowner to work independently;
- high quality of production prevents the need to use trim strips, without which the longitudinal connection of other facade panels cannot be obtained;
- there is no need to maintain the cladding (the maximum that needs to be done is to periodically wash off dust from the surface through a hose);
- the service life of the panels is no less than the service life of the house;
The disadvantage of such cladding products is their large thickness, which creates additional load on the walls. Undoubtedly, the strength of the cladding is inferior to the strength of natural stone. It is necessary to handle the cladding carefully, since to replace even one sheet it is necessary to disassemble the entire structure.
The indisputable advantage of the material is the exquisite appearance of the house, the chance to create the appearance of a modern or ancient building using a single technology.
How to care for metal siding
Caring for metal siding is quite simple. During operation, dust and other contaminants settle on the surface of the facade. To remove dirt, simply wipe the coating with a damp cloth. Solutions of conventional detergents will help clean the façade from stubborn stains.
Do not wash off the dirt with strong water pressure; moisture will get into the cracks between the panels and lead to the loss of the basic properties of the thermal insulation material. In addition, do not use abrasive substances when cleaning, because the use of powders can lead to scratches on the decorative surface.
Material selection
The cladding of the outer part of the room should last for more than one year, it is for this reason that it is necessary to approach the issue of purchasing cladding with all responsibility.
Before choosing, you must be guided by the following rules:
- Easy to install yourself;
- The material must be environmentally friendly, without the presence of harmful substances in the composition;
- Long service life;
- Resistance to mechanical and weather influences, corrosion, fire, moisture;
- Easy to care for.
If the selected cladding meets all the above requirements, then you can choose it, but it is worth considering the thickness of the walls; the thicker the walls, the heavier the cladding they can withstand.
Advantages of panels
This method of finishing external walls is so popular that you immediately want to figure out what the secret is. Those who have already been lucky enough to sheathe a house in this way give extremely positive reviews.
- Price. The cost of the panels themselves, as well as all the necessary materials for fastening and arranging the frame, is much lower than for natural materials.
- Installation. The whole process is quite simple. If you carefully read the instructions and strictly follow the recommendations, you can cope on your own. For installation you do not need to buy special expensive tools. There will be enough of those that every owner has. Well, as a last resort, you can borrow it.
- The ability to heat and sound insulate the building. Do-it-yourself installation of facade panels is carried out according to the principle of a ventilated facade. That is, first the frame is installed, and then the cladding is attached to it. Insulation can be laid in the space that has formed between the main scrap wall and the sheathing. It will retain all the heat indoors and not release it into the atmosphere. This same layer will help protect yourself from external noise.
- Weight. Natural materials create a large load on load-bearing walls, and not every structure can withstand this. Facade panels weigh relatively little, so they are an excellent option for those houses. Which lack strength.
- Lifetime. Thanks to synthetic components, facade panels last a very long time - up to 50 years. But this figure will depend on the correct installation and the quality of the chosen material.
- Variety of colors and textures. Manufacturers, trying to conquer a wider range of the construction market, create a wide variety of shades and textures. Thus, among the facade panels you can find a wide variety of imitations, ranging from brickwork to wood or stone.
- Easy to care for. To wash the cladding, just spray it with water from a hose, but rainwater will do the job just fine.
Advantages of siding cladding
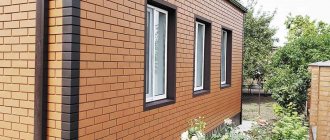
Framing windows on the facade of the house
So, let's say a few words about what siding is. This is a hanging material intended for finishing external walls using a system of ventilated facades. It is also called basement siding, since these panels were originally intended for finishing foundations.
So:
People liked the appearance of such cladding so much, as well as the ease of installing it with their own hands, that it quickly “moved” from the base to the walls, and greatly displaced the long-length siding panels that were familiar to everyone. In contrast, the base version has more compact dimensions.
Facade siding "brick"
The length of such a panel is a maximum of 1.25 m; the height varies between 0.45-0.75m, which is commensurate with the standard height of foundation walls. Siding is made from a variety of raw materials: metal, fiber-reinforced concrete, all kinds of polymers, composite wood - which determines its price.
Note that the “brick” facade is not the only option for styling such panels. They can also imitate various types of stone and wood, decorative plaster, tiles, and wood chips.
The variety of textures and colors allows, by combining them, to carry out facade design, one of the options of which we see in the photo below. Moreover, they combine not only base panels of different types, but also modular options with long lengths.
Ventilated façade “brick-like” with combined “stone-like” inserts
Panel structure and accessories
A standard siding panel consists of three elements: a mounting edge, a form factor and a lock, which allows you to fix the panels together horizontally. In any case, this is how long lengths are designed.
So:
- As for modular panels, depending on the material and manufacturer, their configuration, as well as the design of the locking connections, may vary. Therefore, installation instructions cannot be absolutely the same for all types of siding.
- Metal or vinyl panels that imitate brickwork are connected to each other not horizontally, but vertically. On the sides they have long locking tabs that fit together easily, forming a joint that is almost impossible to notice even upon close inspection. That is why such cladding can be visually indistinguishable from real brickwork.
Vertical lock connection
To install them you need: a starting bar (starting profile); base strip; J-plank (finishing), ensuring the adjoining of the cladding to the openings and pediment; external corner elements.
We will talk about the consumables that will be required to install the frame part of the ventilated facade in the process of describing the technology.