- Preparation of plaster mortar
Features of plastering external walls
- What is the best way to plaster external facades?
- Algorithm for performing work with mechanized plastering
One of the mandatory stages of construction or major repairs of a brick house is plastering. It is carried out without fail, regardless of whether we are talking about the new construction of a brick house or a major overhaul of an old building.
Which plaster is best to use?
The primary issue that needs to be resolved before starting work is how to plaster the external and internal surfaces of the walls. Plastering brick walls is done using various dry mixtures:
- cement-sand;
- limestone;
- plaster;
- perlite.
Cement-sand mixtures
This is the optimal solution if you need to plaster walls for painting or wallpaper. Their recipe includes cement of various brands, sand, water (you can add additives, for example, frost-resistant ones). The mixture is universal. This type of plaster is used inside and outside the house.
Rice. 1. Cement-sand mixtures
The performance characteristics of plaster depend on the materials chosen. Cement grades M150 – M300 are used only in mixtures for interior finishing. From M400 and above, for external facade work. If you prepare the solution yourself, you must strictly maintain the proportions of the components and use materials of the required quality. Otherwise, everything will have to be redone.
It is undesirable to use fine sand for brick plaster, as it will be prone to cracking. The use of contaminated sand with various inclusions (soil, clay, etc.) also does not contribute to the necessary strength and durability.
The optimal solution is to use river or quarry (after washing) with a fraction of 0.5-2.0 mm. Coarser grains increase the roughness of the outer surface of the plaster. Therefore, such sand is used for laying bricks or installing reinforced concrete structures.
The advantages of the DSP include:
- long period of operation (if applied correctly), reaching 30 years;
- significant plasticity, achieved by long drying times (it is permissible to level the surface within several hours after finishing plastering);
- high resistance to high humidity allows the use of this plaster on external facades and when decorating bathrooms;
- resistance to sub-zero temperatures;
- fire resistance;
- environmentally friendly;
- versatility - no special equipment is needed for application.
Disadvantages include long periods of complete drying, the need for significant physical effort for application, and the importance of strict adherence to application technology. The material is quite heavy and does not have adequate resistance to shrinkage of the structure and vibration loads.
Lime mixtures
These solutions are divided into three subgroups:
- purely calcareous;
- lime-clay;
- lime-gypsum.
They are used for laying on walls that are not exposed to the negative effects of atmospheric factors (primarily precipitation) - indoors, closed loggias and balconies, interior partitions. To increase their strength and reduce setting time, building gypsum is added to the formulation.
Rice. 2. Lime mixtures
The total curing time is only 30 minutes, and the setting process begins as early as 4 minutes. The average proportions of lime and sand are 1:3. A properly diluted mixture has a dough-like consistency. This group is considered budget.
Advantages:
- vapor permeability;
- environmental cleanliness;
- bactericidal;
- durability;
- fire resistance;
- high adhesion to various substrates;
- versatility.
The disadvantages are:
- low resistance to moisture;
- slow development of design strength;
- cracking under vibration loads;
- weak, compared to other compositions, strength;
- When working, it is necessary to use protective equipment.
Gypsum plaster
It is a finishing material for work inside the house. Due to the high adhesion of the material, it is easier to work with. It is prohibited to add water to the prepared mixture, which has a rapid setting. This imposes certain restrictions on the volume of plaster that can be mixed at a time.
The advantages of the material include:
- rapid development of design strength (up to 7 days);
- significant plasticity;
- environmental cleanliness;
- vapor permeability;
- low thermal conductivity;
- high adhesion;
- light weight;
- fire resistance;
- ease of grinding;
- maintainability.
Rice.
3. Gypsum plaster The disadvantages of the material are:
- low resistance to moisture;
- short service life;
- does not tolerate negative temperatures;
- easily affected by pathogenic microflora.
Perlite plaster
Perlites are sand with a coarse fraction obtained from obsidian. Visually, it resembles fine off-white crushed stone. It is a material for exterior finishing. The coating made from perlite plaster is very durable and differs in:
- high wear resistance;
- light weight;
- low thermal conductivity;
- fire safety;
- resistance to pathogenic microflora;
- acceptable vapor permeability.
Due to its characteristics, it can be used as an additional noise and heat insulator. Belongs to the category of “warm” finishes. The disadvantages include significant dust formation and technical difficulties in preparing the solution.
The recipe includes:
- aggregate belonging to sponge class building materials;
- base – perlite;
- binder – cement, gypsum, lime;
- polymer additives – help to increase water-repellent properties, ductility, and air filling intensity.
All plastering materials discussed in this chapter can be made independently directly on the construction site. This reduces the cost of purchased materials. However, only using factory-made plaster from well-known manufacturers allows you to obtain a plaster coating of guaranteed quality.
Read about other types of plasters in this article.
The best plaster mixtures
There are many different dry plaster mixtures from well-known brands on the market, the quality of which is not satisfactory. First of all, these are Ceresit and Knauf.
In addition to them, it is worth noting the materials produced:
- (the entire Osnovit line, including dry mixtures for rough leveling (Startwell, Bigwell), finishing (Slimwell), decorative (Exterwell).
- Saint-Gobain group of companies (for example, mixtures of the Weber-Vetonit line).
- Brands Bolars and Kiilto, Glims and Unis.
Necessary tool for plastering bricks
Rice.
4. Minimum set of tools for plastering brick An experienced finisher’s list of tools includes up to 30 items. Let us mention the minimum set of tools, without which it is impossible to work. These include:
- The trowel, which is used to mix the working mixture during its preparation, is applied to the wall and leveled. These operations are also performed with a set of spatulas or a falcon.
- An electric drill (perforator) with a mixer is convenient to use for preparing the solution.
- “Semi-grater” (oval or standard) for drawing out corners.
- A smoothing board, a spray bottle (brush), a building level (preferably a laser), usually a plumb line, a tape measure for leveling surfaces.
- Bubble level rules. For small ones, up to 1.5 m, the plaster is leveled. Large checks the quality of application (horizontal, vertical).
Preparing a brick wall for plastering
It is allowed to begin plastering work on a house after the completion of shrinkage of the structure and completion of a set of installation and general construction work related to the walls (laying wiring, pipelines, installing door and window frames). They begin with the stage of inspecting the surface of brick walls and determining how smooth the surface is. Based on this information, the expected consumption of materials for their preparation and plastering is calculated.
The work algorithm is different for new and old walls. In the first case, to prepare them, you need to perform the following activities:
- general cleaning (removing dust, grease stains, dirt, undoing seams, cleaning identified cracks);
- surface treatment with bioprotective impregnation;
- wire brushing for better adhesion to the plaster.
In the second, the list of upcoming works depends on the actual condition of the wall:
- the old coating is removed;
- identify and fix (replace) loose bricks;
- repair chips and cracks;
- remove the remaining elements of the metal fasteners.
Preliminary work
The quality of adhesion (that is, adhesion) of the plaster finish and walls depends on the level of preparation of the surfaces for applying the solution.
Surface preparation
- First of all, the old finishing coating is dismantled, and then the rough coating, if present.
- Next, the walls need to be cleaned of oil and grease stains, as well as efflorescence. Protruding reinforcement must be cut off with a grinder and a metal disc. Sludges of mortar should be cut off using a hammer and chisel or a hammer drill with a “spatula” attachment.
How to plaster a brick wall
Let's take a step-by-step look at the main stages of the work.
Preparation of plaster mortar
The quality and durability of the applied layer of plaster depends on proper preparation:
- when working with ready-made dry mixtures, they are diluted taking into account the manufacturer’s recommendations (instructions are given on the packaging);
- if you plan to determine the proportions yourself, you should take into account the upcoming operating conditions and the consequences of errors in adding components.
Example. If there is an excess of binder, a greasy paste-like solution is obtained. It is characterized by increased consumption and a tendency to surface cracking when drying. A lack of binder makes the paste thin and significantly reduces its strength.
Rice. 5. Preparation of plaster mortar
You can mix the components by hand (with a shovel or electric drill with a mixer) or in a mortar mixer (for a team of several plasterers and a large volume of work).
Surface priming
This step is mandatory. Performed immediately after the preparatory one. This is explained by the high porosity of the brick, which absorbs water from the applied finishing material. As a result, the strength of the latter drops by almost half.
The choice of primer type is associated with an assessment of the following factors:
- The degree of porosity of the brick from which the masonry is made. For silicate, a mixture with increased adhesive properties is better suited. For medium-density bricks, a universal primer is recommended.
- The initial state of the surface (for old masonry it is necessary to choose a deep penetration soil).
- Places of application (facades, rooms with high humidity are treated with moisture-proof mixtures with antiseptic capabilities).
The optimal solutions are materials based on silicone or acrylic (water-soluble universal). It is recommended to apply the primer in two or three layers, applying them by hand (brush or roller) after the previous one has completely dried.
Reinforcement
Reinforcement increases the strength of the coating. When performing this, a reinforcing mesh with a cell size of 10*10 is used:
- fiberglass - under plaster for interior work;
- metal - on facades and when simultaneously processing large areas (as a rule, it is pre-treated with a protective varnish);
- PVC mesh is not used for applying DSP.
The mesh must be installed after the soil has dried. It is coated on both sides with mortar, which eliminates contact with the surface of the brick. Stretch it overlapping in place, fix it with self-tapping screws, nails or special hooks (fastening pitch, 250 mm). Fixation is carried out without tension, without sagging and the formation of mesh bubbles.
Installation of beacons
Lighthouse profiles are commercially available. The installation of beacons is carried out according to the following algorithm:
- the most convex point on the wall surface is determined (the location of the wall plane after applying the plaster layer is determined using it (screws, plumb line), installed beacons must exceed it in height by 5 mm);
- Marking of beacon installation sites is carried out (step 600-1000 mm);
- the two outermost ones are set (indented from the corner by 300 mm);
- The plane is set with a nylon cord and the remaining beacons are mounted on the solution (it is recommended to pre-cut them to the required length).
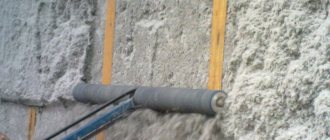
Applying layers of plaster mortar
Rice.
6. Applying and leveling the plaster mixture When working independently, you should consider a few simple recommendations:
- the solution is mixed in a volume that the master is able to produce without losing its plasticity in an hour;
- the prepared solution should stand for 5-10 minutes (“rest”) before using it;
- The plaster solution is applied to the surface of the brick wall in three layers.
Before applying plaster in an apartment or private house, it is recommended to wet the surface of the wall.
The spray is applied first. This is a material that has the consistency of liquid sour cream. Direction of application: bottom left – top right. The composition is applied in blocks (between two adjacent beacons). The thickness of 1 layer is 4-5 mm. after 3-4 minutes, areas that strongly protrude beyond the beacons are cut off or smoothed. There is no need to level it (the option of applying a layer by spreading is possible).
The second layer is soil. The consistency of the mixture is doughy. Apply after the previous layer has dried. Thickness – up to 20 mm. The casting is carried out in the places of the recesses left after the first pass. The alignment is performed by the rule. 3-4 times from bottom to top, then from top to bottom once (this reduces the likelihood of the mixture running off). The solution is again added to the remaining recesses. And the work is repeated as a rule.
The third layer is the covering. It is not required. The solution becomes quite liquid. Application thickness up to 2 mm. The covering is leveled with a trowel. If the estimated thickness of the plaster layer exceeds 30 mm, it is more economically feasible to use plasterboard sheets for interior finishing. After the plaster has set, the beacons should be removed and the remaining traces should be sealed with putty.
Finish grout
The final grouting of the surface is carried out with a float. First pass, in a circular motion. The second is vertical alignment. Tritium - horizontally.
If plastering for wallpaper or painting is carried out, the surface is additionally sanded.
Installation of beacons
External plastering of brick walls begins with the installation of beacons. If this stage is carried out correctly, you can completely eliminate the need for subsequent leveling of the surface, making it initially flat.
The beacons consist of a metal profile; a gypsum-based mixture is used for fixation. Using a level, the accuracy of installation of beacons is determined; a plumb line is also required for this work. Also, the modern building materials market offers laser systems for faster and easier measurements. An economical option is to attach threads to beacons.
How to fix beacons:
Plastering of brick walls outside begins when the beacons installed on the plaster dry well.
The mesh, which is attached to the wall before covering with plaster, will help strengthen the adhesion of the materials and increase the strength of the canvas. This will make it possible in the future not to redo the entire plaster layer that protects the brick from negative natural factors.
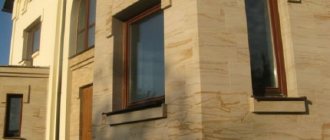
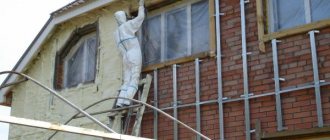
Features of plastering external walls
The difference between performing external work is the same:
- the entire surface must be reinforced with metal mesh;
- when plastering external facades, it is recommended to use a cement-sand mixture;
- the corners of the building and slopes are fixed with special perforated plastic corners (their unique reinforcement is performed);
- total permissible thickness of the applied plaster layer ≤ 15 mm;
- Before covering, the previous layer is primed twice.
For other positions, the technology for carrying out work from the outside and inside is the same.
What is the best way to plaster external facades?
Exterior finishing is carried out only with DSP or cement-lime mixtures. In areas of efflorescence, sanitizing mixtures are used. Finishing may involve the use of decorative plaster, both universal and purely facade. Plinths are plastered only with DSP.
Frost resistance by brand
The ability of a plaster mortar in a hardened and moisture-saturated state to withstand cycles of freezing and thawing is determined by the frost resistance grade. The regulatory documentation provides special designations and classification for this indicator.
The Latin letter “F” is placed on the left, and on the right is a number that corresponds to the number of freezing and thawing cycles without significant loss of the original characteristics. On average, the range for cement plasters varies from 25-100. The higher the value, the more resistant the mixture is to temperature changes.
Important! Gypsum plasters are sensitive to moisture, so they are not used for outdoor work. The frost resistance of such mixtures is not tested. The grade is assigned only to cement-based compositions.
Important nuances of brick plastering
Rice.
7. Plastering the external wall of a house In cases where the applied layer has a significant thickness, it is applied in several stages (with a thickness of each layer ≤ 5 mm), with mandatory reinforcement.
The intermediate layers may not be leveled. The maximum permitted thickness of the plaster layer cannot exceed 100 mm. at the same time, the probability of its delamination and shedding increases significantly. The optimal thickness is considered to be up to 50 mm. Acceptable environmental parameters for plastering brick walls are temperature (5-35) °C, humidity ≤ 65%.
The electrical wiring is de-energized, the recesses for installing switches and sockets are covered with masking tape. They also protect door (window) trims.
- It is recommended to add quicklime (calcium oxide) to self-prepared solutions for exterior finishing.
- In order to increase the thermal insulation properties of the plaster, porous substances (pumice, sawdust, analogues) are added to the solution.
- It is strictly forbidden to dry the plaster with a hairdryer or other means. This will lead to cracking.
What is good about a decorative facade?
Plaster or wet facade is one of the most beautiful options for the facade of a house.
If we consider a building from an architectural point of view, what a plaster facade is, then secondly it is insulation, and firstly it is a beautiful surface. Plastering the facade gives such beauty that no other facade, not even marble, can provide.
The popularity of the wet facade is also explained by its relatively humane cost (it is more expensive than vinyl siding, but is on par with fiber cement and brick siding).
The plastered facade can be mounted on any walls, it is non-flammable and perfectly insulates light and weak walls, allowing you to save on gas and electricity.
The system consists of insulation, glue, facade dowels, a base layer of plaster, reinforcing mesh and a finishing layer of decorative plaster. Every element in this pie is important, but the wrong choice of decorative plaster can simply ruin the whole thing, you will have to “tear it off and redo it.”
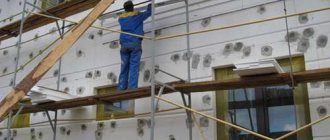
Manual and mechanized plastering
The manual application technology was discussed in detail above. There is another technology that is optimal for a large surface area of brick walls - mechanized.
Algorithm for performing work with mechanized plastering
The preparatory stage is similar. After its completion, a team of plasterers installs a plastering station at the work site and connects it to water and power sources. The dry plaster mixture of the selected brand is loaded into the hopper. From there, the material is fed by a screw into the mixing chamber, where it is mixed with water. The continuity of the feeding and mixing process guarantees the homogeneity of the resulting mixture. The plaster is applied to the wall at an angle of 90° through a special nozzle mounted on the supply hose (the shape of the nozzles can be changed).
Rice. 8. Mechanized plastering of brick walls
The process ends after the beacons are closed. The finishing is done manually.
Advantages of machine application
Mechanical mixing produces a high-quality plaster mixture with a high content of air bubbles. This increases the volume of the solution while reducing its weight. The savings in raw material are quite significant. Consumption is approximately 16 kg/m2 (at 35-45 for the manual version). The finished composition is homogeneous.
Other advantages of mechanized plastering are that:
- The plaster is applied to the entire surface almost at the same time, which eliminates the “scale effect”.
- The time required to complete the work is reduced by more than 2 times and the quality of the finished wall surface is improved (more suitable for applying finishing materials: painting, wallpaper, tiles).
- Two technological stages are performed simultaneously - leveling the wall and putting it on. Up to 200 m2 of surface is processed per shift.
- A lower cost of plastering is achieved.