The modern construction industry provides apartment owners with a variety of ways to finish the walls in the bathroom. Among them: moisture-resistant wallpaper, PVC panels, decorative plaster, etc. However, despite the large selection of options, wall painting and tiling remain the most popular. And here, those who do the work with their own hands have a lot of questions: is it necessary to plaster the walls under the tiles, what plaster to use in the bathroom for painting, and which one to use under the tiles? Below we will try to give answers to the questions posed.
Why do you need plaster walls in the bathroom, and how to choose
In fact, the scope of application of moisture-resistant plaster is somewhat wider; it can cover surfaces in:
- plinths
- bathrooms and restrooms
- any unheated premises
- rooms with swimming pools
- commercial areas
The main advantage of any moisture-resistant plaster for interior work is its vapor permeability. However, it does not absorb moisture well.
Important! Even if there is moisture-resistant plaster on the walls, the need to install a hood has not yet been canceled.
When dry, such a coating should not crack, even when applied in a very thin layer. Another requirement for bathroom plaster: good adhesion to almost any wall material: from blocks to brick or concrete.
The high plasticity of the mixture allows it to be applied without significant effort when working manually. If the mixture has frost resistance, then it can also be used for facade work.
Cutting down hillocks
An important step in removing the old layer of plaster is cutting down the mounds. This is often where the leveling of walls without tiles begins. For plaster and gypsum, it is convenient to use a chisel and a hammer, and for denser layers, a hammer drill or sander. It is important to select the correct attachments and discs for the material to avoid damage to the tools.
Important! Particular care must be taken where wiring runs, usually under the ceiling, in corners and near outlets.
Types of plaster compositions for bathrooms
A special waterproof decorative plaster for the bathroom stands out. With its help you can obtain a relief surface with a high degree of resistance to moisture, mold and mildew.
The disadvantage of this coating: the need for special skills in working with it and the price. Pros: durability, high aesthetic qualities, the possibility of tinting in various colors in accordance with the interior tasks, fire safety and environmental friendliness.
Decorative types of plaster are divided into types depending on the composition:
- silicate
- mineral
- acrylic
- silicone
Other types of plaster for the bathroom:
- plaster
- cement
- sanitizing mixtures
Gypsum plasters
Special additives are introduced into gypsum plasters that help reduce the degree of moisture absorption by this coating. The trouble is that gypsum plaster has the highest degree of absorption among other types of bathroom mixtures.
This is why it is not the most popular or durable option. The adhesion strength to the surface is also poor, so with prolonged use the plaster may peel off from the walls. There is only one definite plus for such mixtures: they are quite plastic when worked by hand. However, some people are attracted to white for painting.
Cement plaster for bathroom
But this is already an application for long service without unpleasant surprises. Cement plaster is produced on the basis of the material of the same name, as well as sand and various special additives. The advantage of this coating is that it practically does not absorb moisture. This makes it a better option than gypsum.
Modern cement plasters are quite flexible, making them easier to work with manually, and quite durable. They have a high degree of adhesion to almost any surface. And one more plus: they are not afraid of temperature fluctuations.
Silicone plaster
A modern solution for the bathroom, it is a type of decorative plaster. Silicone plaster is produced on the basis of silicon resins. It is clearly not a favorite environment for the growth of fungi and mold.
Disadvantage: it is not used to level walls, which is why silicone plaster is usually used as a finishing coating. Pros: very long service life, up to 60 years. This coating does not absorb moisture and adheres well to almost any type of surface. Plus it can be tinted and washed.
Sanitation mixtures
Sanitizing mixtures have one great advantage, which affects the durability of such coatings.
They prevent leaching of surfaces, so that “capillaries” do not form on the walls, leading to erosion and peeling of the coating. They are vapor permeable.
Tips for choosing tiles
Ceramic tiles are rightfully considered the best finishing material. It has a number of advantages, which include durability, hygiene, strength and aesthetic appearance. However, due to the high cost of the material, it makes sense to take care of leveling the base so that the tile looks decent. Leveling is important when laying any type of tile, and for ceramic tiles it is necessary.
Important! Tile laid on a base with defects has a significantly reduced durability due to voids in areas of unevenness. Before you start working with tiles, you should carefully level the walls.
What is the best way to plaster the walls in the bathroom?
The most popular types of coating in the bathroom remain: tiles and porcelain tiles, plastic panels and painting.
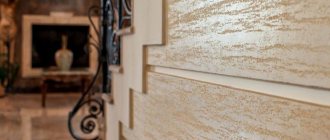
Today, decorative moisture-resistant plaster with tinting is increasingly breaking into this range.
Under tiles
Cement plaster under tiles is perhaps the best option. It is relatively inexpensive and will withstand the load, as well as temperature fluctuations. The last parameter is important, as it can prevent cracking and peeling of the tiles.
And yet, a fairly popular solution is tiles laid on an appropriate adhesive, which is used to immediately cover the walls and level the surface with it. In addition, tile adhesive can be used to level even if there is a discrepancy of several centimeters.
For painting
Cement plaster is the most preferred first layer for leveling bathroom walls. It can be used to coat with decorative types of moisture-resistant plaster into which color is added.
If we are talking about painting a plastered surface, then gypsum compounds are usually used. Although, due to their significant disadvantages, they have recently been used less and less.
Why you need to putty
The bathroom is a room with difficult operating conditions. There are regular changes in humidity and temperature in the room. Not every building material can withstand an aggressive environment, so tiles are used for cladding. If the tiles are laid on prepared walls, the finish will last for decades.
Plaster under ceramics should protect the surfaces. Unfavorable conditions in the room negatively affect the partitions, which will eventually lead to destruction. The building material not only protects from moisture, but also facilitates tiling.
Features of the bathroom Source zen.yandex.tj
Technology for plastering walls in the bathroom
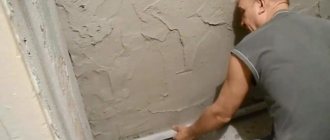
The first step is to remove the old coating, if any. Remove construction debris and dust. Afterwards, the walls are primed with appropriate materials for the bathroom.
Sometimes 2 coats of primer may be needed. Next, they begin installing beacons and applying plaster.
Installation of beacons
The pitch of the beacons during installation is from 1 to 1.5 m. This procedure begins from the corners of the room. Beacons are lighthouse plaster profiles that can be purchased ready-made. The material from which they are made: metal or plastic.
The plastic ones can be left directly in the plaster, but the metal ones will have to be removed after work. Install beacon profiles using a laser level directly onto the plaster mortar.
Preparation of the solution
Large rooms require the use of a construction mixer to mix the solution. In small ones, you can get by with a screwdriver with an appropriate attachment. It is only important to remember that the plaster mixture begins to harden quite quickly, so it is made in the volume required for the job.
After working out the mortar, the construction bucket is cleaned of frozen pieces of plaster to prevent them from getting into the fresh mortar. When stirring, add water gradually, but do not allow excessive load on the tool when mixing an excessively thick mixture.
Applying spray and base coat
Spraying is quickly throwing the mixture onto the wall using a trowel. Then the base layer is pulled with a wide spatula, checking the beacons.
The resulting surface should not have wavy changes or decrease in thickness on one side. Before the spraying procedure, the wall is slightly moistened with water.
Leveling the surface
The leveling layer is on average 5-7 mm. Sometimes they use a rule that is pulled along the beacon profile.
It also happens that another leveling layer is required.
Finishing
Under the finishing layer, apply a primer over the already dried plaster. Then moisten the wall with water and cover it with a thin layer of 2 mm using a wide spatula.
It is held at an angle of approximately 15 degrees to the surface. After a few hours, the wall is treated with a grater in a circular motion.
Some tips for working with plaster
Of course, only clean, cold water is suitable for mixing the mixture. Even if deadlines are tight, the plaster on the walls is not dried artificially using any devices.
They try to produce the solution the faster, the better, since its plasticity is literally lost before our eyes. The optimal time for producing one portion is 20 minutes. If brickwork is covered with plaster, special attention is paid to possible cavities between the bricks.
When renovating a bathroom, special attention is paid to the water resistance of the materials used. One of the popular solutions for such work is the use of Volma Layer plaster, which is designed taking into account all the necessary requirements.
If everything is planned correctly, repairs even in a room with such humidity will delight you for many years.
Making your own solution
Today there is a large selection of plaster mixtures on the construction market. Many masters prefer to make the compositions themselves. So the total cost of components is almost several times cheaper. Even a beginner can handle the preparation of simple cement compositions. To do this, you will need to prepare the components and follow the dosage, as well as the sequence of mixing the solution.
The volume ratio of the cement-sand mixture for cement grade 400 or 500 is taken to be 1:3 or 1:4 (respectively). Sand from a quarry is preferable. However, river sand is also suitable. To increase plasticity, detergent/liquid soap is added to the water used to prepare the composition.
If the solution is prepared in a mortar mixer, then most of the required water is poured into a rotating container. Then add liquid soap and add sand with a shovel. Then cement is poured. The rest of the water is added in small doses, monitoring the consistency of the plaster dough. As soon as the dough reaches the desired consistency, stop adding water.
If the solution is prepared manually, then sand and cement (dry components) are first mixed. After obtaining a homogeneous mixture, stirring and adding water (with a plasticizing additive) until the desired consistency is obtained. For mixing, use a trowel or mixer (depending on the volume).
Calculation of area and necessary materials
To finish a bathroom tile, on average you need to lay a mixture 20 mm thick on the surface. This value is effective, it will protect the walls from moisture, the load-bearing layer will be strong and stable, which will allow you to attach various bath accessories if necessary.
The calculation is carried out taking into account the thickness of the application layer. Differences in vertical planes are measured by applying a flat rod. If the layer thickness is 20 mm, at least 16 kg will be required, so one 25 kg bag will not be enough for 2 sq.m. If the layer thickness is 10 mm, then it will be enough to lay the solution on 3-4 sq.m.
For example, a room is 6 sq.m., and the ceilings are 3 m high, then 10-20 bags will be required, based on the thickness of the layer.
Additional hanging
Finishing work is carried out from bottom to top. Therefore, for hanging, it is necessary to install slats around the perimeter of the floor. They are installed at the height of the finished floor or baseboard. After installing the slats, the surface is hung to install beacons along the upper level on each wall.
Beacons must be stretched strictly along a flat, horizontal or vertical line.
For hanging vertical beacons, a plumb line is used, and for horizontal ones, a level is used. When installing beacons, the thickness of the tiles and plaster layers is taken into account. The beacons are attached to the same mortar as the tiles, using nail marks installed during the hanging process.
The purpose of hanging is to find out the most protruding part of the wall in order to plaster the entire wall up to this line, so this stage is carried out after cutting down the mounds. The tools you will need are: a level, a plumb line, a long ruler, nails, even slats for the beacons and clamps for attaching them.
Hanging algorithm
Hanging is necessary to create an even finishing coating for the tiles. The hanging technology is as follows:
- At a distance of 30-40 cm from the ceiling, the first nail is driven in, the head of which should approximately mark the thickness of the plaster mortar;
- a plumb line descends from the nail, along which a second nail is driven in similarly 30 cm above the floor;
- a third nail is driven between them along the same plumb line;
- the procedure is repeated in another corner of the same wall;
- to check diagonally, tighten 1 from 6 and 2 from 4 nails with a cord;
- where the cord touches the base, the unevenness on the wall is cut off;
- Beacons are installed and fixed along the nail heads.
When hanging, the distance between the nails should not exceed 2 m. On long or uneven walls, you can hang a central vertical row of beacons. Lighthouses should be 10-12 cm away from the corners.
Preparatory stages
Before finishing, the surface should be prepared. The preparation process consists of the following stages:
- old material is removed and cleaned;
- existing rust is removed with an acid solution, old paint by burning with a blowtorch, mold with the help of antifungal agents;
- cracks need to be opened and dusted, and the through space around communications needs to be cleared. To seal cracks and crevices, cement mortar is required, and reinforcing tape is additionally used;
- on a surface that is too smooth, notches of 2-3 mm are made, which will allow the composition to better adhere to the wall;
- The final stage is surface treatment with soil.
When can follow-up work be carried out?
After completing the preparatory work of removing old finishing coatings and hanging, you should begin preparing and applying the solution. The mixture is prepared according to the instructions on the package. It is applied to the leveled wall with a spatula in small sections, with the rule aligned along the beacons.
After applying the solution to the entire wall, the beacons are carefully removed and the recesses are filled with the solution. The finished wall must be completely dry. A deep penetration primer is applied to the dry putty.
Attention! You can begin laying the tiles directly only after the primer has dried.